Windows 7 maximum installation from a flash drive. Installing Windows from a flash drive through BIOS. No special utilities
Sooner or later, every user of gadgets on the Windows operating system faces all sorts of problems that can be solved by reinstalling the OS. Often such a need arises when a virus is damaged, the device is littered with programs that leave their mark even after uninstallation. Windows 7 reinstall problem USB media solved with professional master, but in order to save money, you can do it yourself without outside help using the instructions below.
Preparing your computer for installation
To properly prepare a netbook, computer or laptop for reinstalling Windows 7, you must perform a number of preparatory steps:
- To save data, all information from the hard disk where the system will be installed must be transferred to another digital medium (flash drive, DVD).
- It is often necessary to save links to sites, bookmarks, online information. The process for storing such data differs in different browsers:
- Internet Explorer(explorer). In order not to lose data, save the Favorites folder to another drive, which is located at: local disk– Users – Username.
- Opera. In the AppData folder, find the bookmarks.adr file and save it.
- Google Chrome. Find and save the User Data folder, which is located at: AppData - Local - Google - Chrome.
- Next, find the operating system that you will install on your computer or laptop. You can do it this way: buy a licensed disk or download a paid analogue from the official site; find a "pirated" version for free on the Internet and download it to a USB flash drive.
- Before reinstalling, it is important to check if the data of the computer or laptop meets the requirements of the OS. For Windows 7 they are: RAM- 1 GB; physical - at least 16 GB; clock frequency processor - 1 GHz.
Preparing a USB flash drive with Windows 7
To start reinstalling Windows 7, it is important to properly prepare a bootable USB flash drive, then the process of updating the operating system will pass without problems. It should have at least 4 GB of memory, ideally 16 GB. The digital media should be formatted to start erasing all data and prepare for OS burning. Here step-by-step instruction to prepare the flash drive for Windows entries 7:
- On the home computer or install a laptop special program(utility) for working with operating system images. For such purposes, Ultra Iso or Daemon Tools are suitable, the installation and operation algorithm for which is almost the same.
- Download a Windows 7 OS image online or buy a licensed disc from a retail outlet? Which are in large cities of Russia (St. Petersburg, Moscow, Rostov).
- Insert a pre-formatted flash drive into USB-2 (USB-3 is not suitable for such purposes, the program may simply not recognize the presence of devices connected through this port, so be careful).
- In the downloaded program, open the OS image.
- Press the "Self-upload" button and from the menu items select the option: "Burn image hard drive».
- In the window that opens, from the options presented where to upload the image, select a formatted USB flash drive.
- Next, confirm the check and select the recording method - USB-HDD+.
- Click the "Record" button.
- Confirm your choice to delete all files from the media (warning occurs even if formatting has been performed). After that, automatic recording will start.
- The appearance of the inscription "Recording completed" indicates the completion of the download. Once this happens, proceed to the next step - reinstalling the system.
- To reinstall the OS, reboot the device and enter the BIOS.
BIOS setup
It is possible to reinstall windows 7 from a USB flash drive via bios after making simple settings, thanks to which the device will boot from digital media. Such changes are made in the BIOS, which you must get into when you turn on your computer or laptop. To enter Bios, you can use a specific key or a combination of them. The line at the bottom of the screen will help you get a hint about the combination: “Press Del / F12 Esc / F8 / to enter setup”. Look at the photo for button combinations for entering the BIOS of different manufacturers:
Once you have entered the BIOS, select the USB flash drive as the source from which the system will boot. Do this in the "Download Mode" tab, then reboot the device. If all the settings have been made correctly, the next time the laptop or computer will boot from the USB flash drive. After reinstalling the system, be sure to return the previous settings, otherwise the boot will be performed from digital media each time, and not from the hard disk.
Installing the Windows 7 operating system
If the image of Windows 7 (32 or 64 bite) is written to the USB flash drive correctly and that's it bios settings entered correctly, the next time you turn it on, the download will start from the digital media. Consider the instructions on how to step by step reinstall the OS:
- When booting a laptop or desktop computer from a USB flash drive, the following phrase will appear on a black screen: "Press any key to boot from CD or DV". Then press any key on the keyboard. If there was no such inscription, return to the BIOS settings or write the image to the media.
- The next step is to select the interface language.
- Select from the dropdown list windows version, to which there are keys. It can be: maximum (Ultimate), home basic or extended, professional, initial. If you want to expand the capabilities of the system, install a newer, full version of it.
- Confirm that you agree to the license terms and click on continue installation.
- Select the type of installation - upgrade or complete. It is better to give preference to the second option. This will ensure a complete update of the system, which will contribute to the normal functioning of the computer or laptop. Windows Installer can be used to update.
- Specify the location where you want to install the operating system. As a rule, this is the "C" drive.
- The next step is to format the disk for the system (therefore, all valuable information must first be saved to other media).
- After formatting, Windows installation 7, which will take some time (15 to 35 minutes).
- Upon completion of the installation, lines for entering a login and password will appear in a new window. Fill them out and enter the activation key, which is indicated on the laptop sticker.
- Set the usual settings: time and date, security mode.
- After installing classic settings, restart your device. Then check for sound, network connection and other settings. If necessary, install the missing drivers and programs necessary for work, directives.
- Return the BIOS settings to the previous ones so that the system boots from the hard drive. Reboot your device. This will complete the reinstallation.
Driver installation
Often, after reinstalling the system, users experience a number of problems. For example, there is no sound, a computer or laptop does not see connected devices, or video does not load. Such problems occur if an unofficial, inferior version of the OS is used. Fixing these troubles is simple - you just need to install drivers designed for specific device. You can download them from the official website of the manufacturer (for example, for an Asus laptop, they are located at asus.com/ru).
To search and install drivers, follow a series of simple steps:
- In the search bar, enter the required query, including the name of the device model and the phrase "download drivers".
- By opening the official website of the manufacturer, find specific model laptop and drivers for it.
- Download the necessary programs to your laptop or computer and download everything to the device one by one. This procedure does not require special efforts, and even a novice computer scientist can cope with the task.
- After installing all the components, restart the laptop if the system did not do it on its own.
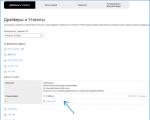
- Sometimes drivers only need to be updated through the "Device Manager" or activated.
Video instructions: how to properly reinstall Windows 7 from a USB flash drive
Booting Windows 7 from an installation flash drive does not require special skills and experience. To work, you only need a digital media with a loaded operating system, proper preparation of the device for manipulation (saving data to other disks before formatting), a little patience and free time. To make the installation go as quickly as possible, without losing information, watch the video from YouTube below. It will help you get familiar with the secrets reinstalling Windows 7.
How to reinstall Windows 7 on your computer
How to reinstall Windows 7 on a laptop: instructions for dummies
Reinstalling Windows 7 via BIOS
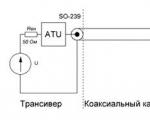
This article will discuss how to install Windows Vista or Windows 7 from a USB flash drive but any computer, laptop and netbook. In addition to a flash drive, you can use any memory card and an external card reader.
Brief description of installing Windows from a flash drive
In this article, you will learn how you can install Windows Vista and Windows 7 on your computer using a flash drive or memory card. This guide primarily written for those people who are new to working with a computer.
Of course, where easier than Windows install using the usual DVD disc, but this is not always possible. And there may be several reasons for this, starting with the fact that your computer or laptop does not have a DVD drive, and ending with the fact that this DVD drive is broken, and you may simply not have a Windows disc.
And so, if you have one of the above problems, then you can install Windows using a flash drive or memory card, for this you need to write Windows to external drive and then install it safely. In fact, this is what will be discussed in this article.
Installing Windows Vista and Windows 7 from a flash drive
Before you start installing Windows Vista or Windows 7, you should copy all the important data from the partition on which you plan to install it, these files can be copied to another partition, to a USB flash drive or to any other computer. It should be remembered that the elements of the desktop, programs and documents in the system are located in different sections. Why do we copy files? In order not to lose them. Because if we start clearing space for our Windows, we will need to format the partition where Windows will be located, and this will lead to the irretrievable destruction of files.
In addition, before installing Windows, you will need to copy all the necessary drivers (this mainly concerns the drivers for the network card, modem, and Wi-Fi adapter). This procedure is necessary in order to avoid problems that may occur after installing Windows. And the problems may be of the following nature: on the version of Windows that you install, some drivers may simply be missing, and it’s okay if these are drivers from the video card, but if these are network drivers, then you will lose the opportunity to enter the network and download the drivers you need, And this, as you understand, is an unpleasant development of events.
The entire process of installing Windows Vista and Windows 7 can be divided into five main steps:
- Actually, the preparation of a flash drive for filling Windows 7 or Windows Vista on it.
- Setting laptop BIOS, which will allow you to boot Windows from a flash drive or memory card.
- Direct installation of Windows.
- We are looking for and then install the driver.
- Installing software and utilities.
Let's analyze each of the stages.
1. Preparing the flash drive
And so, now you will learn about three ways, which will help you burn the Windows distribution to a USB flash drive. It should be said that the first method is simpler than the second, but more difficult than the third.
Method number 1
To do this, we need a Windows distribution, which is best used in the original MSDN assembly. Why exactly MSDN assembly? Because with it arises minimal amount problems, both during installation and further use.
After that, we need a set of utilities that you can find on the Internet. And, of course, the flash drive itself is larger than 4 GB. In this case, the flash drive is best used with a memory card. So you can avoid problems that may arise if your netbook or laptop does not have the ability to boot from a memory card in the built-in card reader.
Before installing Windows, find out which version your laptop supports. Because it can support either 32-bit or 64-bit version.
Let's get started! First you need to copy the image of your Windows (Vista or 7) to the hard drive, while the format must be ISO. Then we launch the UltraISO program, which you must download and install on your computer. After that, the main window of the program will open in front of you.

If your UltraISO program requires payment, and you do not have a tablet, then select the "Trial period" item.

After that, you will need to open an image of your operating system. To do this, click on "File" and then "Open".

Find the folder where the system ISO file is located.

Go to the boot menu and select "Burn hard disk image" from the list that appears.
Now insert your flash drive or memory card into USB connector on your computer or laptop.

After that, click on the "Format" button.
Remember that during the formatting process, all the data that was on your flash drive will be irretrievably lost, so if these files are of particular value to you, copy them to one of the media or to a computer.

After you clicked format, you will need to select the type of file system (NTFS) and then click the "Start" button.

Data deletion warning.

After a while, the formatting will be completed.


Warning. Click "Yes".

Now you need to be patient and wait. After the recording is completed, you will have a flash drive or memory card with working Windows 7.
Method number 2
Using this method, we need a Windows distribution kit, a flash drive with a capacity of more than 4 gigabytes or a memory card with the same capacity.
Remember that before you start formatting a flash drive or memory card, you should copy all the files that are important to you from it, otherwise they will all be irretrievably lost.
We start work. First of all, you need to insert a memory card or flash drive into the USB connector, after which you need to launch the “Command Prompt”, which can be found in the Start menu.

It looks like a window with a black background and white letters.

Enter the command "diskpart" into it and press the "Enter" button.

Then we type the command "list disk", press "Enter" and you will see a list of all storage devices. After that, you should find the disk number under which your flash drive is displayed (this can be done based on the volume of the flash drive).

After you figured out what number your flash drive is located under, enter the “select disk” command (and the number, for example, select disk 2), press “Enter”.

Now we type “clean” into the command line and press “Enter”.


After that, you will need to select the first partition, for this again use the command line and enter "select partition 1" and press "Enter".

Type the command "active" and press "Enter".

Then we start formatting the partition, for this you need to type the command “format fs = NTFS” and, as you already understood, press the “Enter” button.


After entering this command, a flash drive will appear in the system. And after it appears, enter the command "Exit" - press "Enter".
After carrying out all the work with the command line, it remains to copy the Windows distribution kit to a USB flash drive. For this, it is best to use the 7-zip utility.

We launch the utility and select the one we need ISO image. When the image is selected, you will need to click the extract button and specify the path to the flash drive. After the file is unpacked, Windows will be ready for installation.
Installation method number 3
As mentioned above, this is the easiest way. In order to use it, we need the WinToFlash utility, which you can figure out on your own.
After all the above steps, you should have a flash drive with the following contents:

2. Enable file loading in BIOS
Now let's talk about how to enable file loading in the BIOS (in our case, Window) via a flash drive or memory card.
We turn off the computer, netbook or laptop, insert the USB flash drive into it and turn it on again. While it is loading, press F2, Del or ESC (depending on your system) after that you will enter Bios. If none of the buttons helped you enter the BIOS, then pay attention to the lower left corner of the screen during boot and press the button that you see there.
Once you have entered the BIOS, select the BOOT tab and use the F5 and F6 keys to change the boot order. Again, if the indicated buttons did not help to change the list of downloads, then the buttons necessary for this should be displayed on the screen.

And so, you need to install your flash drive or memory card in the first place in the list of downloads, most often portable USB devices memory are referred to as USB-HDD. After that, you should save the selected settings using the "Save and Exit Setup" item.
3. Let's proceed to the direct installation of Windows 7
There is nothing complicated here, because installation via a USB flash drive or memory card is very simple. The main thing during installation is to pay close attention to the operations associated with choosing an installation partition and creating disks.

We restart the computer (laptop). In the first window that appears, you need to select the system language. Click on the "Next" button.

In the next window, click "Install".

The next step is to select the version of Windows 7. You should choose the one for which you have a key. Usually it is indicated on the bottom of the laptop and you need to enter it at the end of the installation. We press "Next".

We accept the license agreement and click "Next".


Now we need to select the partition in which we will install Windows 7. I recommend choosing the system partition. Also, when installing Windows 7 Professional and Windows 7 Ultimate, there will be another additional 100 MB partition. This partition is created by Windows 7 itself and it is intended to implement the system partition encryption function, but not to install Windows.
Click on Disk Setup.

Select "Format".

After that, we will see a warning that all data from the disk will be deleted. We confirm.

Once formatting is complete, click the "Next" button.

The installation process has begun. We are waiting for Windows to be installed on the computer.

When installation is complete, you must enter a username and computer name.

You can set a password to access your computer, or you can skip this step.

The next step is Windows activation. The code can be entered immediately, or it can be later for 30 days. If you bought a laptop with installed system, then the activation code must be written on the bottom of the device.


You can set the time and date.

If the Internet is connected to the laptop and network card drivers are installed, the system will automatically prompt you to specify the type of network.
Everything! now you know how to install Windows 7 from a USB flash drive. It remains to install drivers and programs.
4. We are looking for and installing drivers
Usually you will need to install a minimum of drivers, almost all laptop hardware will work. On the Internet, you can find new versions of drivers that will significantly speed up the laptop. Also, there should be a driver disk in the kit and you don’t need to search anything on the Internet at all.
5. The final stage. Installing utilities and programs
The utilities are additional programs that enhance the performance of the laptop. Usually they go on the same disk as the drivers and you don’t need to look for them anywhere else. It is not necessary to neglect their installation, they greatly simplify the work.
Programs for installation on a laptop you choose yourself. There will be no special recommendations here, since there are a huge number of them and they solve different goals.
I hope this article will be useful to you and installing Windows 7 from a USB flash drive is no longer a problem for you.
If you are the owner of a compact netbook and sincerely believe that soon CDs and DVDs will take pride of place in the storage media museum (next to cassettes and floppy disks), you definitely need to know the answer to the question “how to install windows 7 from a USB flash drive? » And not only for this reason! There are more than enough motivations for studying this computer wisdom.
The installation distribution kit on a USB-drive is at least convenient and compact. And most importantly, it's reliable: you don't have to worry that a few bits will be lost due to some kind of scratch or dust, and the OS installer will fail (again, as it often happens with disks).
This article discusses in detail all the steps for installing windows 7 from a USB flash drive: from choosing a media to setting up a distribution kit.
Prepare bootable USB media
The volume of the installation flash drive must exceed 4GB. Since some builds of the "seven", unlike the standard distribution, include many updates, patches, applets, integrated components (Framework, WinRAR, DirectX, etc.), respectively, they are also large.
1. Connect the flash drive to the PC.
2. Open the Start menu (the first icon on the taskbar).
3. On the right side of the menu, click "Computer".
4. In the "Devices with removable media" section, click on the USB flash drive icon.
5. Select the "Format..." command from the context submenu.
6. In the formatting settings window, in the "File system:" option, set "NTFS". Necessarily! Installing windows 7 from a USB flash drive is most stable and correct in this system.
7. Click the "Start" button.
8. Wait for formatting to finish.
Selecting and downloading a Windows 7 distribution
To create an installation flash drive, you will need a distribution image in ISO format. It can be downloaded from specialized sites or popular torrent trackers (nnm-club.me, torrent-windows.net, etc.)
Advice! Installing windows from a USB flash drive is a responsible and extremely serious matter. The success of this event guarantees comfortable and safe work on the PC. Therefore, before downloading any ISO image of the system, or, simply speaking, an assembly, on your computer, find out the opinions of other users about it. Better yet, consult with IT specialists (if, of course, there is such an opportunity).
Create a bootable flash drive
In addition to a formatted 6-8 GB flash drive and a Windows 7 distribution kit in ISO format, you will also need the UltraISO program to burn the USB installation media. And don't be put off by the fact that this digital product is paid - you don't need to buy it. A demo version of UltraISO will also work to make bootable media. Download it on the developer's website - ezbsystems.com/ultraiso/.
After downloading and installing the utility, do the following:
1. Launch UltraISO.
2. In the "File" menu, activate the "Open ..." function.

3. Specify the path to the OS image:
- go to the section/folder where it is stored;
- select it with a mouse click;
- click the "Open" button.
4. Open "Boot" (the third section of the main UltraISO menu) and click "Burn hard disk image ...".

5. In the settings window, in the "Record Method:" option, set the value to "USB-HDD +", and then click the "Burn" button.

6. Close the program when finished recording. Make sure that the distribution kit is installed on the flash drive (visually inspect its contents; do not edit or change anything!)
Installing Windows 7 from a flash drive
Before installing windows from a flash drive , transfer data that is valuable to you (photos, videos, game saves) from the system partition (drive C on which the OS is installed) to the logical partition (to drive D or E). Otherwise, they will be destroyed during the installation process.
So, to install windows 7 from a flash drive:
1. Reboot your PC and hold the F8 key until the display shows Select boot device.

Attention! On your PC, this function can be activated by another key (eg F12, F2). Specify this characteristic in the manufacturer's data sheet.
2. Using the cursor keys, highlight the item "USB" (boot from a USB flash drive) in the menu. Press the "ENTER" key.

4. In the "Install Windows" window, select the system partition (on which the OS will be installed) with a mouse click. In its column, in the "Type" column, there should be a value of "System".
5. Check your settings again! And only then run the "Format" function.
At the end of the installation - after the PC automatically reboots - you can start installing the software.
That's the whole instruction, dear reader! As a result of little effort, you have a bootable USB flash drive made with your own hands and a “fresh” Windows 7 on a PC. What's bad?!
We will consider two methods for recording an image Windows 7 to a flash drive
- Write the image to a flash drive using UltraISO.
- Writing an image to a USB flash drive using command line tools.
This article only covers how to burn an image to a flash drive.
- detailed instructions See the installation guide in this article: Installing Windows 7.
- How and where to download the image is legally described in the same article, in the chapter how and where to download the original windows 7 64 or 32 bit image.
If you are not sure how much bit Windows version 7 (32-bit ( x86) or 64-bit ( x64)) you need for the upcoming installation, you can learn more about the difference between Windows 7 x32 and Windows 7 x64.
Before proceeding with the installation of the operating system, it is necessary to determine from what type of media the installation will be performed. Recently, this issue has become especially relevant, since compact computers have become widespread in the computer technology market. netbook"and, not equipped optical drives, as well as flash- high-capacity drives that have become so popular and at the same time perfectly cope with the task of a boot disk for the operating system.
If you have on hand flash- drive (4 GB , because the installation image takes about 2.5 GB), then after carefully studying and following the steps described in this article, you can install the operating system using flash- drive like boot disk. This does not require any additional software: everything will be done using the command line and the mounted image Windows 7. Generally installing windows 7 from flash drive- faster (albeit a little more complicated option).
Burning an image in UltraIso to Flash
After you have received the image with Windows 7 you need to burn it to some medium. The question arises "How to do it?".This article will tell you how to write an image to a flash drive ( USB Flash or HDD Flash) using the program Ultra ISO.
Step 1. Install the program UltraISO(this lesson covers the version 9.31
, although there is no fundamental difference in other versions).
located at the end of the article, in the block Attached files.
 Figure 1. UltraISO Setup Wizard
We press "Further", along with specifying the necessary installation parameters.
On the last window NOT uncheck the boxes "Associate .iso file with UltraIso" and "Install ISO CD/DVD Emulator (ISO Drive)".
 Figure 2. Additional tasks for the UltraISO program
Step 2 After installation, run the program and in the offer to register the product, select "Trial period", which will give us the opportunity to use this program for 30 days (which is quite enough to burn our image).
 Figure 3. UltraISO installation completed
Step 3. Before you start manipulating our image, you need to insert it into a free USB- flash drive output or external HDD to be written to.
Step 4 Opening our image with "File - Open". Next, we go to "Boot - Write Disk Image (write a disk image)".
 Figure 4. Burning a Windows 7 image to a flash drive
Step 5 In field disk drive you need to select your media (in case several flash drives are inserted into the computer). Also check the correctness of the selected image in the line "Image file". In line "Writing Method" choose USB-HDD. When everything is selected correctly, you must click on the button "Record". Before the process starts, you will be asked: “Are you sure you want to continue the process? All information on the flash drive will be destroyed". Check the contents of your flash drive, and if there is nothing important on it, feel free to click "Yes". At the end of the recording, you will be notified that the recording was successful: Burn successful!. Your bootable flash drive is ready.
Write a Windows 7 image to a USB flash drive using the command line.
- So, to prepare the image, connect flash- drive to usb-port on your computer. Make sure on flash- the drive does not contain the data you need, since flash- the disk will be formatted.
- Now run command line Windows. You can find the launch shortcut at:
Start -> Programs -> Accessories -> Command Prompt.
You can also press the key combination Windows+R, then in the opened window "program start" you need to enter the name of the program "cmd" and press "Enter". - Now, in the command prompt window that opens, run the command diskpart. After that, the system utility for managing disks will start. With this program, we will clear the contents of the disk, create a partition on it. After that, we can make it active, format it and write the contents of the image to it. Then we will only have to place the bootloader files on the disk: after that, when the operating system boots, our flash- disk is defined as removable media- we can start the installation from it Windows 7.
After the system utility loads diskpart, you will see the prompt as a string DISKPART>.
Now you can move on to executing commands.
With the command list disk you can see a list of all disks this computer(Figure 5).
 Figure 5. Preparing to install Windows 7 from a flash drive: creating a bootable flash drive
Now if you run the command select disk room» , where "room" is the number of the disk that is flash- drive, then we choose this disk to apply all subsequent commands that we will enter when working with the utility diskpart.
As you can see from Figure 1, in our case it will be the command select disk 3.
But be very careful - you can select any hard drive and delete all data on it.
- Next, we will delete all data and partitions on our flash- drive. To do this, run the command clean.
- Next step will be, using the command create partition primary, create on flash- drive a new partition.
- Let's choose this section to further apply commands to it with the command select partition 1.
- Let's make it active using the command active.
 Figure 6. To format the drive, run the format fs=NTFS command.
Now it remains to initialize the disk connection using the command assign(an autorun window will open, as if we had just connected to the computer flash- disk) and exit the utility with the command exit(Fig. 7).
 Figure 7. Initializing the disk connection with the assign command.
The final step remains - we must copy the bootloader to flash- storage device.
To do this, mount the image Windows 7 that you want to install on your computer.
Now using the command line navigate to this (mounted) drive. After that go to the folder boot and run the command bootsect /nt60K:.
note that instead of a letter "K" this command must contain the letter that was assigned to your flash drive when executing the assign command.
This command will run system utility bootsect with 2 parameters:
- the first one indicates the bootloader version OS (/nt60- parameter required to create a bootloader OS Windows Vista and Windows 7).
- the second parameter is the letter assigned to our flash- drive.
If you mount a 64 bit image Windows 7, then you will not be able to run bootsect, if your operating system is 32 bit - because. this version bootsect is 64 bit.
Copying files to a prepared flash drive.
After the flash drive is prepared, the files are copied from the image:you can mount the image you have with the program DAEMON Tools Lite, then copy all the files from the mounted disk to the flash drive.
Installation
Now if you restart your computer, then by going to BIOS, you will be able to install your flash drive to download and install from it Windows 7 (first boot device).Now you can move on to the next chapter, which will go into great detail about the next step. Windows 7 installation.
Detailed instructions for installing Windows 7 in this article: Installing Windows 7.
You can also pay attention to recording an image using the utility
This installation method is suitable if you own a netbook or your CD / DVD drive is out of order and you need to install Windows 7. This method is also good because the process of installing Windows 7 from a flash card is several times faster than from a CD or DVD disk.
Before you start burning Windows 7 to a USB flash drive, copy all important data from the USB flash drive to other storage media (hard drive where Windows will not be installed, another flash card, disk, etc.), as in the process of formatting and recording image of Windows 7 on a USB flash drive, all data on it will be destroyed.
First way
If you are creating a bootable USB flash drive while in the Windows 7 operating system, then you will need a program Windows 7 USB/DVD Download Tool, which can be downloaded from Of. Microsoft website at the link.
If you create a bootable USB flash drive under the operating Windows system XP, you will need to install Microsoft .NET Framework 2.0 and Microsoft Image Mastering API 2.0. Of course, if you already have them installed (more often for the first program), then you do not need to reinstall them.
1) Insert the flash drive into the laptop.
2) Run the program. Click the button Browse.
3) Select the ISO image of Windows 7 and click the button Open.

4) After you have specified the ISO image of Windows 7, click the button Next.

5) Press the button USB device.

6) Your flash drive should appear in this window. Click the button Begin copying

7) Click on the button Erase USB Device

8) Click Yes.
9) The process of writing the Windows 7 image to a USB flash drive will begin

10) When the recording is completed, the status will change to Backup completed . close the program

Second way
For the second method, you will need a program UltraISO.
1) Insert the flash drive into the laptop.
2) Run the program. In Windows 7 and Windows Vista, it is recommended to run the program as an administrator.
The UltraISO program is paid, but you can use trial period Let's consider this option. Click the "Trial period..." button

3) Select a menu item File ->Open...

4) Select the ISO image of Windows 7 and click the button Open.


6) In the field Write method: select USB-HDD. Click the button Format.

7) The formatting utility will start. Click the button To begin.

8) Click OK.

9) After formatting, a success window will appear. Click OK.

10) Close the program.

11) Press the button burn.

12) Click Yes.

13) The process of writing the Windows 7 image to the USB flash drive will begin.

14) At the end of the entry in the column event the message "Recording completed!" appears. Close the program.

Third way
For the third method, we need the WinSetupFromUSB 1.0 Beta 7 - program.
Note: the link is a newer version, but the principle remains the same.
1) Insert the flash drive into the laptop.
2) Run the program. In Windows 7 and Windows Vista, the program must be run as an administrator.

In field USB disk selection and format should be your flash drive.
Note: If the flash drive is not detected, then format it with the PeToUSB or HPUSBFW utility.
Also, the flash drive may not be detected if it is inserted into the laptop after the Winsetupfromusb 1.0 Beta7 program has been launched and in order for it to be determined, just press the button Refresh.
3) Press the button RMPrepUSB.

4) We mark such lines as: WinPEv2/WinPEv3/Vista/Win7 bootable (CC4), NTFS. Put a tick next to Boot as HDD (C:2PTNS). Click the button 6 Prepare Drive.

5) Press the button OK.

6) Press the button OK.

7) After that, this will appear Dos window.
Warning: Do not close this window. It should close automatically.

8) After Dos the window closes click the button exit.

9) Check the box next to Vista/7/Server 2008 - Setup/PE/RecoveryISO. Click on the square on the right.

10) A window will appear Folder overview in which you need to select the virtual drive in which the ISO image of Windows 7 is mounted.
After you have done this, press the button OK.

11) Press the button GO. The process of writing Windows 7 to a USB flash drive will begin.

12) When the recording is finished, this small window will appear. Click OK.

13) Close the program.

Fourth way
The installation method is quite simple, so anyone can do it! For this we need:
1) Windows Image 7
2) A flash drive with a capacity of at least 4GB
3) A program for creating and editing ISO images, ultraISO from the above method or a free MagicDisk
You can take any media from a regular flash drive to an SD card, but not less than 4GB!
4) Run the command line (in Windows XP, these are standard-> command line. In Windows Vista / Windows 7, open start, at the very bottom there is a search, enter cmd and open as administrator).
5) Next to command line enter diskpart, the disk management utility will open.

6) Next, in the diskpart utility itself, enter: list disk, and all physical disks PC, namely disks and not partitions.
Among them we are looking for our flash drive.

7) Then we execute the command select disk#, where # this is the number of our flash drive.
In this case, the flash drive on the screen is number 1, therefore s elect disk 1. All further manipulations will be carried out only with this disk.
8) Execute the command clean, clear the drive, then the command create partition primary- create a new partition on the disk.
9) After creating a new section, write select partition 1, select this section for manipulation, enter active, thereby making the section active.
10) Now in order for the flash drive to be visible in bios, you need to format it in NTFS format, which we do with the command format fs=NTFS.
11) Next, you need to activate the process of connecting the device and assigning letters to it, we do this with the command assign.
Everything, the preparation process is completed.

Installing Windows 7
Distribution recording can be done with any file manager or free .
In this case, you need to somehow open the image installation disk with the OS, you can do this with any disk emulator, Alcohol or MagicDisk, create an image and copy everything from it with a file manager to our prepared flash drive.
Everything, the process of creating an installation flash drive is completed, now we are trying to install the OS by first setting it in bios.
Well, that's all, which of the four ways to create a bootable flash drive to use is up to you.
Inclusion in Boot BIOS from a flash drive
Before you start installing Windows 7 from a USB flash drive, you need to go into the BIOS and enable booting from a USB flash drive.
To enter the BIOS, you need to press a certain key when the computer boots. On desktop computers, this is the Del key. On laptops, the F2 key is most commonly used.
Usually, when you turn on the laptop, a screen appears on which at the very bottom there is a line that says which key you need to press in order to enter the BIOS.
If you do not have such a line, then you need to look at the information on how to enter the BIOS in User Manual walking with a laptop.
1) We insert the USB flash drive into the laptop, if it is not inserted.
2) Turn on the laptop, if it is on, then reboot.
3) We go into the BIOS.
For example, the whole process will look like below, if your BIOS is different, then the principle will remain the same. If you have any questions - write in the comments.

4) Go to the tab Boot. In it, in the boot order, you need to put our flash drive in first place, using the arrow keys and the keys F5 and F6. That is, with the arrow keys we select our flash drive, and with the key F6 take her to the top.
To find out which keys you need to use to set the boot order, see the hints on the right.
The name of the flash drive must appear in the line USB HDD.
Also, a flash drive can appear in the line USB key.
To save the changes and exit the BIOS, press the key F10. (Depending on the manufacturer of the BIOS, the key may be different. See the hints on the right or below).

5) A window will appear asking you in English to Save changes and Exit? You are taking Yes.

6) After that, a reboot will occur and the installation process of Windows 7 will start.
Installing Windows 7 from a flash drive
If a bootable USB flash drive with Windows 7 was created using the WinSetupFromUSB 1.0 Beta 7 program, then a green screen will appear first. Select Start Vista/Win7/Server 2008 Setup or PE/Recovery ISO from partition 0.

Next, the Windows 7 setup program will launch.
Write in the comments what is not clear and what questions you have.