Installing windows from disk via BIOS. Reinstall Windows via BIOS. Configuring BIOS for booting from media
If you download ISO image with the Windows distribution and even write it correctly to DVD disc or create bootable USB drive with the help of the same UltraISO, practically no one has any difficulty. Then, with the second stages, directly installing the operating system from a disk or flash drive on a PC, many have difficulties.
I know of three ways to start installing Windows.
1) the simplest and most unreliable is to open the image through a virtual drive with Windows already running and start the installation, but there are many factors that can interfere and give an error at some stage of such an installation.
2) Insert the USB flash drive we created into USB connector or a DVD disk with Windows into your drive, no matter what version, windows 7 roofing felts, windows 10 roofing felts, even win95. It works for everyone. Then, when you turn on the PC, call the BOOT menu, this is a list with the media from which you need to boot, select the media we need and press ENTER. More details on how can be found here.
3) It differs from method 2 only in that we indicate what we want to boot from not through the boot menu, but in the BIOS of our device.
In this article, we will talk in detail about how to install Windows from a USB flash drive via BIOS or boot Windows 7 from a BIOS flash drive.
Booting Windows 7 from a BIOS flash drive
Installing Windows from a USB flash drive through a BIOS begins with calling the BIOS menu or it is also called Setup, this is most often done with the Delete button immediately after turning on the laptop or computer, continuously press until you see blue screen with some kind of text, but it happens that you need to press another button, it's F2 or F10 or Esc. You can try all the options until you see the desired result, or you can read it in the welcome window motherboard firmware text like "Press DEL to run Setup" he tells us to get into the BIOS, you need to press DEL.
And so, after we got into BIOS SETUP UTILITY, we look for the Boot tab and use the arrows to go there. We need the line Boot device Priority

Here the logic is simple, the higher the device in the list, the higher the priority in the download queue. That is, the top one in the list is loaded first, and so on in turn until the system boots.

And so we select the first drive in the list using the arrows and press ENTER, we see a list of all possible devices from which the computer can boot.

If we want to choose to boot the BIOS through a USB flash drive, then we select the USB interface, this is Removable Dev or something with the inclusion of the text "USB", or if the flash drive is already inserted, then the name of the manufacturer of the flash drive will be written. If you need to choose DVD drive as a rule, this line begins with the words CDROM: or DVDROM: or it can also be written by the manufacturer of the DVD drive.
If you decide on the choice, then press ENTER and in the same way select the second device in turn, the second in the list should be yours HDD to which Windows will be installed. If the BIOS does not see the USB flash drive, then try to insert the USB flash drive into another USB connector and do everything over again.
For all changes to be saved in BIOS Setup, you need to go to the Exit tab before leaving and select the Exit & Save Changes line and press ENTER.

Then we can Windows bios install via a USB flash drive or dvd drive. bios with a blue screen can no longer be found on everyone. In 2017, more and more often you can see the new generation BIOS, it is more graphically thought out, there are icon pictures for an understandable association, if not strong in English so as not to be mistaken. But in fact, all settings are similar.
Attention!- after our changes in the BIOS, now the computer will always boot first from a USB flash drive, then from a hard disk, therefore it is important when Windows installation after the first stage of the installation, when the laptop or PC reboots, YOU SHOULD BE HAPPY TO PULL OUT THE FLASH DRIVE FROM THE USB SOCKET, or pull out the disc from the DVD-roma. Otherwise, the first stage of the installation will be repeated endlessly.
Now we know how to set up a BIOS to install windows from a USB flash drive. And having with us a bootable USB flash drive with the image of WINDOWS 7 or 10, we can easily install or reinstall the OS on any device.
Attention! In some assemblies, the default settings are already set for Chrome browser, the start page leads to search engine go.mail.ru. Everyone has the ability to change the search engine to any other.
At some point, the operating system has to be changed. Perhaps some of you, dear readers, have finally decided to upgrade to a faster Windows 8, or there was an unexpected OS crash. In any case, if you do not know how to start a disk with Windows through BIOS, then this article will be invaluable in solving this kind of difficulty.
Basic I / O System - It All Starts Here
To install the operating system, you need to use some of the BIOS settings of the microsystem. In particular, it is required to set a priority bootloader, in our case that will be a drive for optical CD / DVD disks.
However, first we need to get into the interface BIOS programs... Due to the difference in basic microsystems, the main manufacturers of which are the three leading companies - American Megatrends, Inc. (AMI), Award Software and Phoenix Technologies - a special method of entering work area BIOS (a).

The most common access scheme is using the DELITE and F2 keys. At the time of starting the computer, you need to use the service key several times (with the intensity of one press in half a second) to enter the PC control interface (if you have a laptop, then you should pay your attention to the article that is ).
Setting the CD / DVD drive as the priority bootloader
It makes sense to consider the above BIOS versions separately. Rather, using each of them as an example, we will show you where to go and what needs to be done in a certain place of the BIOS microsystem. As a result, you will understand the algorithm according to which the assignment is performed. specific device priority bootloader.
How to start a disk with Windows through AMI BIOS
- Using the left / right keys, open the "Boot" tab.
- Press the "Enter" button on the first item "Boot Device Priority".

- In the first position, you must put the optical disc drive - being on the first step, use the "Enter" key to bring up the boot device selection menu.
- Set to "CD-ROM".

- Go to the "Exit" tab and use the "Exit & Save Changes" item.

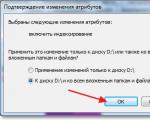
- Confirm your intentions to save the settings by pressing the "OK" button.
Choosing to boot from the drive to Award and Phoenix BIOS
- Activate the Advanced BIOS Features tab.

- Select the item "First Boot Device" and press the "Enter" button.

- Select "CDROM" from the list of bootable devices and press "Enter" again.

- Use the "F10" key and confirm your consent to change the settings.
Quick Launch Menu
Literally all BIOS systems provide for the so-called " Boot menu", Which can be accessed at the initial stage of OS boot. From the material you read above, you learned that the versions of the basic microsystems are different, and therefore the script for entering quick menu downloads for each OEM may vary. Moreover, in laptops for such purposes, a special remote button is sometimes implemented (read ).

As a rule, to call the "Boot menu" you need to intensively press the "F12" or "Esc" key during the passage computer system initialization process (POST hardware check). In other cases, the manufacturer may have used a different keyboard access scheme (for more details on this point, see ).
In conclusion
So, now it is not a secret for you how to start a disk with Windows through BIOS. You can easily repeat all of the above in practice on your own. However, do not forget that the disk with the Windows distribution kit, first of all, must be bootable. However, if something still does not work for you and you decide to use a regular flash drive, then read the recommendations from ... Happy loading to you!
It will not be a big secret that for many users the question of installing (reinstalling) Windows 7 often becomes a stumbling block. Meanwhile, there are no special difficulties in this - almost anyone can. First, you need to understand that there is not much difference between the terms "reinstall" and "install", except that the reinstallation is carried out in the presence of a previously installed OS, and the installation is carried out on a "bare" PC. Secondly, reinstallation is not performed by means of a previously installed OS, namely through the use of the basic input / output system (BIOS), which is stitched into the PC motherboard. Finally, the user should clearly understand that all applications installed in the previous OS after reinstalling "Windows" will also have to be reinstalled.
Reinstall Windows: where to start
When starting the installation of Windows, the user must prepare the media with the installation Windows files 7. It can be an installation DVD that came with your PC, or purchased from a computer store, or recorded by the user himself from some other source. In addition, such a medium can be a USB flash drive, which the user can prepare using various programs for writing bootable flash drives.
As a rule, it independently finds and installs drivers for devices such as a video adapter, sound and network card. However, some older models of these devices, as well as non-standard hardware, may require drivers.
Further, since the section hard disk from the previous OS will be formatted during the reinstallation process, it is advisable to save the user data available on it. They are usually found on this section in the Users folder.
BIOS launch
For most desktops, the entrance to the BIOS is done by pressing the "Delete" button when turning on or restarting the PC. On laptops, this is usually the F2 key, but other function keys can also be used.
A description of the details of interaction with BIOS is beyond the scope of this article, especially since there are as many varieties of this interface as there are PC manufacturers. The purpose of using BIOS is to set a boot device through which Windows will be installed. To do this, in the BIOS functions, you should find an item with a name containing the word "Boot", and activate this item. For example, this is how the BIOS window from AMI looks like, which determines the order of boot devices:

Here, "1st Boot Device" is the first boot device, "2nd Boot Device" is the second, and so on.
The meaning of the user's actions is to make either a DVD-disk or a USB-flash drive as the first bootable device, depending on which of these media contains the Windows 7 distribution kit. desired device, you should save the changes made (“Save” function), install the specified boot device and reboot the PC.
Windows 7 installation process
After restarting the PC, the bootloader will start from the installed OS distribution kit. And here there are a lot of options, depending on the carrier and the manufacturer of the distribution kit. The main window, from which the installation of Windows begins, should always look like this:

In it, the user must select the installation language. Further, again depending on the distribution, you may be prompted to select the OS version. There are also several options here: Initial, Home, Advanced, Professional or Maximum, and even taking into account the bit depth - 32 or 64.
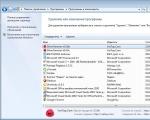
But the most important window is the window through which the hard disk partition is selected, and the OS will be installed on it. This window lists the found hard drives and partitions, for example:

In this window, select the same disk and partition where the previous OS was installed. It is no coincidence that it contains the inscription "Disk settings" - this is just a way to format a partition. If this is not done, then in the system partition there will be files not only of the new Windows, but also of the old one. The results of this "mess" are unpredictable! After clicking on this inscription, you will be able to format the system partition:

After clicking on "Format", you will be prompted for a formatting method: fast or full, in FAT32 or NTFS format.
After a while, upon completion of the formatting, the Windows 7 installation process begins, which, in the absence of abnormal situations, proceeds "automatically" without requiring user intervention.
Often on the Internet you can see the question "How to install Windows through BIOS?"
First of all, we need to have an image installation disk with operating system Windows. Then choose from what we will install our operating system (DVD drive / external DVD, or USB flash drive).
Now let's go directly to the settings in the BIOS. Depending on the manufacturer, after turning on the computer, press the Del, or F2, or F10, or Esc key in order to get into the BIOS settings (now there may be other combinations, you can find out which one you need to use from the equipment manufacturer).
Next, we need to find the Boot, or Boot device priority, or Boot Device Configuration section in the BIOS in which we will set the boot priority (from which the system will boot when it is turned on and in what sequence). Here you can install the first DVD drive (internal, external USB), USB flash drive or floppy disk (this is not a joke in my experience was installing Win98 using 147 floppy disks)
Then you need to save the changes and restart your computer.

In new equipment, and especially on laptops, in order to ensure intellectual property rights in the BIOS, there is a UEFI mode that must be enabled / disabled to be able to boot from a USB flash drive or optical drive.


It is important to remember that the boot priority on a large number of equipment can now be selected without changes in the BIOS, at startup you need to press Esc or F10, or F12.
You can determine the BIOS settings for a specific motherboard by looking at them in the motherboard passport.
Important! Incorrect BIOS parameters can damage the computer or reduce the power indicator.
Management information.
How to install Windows via BIOS, boot from DVD, USB, HDD depends on several Boot Menu keys
You need to get into the BIOS: restart the PC and enter "Setup" - the software that is responsible for the initial boot of the computer.
During the reboot, carefully monitor the inscriptions on the monitor screen, you must not skip the line that appears below, with the following text:
Press ____ to enter SETUP.
The program prompts you how to get into the BIOS, you need to press the key that is written on the screen, it can be:
F1, F2, F3, F10, Del, Esc - on different computers they differ depending on BIOS version.
Hold down the key until the system redirects to the Basic Input-Output System. A list of tabs will appear on the screen, you need to select the one that says about booting devices - "Boot devices" or "Advanced BIOS Features".
If you did not succeed in performing the prescribed actions the first time, do not despair, you must repeat all the actions a couple of times.
Select the tab, in order to enter, you need to press the "ENTER" button. After that, in the drop-down list, find the "Boot Sequence" tab and check the correctness of the selection with the information that will appear on the right on the monitor screen. It should be said that the selected tab is responsible for the boot priority of devices.
After the boot tab is defined, controlling the input keys, you need to set the priority so that the first in the list is "CD-ROM" or that boot device.
With the help of which the whole process will be carried out. To do this, select "First Boot Device" in the list and after that the hard drive came.
You need to confirm the correctness of your choice and press the "OK" button.
Thus, all BIOS settings for booting and re-setting windows installation ready. This was all done so that the next time the PC was rebooted, the OS would redirect itself boot Windows from the previously selected drive.
In order to start the download, you must restart your computer.
To install Windows via the Basic Input-Output System from a USB flash drive, in fact, the whole procedure is similar to the one described above, but you need to select Secure Boot from the list of proposed tabs in the VV BIOS system, or in the OS with a simple version of "overlay" versions, select the appropriate menu item.
The process of installing Windows from a USB flash drive does not start and a black screen is shown on the monitor:
UEFI mode enabled;
The flash drive is formatted in the NTFS system;
BIOS BB only supports NTFS partitions, UEFI - FAT 32.
With a new version of the system to boot from a USB flash drive, it asks for permission to automatic mode. It is best to refuse such an offer, otherwise the OS may be installed on the wrong partition or delete some of your personal files.
Before installing BIOS settings, you must select using "+" or "-" and click on the "Boot" tab.
When choosing settings, you must save them. To do this, you need to press the "F10" - "Save and exit" key. Also, this action can be performed by pressing the key "->" - "Exit Saving Changes", i.e. "Exit and save changes."
After the approved and selected option and device boot priority, you need to select the F10 option, and then restart the computer.
For novice users who need to reinstall Windows through BIOS, experts have developed some tips for a competent and fast flow of the process.
For a well-tuned BIOS system, you should pay Special attention these guidelines:
PC requirements (subject to Windows 7):
Memory - at least 1 GB;
Processor - at least 1 Hz;
Video card - minimum DirectX 9.
Time to work in BIOS.
How long does the process of setting up and configuring a new version of Windows take? It all depends on technical parameters PC:
Speed "Clock Speed";
The number of cores "Cores";
The trunk frequency is "800/1066/1333/1600 MHz".
On average, it will take one hour to install Windows via BIOS.
Clean and simple Windows installation processes
A clean install is a startup disk with the system in manual mode, during computer startup. After that, start, press any button, after the message "Press any key" appears on the tap.
The BIOS indicates the location of the new OS, for example, on a CD / DVD or on a hard disk, so that the old version is not used at all, or has been deleted. The clean version is used for any OS: Unix, DOS, Windows XP, as well as Linux, Windows 8 and Windows
Simple is rarely used and is not recommended. This is because a new version runs from a CD / DVD with an old OS already installed. So easy installation more like a "overlay" process, as the new version is overlaid on the old version.
Difference in installation processes
Easy installation of Windows:
Computer startup;
BIOS;
Operating system;
BIOS;
Installation.
Clean install:
Computer startup;
BIOS;
Installation.
Clean install.
Operating system hard disk partitions.
Often during clean install, all partitions are formatted and old versions and files are deleted. If you need to reinstall a system with several partitioned disks where important files are stored, you can leave the information unchanged.
It is not necessary to format drive D, however, drive C with files old version windows will be formatted.
Analysis of the hard disk during installation.
Before starting the installation of Windows (with a non-working OS, crashes and glitches), you need to try to use the last chance to restore and clean from malware.
In case of pronounced problems with the operation of the PC, it is necessary, first of all, to check the state of the hard disk, analyze the work of the segments, otherwise, even during the installation of the system, the formatting process may freeze or work unstably.
Retention of personal information.
Personal data and information is a very important component that cannot always be restored in case of deletion or damage, therefore, before reinstalling anything, you need to take care of their safety.
To save information and personal data when reinstalling Windows, you need to copy and transfer all required files to a portable medium (disk, flash drive, etc.). It is also very important to save passwords, for this it is recommended to use Backup program or do it the old fashioned way, by hand.
By exactly following the rules and tips, you can understand how to install Windows via BIOS on a computer, even for a person without special skills and experience in such situations.
BIOS setup for Windows 7
During BIOS settings for installing any operating system, difficulties arise, since the versions may differ from each other. First you need to enter the BIOS interface - restart the computer and until the operating system logo appears, press one of the keys in the range from F2 to F12 or Delete. In addition, key combinations such as Ctrl + F2 can be used.
Further actions depend on the version.
AMI BIOS
This is one of the most popular BIOS versions that can be found on motherboards from ASUS, Gigabyte and other manufacturers. Instructions for configuring AMI for installing Windows 7 are as follows:
Once you have entered the BIOS interface, go to the "Boot" item located in top menu... Moving between points is carried out using the left-right arrows on the keyboard. The selection is confirmed by pressing Enter.
A section will open where you need to prioritize computer boot from certain devices. In the item "1st Boot Device" by default there will be a hard disk with the operating system. To change this value, select it and press Enter.
A menu appears with the devices available to boot the computer. Select the medium where you have the Windows image recorded. For example, if the image is written to a disc, you need to select "CDROM".
The setup is complete. To save the changes and exit the BIOS, press F10 and select "Yes" in the window that opens. If the F10 key does not work, then find the "Save & Exit" item in the menu and select it.
After saving and exiting, the computer will restart and boot from the installation media.
The BIOS from this developer is in many ways similar to that of the AMI, and the instructions for setting up before installing Windows 7 are as follows:
After entering BIOS, go to "Boot" (in some versions it may be called "Advanced") in the top menu.
To move the "CD-ROM Drive" or "USB Drive" to the top position, highlight this item and press the "+" key until this item is at the very top.
Exit BIOS. Pressing F10 here might not work, so go to Exit in the top menu.
Select "Exit Saving Changes". The computer will restart and the Windows 7 installation will begin.
There is no additional configuration required.
Phoenix BIOS
This is already outdated version BIOS, but it is still used on many motherboards today. Instructions for setting it up are as follows:
The interface is presented here as one continuous menu, divided into two columns. Select the "Advanced BIOS Feature" option.
Go to "First Boot Device" and press Enter to make changes.
In the menu that appears, select either "USB (name of the flash drive)" or "CDROM" if the installation is from a disk.
Save changes and exit BIOS by pressing the F10 key. A window will appear where you need to confirm your intentions by selecting item "Y" or by pressing a similar key on the keyboard.
In this way, you can prepare your Phoenix BIOS computer to install Windows.
UEFI BIOS
This is updated graphical interface BIOS with additional features that can be found in some modern computers... Versions with partial or full russification are often found.
The only serious drawback of this type of BIOS is the presence of several versions, in which the interface can be greatly changed, due to which the desired items can be located in different places... Let's consider setting up UEFI for installing Windows 7 on one of the most popular versions:
In the upper right part, click on the "Logout / Auxiliary" button. If your UEFI is not in Russian, then the language can be changed by calling the drop-down language menu located under this button.
A window will open where you need to select "Additional mode".
The advanced mode will open with the settings from the standard BIOS versions, which were discussed above. Select the Download option located in the top menu. You can use a mouse to work in this BIOS version.
Now find "Boot Option # 1". Click on the value set opposite to it to make changes.
In the menu that appears, select the USB-drive with the recorded Windows image or the item "CD / DVD-ROM".
Click on the "Exit" button located in the upper right side of the screen.
Now select the "Save Changes and Reset" option.
In spite of a large number of steps, there is nothing difficult in working with the UEFI interface, and the likelihood of breaking something with an incorrect action is lower than in the standard BIOS.
For self installation Windows via BIOS needed boot disk Windows OS and basic knowledge of BIOS. In this article, we will teach you the intricacies of working in BIOSe, so as not to harm your computer and get a working operating system.
Before installing the OS, download and write to the disk drivers for such computer parts as:- motherboard;
- sound card;
- DVD / CD drive;
- network card, Wi-Fi, Bluetooth;
- CPU;
- BIOS;
- video card;
- Touchpad, Web-camera, monitor;
- USB devices (mouse, keyboard, printer), USB ports.
Save to the USB flash drive all the files you need from the desktop and the "My Documents" folder, since all the data from " Local disk C "are erased when installing Windows.
Installation begins with restarting the computer and entering the BIOS. On different motherboards, different manufacturers have their own key combination for entering. Most often, you can enter the BIOS by pressing Del, F1 or F2, F12. We advise you to pay attention to the lower right corner of the screen when starting to boot your computer. It is there that the combination is written that will allow you to enter the Bios.


There are no difficulties in installing Windows via Bios, if you really understand it. We advise you to write down the main points of work in the BIOS before starting the installation of the OS. BIOS is the heart and brain of computers, do not change the settings just like that, otherwise the work with the PC will end there before the repair at the service center or forever.