Installing xp from disk. Installing Windows XP is a BIOS installation process. Formatting the system partition
Hello everyone, today we will talk about how to install Windows XP to your computer. I will write several options, for example, installation from a USB flash drive and in other articles - to a virtual machine. Windows XP is a very old system that a lot of people feel nostalgic about, so let's try installing it on a PC again and do a little bit of work!
By the way, before installing Windows XP, I advise you to read the material: "". This is to set the boot from disk to the first place. If you do this from a USB flash drive, then read about, with which you can not rearrange the drives, but immediately select the USB flash drive to boot.
Preparing to install Windows XP from disc
If you have an old distribution kit with Windows XP lying around, then let's proceed directly to the installation. In the absence of a distribution kit, I recommend downloading the image from the following links:
https://win-torrent.net/windowsxp_torrent
http://free-max.ru/windows_xp
On them you can find images without keys.
We enter the BIOS and move to the tab Boot or Advanced(depending on the BIOS version). We get into the parameter Boot Devices Priority and using the F5 and F6 keys, move the desired device to the first place, for example, a CD / DVD drive. Or use Enter to select the desired boot device.

To save the parameters, you need to go to the tab Exit and choose an option there "Exit & Save Changes".

If you have another BIOS version, for example - Award, you can proceed as follows: open the section "Advanced BIOS Features".

Choosing a parameter First Boot Device... Nearby there is the HDD0 option, which is responsible for booting from the hard drive. Press Enter and select CDROM if booting from disk.


To save the changed parameters, go to the option in the main window "Save & Exit Setup"... A red confirmation window will appear, where we press the button Y.

How to install Windows XP using a disc
As soon as you have done everything necessary and exited the BIOS while saving the settings, you should see such a black window with the phrase "Press any key to boot from CD" which means "press any key to boot from disk". Be sure to press any key for the installation to go.


Our gaze comes off the welcome menu. There are several parameters here that we can use:
- Proceed directly to the installation of Windows XP.
- Recover Windows XP using the Recovery Console.
- Exit the installer.

Naturally, it is necessary to select the first option by pressing the key ENTER.
In the next window, we accept the terms of the license agreement using the key F8.

Now we need to deal with the sections. In this example, we see three sections. You can delete all partitions to put them together (done with the D key), or install into a ready-made partition. I will choose a disc called "Section 2", it just has the letter C. The choice is made with the Enter key.
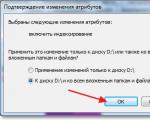
In the next window, you need to select the type of formatting. You can choose full formatting to completely clear the partition table, but this is not required. Choosing a parameter "Format a partition in the NTFS system<Быстрое>» .


As soon as the installation files are copied to the disk, a window will appear asking you to specify the regional data. In this case, click Next.

If you are asked to enter the product key, enter. In case you downloaded another image, the key may be embedded in it, so you will not see this window.

Another window where we are asked to indicate the date and time. Then we press the button "Further".
 "Skip" how to uninstall Windows.
I propose to consider a few links
Windows XP is a good option for installing on a netbook, a weak desktop computer, or a laptop from many years ago.
The operating system Windows XP, despite the fact that it was released in 2001, is still well suited to work on low-power, outdated computers. More modern operating systems Windows 10, Windows 8.1, Windows 8, Windows 7 make more serious demands on the computer hardware.
At the time of the creation of Windows XP, CDs were used to install the operating system, which were inserted into the CD / DVD drives of the computer. The era of portable USB sticks has not yet arrived, so Microsoft has not provided a tool to install a system from a bootable USB stick.
Installing Windows XP via a USB flash drive takes place in three stages:
- Creating a bootable USB flash drive.
- Choosing to boot from a USB flash drive in the computer's BIOS.
- Installing Windows XP on a computer from an installation flash drive.
Creating a bootable USB flash drive with Windows XP
To create a bootable USB drive, we use the free WinSetupFromUSB program. We also need a clean USB drive to write to the system's flash drive.
There is a detailed article on my website. Read the article, write down the operating system on a USB flash drive according to the instructions.
Boot priority selection in BIOS
Insert the USB flash drive with Windows XP into the USB connector, and then turn on the computer. Immediately after starting the PC, you must press a specific key on the keyboard to enter the BIOS settings to select the priority of booting from a bootable USB flash drive or DVD drive.
Different devices use different keys or keyboard shortcuts.
After starting the computer, testing the equipment begins, at this time you need to quickly press the key to enter the BIOS. The most commonly used keys are "Del", "F2" and "F8" for fast boot.
Work in the BIOS is carried out using the keyboard keys. The BIOS window explains in English which keys you need to use to configure.
In the AMIBIOS settings, enter the Advanced BIOS Features menu, where you need to select a USB disk as the first bootable device by moving it to the first place.
AMI BIOS ver.3.31a
In other BIOS versions, open the Boot tab, select USB stick, install it as the first boot device if installing from a USB flash drive. Please select DVD drive if installing from disk.
Save your settings and then exit BIOS. Immediately after that, the computer will boot the system from an installation flash drive or from a CD / DVD disc if an optical disc is used to install Windows XP.
If you didn't manage to enter the BIOS in time, it's okay: restart your computer again, and then try again.
How to install Windows XP from a USB flash drive
In the first window with the inscription "Press any key to boot from CD" you need to press any key on the keyboard.
To create a USB flash drive, we used the WinSetupFromUSB program, so the MultiBoot USB window will open on the screen, in which you need to select "Installing Microsoft Windows XP SP3 x86 - Russian version".
If you install from a disk, then the window above does not come out.
Windows XP installation begins. After downloading the required files, the Windows XP Professional Setup window opens. Necessarily
Press any key otherwise the installation will not start. 
Press the button " Enter»To start the installation of the operating system.
All suggested options:
1. Proceed to install windows xp (Enter key)
2. Restore Windows (Key R)
3. Exit the installer (F3 key)

We accept the license agreement by clicking on the button " F8».

If the system is already installed on the computer, the window will display the partitions of the hard disk. It is possible to delete all partitions and install the system in an unallocated area, (be careful, after deleting a partition or formatting it, you will lose all data) or select an existing system partition for installation.
We will install Windows XP into an unallocated area. In the unallocated area, if necessary, you can create an additional non-system disk partition (partition D - for storing data).
An unallocated area is selected on our computer. To start the Windows installation, you need to click on " Enter». 
- Format the partition in NTFS (Fast).
- Format the partition in NTFS system.
This window may suggest formatting to the FAT file system, do not consider this option.
You can choose any of these NTFS formatting options. In the first case, the formatting of the partition will be faster.

The system partition is being formatted.

The system copies the files to the Windows installation folders.

Upon completion, the computer will restart.
Next, a window will appear with the inscription "Press any key to boot from CD", in this time we don't press anything!  The installer displays information about the features of the operating system. It will take some time to install Windows XP, the approximate time until the installation is complete is displayed in the Windows Setup window.

On top of the system wizard window, windows open for configuring certain parameters.
In the window " language and regional standards"Select a language, click on the button" Further". In the Russian version of Windows XP, the Russian language is selected by default.

In the next window, be sure to enter “ Account name ", for example Alexander.
You can enter anything. This name will be displayed on the system as the computer username.
If you are a regular user, " Name of the organization» do not enter. 
In the Product Key window, enter the key for your copy of Windows. (this window may not come out - depends on the build of Windows XP ). You can skip this step, the system can be activated later, after the installation on the computer is complete.

If you did not enter the key in the previous window, in the window " Error"Click on the button" No».
In the next window, enter “ Computer name"For example Dell, and admin password... If you will not use a password, leave the corresponding fields blank, and then click on the button " Further". If necessary, you can set the administrator password later. 
In the window " Setting the time and date»- select time, date and time zone.

The Windows XP Setup window opens again.

In the next window “ Network parameters»Select« Common parameters».

In the window " Workgroup or domain"Click on the button" Further"Without changing anything.  The Windows XP installation window will open again.

The installation of the operating system continues for some time. After the installation is complete, the computer will restart.

A welcome window will open, and then Windows XP will start. 
Windows XP installation is complete.
Enter BIOS, select your computer's hard disk drive (HDD) as the first boot device again. Next, install the necessary drivers on your PC. You can have the drivers on the disk that came with the computer, or you can go to the official website of the equipment manufacturer and download the necessary drivers from there. More about this in the article: “. This article contains links to the official websites of manufacturers of motherboards and video adapters.
In contact with
Windows XP users are increasingly starting to experience problems launching new games, programs and support for certain components due to the lack of suitable drivers. Therefore, almost everyone is now switching to more recent editions of Windows, some are choosing the seventh version. Today we will take a closer look at the process of how to upgrade Windows XP to Windows 7.
This task is not difficult and does not require any additional knowledge or skills from the user, it is enough just to follow the instructions in the installer window. However, there are certain nuances that need to be dealt with.
Checking the compatibility of Windows 7 with a computer
Most often, owners of old weak computers have the XP version installed, it is not demanding on the system, it loads the RAM and the processor to a minimum, which cannot be said about Windows 7, because its minimum system requirements are slightly higher. Therefore, first we recommend that you find out the characteristics of your PC and compare them with the requirements of the operating system, and only then proceed to the installation. If you do not have information about your components, then special programs will help you find it out.
Step 1: Prepare a bootable USB stick
If you are going to install from a disk, then you do not need to prepare anything, feel free to go to the third step. Holders of a licensed copy of Windows on a USB flash drive can also skip this step and go to the second. If you have a flash drive and an OS image, then you need to make preliminary settings. Read more about this in our articles.
Step 2: Configure BIOS and UEFI for installation from a USB flash drive
Owners of old motherboards will have to perform a few simple steps in the BIOS, namely, you need to check support for USB devices and set the boot priority from a USB flash drive. The whole process is described in detail in our article, just find your BIOS version and follow the instructions.

If the motherboard is equipped with a UEFI interface, then the configuration principle will be slightly different. It is detailed in our article on Installing Windows on UEFI Laptops. Pay attention to the first step and follow all the steps one by one.

Step 3: Reinstall Windows XP on Windows 7
All preliminary settings have been made, the drive is prepared, now it remains to follow the instructions of the installer and the OS will be installed on your computer. You need:


The installation process will now start. The screen will display the progress and what process is currently in progress. The PC will be restarted several times, after which the installation will continue, and at the last step, the desktop will be configured and shortcuts will be created.
Step 4: Preparing the OS for Comfortable Use
Now you have clean Windows 7 installed, without a lot of programs, antivirus and drivers. All this must be downloaded and installed with your own hands. We recommend preparing offline software for installing drivers in advance, downloading a network driver or using the included disk to supply everything you need.

This article explains how to install Windows XP on a computer that already has Windows 7 installed and the steps to create a dual boot configuration when the boot menu is available when you turn on the computer.
Introduction
It is generally accepted that the more correct sequence for installing Windows is to install the minor version before the major one. In this case, it is possible to boot an older system, and after installing a newer OS, a menu for selecting a bootable system appears.
However, the sequence does not matter if you know how to boot operating systems. Consider a situation where Windows 7 is already installed, and Windows XP needs to be installed on the computer. This article is intended to help circumvent the pitfalls for those planning to install Windows XP after Windows 7.
Initial data
Installing Windows XP
A lot of articles have been written about installing Windows XP, so there is no point in dwelling on this issue within the framework of this article. The only thing is that you can install Windows XP with Windows 7 already installed only by booting from the Windows XP installation disc. During installation, you must specify a disk partition that was prepared in advance.
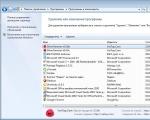
Figure 2 - Selecting a partition for installing Windows XP
Already in this figure, you can see that the section that does not have a letter in Windows 7 is assigned the letter C, and the section with Windows 7 is assigned the letter D.
The picture of "disk management" looks the same after installing Windows XP
Figure 3 - Disk Management in Windows XP
After installing Windows XP, there will be no choice of operating systems at boot, nor, accordingly, the ability to boot Windows 7.
Pay attention to the changes that have occurred to the hidden "System Reserved" section: it has become visible (it is assigned the letter C). Let's see what is located on the active section (C). To do this, you need to disable hiding system files in the folder properties and enable their display:

Figure 4 - Enabling the display of hidden and system files
So, on section C we see the Windows 7 boot files: bootloader - bootmgr and folder Boot, in which the files of the boot menu interface are located, the boot data storage file is bcd, memory checker files - memtest.exe... In addition, it now contains the Windows XP boot files: ntldr, ntdetect.com, boot.ini.
Figure 5 - Boot files for Windows 7 and XP operating systems
Repairing the Windows 7 bootloader in Windows XP
To restore Windows 7 boot, you need to use the Windows 7 installation disc.
Insert the Windows 7 installation disc, find the file on it bootsect.exe in folder BOOT. Note that the path to the bootsect.exe file is F: \ boot \ bootsect.exe. In your case, instead of F, there will be a letter belonging to the CD - DVD drive

Figure 6 - Contents of the BOOT folder of the Windows 7 installation disk
Run Command Prompt: Click Start - Execute, in the field enter cmd. When prompted, enter the following command
Figure 7 - The progress of the bootsect command
The command will restore the Windows 7 Master Boot Record and the boot code that transfers control to the Windows 7 Boot Manager.
Creating a Dual Boot Configuration in Windows XP
As you know, there is no utility for changing configuration data in XP, but it is in the folder with Windows 7 installed. To correctly apply it in XP, you need to enter the System32 directory of the Windows 7 operating system in the command line. After the transition, run the following commands in sequence:
Bcdedit / create (ntldr) / d "Microsoft Windows XP"
This command creates a store in the Windows 7 Boot Store for Windows XP Boot. Execution of this command may fail, since by default this repository has already been created, so you only need to rename it:
Bcdedit / set (ntldr) description "Microsoft Windows XP"
The following command will point the Windows 7 boot loader to the location of the XP boot files:
The following command will point the Windows 7 boot loader to the Windows XP boot loader:
Bcdedit / set (ntldr) path \ ntldr
The following command will add a line about choosing Windows XP to the boot menu and place it below the others:
Bcdedit / displayorder (ntldr) / addlast
Figure 8 - Complete list of commands for creating a boot menu in Windows XP
You can check the correct execution of the commands and the presence of the boot menu by executing the command in the command prompt window bcdedit or by parsing the bootcfg file from the bcdedit> c: \ bootcfg.txt command. The file will be located in the root directory of the C drive.
Figure 9 - Checking for the presence of a Windows XP boot record and the boot menu
After executing these commands, when you boot your computer, you will be given the option to select the OS to boot.
Figure 10 - Selecting OS to boot
Perhaps many will find it more convenient to reduce the OS boot selection timeout, which is 30 seconds by default. To configure this parameter, use the command
Bcdedit / timeout XX
Where XX is the timeout time in seconds.
Considerations for creating a dual boot configuration in Windows 7
If you are just going to install Windows XP, you can create a dual boot configuration in advance, while still running Windows 7. The same recommendations will help if you restored the Windows 7 boot loader while in Windows XP, and decided to create a dual boot configuration later.
In this case, some peculiarities should be taken into account.
Commands, just like in Windows XP, are executed in the command line. On Windows 7, these commands must be run from a command prompt with elevated user rights. To do this, press the button Start, select item Standard, right-click the command prompt shortcut and select, or like this:
Click on Start and in the search box enter cmd
On the found file, right-click and select the item Run as administrator.

Figure 11 - Running the command line with elevated rights (as administrator)
The order of execution of the commands is the same, with the exception of one. As you know, the boot files for Windows 7 and Windows XP are located on a hidden partition that does not have a letter. Therefore, instead of the command
Bcdedit / set (ntldr) device partition = C:
Need to complete
Bcdedit / set (ntldr) device partition = \ Device \ HarddiskVolume1
This remark does not make sense if, for some reason, (for example, if your hard disk was partitioned before the installation began), a hidden boot partition was not created, and the system boot files are located on the same one with Windows 7 section.
Conclusion
Even if the sequence of installing operating systems is not entirely correct, it is easy to organize their correct loading without resorting to complex manipulations or third-party programs. Using the Windows 7 installation disk, you can restore the ability to boot into this operating system, and using the utility bcdedit configure the boot of two operating systems.
Many users believe that installing operating systems on a computer is the prerogative of specialists. But is it really so? Learn to install and reinstall Windows XP yourself.
It is no secret that human-computer communication is carried out using the operating system installed on your PC. This is the primary and fundamental software component, without which it is impossible to imagine a modern computer. Unfortunately, like any other program, the operating system is imperfect, and over time, almost any user is faced with a violation of its normal functionality. This can be expressed in a significant increase in the computer boot time and opening applications, freezes during operation, the occurrence of various kinds of errors when performing certain actions, or even in a complete failure of the system. Such consequences can be caused by both incorrect actions of the user himself and the impact of various malicious programs that are abundant in the global Internet.
According to statistics, even if you carefully enough exploited your OS and reliably protected it from virus infections, after 3-4 years, 80% of users have significant reasons to reinstall the system. And if you still decide to do it yourself, without resorting to all kinds of paid technical services, this article is for you. In it, we will consider not just a complete installation of the WindowsXPSP3 operating system, but will try to disassemble all the main nuances that arise during the installation process. This approach will allow you not only to more flexibly configure the new OS already at the reinstallation stage, but also to avoid possible loss of important data.
Naturally, before starting the installation, you need to have an installation disc with the system. Moreover, this disk must be bootable, that is, the computer must be able to boot from it. As a rule, all original system disks or their images are bootable by default. In general, the installation of WindowsXP can be launched in two ways - directly from an already installed system or through booting from disk. The second method is preferable, but if your old system does not boot or you are installing on a new computer, then the only possible one.
In order for the computer to start booting from the installation disk, you may need to make simple settings in the BIOS. The point is that your optical drive should be the first in the list of boot devices, which is not always configured this way. To check this, you need to insert the Windows CD into the drive and restart the computer. If during the boot process you see the inscription: "Press any key to boot", then everything is in order and you can proceed with the installation. Otherwise, you need to go to the BIOS setup.
SETTING UP YOUR COMPUTER FOR DOWNLOADING FROM CD
When you turn on the computer, as a rule, a short message appears indicating the key with which you can enter the BIOS settings menu. Be careful, as this inscription disappears from the screen rather quickly, especially on laptops. If you cannot see it the first time, immediately reboot your computer using the Reset button and try again. At the start of the download, a large graphic image may appear on the screen, covering the service inscriptions on the screen. To remove it, press the Esc key.
A list of the most commonly used keys:
- Desktop computers - Del (almost always), F1
- Laptops - F1, F2, F3, Del, Ctrl + Alt + Esc. In the case of laptops, the keyboard shortcuts can be very different, depending on the model. You can find this information either via the Internet or by calling the technical support service.
Having found out the key responsible for calling the BIOS settings menu, restart the computer again and at the very beginning of the boot press it several times (just once is enough, but to precisely catch the right moment, repeated pressing will not hurt). If everything is done correctly, then the settings window should open.
As a rule, two types of BIOS are most common:

If your window looks like this, then here you need to select the section Advanced BIOS Features, and in it the paragraph First Boot Device assign the CDROM value. Then press the F10 key and select Yes in the dialog box that appears.
American Megatrends BIOS

Or if your window has a gray background, as in this screenshot, then select the section above Boot and in subsection BootDevicePriority in point 1stBootDevice set the name of your optical drive. Then press the F10 key and select Yes in the dialog box that appears.
For mobile devices (laptops), BIOS programs can be very different, and it is not possible to cite all their possible options within the framework of this article. In any case, you should find the item in the settings window, the name of which is associated with boot (Boot) and in it set the optical drive (CDROM) as the first device.
STARTING INSTALLATION
After turning on / restarting the computer, if any Windows operating system is already installed on your computer at that moment, then after some time on the screen you will see the inscription "Press any key to boot from CD" (Press any key to boot from CD) which you should do.

Be careful as you will only have 5 seconds to enter the system setup. If the loading of the current operating system has started, it means that the opportunity to start the installation was missed and the computer should be rebooted again for the next attempt.
The Windows XP Basic Software Installation screen will then appear, requiring your attention only if you plan to install on an array of hard disks (RAID) or a high-grade SCSI disk.

It is here that you should press the key to install additional drivers for these devices, guided by the messages on the bottom line of the screen. In most cases, no such intervention is required and you just need to wait for the welcome screen.

The welcome screen will prompt you:
- Install Windows XP. Select by pressing ENTER for a new installation or restoring a previous copy of Windows using a graphical interface.
- Recovering Windows using the Recovery Console. Should be chosen by advanced users for system recovery using DOS commands run from the command line. Allows you to fix minor system errors without going through the full installation procedure. Most often used to repair the file system boot sector and master boot record (MBR); spot copying, renaming or deleting folders and files of the operating system; creating and formatting partitions on disks. The Recovery Console is invoked with the R key.
- Output. In case of refusal to install, press the F3 key.
We select the first item "Start installing Windows XP" (even if you are going to reinstall the system) by pressing ENTER, after which a window with a license agreement will appear, which must be accepted in order to continue the installation by pressing F8.


If any are found, then you will see a screen with a list of these systems and a menu in which it will be offered:
- Restore the found copy of Windows by pressing the R key. By selecting this item, you will have to go through the complete system installation procedure, during which all system files of the old copy will be replaced with new ones from the CD. All your data, settings and installed programs will be saved. Recovery helps in case of damage, deletion or replacement of infected files, Windows system files.
- Install a fresh copy of Windows by pressing the Esc key.
You will not see a window with a list of installed systems if you are installing the system on a new computer / hard drive, as well as if the previous copy of Windows has a different edition or service pack.
The next step in the installation is to allocate disk space for the operating system. This is a very important point and you should treat it carefully, and perform all actions very carefully.
HARD DISK DISTRIBUTION RULES
At this point, I would like to make a small digression and give some useful recommendations for partitioning a hard drive:
- Do not allocate all of your hard drive space to one single partition. This is considered bad form and can cause you a lot of trouble in the future.
- Modern hard drives have large enough storage capacities and therefore it is advisable to divide them into several thematic sections.
- It is recommended to set aside a separate section for the installation of the operating system and the necessary software and not to clog it with your personal data.
- You should choose the size of the system partition with a margin, given that for the correct operation of Windows, 15% of the space of this partition must remain free.
- Don't create too many sections. This will complicate navigation and reduce the efficiency of distributing large files and folders.
DEFINITION OF A SYSTEM SECTION
Now, let's get back to the installation. From this moment on, the installation can proceed in two ways:
Option 1: You have a new computer and the hard drive has never been allocated... In this case, you will see a window of the following plan:
.jpg)
The size of the unallocated area is the size of your hard disk and of course should not coincide with the one indicated in the screenshot. To proceed with the installation, you need to create a partition on the disk (system partition), into which the OS will be installed in the future, and specify its size. As a rule, for Windows XP and accompanying software, 40 - 60 GB is sufficient, but not less than 20 GB. Pressing the C key in the window that appears, enter the required size of the created partition.

The size must be specified in megabytes. Calculate it assuming 1 GB = 1024 MB. Thus, if you want to allocate 60 GB for the system partition, you must enter the number 61440 in the size field.
Pressing the ENTER key will return you to the hard disk partition window, where the created partition will be highlighted in a separate line indicating the assigned letter from the Latin alphabet (usually "C"), the file system - in our case, "new (unformatted)" and its size. Below there will be a line with the remaining unallocated area, which you can divide in exactly the same way into the number of sections you need. True, it is not at all necessary to do this here, since after installation it can be done using Windows tools.
After creating the system partition, select it using the arrows on your keyboard and press Enter, after which you will see the last dialog box in which you will be prompted to format it.

Feel free to choose the quick format option by pressing ENTER, since in the second case the physical surface of the disk is checked, which takes quite a long time, especially if the partition is large.
After selecting the file system, the installation of Windows will begin.
Option 2 - If the system was installed on your computer. Then your hard disk has already been allocated to logical areas, and you will see a window listing all the partitions found.

Attention! All further manipulations with the found partitions can lead to the loss of your data, so be very careful in your actions. If the current partition of the hard disk does not suit you, you can delete the existing partitions in whole or in part by pressing the D key. Select the desired section using the up and down arrow keys. After deleting a partition, the area it occupied becomes unallocated, and all data on this logical disk is deleted. When you delete several sections, they turn into a single unallocated area, which you can further distribute as you wish. The principle of allocating an unallocated area of a hard disk is described above.
After all the redistributions, or if the existing structure of the hard disk suits you, you just have to select the desired partition in which you plan to install the system and press the ENTER key.

If you have selected a pre-existing hard disk partition with existing data on it to install the OS, you will be offered several options to choose from, how to proceed. Be careful, formatting a partition in any file system will result in the loss of the data in it! The FAT system is obsolete and it makes sense to format it only in NTFS (fast is preferable). Once you've made your selection, press Enter to begin formatting and copying system files.

If for some reason you still want to save the information in the section you have chosen, then you should select the item "Leave the current file system unchanged." In this case, all data on it will not be affected. Moreover, if it was in this section that the previous copy of Windows was installed (the most likely option), then the installer will warn you that the Windows folder already exists, offering to either overwrite the existing copy by clicking, or select a new folder for installation. Here, unambiguously click, since all the same, the old folder with the system will be renamed automatically and saved.
It should be noted that after such an installation, it is strongly recommended to manually clean your system partition, namely to delete a large number of duplicate files. The fact is that the Windows installer will not only save the old copy of the system, but also all the files of the accounts that existed in it. Of this all the goodness for you, the folders "My Documents", "Favorites" and "Desktop" may be useful. Everything else will turn out to be useless garbage, taking up gigabytes of hard disk space. That is why it is preferable to take care of saving your data in advance, and install the new system in a clean, pre-formatted partition.
This is where the branches of the installer end, and the further installation proceeds linearly. After selecting a hard disk partition to install a new operating system, copying of the main Windows system files begins.

Upon completion of copying, the computer will restart, where you do not need to do anything, but only wait for the installer screen to appear with a graphical shell.
DETERMINING WINDOWS STARTING PARAMETERS

In this window, you can change the regional settings and the input language. By default, Russia and Russian are already set as the location. So there is no need to change anything unnecessarily, click "Next".
In the next window, you must enter your username (your name) and organization (optional). Click "Next".

To continue the installation in the key entry window, you must enter the serial number of the Windows license sticker.


In the window for setting the time and date, most likely, you will not have to change anything either, since the correct data will be entered automatically, and you just have to click on the "Next" button.

You will see the next two windows only if the WindowsXP distribution contains a driver for your network card.

You should not change anything here, leaving the "Common settings" option selected, however, the same as in the next one, where it is more expedient to choose the name of the workgroup / domain after installation.

After clicking the "Next" button, the final phase of the installation will begin, and you just have to wait for it to finish. After a few minutes, the computer will automatically restart, after which the first start of the new operating system will begin.
COMPLETING THE INSTALLATION
When Windows starts up, you will see a few more dialog boxes. The first of these will be "Screen Options", where you just need to click "OK".

After automatically adjusting the screen resolution, Windows will ask you to confirm them, which should be done by clicking "OK":

There is nothing to configure on the welcome screen, so just click Next:

The next step will be the ability to select the automatic Windows update settings, designed to regularly check via the Internet for all kinds of system security fixes, critical updates and service packs on the official technical support website. Enabling automatic updates is desirable, but optional at this stage, since you can perform more flexible configuration of this parameter after installation from the control panel.

If during the installation the network card drivers were installed, then you will see two more windows: the first - checks and settings of the Internet connection, which should be skipped, and the second - system registration, which is also better to postpone for later.


The last parameter that you will have to enter for the final boot of Windows will be the name of the user account under which you will work on the system.

At the end, you will see a window informing you that the installation of the operating system is complete.


A complete installation of Windows XP can take 15 to 35 minutes and depends on the power of your computer. Immediately after its completion, you should install all the necessary drivers for the installed devices, after which you can start installing the software.