Recovering the partition table of the disk. Recovering data from a RAW partition using TestDisk. Section still missing: deep search
I did everything as written in your article, but to no avail, Acronis Recovery Expert writes - no remote partitions were found on your hard disk, I also tried to use the TestDisk program, but apparently I am doing something wrong, the instructions for the TestDisk program on the official website are half in Russian , and the other half in English, could not master this work http://www.cgsecurity.org/wiki/TestDisk_step_ by_step.
Letter No. 2. Tell me how to use TestDisk?After an emergency power outage, my operating system stopped loading, booting from Livecd, I found that all my HDD became unallocated space, and there were two partitions C and D, Windows 7 was installed on C, and very necessary files on D. I found information on the Internet about the free TestDisk program, downloaded it from the official website http://www.cgsecurity.org/wiki/TestDisk_Download. By the way, there are instructions for working with the program, namely, how to recover a deleted partition from a hard disk formatted in the NTFS file system. I disconnected my hard drive and went to a friend, connected my hard drive to his system unit, there is the same unallocated space instead of my partitions.
By instructionswhen the program startsTestDiskI type (Create), then in the window that appears, select my hard disk from the list and press Enter, then select the desired type of the Partition Table, always the correct value is already selected "by default", since TestDisk automatically detects the type of table (Intel). Then I leave (Analyze) to check the structure of the hard disk partitions and search for "lost" partitions. Further in official instructions a window appears with the current structure of sections, and I have this,
I have not found any information on what this means anywhere on the network, and I don’t know whether to continue working with the program, I am very worried about my files, I ask for advice.
Letter No. 3. Please tell me,where can i download TestDisk Livecd, that is, TestDisk on the bootable CD, they say this disk is made on operating system Ubuntu is based on Debian GNU / Linux and the desktop is different from Windows. And is it possible somehow (you can, administrator's note).
The fact is that I stopped loading Windows 7, deciding to check the integrity system files, I booted my laptop from a simple Livecd and found that my C partition disappeared along with the operating system. The hard drive on my laptop was divided into two volumes C and D and now the C section is displayed as unallocated space, on one forum on the network they suggested that you need to find TestDisk Livecd and boot the laptop from it and try to restore the deleted system partition. If you can tell me how to do it all step by step, thank you very much.
How to recover a deleted hard disk partition with a free program TestDisk
In this article I will give three examples of recovering deleted partitions using the TestDisk program. This program will help you in most cases to recover deleted hard disk partitions, whether it happened by accident or due to any extraneous reasons, for example, inept use of partition manager programs - or Paragon, emergency shutdown of the computer, and so on. You can help, the main thing is not to spontaneously and without experience use several programs to restore lost hard drive partitions at once and not stop them halfway through the work done.
But I want to warn you, do everything exactly according to the instructions, do not choose program functions that you do not know anything about. If you want to practice in this program, then install in your system virtual machine and practice as much as you want, when you have already learned most of the capabilities of the TestDisk program, then get to work. TestDisk can recover the deleted partition and lost information, but it can also delete the partition and you will lose all data. You won't be able to play around with the TestDisk program, as well as with other similar programs. Laptop owners need to be especially careful.
- First, we will analyze the simple and most common case of recovering one lost partition on a hard disk belonging to a friend of mine. After experimenting with one program, he disappeared into a hard disk partition with a volume of about 130 GB with the folders he needed.
- The second example will be more complicated, also taken from life, colleagues at work brought a hard drive with two remote partitions, one of which contained the installed Windows 7 operating system, and on the other section there was a photo folder with a family photo archive, it had to be saved first of all. Upon closer examination of the hard disk, the TestDisk program also gave us a warning Warning: the current number of heads per cylinder is 127 but the correct value may be 255. Results, but about everything in detail, we will need to restore all the data and start the seven.
- In the third example, we will download the TestDisk Livecd on the official website and use it to also restore the deleted partition of the laptop hard drive.
- If you need bootable USB flash drive with TestDisk program, read our article.
In fact, on the official website of the developer of the wonderful free TestDisk program, there is clear instructions application of the program, the program itself was developed by Christophe GRENIER.
http://www.cgsecurity.org/wiki/TestDisk_step_ by_step, but since all work with the program takes place in command line and on English language, many novice users this program avoid, but in vain. By the way, we already have one article describing the work of the program.
So let's look at three examples of recovering deleted hard disk partitions one by one.
We go to the official website of the program http://www.cgsecurity.org/wiki/TestDisk_Download and download it,
I suggest downloading and working in the Beta version: TestDisk & PhotoRec 6.14-WIP, Data Recovery, you can choose the stable TestDisk & PhotoRec 6.13 (November 15, 2011), Data Recovery, if you have Windows 64-bit we choose our version,

downloaded then unzip the program from the archive. The testdisk_win.exe file is responsible for launching the program.

How do I use TestDisk? We have a Maxtor STM3250310AS hard drive, on which a partition with a very the necessary files... As you can see in Disk Management, it is defined as Disk 2. It contains 113.2 GB of unallocated space, this is our remote partition,

we need to restore it. When working with the TestDisk program, it is very important to know which files were located on the remote partition, since the program can find long-deleted partitions that you no longer need. We need to return the deleted section with the Diploma, Coursework, Drawings folders.
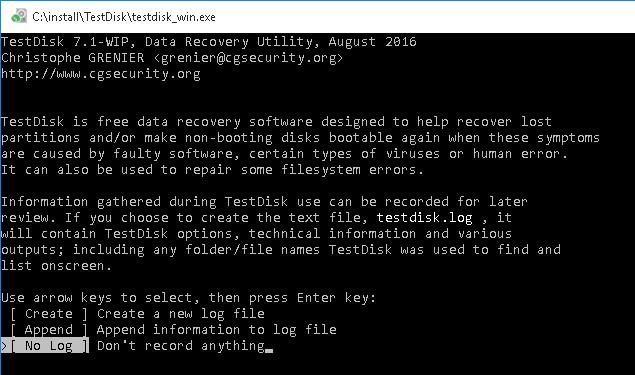
In the initial window of the program, you and I need to choose whether to keep the program in the process of running a report on all operations performed or not. Personally, I do not need a report and I will select using the arrows on the keyboard No Log (No log required)... You can choose Create (report required)... To continue working, press Enter on the keyboard.

In this window, you need to select the hard disk on which you want to search for the deleted partition. In my case, as you can see, there are three hard drives: Western digital and two identical Maxtor STM3250310AS. I choose the last Maxtor in the list (why is the third, and not the second, it was on the third that I managed to find my friend's files, as I did, read on) and press Enter. Below is the default Proceed

Select the required type of Partition Table, usually Intel. You need to know that TestDisk detects the type of the table automatically and the correct type is always selected by default. Next Enter

We select the Analyze item to search for deleted partitions and TestDisk looks at the initial sectors of the cylinders, the primary partitions are found starting from the first sector of the cylinder, and the logical partitions from the second sector. In other words, the TestDisk program scans the hard disk for the presence of file system headers, and TestDisk considers each header found during such a scan as a found partition, then it determines its size and adds it to the list of found partitions.

This window displays the current partition structure of our hard disk, click Quick Search.

There is a more thorough search for deleted partitions, it may take some time, which depends on the power of your computer.
Now attention friends, in this window it is better not to be mistaken, among the found partitions is our deleted volume, which needs to be restored.
Using the arrows on the keyboard, select the lower section, firstly, we are guided by the volume, it took us about 113 GB,

then we go inside the remote section by pressing the keyboard key in the English layout (P) and to our delight we see all the folders we need: Diploma, Coursework, Drawings.

To exit the file display mode, press (Q). By the way, on the left of each section its type is indicated. * for boot partition, P for primary, L for logical, E for extended. Now press Enter.

So almost the finish, we have already selected the partition we need to restore, here we select "Write" using the arrows on the keyboard and all information about the found partition will be written to the hard disk partition table, press Enter.

Press Y


We close the program and restart the computer. A deleted section with the folders we need has appeared.


In the second case, having connected a hard drive with two remote partitions, one of which had the Windows 7 operating system, to our computer, we see the following picture in Disk Management. Disk 2 with a volume of 111, 79 GB is completely unallocated, it will be possible to restore anything on it now, we'll see.

Run TestDisk again and in the first program window select No Log (no report required) or Create (report required) and press Enter on the keyboard

Select the Samsung hard drive with the arrows on the keyboard and Enter


Analyze
In this window, TestDisk tells us that no active partitions were found, click Quick Search.

A warning awaits us here Warning: the current number of heads per cylinder is... This message is not good and says that TestDisk has detected the wrong geometry of the hard disk (the number of cylinders, heads or sectors), we ourselves will not manually change the geometry of the hard disk, (although the program may allow us to do this) this is a topic for a separate article , let's put our trust in the TestDisk program. Even if we restore the deleted partitions, it would be good not to store important data on this hard drive. In the future, it will be necessary to treat this hard disk from bad sectors of bad blocks according to the example of our article.
Click Continue to continue.

We select the last partition of the hard drive, it fits the volume of the -52 GB partition, on which the desired Photo folder was located,

to see the files located in the deleted section, press on the keyboard in the English layout (P), we see the photo folder, if we restore the section and this folder, especially with the family archive of photos, they will thank us.

Exit the file display mode, press (Q). Then Enter

Move to the "Write" item and press Enter, the information about the found partition will be written to the hard disk partition table.

Sometimes it happens that you accidentally deleted a partition (partition) on a hard disk, or, say, inadvertently formatted the wrong hard disk. In these cases, it is strongly recommended to shut down the computer as soon as possible so that nothing is written to the hard disk and the deleted information is not erased.
To restore the partition completely after deleting or accidentally formatting, the TestDisk program will help us.
TestDisk: instruction
Step 1. Download the disk image with the program or download the Ultimate Boot CD (UBCD), which already contains TestDisk.
(We advise you to read our article on how to create bootable USB drive with UBCD :)
Step 2. Boot from a CD or USB drive containing the TestDisk program.
Step 3. If you booted from UBCD 4.11, then find the utility in the appropriate section: Filesystem Tools -> Partition Tools -> TestDisk v6.6.
Attention! We answer all questions when starting the program "OK" using the "ENTER" key, or just wait automatic execution default actions:
After a couple of minutes, the program will load.
Step 4. In the TestDisk program, select the hard disk on which you want to find the partition, and click Proceed:

Step 5. Choosing a type file system... If the hard drive was used with Windows OS, select Intel:

Step 6. Click Analyze to analyze the hard drive:

Step 7. When the program detects the type of the filesystem, click Proceed to start searching for the overwritten partition:

The program searches for deleted partitions (partitions) and shows progress as a percentage:

If deleted sections are found, they will be displayed as a list.
(In the picture below we see that in our case the program found two sections - Data1 and Data2)
Step 8. Recovery desired section it is necessary to select it using the "Up Arrow" and "Down Arrow" keys and press the Enter key:
(Let's say we were looking for the Data1 partition and want to restore it so that it becomes visible again in Windows)

Step 9. Now you need to select the Write command with the arrows! and press Enter to run it. By this action, we restore the partition table and the selected partition will again be visible in Windows OS along with all its contents:

Step 10. We confirm the intention to write the partition table by pressing the Y (yes) key:

The program has restored the partition and informs you about the need to reboot! It is done!
Step 11. Exit the program.
Press Enter to close the message:

... and exit the program using the Quit commands (all commands are still run with the ENTER key):


The program reports the successful completion of the TestDisk utility. You can press RESET to restart your computer. 
Attention! The file system works in such a way that when files or partitions are deleted, only their coordinates on physical disk, and the data remains, but is replaced with new information as needed. Hence, it follows that the contents of the deleted partition will remain intact. only in case that if after deleting the partition you did not have time to overwrite the area of the hard disk. For if you delete a partition and then drop a couple of movies onto the same hard disk, the new data will partially or completely overwrite the area where the deleted partition was previously. Therefore, if you accidentally deleted the partition you need, start restoring it immediately!
Recently, a logical partition of a hard disk suddenly disappeared on my computer, and then I thought that the data could not be recovered, but still there was hope, so I started looking for a solution to recover the disappeared hard disk volume.
And so I came across this very multifunctional utility TestDisk with the help of which I was able to restore the missing partition of the hard disk, therefore I express my gratitude to the developer of this utility.
Firstly TestDisk the program is distributed openly source code and is licensed under the GNU General Public License, so you cannot dream of paying for use, I must note that the utility is not inferior to similar paid counterparts.
TestDisk it's powerful free program to recover lost data. It was designed primarily to help recover lost partitions and / or restore the bootable capacity of disks if the problem is caused by software, viruses, or human error (such as accidentally deleting the Partition Table). It is very easy to restore Partition Tables with TestDisk.
TestDisk maybe:
- Correct the partition table, recover deleted partitions;
- Recover FAT32 boot sector from backup;
- Rebuild (reverse engineer) the FAT12 / FAT16 / FAT32 boot sector;
- Correct the FAT table;
- Rebuild (reverse engineer) NTFS boot sector;
- Recover NTFS boot sector from backup;
- Recover MFT using MFT mirror;
- Define a backup SuperBlock ext2 / ext3 / ext4;
- Restore deleted files on file systems FAT, NTFS and ext2;
- Copy files from remote FAT, NTFS and ext2 / ext3 / ext4 partitions.
It is also very important that the utility works under a variety of operating systems:
- DOS ( real or in Windows 9x, DOS-box);
- Windows (NT4, 2000, XP, 2003, Vista);
- Linux;
- FreeBSD, NetBSD, OpenBSD;
- SunOS;
- MacOS.
TestDisk can find and reconstruct lost partitions for multiple filesystems:
- BeFS (BeOS)
- BSD disklabel (FreeBSD / OpenBSD / NetBSD)
- CramFS, Compressed File System
- DOS / Windows FAT12, FAT16 and FAT32
- Windows exFAT
- HFS, HFS + and HFSX, Hierarchical File System
- JFS, IBM's Journaled File System
- Linux ext2, ext3 and ext4
- Linux LUKS encrypted partition
- Linux RAID md 0.9 / 1.0 / 1.1 / 1.2
- RAID 1: mirroring
- RAID 4: striped array with parity device
- RAID 5: striped array with distributed parity information
- RAID 6: striped array with distributed dual redundancy information
- Linux Swap (versions 1 and 2)
- LVM and LVM2, Linux Logical Volume Manager
- Mac partition map
- Novell Storage Services NSS
- NTFS (Windows NT / 2000 / XP / 2003 / Vista / 2008)
- ReiserFS 3.5, 3.6 and 4
- Sun Solaris i386 disklabel
- Unix File System UFS and UFS2 (Sun / BSD / ...)
- XFS, SGI's Journaled File System
So let's look at an example of recovering a lost hard disk partition.
Run TestDisk as in the operating system itself Windows, so with under
DOS with USB stick or LiveUSB in case the partition on which the operating system was installed flew.
For example, let's take restoring an accidentally deleted NTFS logical partition.
Recovering a FAT32 partition (instead of the one shown in this manual NTFS partition) can be achieved by following the same steps.
You need to run the program with "administrator" privileges / rights, if we work with OS, for this you need to click right click mouse on testdisk_win.exe, having previously unpacked from the archive to a computer.
The program window will appear, the program interface is in English, but pretty much everything is bypassed in pressing a few keys:
- To go to TestDisk use the arrow keys Up down and PageUp / PageDown .
- To continue, confirm your choice by pressing the key Enter .
- To return to the previous display or exit TestDisk, use the key Q (output ).
- To save the changes made while TestDisk is running, you must confirm them with the key Y (yes) and / or Enter
- To write data to the MBR partition, you need to select "Write" by selecting from the keyboard and press the key Enter .

Next, it is given to choose a hard drive, since there can be several of them, plus removable media.

Use the arrows to select our hard drive and press Enter.
TestDisk will display the Partition Table types.

Select the desired type of Partition Table. Usually the "default" value is already set to the correct value, since TestDisk automatically detects the table type during analysis.
Press Enter to continue.
TestDisk displays the following menu Partition Table Status
 Select the "Analyze" menu item to check the partition structure of the current disk and search for "lost" partitions.
Press Enter again to continue the procedure.

Next, the current structure of the sections will be displayed. Examine it for missing sections or errors.
Here we can see already found we lost hard disk partitions
We choose Quick Search
(Quick search) and press Enter to continue.
Then the program issues a request Should TestDisk search for partition created under Vista?
(Search for partitions created under Vista OS?).
Be sure to click Y (YES) if we recover data from under Windows Vista & Seven, but if you just click yes, nothing terrible will happen.
TestDisk should find hard disk partitions, including lost ones.

To view what is on each section, select the section and press the key P to view the list of files.
All folders and files should be displayed normally. (The utility does not understand Russian, so files with Russian names will not be displayed correctly), to copy files to another disk, press the key WITH(copy), but before that you need to specify the path to save the files.
To exit, press the key Q, also to view data about the disk at the very bottom there are data for its size and file system.
Click on Input(Enter) to continue.
The following window will appear:

For a more thorough search, click Deep search if a quick search is not found for lost partitions, to write the data of the disk table structure to the MBR partition, select Write and click Enter(if TestDisk correctly identified the partitions), after which our OS should boot with all logical partitions of the hard disk.
There are some comments or additions, I will be happy to hear from you.
TestDisk - how to use. You have lost a section hard disk on Windows, this can happen for many reasons, a virus has entered your computer, a program malfunctioning or user actions are incorrect, which happens more often. No need to panic, your files are safe and sound, only section information has been deleted hard disk, from the partition table. This table is something similar to links, the file seems to be as it is, and without a link to it, the system cannot see it, because its address is not known. The first thing to do in this case is not to try to do anything with it. hard disk(format, or try to write something to it) If this happened with the system partition, that is, drive C, and the system does not start, then the hard drive must be removed, connected to another working computer and all the following operations performed with it. In this case, partition E, located on the same hard disk with the system, has disappeared. In this I was helped by a powerful absolutely free utility TestDisk... This program specially designed for recover lost partitions on hard drives, to restore boot files, due to incorrect actions of programs, humans and viruses (for example, the partition table has disappeared), as well as in case of a failure in the operation of the storage medium. On this moment, TestDisk counts the best tool in its category, repeatedly helping to cope where paid tools from such monsters as Acronis, Runtime and others could not help. It is believed that using a utility like Acronis Recovery is more likely to harm and aggravate the problem more than it helps you. And so, I present to you an overview of how I dealt with this problem. Download TestDisk from official site or, and unpack it, be sure to another hard disk, not to the one on which we are going to restore the partition, if you have one hard disk, then this must be done on another computer.
I lost section E.

Launch program by double clicking on the icon
The program window opens

in the program we work with the keys, up, down, left, right.
Here we select Create and press Enter

Here we select the problematic hard drive, it is the first one, 20 GB in size and press Enter

Select the type of Partition Table you want. Usually the correct value is already selected as "default", because TestDisk when analyzing, it determines the type of the table automatically.
Press Enter to continue.

Select the "Analyze" menu item to check the partition structure of the current disk and search for "lost" partitions.
Press Enter to continue.

Press Enter to continue.

Answer the question Should TestDisk search for partition created under Vista? (Search for partitions created under Vista OS?).
Press Y to continue.

TestDisk displays search results in real time.

TestDisk found two partitions, including the lost logical one with the L label, at the bottom of the table we look at the size of the partition.
Select this section and press p to display the file list (To exit the file list display mode, press q).

All folders and files are displayed normally. (The utility does not understand Russian, so files with Russian names may not be displayed correctly)
Press Enter to continue.

Press Enter to continue.
Here the rescanning starts, but we press Enter (Enter), the program closes, we restart the computer.
We go into my computer and see what is there

Chapter restored, everything is OK, the files are saved.
Recently faced a situation where my old external USB the disk has ceased to be read in Windows, being detected as RAW... This indicates that Windows cannot determine the structure of the file system on the disk. The reason why the partition is determined, how RAW can be different: the disk may not be partitioned, the partition table header may be erased / damaged / missing, the disk may contain broken sectors or there may be physical problems with the drive itself or its controller.
From the user's point of view, such a RAW disk is displayed in the explorer, but its size is defined as 0 (zero). When trying to open or read data from a RAW partition, various errors of the form appear:
To use a drive in E: drive, first format it. Do you want to format it?
You need to format the disk in Drive E: before you can use it. Do you want to format it?
E: \ cannot be accessed. The file system of the volume is not recognized.
Cannot Access Disk. The volume does not contain a recognized file system.
Note... We deliberately do not consider the option with physical damage to the disk, since by software it is not cured. General recommendation: it is advisable to first check the disk using any S.M.A.R.T.status viewing utility.
As a rule, the easiest way to restore disk performance is to delete the current RAW partition and re-create it with formatting. But the data will, of course, be lost, which may be categorically unacceptable. Let's try to run a disk check using the standard CHKDSK check utility:
The utility returned that CHKDSK cannot be performed on RAW discs.
The type of the file system is RAW.
CHKDSK is not available for RAW drives.
 To restore the original file system on a RAW disk without formatting, we will use a free console utility TestDisk.
- Download, unpack the archive with the utility and run exe in mode No.Log
- Find the disk, the file system of which is defined as RAW and select Proceed

- Next, you need to select the type of disk partition table. Typically, it is automatically detected as Intel for MBR partitions either EFI GPT for GPT tables. However, in some cases, you need to select None

- To run the analysis of the disk data structure, select Analyze, and on the next screen Quick Search

- The TestDisk utility will display a list of the partitions found. Using the key P you can display a list of files on the found partition (Q- exit the viewing mode), In the event that the partition also has a P label (the in green) - this section will be restored. Mark D - deleted. Use the left / right arrows on your keyboard to change the label.
Advice... Enough useful functions mode of viewing files on the file system - the ability to restore individual folders / files to another disk. To do this, in the viewing mode, press the key C.

- After all partitions are marked for recovery, click Enter and Write(here, be careful not to overwrite the partition table with garbage). If you want to perform a deeper analysis of the disk, select DeepSearch.
Advice... Be aware that if you restore this way system disk, in addition to the partition with Windows itself, depending on the OS version, there may be other partitions: a partition with a boot loader, a partition with a recovery environment, etc. To understand the structure Windows partitions I recommend reading the articles. In the event that the boot sector of the disk is damaged, the TestDisk utility will offer to try to restore it using the option RebuildBS.

- After that (a reboot may be required), the utility will restore the original structure of the partition table and file system (as a rule, it is NTFS or FAT32) on the RAW disk and you can access the files stored on it.