Activation of Windows 10 change of motherboard. Replacing the motherboard without reinstalling Windows. Preparation of Windows before replacing the motherboard
Very soon (and if exactly exactly July 29, 2016) upgrade with Windows 7, 8 or 8.1 to Windows 10 will cost 119 bucks for the "home" version or 199 - for version pro.. Nonalternative. And this, as if, one aspect. But there are also others. For example, activation.
If you remember that the so-called "digital license" is used in Windows 10 instead of the traditional product key. Then the question arises: whether free upgrade will be free after the replacement of some components of the computer, in particular motherboard?
And so, as it turned out, the answer to this question is likely to be positive.
At least, judging by the detected changes in the Windows 10 Insider Preview Build 14371 released (they, by the way, should also be included in the Loving July Mega Paul system).
This assembly features a new Activation Troubleshooter utility, with which the user will just have to decide. most frequent problems", Which arise when activation" original Windows 10."On PC after replacing his motherboard or hard disk.
Activation Troubleshooter will also prompt how to upgrade to the desired OS, if, for example, having the Windows 10 Pro activation key, the user by error installed on the PC version HOME.
Microsoft also specifies that the utility is focused only to troubleshoot the problems associated with significant changes in the computer configuration (i.e., the level of replacement of the "motherboard" or "screw") and will work if the user account in Microsoft has already been to introduce these changes It is associated with a digital license installed on the corresponding PC version of Windows 10. However, if some Microsoft account has already been previously used to enter this system, then it was "tied" to a digital license automatically.
However, to link the account to a digital license can be manually. In Windows 10, this is done as follows: settings menu -\u003e "Parameters" -\u003e "Update and Security" -\u003e "Activation" -\u003e "Add an account" button (She must have administrator rights). Next, the system can request a login and password account Microsoft. If the local account is not related to the Microsoft account, you need to enter a local account password. If the local account is not related to the Microsoft account, you can enter a local account password.
On the fact of successful completion of the procedure in the section " Activation»A message will appear" Windows activated digital license associated with Microsoft account «.
After that you can run the utility Activation Troubleshooter.: settings menu -\u003e "Parameters" -\u003e "Update and Security" -\u003e "Activation" . If the page is displayed " Windows is not activated", Click TROUBLESHOOT to continue (the account must be with the administrator rights).
In the next window Click Link " I recently changed the components on this device ", I enter the username and password of the Microsoft account and click" To come in "(If Microsoft Accc has not been added to the computer, we enter local Account Password and click " Further "). The system displays a list of devices that with this Microsoft account, select the device that should be activated again (or " This is a device that I am currently using") And click" Activate ". Like that.
License in Windows 10 works otherwise than in Windows 7 and Windows 8. Previously, the user received a key that could be used on any computer, and now activation is attached to specific device And can "fly" when you change the equipment in your computer.
Users can still acquire Windows 10 activation keys, but it happens only when you buy new license (In Russia, it costs 7900 rubles). When you update your computer with Windows 7 or Windows 8.0 license keyWith which you could re-make activation, you do not have.
In Windows 7 and Windows 8.1 there was such a system: it doesn't matter what you bought a license to use operating system or new computer - You have issued a key with which you can activate Windows. At the same time, it did not matter where you would use this key, you could activate one computer, and then (for example, when it is outdated or broke) you could re-activate the same key another device. For this, it was necessary to withdraw activation from the first computer.
Now that the activation key in Windows 10 may not be, the license is complicated. Each license is tied to your Microsoft account and a unique identification number assigned to the device on which this activation was carried out. When changing the equipment, the identification number may change, after which Windows 10 will again be unactivated. Different types of devices have been assigned a different "weight", affecting the need for re-activation. For example, you can replace the mouse, keyboard and hard drive, and this will not affect activation, but you should change your motherboard or processor with RAM, and it will be withdrawn.
Of course, in such conditions, the system that is responsible for checking the uniqueness of computers often gives failures, because the user can replace almost all components in his computer, this is its right and this feature of the PC platform. At the same time, he should not lose the license of Windows 10, even if he received it for free when upgraded from earlier versions of Windows. This is understood in Microsoft. Previously for recovery windows licenses It was required to write or call technical support, describe it the essence of the problem and prove that you did not buy a new computer and are not trying to install the operating system on a completely different device. Now checking the modified computer is automatically performed.

If after the upgrade of the computer it disappeared on it activation of Windowsyou need to open system application "Parameters", switch to "Update and Security"\u003e "Activation" and click "Troubleshooting". This feature is shown only on non-activated copies of Windows 10 And only under the account with the administrator's rights. Automatic system Asked you to specify the essence of the problem (loss of activation due to the upgrade of the computer) and choose which particular computer is speaking (if you have several). Then she checks out the equipment installed in your computer, and returns activation or refuses it. The check will be quite careful, so if you really try to activate Windows 10 on your computer, which was previously activated, most likely, the license will be returned. Otherwise you can contact Microsoft technical support e-mail or phone and try to solve the problem with its help.
The Microsoft website provides an algorithm for solving a problem with Windows re-activation:
If you recently made a significant change in the equipment of your device, for example, replaced system feePerhaps you will fail to activate Windows on your computer.
If you tied your Microsoft account with a Windows 10 digital license on the device before changing the equipment, you can re-activate Windows using your entry data:
In the troubleshooting tool, select "I recently changed the equipment on this device" and click the Next button.
- Enter your Microsoft and password account, and then click Login. In addition, if the Microsoft account you entered is not connected to the network, you will need to enter a password for a local account.
- Select from the list of devices connected to your Microsoft account, the device you use currently select the checkbox next to the "This device" that I now use, and then click "Activate".
- If you do not see the device used in the Results list, make sure that the input is made with the same Microsoft account that you have connected to the Windows 10 digital license on your device.
If the input is made with the correct Microsoft account, check the following additional reasonswhich can prevent Windows re-activation:
The release of Windows on your device does not comply with the release of Windows that you tied to your digital license.
- The type of device you activate does not match the type of device that you tied to your digital license.
- Windows has never been activated on your device.
- You have reached a limit on Windows re-activation on the device.
- Your device has several administrators, and another administrator has already re-activated Windows.
- Your device manages the organization, the ability to re-activate Windows is not available. For assistance with re-activation, contact a specialist in supporting your organization.
If you are going to update / replace your motherboard, but do not want to reinstall Windows, driver, programs or you want to switch operating modes sATA controller With IDE in AHCI or RAID (or vice versa), then this article is just for you!
Often when changing the motherboard and start a PC without reinstalling Windows you can see " blue screen Death "(BSOD) with Stop 0x0000007B Inaccessable_Boot_Device error.
The cause of this unpleasant picture of the Windows-availability of Windows itself to find proper drivers for the SATA controller. This problem can be easily eliminated without reinstalling Windows. To do this, everyone needs to "order" the operating system so that it uses the standard SATA controller driver at start-up, which is loaded after a clean Windows reinstall. And the registry editor will help us.
Run "old" windows on a new motherboard
To make changes to windows registryJust follow the instructions below:
Before proceeding to further actions, it is necessary to determine below:
1. You are just going to replace the motherboard or change the IDE / AHCI mode and your PC is running in normal normal mode, Windows starts
2. You have already replaced the motherboard and Windows does not start. In this case, you will have to use the autonomous registry editor.
1. Changing the registry Before updating the motherboard or controller settings
This section is suitable for those whose PC starts in normal mode and you are just going to replace the motherboard. Open, for this press the buttons " Win + R."And the window that appears, type" ", then click ENTER.
We offer the registry editor. It looks like a "tree" with a bunch of folders and settings:

We need to go into the branch:
HKEY_LOCAL_MACHINE \\ SYSTEM \\ CURRENTCONTROLSET \\ SERVICES \\ MSAHCI
Find there parameter Start. and put it the meaning " 0 "(Zero) and press the button" OK»
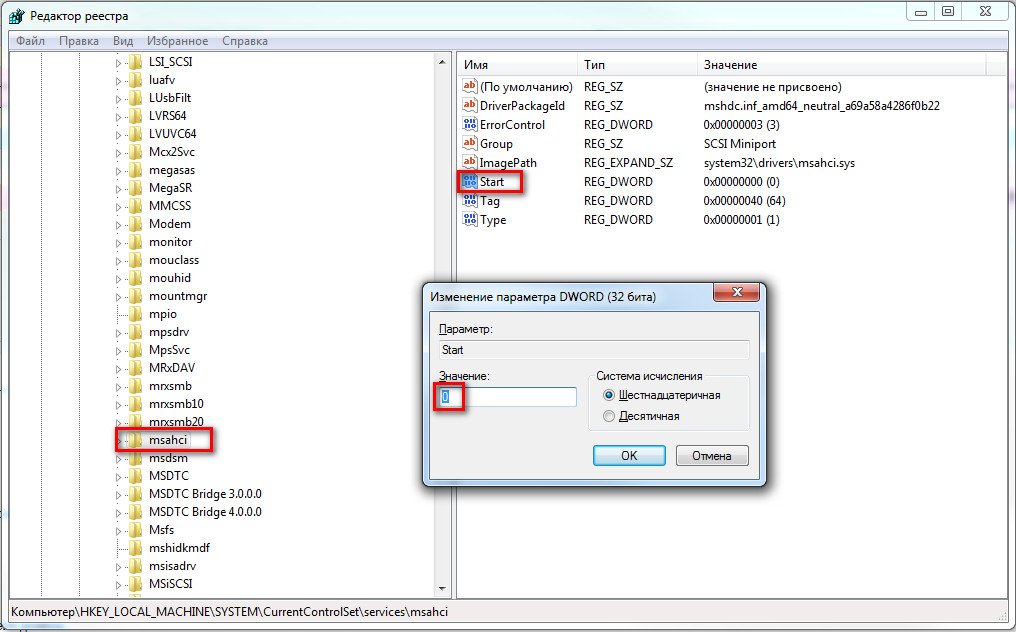
HKEY_LOCAL_MACHINE \\ SYSTEM \\ CURRENTCONTROLSET \\ SERVICES \\ PCIIDE
and do the same with the start parameter

If you use RAID (if not, then skip this step) then you need to do the same in the next branch:
HKEY_LOCAL_MACHINE \\ SYSTEM \\ CURRENTCONTROLSET \\ SERVICES \\ IASTORV
This preparation is over. Now you can install a new motherboard or me the SATA controller parameters. The next time you launch Windows will boot with standard SATA controller drivers. After launch, automatically drivers will be installed on a new controller. After downloading, do not forget to install new Drivers From the motherboard, which come in the kit, or download them from the Internet. It is best to download original drivers from the manufacturer of your motherboard.
2. Changing the registry after updating the motherboard (Windows does not start)
If you have already changed the motherboard and there is no possibility to download Windows, for example, the old failed, then in this case you need to use the autonomous registry editor. To solve this task, I prefer to use the recovery environment where you can get, for example, using a disk to install the operating system.
To open the registry editor using the installation DVD or USB drive, Load your computer using the installation disk. You may need to choose a DVD / CD or USB as the first boot device in the BIOS settings.
After loading, on the first screen, click "Next", and then select Restore System.

If you have Windows 7, then on the first screen, click Next, it will start to start command line
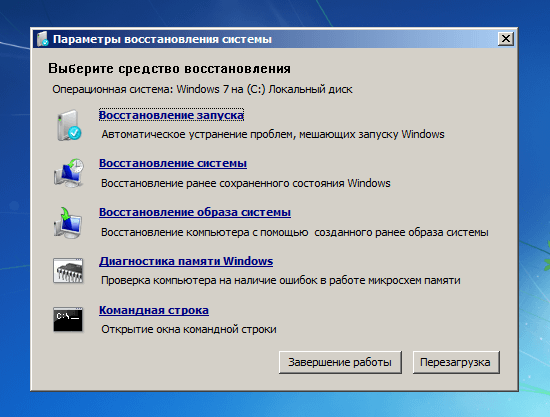
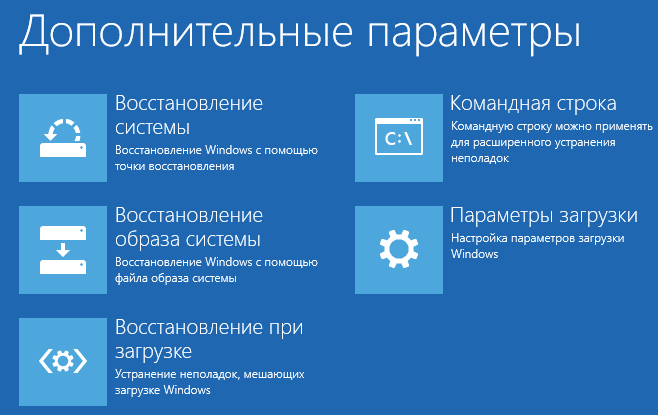
If you use Windows 8.x or Windows 10, then you need to choose "Diagnostics" -\u003e " Extra options"-\u003e" Command Line ".
In the command line, enter and click ENTER.

In the registry editor, highlight the branch HKEY_LOCAL_MACHINE, And in the "File" menu, click "Load a bush".

Open the disk on which the operating system is installed.
Go to the Windows \\ System32 \\ Config directory, select File system. And click "Open".

Enter the partition name (for example, offline) and click OK.

Opening the HKEY_LOCAL_MACHINE branch, you will see the created section (in our example it is called offline).

Expand new section And go to the next subsection:
HKEY_LOCAL_MACHINE \\ OFFLINE \\ CONTROLSET001 \\ SERVICES \\ MSAHCI
Open the Start parameter, change its value to 0 (zero), click OK.

Perform the same operation in the subsection:
HKEY_LOCAL_MACHINE \\ OFFLINE \\ CONTROLSET001 \\ SERVICES \\ PCIIDE
Close the registry editor, command line and restart the computer. Remove installation diskSo that the operating system can boot as usual. Now Windows must start without any problems and then install the necessary drivers of the hard disk controller. Do not forget to install the drivers from your new motherboard!
Conclusion
This is not a difficult method, you can save your Windows operating system and all programs installed on it when changing the motherboard or when changing the SATA controller parameters without reinstalling the system.
I hope this article was useful!
You had to change computer components, and after that it was not possible to activate the operating system? IN this manual Steps will be shown to be taken using the Activation Troubleshooter tool to re-activate the Windows 10 system.
When you make significant changes in the computer component, such as changing a hard disk or motherboard, Windows 10 cannot correctly identify the computer and the operating system is unactivated. Previously, if Windows 10 lost activation due to hardware changes, it was necessary to contact technical support Microsoft for re-activation, which was a completely imperfect solution.
Now Microsoft has simplified the process. Starting with the version of Anniversary Update leaving in July, you can bind Microsoft account (MSA) to the Windows 10 digital license on its computer. New opportunity Allows you to access the Activation Troubleshooter troubleshooting tool and re-activate Windows 10.
In this Windows 10 manual, the process of binding a Microsoft account and a digital license, as well as the use of Activation Troubleshooter to re-activate the system.
How to tie a digital license and Microsoft account
- Open the Parameters application.
- Open the Update and Security section.
- Click Activation.
- Click "Add Account". (The account must have administrator rights).
- Enter the username and password of Microsoft account and click Login. If the local account is not related to the Microsoft account, you need to enter a local account password.

After completing this process, you will see the inscription "Windows activated a digital license associated with Microsoft account on the Activation page, so that the binding has passed successfully.
If you have used Microsoft account when upgrading to Windows 10, it was automatically tied to a digital license and you will see the message "Windows is activated by a digital license associated with Microsoft account." In this case, the previous step can be skipped and go to the next one.
How to use troubleshooting tool to re-activate Windows 10
After binding a Microsoft account and a digital license, you can use the Activation Troubleshooter tool to re-activate Windows 10 after replacing the components in the computer.


If you want to see other device tied to account, you can click "View other related Microsoft Device Account". This page provides a list of devices in three categories (the editorial does not match, the device type does not match, Windows is not activated), speaking causes, why Windows 10 does not turn out to be activated on other devices.

Additional steps
If your device does not appear in the list, there may be several reasons for it.
First, make sure you entered the Microsoft account, which previously tied to the Windows 10 digital license.
If you use the desired Microsoft account, you need to consider the reasons for the impossibility to perform activation. Here is a list of possible reasons:
- Windows 10 has never been activated on this computer;
- an unlicensed version of the operating system is used;
- the edition of Windows 10 does not correspond to the edition affected by the digital license;
- the type of the device link does not correspond to the type of device tied to a digital license;
- the number of repeated activation is limited. If this number is exceeded, Windows 10 will not work;
- the edition of the operating system installed on your computer is not Windows 10 Pro or Windows 10 HOME;
- the computer is managed by your organization, in this case the re-activation tool is not available. Need to contact the system administrator;
- if after using the Activation Troubleshooter, you failed to activate Windows 10, you need to contact Microsoft technical support.
Conclusion
From the first release of Windows 10 Microsoft is working on improving the system, including in the field of activation. However, problems with activation from time to time continue to meet, so the new tool is designed to decide and allow them to change computer components without any problems.
Activation Troubleshooter will be available in Windows 10 Anniversary Update version. Testing program participants can use a tool from assembling 14371 or more modern.
It is obvious that it is impossible to re-activate Windows 10 after changing components without adding Microsoft account to your computer. Troubleshoot is not available if the system is activated.
Also Microsoft renamed the type of Windows 10 key with "Digital License" (Digital License).
Using the operating system on your own computer can be very different from the user to the user. Some, having bought a new PC, mainly use the built-in in Windows Programs and tools, as well as the default OS settings. Others - work with many third-party applications and utilities, while configuring the interface of the system to its own taste.
And if in the first case, reinstalling the system and multiple applications is not a challenging task, then in the second, in addition to the installation of the OS, you will have to re-engage all the necessary programs, Windows personalization and other settings. That is why many users do not burn with a desire to do it again. Especially at hand it may not be necessary applications Or their settings were performed by a specialist who will now have to be repeated.
In general, the reasons do not touch the normally working operating system can be very much, but the time comes when the internal components of your computer begin to obscure hopelessly and their replacement to a more productive iron becomes an acute necessity. And if the installation of a new power supply unit random access memory, individual processor or video card can be made relatively painlessly, that is, without reinstalling the operating system, then everything is not so simple when replacing the hard disk or motherboard.
As you understand, all windows files Stored on a computer hard drive, so that its replacement leads to a non-re-setting system. Although it can be avoided by pre-making a complete backup current OS in the image and retaining it on old HDD Or some other media information. Then you will only stay to unpack the received backup system to a new disk, and you can continue to work in the former Windows using all previously installed programs.
In case of replacing the motherboard on a PC with Windows Result It may depend on many different factors, but the main thing is to choose a future hardware platform (for example, when changing Intel on AMD or vice versa, problems are almost inevitable) and a set of system logic (chipset). In short, the more differences will be at the new system board from the previously installed, the less chances will be loaded at the previous system after its replacement.
Despite the fact that Windows 7 has an impressive database of drivers in his arsenal, simply change the motherboard and run earlier installed system It is often impossible. This is especially true of those boards that were released much later than the exit of the system itself. But they are now most, since since that moment has passed for more than three years. So the question is how to replace the motherboard on personal Computer With Windows without its reinstallation, is still relevant.
Why is the replacement of the motherboard so often turns along to reinstall Windows? As a rule, the most common cause is the incompatibility of the ATA / SATA controller drivers hard disks With those that are equipped with a new "motherboard". In this case, after replacing the "iron", during the boot of the OS, you will get a blue screen of death (BSOD) with a Stop error: 0x0000007b.

The fact is that when loading, Windows simply does not have the ability to change the hard drive controller driver on their own. As a consequence, the hard drive connected to the new controller from the installed OS simply does not see the system, and its further launch becomes impossible.
To avoid such a situation, there is a pretty simple solution. Even before replacing the motherboard, run Windows, go to Device Manager, Open click on the arrow point IDE ATA / ATAPI Controllers And remove all installed devices from it.

For this click right-click mice alternately on all controllers and in the opening context menu Select Delete command. If after that window appears Confirmation of device deletionTick \u200b\u200bon the point Delete drivers for this device and click OK.
In some cases, to perform the controller removal operation, the system will require a reboot. Do not do this until you walk through the entire list. Then simply turn off the computer and proceed to replace your motherboard. If you still reboot the PC, then the entire procedure will have to be done again, since Windows will restore all previously remote devices at the time of startup.
And yet, not rare cases when this method You will not help. For example, if a set of system logic (chipset) on a new motherboard will be very technologically different from the previous one. In this case, to avoid problems with the loading system, you need to get rid of all drivers that can cause them. But how to do that?
IN windows system There is one very useful utility that not even advanced users know about. It is called Sysprep. and allows you to delete system data from the operating system, including information about installed hardware, as well as user installed drivers.
In such a way to ensure successful windows download On new equipment it is necessary to clean the OS from the old system information using this utility before replacing the components! Also before starting sysprep it is better to remove all installed antivirus programs Or disable self-defense in them. This is especially true of the products of Kaspersky Lab. Otherwise, when starting an OS with a new iron, you risk getting a message: "Windows failed to complete the system setting. To resume settings, reboot. Only no reboot will no longer help you. You have to return the old equipment in place and do everything again.
So, to start the SYSPREP utility, press the Win + R key combination and in the window that opens Perform Enter the full path to the executable file: "% windir% \\ system32 \\ sysprep \\ sysprep". For those who do not know, "% windir%" is a variable containing the path to the folder in which the system is installed, most often "C: \\ Windows". And we use it, because the location system folder And its name on various computers can be different.

In the window that opens, the system preparation program in the option System Cleaning Action paragraph Switch to the system greeting window (Oobe)we leave unchanged. Next, we put a tick next to the parameter Preparation for use.

In the falling menu Options for completing work Choosing a team Completion of work. This is done in order to immediately after cleaning the system, the computer did not go to the reboot, because if it does not stop it in time, the primary process will start windows settings And you have to repeat everything again!
After performing all these simple settings, press the OK button to start the system cleaning procedure. This process is fully automatic and after its completion, the computer must only turn off. Now you can proceed to replace the motherboard.
During the first windows startup new equipment will be installed required drivers Devices and appropriate records in the operating system register. You will also have to re-enter regional standards and account settings.
Please note that when the OS will ask the username, the name of the old account cannot be introduced, since it already exists. Particularly upset about this is not worth it. Enter any name, and after the first login, the new account can be deleted and use the old one.
The only inconvenience that can expect you after downloading the system with new components - Windows re-activation. The fact is that a number of versions of this OS are attributed to the installed equipment. In particular, the most common legal windows version 7 OEM, which is installed on new desktop computers and laptops. In this case, the activation is likely to be carried out by phone, as it will not be possible to do it through the Internet due to the fact that the system will make the operation of you installing Windows On another computer, that in this version is prohibited by the terms of the license agreement.
Strictly speaking, initially designed to create a configured image of Windows, in order to reuse it. That is, simply speaking, Sysprep is a utility, for cloning the prepared OS on other computers. Most often, the installation of Windows from a preformed image is carried out in organizations where the set of basic working applications for employees, for the most part, may be the same.
True, in our time there is already a situation that there is no one computer, but at once a few. For example, one desktop PC is used as a multimedia center, the other is in the child's room for learning, and the laptop is a business tool of parents. Despite the various purpose of each device, they may well have a common software: operating system, office package, web browser, archiving, program for recording optical disks, all kinds of auxiliary utilities and much more.
In such a situation, it is convenient to have a "duty" image of the OS, from which, if necessary, you can always install the system with all the main applications. To create it, it is enough to produce once the installation of Windows and all the necessary programs on any computer, then using the SYSPREP utility, delete the system data described above. Next, you will need to burn the image of the prepared system for a separate medium: Blu-ray disk (on DVD simply not enough space), external hDD or Flash drive.
The key point here is the fact that the computer loading to remove the image must be carried out with optical disk or a USB drive, but in no case from the hard disk on which it is installed. If this happens, the primary setting process will start and the entire procedure will have to be repeated again.
Prepare boot disk and save image of Windows. in the right place can be using special applications, for example, Acronis True Image. Home, paid program, but with a visual graphic interface and all required tools. There are free alternatives, for example, imagex in the composition windows shells PE. True, in this case, prepare for working with the command line.
Unpacking the image to the desired (target) computer occurs similarly to its removal using the same programs.


