How to go to the page options word. How to use page parameters in a Word. More information about fields
Page setup in Word Office since 2007 appears on a separate menu tab. The design of the menu has changed significantly since this year's version and many users have spent significant emotional efforts in the transition to it. But after a while, changing the parameters of pages and other design elements ceased to cause confusion.
In preparation text document you have to adjust the size of the page that the computer feeds to the printer, sometimes change the orientation of the pages, almost always change the margins of the document.
Fields
In order to change document fields you need to click on the "Fields" button in the tab called "Page Layout". This will display the possible options for the fields, including the values of the width of the fields set during the last use of the program. You can choose from the proposed options or set new values, for this you need to find "Custom Fields" at the very bottom of the list. Clicking on this label opens the "Page settings" window.
Page orientation
In the window that appears, you can change the values of the width of the fields. Here also changes page orientation"Landscape" or "book". Changing the page orientation is sometimes necessary when you have to insert large tables into the document, oriented to the landscape sheet.
Paper size
In the same window "Page settings" are established and paper sizes, only this can be done in the tab of the same name. Here you can find the standard paper sizes and set them for the entire document or individual pages.

In order to change the parameters for individual pages, you need to select the text on this page and then open the "Page settings" window. In the corresponding tab, change the parameter and indicate at the bottom where it says "Apply" "to the selected text". In this way, you can change the sheet size, margins and orientation of the sheet of paper.
To quickly change the orientation and size of pages, the corresponding buttons are installed right in the "page layout" panel. It should be noted here that changing the orientation not of the entire document, but of individual sheets only possible along the following path: fields / custom fields. Where you need to select the appropriate orientation and specify: apply to the selected text.
Loudspeakers
If the text needs to be displayed in columns, then in the "Page Layout" tab there is a button " Loudspeakers», By clicking on which you can select up to three columns and adjust their sizes and the sizes of the spaces between them. This can also be applied either to the entire document or to selections.
Hyphenation
In the same tab, you can do , moreover, Word 2007 makes it possible to do this in automatic mode and in manual mode, as well as change the parameters of their arrangement.
Home tab
Document design also requires compliance with such parameters as line spacing, paragraph indentation and text alignment on the page. It turns out that many people still do it like on a typewriter, that is, using the space bar.
Paragraph
For these settings, you need to go to the "Page Layout" tab, open the "" dialog box by clicking on this icon. In the window that opens, set the required parameters: line indents, first line indents ( paragraph indent), line spacing and the spacing between paragraphs.

So in Word Office, you can customize page settings and other document layout settings. Here's how to work with the tool menu in the 2007 version.
Page setup in Word Office since 2007 appears on a separate menu tab. The design of the menu has changed significantly since this year's version and many users have spent significant emotional efforts in the transition to it. But after a while, changing the parameters of pages and other design elements ceased to cause confusion.
Like it and install it when it's on, maybe with gadgets on your left screen there will be new ones. Play with them and enjoy them. To change or add the menu on the left side of the screen, select Appearance - Menu. Here you can select generated pages for automatic menu link or create new link user with a link to the link you need or a link to the category. Dragging and dropping them again. Don't forget, once you've finished working on your menu, to hit the blue "Save Menu" button.
Change the background image and theme colors
In most themes, you can change the background from Themes - Themes - Theme Options. Here, according to the creators of the theme, there are different possibilities, so you will have to act intuitively or on a sample-error basis. But don't be afraid of anything damaged or something that can't be fixed.
The main benefits of this integration of offline and online work include. Now you can select multiple list items and click a button to perform the same action at the same time. For example, you can book or return several documents at once.
Enlarge your blogging environment to include. New features include feeds, social tags, and ratings so you can more easily track your colleagues and share relevant content. The advanced features of the Personal Website allow you to share your experience with colleagues through My Sites and Profiles. Areas of interest and accountability added to profiles help colleagues find each other in communication channels, ask questions, and answer and answer other questions.
In order to change the parameters for individual pages, you need to select the text on this page and then open the "Page settings" window. In the corresponding tab, change the parameter and indicate at the bottom where it says "Apply" "to the selected text". In this way, you can change the sheet size, margins and orientation of the sheet of paper.
Enterprise content management for documents, records, digital assets and web content
Using the activity channels on your personal websites, you can track the work of your colleagues, get information about developments in the areas of interest, and connect with others who are looking for help in the areas of interest. With the new Managed Metadata Service, you can.
Publishing and Sharing Content Types Between Web Collections and Web Applications Use the term storage to manage dates and taxonomies. Taxonomy is a hierarchical arrangement of terms. Users can apply these terms to content on your site by adding new managed metadata columns to lists, libraries, or content types. Taxonomies and terms can be centrally managed across organizations, or managed metadata using social tagging can be integrated and allow site users to create new dates when tagging content.
To quickly change the orientation and size of pages, the corresponding buttons are installed right in the "page layout" panel. It should be noted here that changing the orientation not of the entire document, but of individual sheets only possible along the following path: fields / custom fields. Where you need to select the appropriate orientation and specify: apply to the selected text.
Document collections are set up similarly to other content types. They can be configured to include default document collections that the user configures when a new instance of a document collection is created. Collections of documents, such as shared metadata, workflows, and versioning, enable teams to efficiently manage the development of a work product or set of content. A common example of a set of documents is an investment ledger used by a sales and marketing team to group different types documents for product promotion.
Loudspeakers
If the text needs to be displayed in columns, then in the "Page Layout" tab there is a button " Loudspeakers», By clicking on which you can select up to three columns and adjust their sizes and the sizes of the spaces between them. This can also be applied either to the entire document or to selections.
Hyphenation
In the same tab, you can do , moreover, Word 2007 makes it possible to do this in automatic mode and in manual mode, as well as change the parameters of their arrangement.
With this feature, you can view content in large lists or libraries based on metadata rather than folder locations. New recording controls include. Advanced web content management features make it easy to create and manage sites.
New and improved web content management features simplify website publishing and site management. Improvements include a new breakdown of results with a breakdown of information into categories, more detailed descriptions and metadata. Plus, the people you most often associate with will find search results in the best locations.
Home tab
Document design also requires compliance with such parameters as line spacing, paragraph indentation and text alignment on the page. It turns out that many people still do it like on a typewriter, that is, using the space bar.
Paragraph
For these settings, you need to go to the "Page Layout" tab, open the "" dialog box by clicking on this icon. In the window that opens, set the required parameters: line indents, first line indents ( paragraph indent), line spacing and the spacing between paragraphs.
Search features for your organization include different ways finding information and people; and how to navigate through search results. Search for a person by expert knowledge to find a user with the required skills. Advanced search results using categories such as department or function. Use phonetic pronunciation search to find similar names. ... The search model uses the functions that you or your computer provide about documents. Search now modifies content for key phrases, which can help find missing and inaccurate features to increase relevance.

So in Word Office, you can customize page settings and other document layout settings. Here's how to work with the tool menu in the 2007 version.
Page parameters should be understood as its key characteristics that determine the placement of text and other objects on it. These may include fields, dimensions, orientation.
Site management and user settings
When you search for a site, the range is automatically set to the current site and its subsites, rather than all sites. There is a new permission report for every site collection, site, list, or list item, so you can easily add or remove users or groups, change permission levels, break inheritance relationships, and manage anonymous access. In addition, you can view and set all the permission levels granted to a specific user or group.
Fields define the edges and borders of an area of text that fit it within itself. Dimensions (edit) adjust the height and width. Orientation means its location in relation to the reader. This article will discuss the features of adjusting parameters in versions Microsoft Office 2003, 2007, 2010. In addition, we will describe the setting of word wrap.
After installing the appropriate language packs, you can view the settings, help, and application content pages, such as list and column names, in your desired language. You can create and use interactive dashboards with reports, reports and performance metrics filters. You can create and use data metrics reports that summarize data from multiple data sources. It can use powerful analytics to identify traffic factors and root causes and help filters to create customized reports. Create new books and tables in these books in the browser. ... Advanced performance metrics make it easy to scroll through the hierarchy and access more detailed information.
Page settings
To set these settings in Word 2003 you need to go to the menu File and choose item of the same name. In version 2007 and later, you need to go to the menu Page layout and click on the arrow below.
Page margins
A dialog box that allows you to change fields in Microsoft Word 2003 will appear after clicking Page settings in the aforementioned way. Its approximate appearance is shown in the photo. Thus, this window sets dimensions top, left, bottom and right margins, binding. Change if desired book focus on landscape and vice versa. These changes can be applied to the entire document or to its current page.
With these advanced features, you can now create your own metrics using multiple data sources. You can also sort, filter, and display deviations between actual and target values and identify gaps or risks. Advanced analytics reports support value-based filtering, new chart types, and server-side conditional formatting.
You can change appearance forms, switch to a multi-column layout, split the form into multiple sections, validate entered information, pre-fill certain fields, and ensure that certain sections of the form are automatically shown or hidden. Workflow options have been enhanced with new actions such as predefined approval actions. Reusable workflows can be created once and then reused across multiple lists, document libraries, or content types.
In version 2007 and higher, everything is installed similar way.
Paper size
The size is set if necessary print out document on a sheet with a size different from A4 sheet. Last installed default... It is important that the paper size is supported by the printing device. As you can see in the screenshot below, the program user is trying to set the A5, A6 or B5 format. For his convenience indicated dimensions each type of paper.
Diplomas or any other work is indicated in the guidelines for how the edges of the page should look. This is easy setup... The next figure. Often in requirements, the left margin becomes wider as school work is tied to anchoring. The back of the binder then goes into the left edge.
Typically, this is 1 cm extra on the left. Setting the margins of the right page is part of the formatting work. Simplify your job and do your job. You can of course use predefined edges. However, the custom border setting is so simple that there is no problem setting it in the last menu. The Page Setup dialog box appears, in which you must set separate bounding dimensions for the top, bottom, left and right edges. The most common options are.
It is also possible to install printer parameters... The paper feed is adjusted and, like the margin settings, the settings are applied to the entire document or to the current position. For ease of selection, the window shows a sample of the printed sheet. 
If we want to be in the same document with different edges, which can be useful for customizing the field for home, work and text output, just use sections. Use the final insert menu on the Page Layout tab to insert a section break. In the new section, we can now set other page margins without affecting the original section. Of course, there can be more sections, so we can have different fields for the introductory page, the text of the thesis and the conclusion.
Does this instruction seem too complicated? Save your worries and do your job. We will make all the necessary settings for you. You can also adjust the margin for opposite pages, allow an extra margin along the inner border for document anchors, and change the margin box. Select a predefined border option.
In Office 2007 and above, the size is adjusted with a different sequence of steps:

Loudspeakers
As a rule, texts are written from one column, but there are situations, say in newspapers or magazines, when they are written in several columns. This is sometimes relevant when filling websites with content.
If the document contains more sections, the new stock is only used for the section you are in, or for as many sections as you select. If you don't match the standard fields, you can set your own.
Mirrored edges are used to set opposite pages for double-sided printed documents such as books or magazines. The margins on the left are a mirror image on the right. Adjust the added border to the border to add more space to the side, top edge, or interior of the document that you want to snap to the book anchor. This will help ensure that the text is not covered by the link.
The choice of the number of columns in the 2003 version is as follows:
- Select at the top of the menu window Format;
- Then click on the item Loudspeakers;
- A window will appear;
- Choose amount columns, their width and scope.
Can be applied to the entire document, or to the end of the document. 
Working with Office 2007 or 2010 we act differently. You need to go to the menu Page layout... Then the item is selected Loudspeakers... Here it is configured number columns and their location. They can be moved left or right.

Hyphenation
In Word 2003, the hyphenation setting is done as follows;

If the text has already been typed and you need automatically to make hyphenations, then a marker is placed in the corresponding field. If you need to transfer abbreviations or other words with capital letters, then the appropriate customization... If necessary, adjust the distance from the last character to the right edge, make changes to the item Transfer zone latitude... If you wish, you can use compulsory method. 
In the 2007 version, the customization is done differently. First you need to go to the aforementioned markup menu and select the command Hyphenation... If you choose Auto, then they will part themselves. At manual options will offer hyphenation options in the highlighted word. The decision is made by a person. To select special settings, use the command Hyphenation options... They are similar to the options in Word 2003. 
Page orientation.
Working with the package from 2003, we go to the already familiar item with fields from the menu Page settings... Two orientation options will be indicated: bookstore and landscape... The current orientation is framed. To change it, you need to put a check mark next to another item. 
It can be applied as to the whole document and to the end of the document... For the first option, select the appropriate item. When working with a package from 2007, to change the orientation, you need to go to the menu Page layout and select item Orientation... The same options will be offered.
Word page options -
This paper size, page orientation, margins in Word, hyphenation Word words,
etc. Word Page Setup feature located on the Page Layout tab. The buttons for commonly used functions are located in the Page Setup section. But by clicking on the arrow at the bottom right of the "Page Settings" section, you can call the "Page Settings" window, in which moreMore functions where you can set your page parameters.
Fields button.
Fields in Word is the indentation of the text from the edge of the page. They can be customized - shrink, enlarge, remove from all to print from edge to edge of the page, etc.
On Word pages, the standard text indentation from the edge of the sheet (margin) is set. On the right, this indent is wider, so that when stapling the printed document, attaching it to a folder, the text is not covered.
You can change the size of the field, separately top, separately bottom, left, right.For this there is a button "Fields".Click on this button and, from the list that appears, select the required field size.
If you want to set your own field size, click the "Fields" -> "Custom Fields" button. A dialog box will open and, in the "Fields" section, configure each field separately. Below in the dialog box, following the example, we look at the changes.
Also, the fields can be adjusted in view mode or in normal mode by moving the ruler.
Remove fields in Word.
You can completely remove all fields. Then the text will be placed to the very edges of the page.
How to make different fields on different pages Word document(for example, letterhead on both sides), see the article "Different fields in one Word document".
Orientation button
in the "Page Setup" section- will unfold the sheet. Will make it portrait oriented and or landscape. ![]()
The "Page Setup" Word will help to give the desired look to the document. With them you can change the page orientation, margins, etc. Let's already figure out how to find and open these same "Page settings" in Microsoft Word.
We will perform all manipulations in Microsoft program Office Word 2013, but these features are the same in Microsoft Word 2010 and Microsoft Word 2007. In Microsoft Word 2003, you just need to click on "File" and select "Page Setup".
In Word 2013, 2010 and 2007, you need to do the following:
1. Go to the "Page Layout" tab.

2. Click on the arrow located at the bottom.

3. A window with the parameters of the Word page opens.
In the "Fields" section, you can:
- Change margins: top, bottom, left, right, binding, binding position.
- Choose orientation: vertical or horizontal; or book or landscape.
- Select page parameters.
- Apply the selected settings to the entire document or to individual pages.

In the "Paper Size" section, you can:
- Choose paper size: A4, A3, etc., choose width and height.
- Adjust paper feed (first page and remaining pages).
- Whether to apply to the whole document or not.
- The "Print Options" button is also available here.

Page parameters should be understood as its key characteristics that determine the placement of text and other objects on it. These may include fields, dimensions, orientation.
Fields define the edges and borders of an area of text that fit it within itself. Dimensions (edit) adjust the height and width. Orientation means its location in relation to the reader. This article will discuss the peculiarities of adjusting parameters in versions of Microsoft Office 2003, 2007, 2010. In addition, we will describe the setting of word wrap.
Page settings
To set these settings in Word 2003 you need to go to the menu File and choose item of the same name. In version 2007 and later, you need to go to the menu Page layout and click on the arrow below.
Page margins
A dialog box that allows you to change fields in Microsoft Word 2003 will appear after clicking Page settings in the aforementioned way. Its approximate appearance is shown in the photo. Thus, this window sets dimensions top, left, bottom and right margins, binding. Change if desired book focus on landscape and vice versa. These changes can be applied to the entire document or to its current page.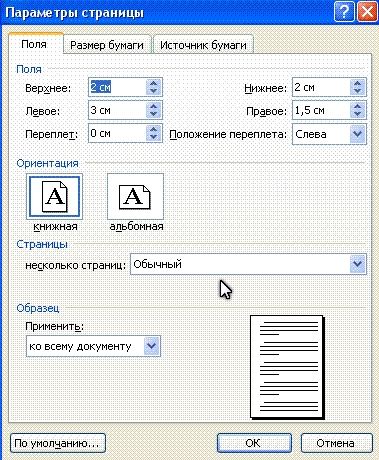
In version 2007 and higher, everything is installed similar way.
Paper size
The size is set if necessary print out document on a sheet with a size different from A4 sheet. Last installed default... It is important that the paper size is supported by the printing device. As you can see in the screenshot below, the program user is trying to set the A5, A6 or B5 format. For his convenience indicated dimensions each type of paper.
It is also possible to install printer parameters... The paper feed is adjusted and, like the margin settings, the settings are applied to the entire document or to the current position. For ease of selection, the window shows a sample of the printed sheet. 
In Office 2007 and above, the size is adjusted with a different sequence of steps:

Loudspeakers
As a rule, texts are written from one column, but there are situations, say in newspapers or magazines, when they are written in several columns. This is sometimes relevant when filling websites with content.
The choice of the number of columns in the 2003 version is as follows:
- Select at the top of the menu window Format;
- Then click on the item Loudspeakers;
- A window will appear;
- Choose amount columns, their width and scope.
Can be applied to the entire document, or to the end of the document. 
Working with Office 2007 or 2010 we act differently. You need to go to the menu Page layout... Then the item is selected Loudspeakers... Here it is configured number columns and their location. They can be moved left or right. 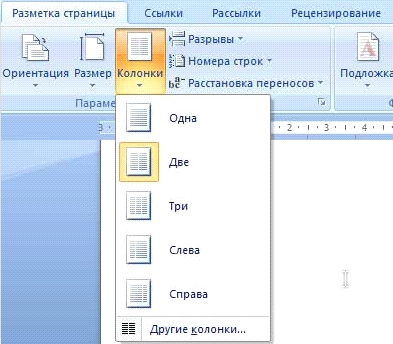
Hyphenation
In Word 2003, the hyphenation setting is done as follows;

If the text has already been typed and you need automatically to make hyphenations, then a marker is placed in the corresponding field. If you need to transfer abbreviations or other words with capital letters, then the appropriate customization... If necessary, adjust the distance from the last character to the right edge, make changes to the item Transfer zone latitude... If you wish, you can use compulsory method. 
In the 2007 version, the customization is done differently. First you need to go to the aforementioned markup menu and select the command Hyphenation... If you choose Auto, then they will part themselves. At manual options will offer hyphenation options in the highlighted word. The decision is made by a person. To select special settings, use the command Hyphenation options... They are similar to the options in Word 2003. 
Page orientation.
Working with the package from 2003, we go to the already familiar item with fields from the menu Page settings... Two orientation options will be indicated: bookstore and landscape... The current orientation is framed. To change it, you need to put a check mark next to another item. 
It can be applied as to the whole document and to the end of the document... For the first option, select the appropriate item. When working with a package from 2007, to change the orientation, you need to go to the menu Page layout and select item Orientation... The same options will be offered.


