Zyxel keenetic start quick setup. Overview of a router from Zyxel Keenetic start model. Internet provider parameters
Since its introduction on the market, this router has gained great popularity among the public. The point, of course, is not only its quality, but also the price. This is the first ZyXEL router in this price range. To buy a pretty decent router for a little over a thousand rubles is a great success. And if this is a device from a famous manufacturer, then doubly. The device differs from more advanced models by the presence of only one antenna and no USB ports on the panel. The highest supported data transfer rate is 150 Mbit / s. Plus there is support for IPTV. We will be interested in the details of setting up the Zyxel Keenetic Start router in relation to the domestic telecom operator Rostelecom.
The beginning of the setup procedure is the same as for any other router: you need to go to the browser on the computer connected to the device, and then type in the address bar - http://192.168.1.1.
Login and password for entering are as follows:
- Login: admin.
- Password: 1234.
A window will appear in which you need to press the button "Quick setup"- will start "Setup Wizard", with its help, configuring the router can be done most simply.
Setup wizard
The setup wizard guides the user through a series of screens designed to configure a single parameter. Using this wizard, setting up a zyxel keenetic start router looks like this: 
- The first window prompts you to specify the MAC address of a specific device. This setting is optional and is only needed if your provider binds the subscriber to the MAC of the network card of his computer. To find the MAC address of your board, type the following instruction in the console: ipconfig / all.
- The second window shows the IP address and DNS of the subscriber. This is also an optional setting because in the overwhelming majority of cases, an IP-shnik is assigned automatically. If this is not the case, write down the IP address and the address of the DNS server here.
- The third window is the window for authorizing the connection to your ISP. Here you specify your username and password in the network of a particular provider. To do this, you will need to uncheck the box "I do not have a password to access" and specify the required values. In many cases, you do not need to specify them.
- The fourth window contains a summary of your settings. The wizard has completed his work and offers to go to the so-called. "Web configurator"- NDMS V2.
The second part of the "Marlezon ballet"
After starting the web configurator, you will need to change standard password to access settings for something else. The subsequent actions look like this:

If everything is done correctly, then the network should work immediately. The above instruction is suitable for a zyxel keenetic start router with a Rostelecom provider; for other providers, the procedure may differ. As an example, let's take a look at the router settings for Beeline.
Instructions for "Beeline"
The web configuration for "Beeline", although it is performed in the same "Authorization" window, differs from the configuration for "Rostelecom" in several points. First, instead of the PPoE connection type, we set the L2TP type. Secondly, we set the name of the future network in the field called "Description". Thirdly, the server address in this case is not empty, but contains the value tp.internet.beeline.ru. And, finally, you need to set the authentication data - for Beeline, the login field is filled in with the personal account number with this provider. Otherwise, all settings are the same as those of Rostelecom. After specifying the parameters, do not forget to click the "Apply" button.
Buying expensive equipment is not always advisable. If you choose a router for home or office, it is better to pay attention to budget items, for example, Keenetic Start model from Zyxel. It is designed as a reliable LAN and Wi-Fi distribution device for multiple users. Let's consider the router, its main characteristics and capabilities in more detail.
The Start Keenetic router works from a regular 220 V network, it is completely autonomous, easy to configure and does not require maintenance.
The model has everything necessary functionality to connect to the Internet. But its main difference from more expensive models is reliability.
Keenetic is designed to ensure uninterrupted interaction of all electronic devices at home with the "global network". The functionality allows you to configure several types of connection - Link DUO - to the provider:
- Directly to the Internet.
- Through the local resources of providers, the so-called district network.
Network types
 Also, the Start Keenetic router creates two types of networks: home and guest. The following devices are connected to the home:
- Receiver for IPTV.
- Computers in the amount of four units over LAN (wired).
- Smartphones, laptops and IP cameras over a wireless connection. The quantity is set by the user.
The guest network is configured for a wireless connection to the Start Keenetic router bypassing the home network, thus ensuring the safety of personal data.
The first model of Start Keenetic router, unfortunately, does not have the ability to connect multiple providers and add a backup 3 / 4G channel. Also no connectivity external storage and, as a consequence, the installation of the torrent client. Absent DLNA server to manage media files from your phone.
Connection types
 The main purpose of Start Keenetic is to provide access to the Internet via a line allocated by the provider. The model works with different types connections:
- VPN (PPTP and L2TP).
- VLAN 802.1Q.
- PPPoE.
- IPv4 / IPv6.
- 802.1X.
The MIPS processor provides the ability to work with file sharing services from several devices at once at speeds up to 80 Mb / s.
The Wi-Fi wireless connection works at the latest on this moment 802.11n protocol, which provides data transfer at speeds up to 150 Mb / s. For the convenience of authorization, interaction with devices of the WPS standard is built-in.
Thus, it takes a few seconds to connect a new device.
Additional functionality
 The general package of Keenetic functions has a built-in free service Yandex.DNS, which protects a PC or smartphone from malicious sites and adult resources. The built-in internet filter also blocks the download of infected files and warns about untrusted pages.
 To work with devices on local network a managed switch is built into the router. It connects computers, receivers and other devices at speeds of 10/100 Mbps. To simplify the user's work, Start Keenetic is also equipped with a DHCP server that automatically issues an IP address to each new device.
 If there are children in the house, the parental control function provided by the SkyDNS service will come in handy. With the help of this service, the categories of sites available to the child are independently selected, and filters are created to restrict it.
 With Start Keenetic and DynDNS and NO-IP clients, it is possible to get remote access to your router. And also create file and web servers, share them with friends. In addition, use the server to monitor the house online by installing a network camera.
In general, these are all characteristics, the description of which will help you understand the Keenetic model.
Appearance
 Start looks like a rectangular box made of glossy plastic with a ribbed pattern along the body. The front is equipped with indicators showing:
- Internet connection.
- The number of devices connected via LAN.
- Availability of food.
- Wi-Fi status (on / off).
- Whether or not the Start Keenetic router was authorized by the provider.
 In the upper right corner there is a button Wi-Fi control... On the back there are five RJ-45 Lan cable connectors. Four are for connecting network devices, the fifth is for. And also on the back there is a connector for connecting a power supply, a Reset button for resetting the settings and a power button. One antenna is included as standard to enhance the wireless signal.
Connection and preparation for work
Before starting the Start Keenetic router for the first time, you need to assemble it. If you plan to connect a PC via a LAN cable, you will need a wire crimped on both sides with connectors. One end connects to the network card on a computer or laptop, the other directly to the Start Keenetic router. After that, you need to connect a cable with the Internet from the provider to the port for external WAN connection.
At the last stage, the power supply is connected. First, a wire from the unit is connected to the connector designated as "5V 2A", and after that, the unit itself is built into the 220V network. 
 For the Zyxel Keenetic start router, the configuration takes place when providing access to the Internet. It is performed through a browser, and at the first start, this procedure is performed via wired and wireless connections. If the network is encrypted, the default password used is indicated on the router itself or in the documentation for it. Configurations are configured manually or using the "Installation Wizard".
Settings
As already mentioned, to configure "Kinetic Start" you need to go through a browser on any device connected to the router. You do not need to have access to the Internet for this. Opening any browser, in the line to enter the address, you will need to drive in the IP of the modem.  It is indicated on the box with the device. But if there is no such data, the standard address for Zyxel Keenetic Start 2 and the first model is 192.168.1.1. If the connection fails, you need to change the line to 192.168.0.1.
 When several devices are connected to a computer, a completely different address is assigned to the Start Keenetic router. To find out the exact IP on Windows 7 and older, you should go to the section "Manage networks and general access", And after - the menu" Change adapter parameters ". All devices - local and virtual - connected to the network card are displayed here. All of them are signed, so the modem will be found right away.
 After that, you need to double-click on the icon with the Start Keenetic connection and then - the "Details" button. Find the line "Default gateway IP". Enter the information of this particular line in the browser.
If everything is done correctly, a window will open, where it is proposed to quickly configure the system in two modes: manual and automatic. Let's take a closer look at each of them.
Automatic tuning
 To start the installation of Start Keenetic automatically, click the "Quick setup" button. A window will appear where in offline will be checked connection, a menu with fields for authorization will open. Here you need to enter the username and password received from the service provider. If the provider uses a PPPoE connection, you must tick the box "Provider provided ..." and select a server. After all the authorization data has been entered, click the "Next" button.
 The Start Keenetic modem will automatically check for updates on its server. If there are any, you must click "Update". This will be followed by the installation of components. During installation, you cannot turn off the PC and the router itself, you must wait until the procedure is completed. After the update is completed, the device will reboot automatically, all configurations will be saved.
After the update, a window will appear with a message containing a proposal to connect the secure Internet function provided by Yandex.DNS. The service is helpful, but not required. If the Internet is weak, it is better to turn it off by unchecking the corresponding box. Now press the "Next" button and enjoy your work on the Internet.
Connecting to the Internet manually using the example of some providers
Manually connecting Start Keenetic depends on the type of connection used by the Internet service provider.
Dom.ru and Rostelecom
 First, let's figure out how to establish a connection with a provider using the PPPoE protocol used by most providers. The first step is to go to the Start settings if this is the first launch of the router. Then, when choosing the type of setting, choose not the quick one, but the "Web configurator". If the launch is not the first, you need to go to the "Internet" section located in the bottom panel and then go to the PPPoE / VPN tab. After that, click on the "Add a new connection" button.
 The submenu "Connection settings" will open, check the boxes in the first two fields. Tags will be responsible for the fact that Keenetic uses this particular protocol to access the Internet. In the "Description" line, you must enter the future name of the connection, using any name. Protocol type: PPPoE. Next in the drop-down list "Connect via ..." you need to select Broadband connection.
The following: "Username" and "Password" are provided by the provider in the contract. The specified data must be entered in these two fields. The rest should be left as default. The last point is to click the "Apply" button. To check if the connection is working, go to the "Connections" section of the Start router. Against new line with the description that was invented, a label with a green checkmark should appear.
Beeline
 To create a connection to the Beeline provider, you will need to go to the Keenetic settings again, the Internet section and select the L2TP connection. This type manual setting suitable for both Zyxel Keenetic Start ii and the first version. In the first paragraph, check the box next to "Enable interface". Next, come up with a name for the future connection. The name will be displayed in the connection string. The line "Connect via ..." requires the selection of Broadband connection.
For the main section: "Use for access ..." a check mark is set. In the line "Server address" enter tp.internet.beeline.ru. Login and password fields are filled with data provided by the operator "Beeline". The very last section of TCP-MSS is also checked.
That's it, now Start Keenetic is connected to an Internet service provider.
NetByNet
The NetByNet operator uses several types of connection, including PPPoE or l2tp. But most often it is DHCP and binding by MAC address, as well as through a static IP address. The Keenetic modem can be connected in any way. The first two types of connection were described for the operators Beeline and Rostelecom, so we will analyze the last methods in detail.
To connect via IP in the "Internet" section, select IPoE from the list of available protocols. 
First of all, you need to select the connector through which the Start Keenetic connection to the Internet will be provided. Therefore, two checkboxes are required under the rightmost WAN connector. Opposite the line "Enable interface" check the box, and in the "Description" section add any name for the connection, relying on your own choice.
The next VLAN ID field remains the default. The number 8 must be entered here. To obtain the IP address and subnet mask, you can contact your provider, but the data must be specified in the contract. Then, opposite DHCP, uncheck the box and put it in the very last section: "This is a direct connection ...". 
It remains only to configure the DNS servers for the Start router. To do this, go to the appropriate section located in the same place as the IPoE. The servers are provided by the provider, but if they are not there, third-party resources are used. For example, the value 212.1.224.6 is entered in both lines, the configuration is saved. 
To organize a Keenetic connection via a MAC address, you need to contact NetByNet technical support. The MAC is on the bottom of the router. Employees will bind the Keenetic router themselves. After that, the user will need to make a connection like the previous IPoE. At the same time, leave the IP-address and subnet mask fields blank, and check the boxes in all other sections. 
 To configure Wi-Fi, you need to go to Keenetic configurations. Then, in the bottom menu, find the icon of the corresponding wireless network. The Access Point submenu will open. To enable or disable it, you must put / uncheck the box next to the "Enable access point" line.
Now directly about the "Wi-Fi" settings on Keenetic. The second field is the name of the network SSID, by default the factory name Keenetic is used - ****. It is easy to change it to any other, if necessary. Also at the bottom there is a setting that allows you to hide your personal network from strangers - the "Hide SSID" submenu. In this case, only authorized devices will be able to connect to Wi-Fi.
If you want to connect your laptop or smartphone to hidden Wi-Fi, you will have to enter your username and password in the “Connections to a wireless network” menu on the Start device. In this case, the gadget will start searching for the network, find it and log in. But only with the correct login, otherwise the connection will not occur.
 The next field after the SSID is Network Security. Here you need to select the security protocol. The most reliable at the moment is the WPA2 protocol, but soon a new one will be introduced - WPA3, which provides a number of additional protections for devices using Wi-Fi.
If you do not use a password and the network is public, an empty encryption field is selected. After selecting the protocol, you will need to enter a password in the bottom line, one 8 characters long is enough. The code consists of any characters of the selected case (uppercase, uppercase) and special characters with numbers.
These were the main security settings on Keenetic. Now you need to specify the region. The default setting is Russian Federation, which is the correct setting. Then comes the standard latest version, 802.11bgn is automatically installed. Thanks to him, the router in offline mode selects for the connected device maximum speed data transmission, from 10 to 150 Mbit / s.
 The choice of the channel affects the data transfer rate, as well as the correctness of the work. The more devices are on one channel, the greater the delay in sending data. The number of "broken" packets will increase when sending, which will reduce the transmission speed. The main problem is that the channels are used by all routers in the same range. Therefore, it is quite difficult to find an empty one. Typically, channels 3-8 are the least commonly used. Smartphone applications are used to determine the purity of the channel.
 The next field - "Signal strength" - is responsible for the area over which the wireless network will be distributed. The parameter is independently adjustable for specific user needs. Be aware that concrete walls and wiring will greatly reduce the range. To improve the signal, the antenna should be in an upright position, and the router itself should be at a height of 1-1.5 meters from the floor level.
WPS
 The last section is the WPS function. It is used for simplified connection to Keenetic devices that have a similar capability. WPS is activated both in configuration mode and when you press the Wi-Fi enable button on the router itself. The main thing to remember is that on the Start model, a quick press on the button is responsible for enabling / disabling WPS. But if you press the key for a few seconds, the network settings will be reset, and everything will have to be done again. To connect any device wirelessly using WPS with a Keenetic router, you must enable this function on both gadgets. After that, during verification on a smartphone or laptop, a button for normal connection and connection using WPS will appear. Pressing the latter will authorize the network without entering a password.
Configuring in repeater (repeater), amplifier, adapter or access point mode
 The Start router can be configured in any of the above modes. To do this, in the configurations, go to the settings tab and the "Modes" section:
After selecting the mode, you will need to restart the modem. If Keenetic is to be used as an amplifier, Internet access is not needed on it. The main thing is that the first router, the signal of which needs to be amplified, has such access, and both of them work in Wi-Fi mode. The Start router will automatically “catch” the signal and amplify it.
IPTV
 To connect the set-top box, the Keenetic router must have the latest firmware version installed. How this is done will be discussed later in the article. After updating the firmware, connect the receiver to one of the four LAN ports. But not to the WAN port used to connect to the Internet. Then go to the configurations of the Start modem, the WAN section and in the “Select ports” line specify the connector to which the receiver is connected. It is also necessary to drive in the IP and password data provided by the provider.
IPv6 protocol
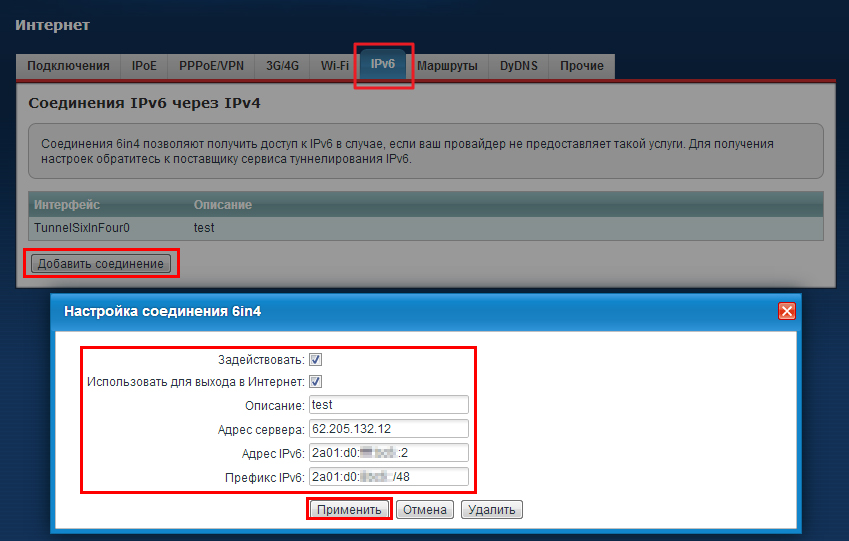 To set up a connection via an IPv6 tunnel, go to the Start setting and select the required connection protocol in the "Internet" tab. Then click the "Add connection" button. A window with settings will open; check the boxes in the first two lines. The "Description" section must be filled in, here you need to enter the invented name of the future network.
The IPv6 protocol in a Keenetic router works by creating a tunnel between IPv4 and new version... Therefore, to create it, you will need the data provided by the provider. If any, they are used to fill in the Server Address and IPv6 Address columns. In the line "IPv6 prefix" you need to enter the previous line without the "mask", that is, without the characters "/ 64" and click "Apply". That's it, now Start works according to the new protocol.
Dynamic DNS
 The connection of this function in the Keenetic model is carried out through external services. If you already have a ready-made subdomain registered on one of the third-party resources, you need to go to the DyDNS tab. In the "Used service" section, select "Other". The URL that was previously issued and copied on a third-party site is inserted into the "Server address". After that, the correct domain name is entered. The "Name" and "Password" fields must be left blank. In the last line "We use DDNS" a check mark is put and clicked "Update".
Security settings (antivirus, firewall)
To go to the security settings on the Start router, you need to go to the "Security -> Firewall" section. Here are set the rules that restrict access to certain sites. 
Going to the configurations, you need to click the "Add rule" button, after which the required window will open. Here you can choose: whether the rule will prohibit something or, conversely, allow it. Also, "Zixel Kinetic Start" chooses in which order the filter will be applied: for the home network or external addresses. To set filtering on visited resources, you need to create rules for the TCP, UDP and ICMP protocols and leave the "Ports" line in the "Any" position. 
Parental control
For installation on Keenetic modems, a schedule function is provided. It is located in "Settings", section "System -> Schedule". 
Clicking the button adds a new schedule. The menu has a convenient system for regulating the broadcast. It is possible to restrict several networks:
- The whole Internet.
- Wi-Fi.
- Guest Wi-Fi.
The menu has a choice of which specific device with limited access... After all the configurations are set, click the "Apply" button, the filter will start working. 
Setting up the printer
Unfortunately, due to the lack of a USB connector on the Start model, there is no direct printer connection to the Internet Center.
Setting up a VPN server
To connect a VPN server to Keenetic, go to the network settings and select the PPPoE / VPN protocol. Fill in the "Description" column, for example, enter VPN. Protocol type - L2TP. In the "Connect via ..." submenu, you must leave the setting defined by the Start Keenetic router. In the next two fields - "Login" / "Password" - enter the data provided by the provider. The column "Server address" shall be designated by the server provided by the Internet provider. Save configuration.
Possible malfunctions and ways to eliminate them
Most of the problems that appear when working with the Internet are solved by resetting the settings to the factory settings. If there is no connection or works slowly, it is worth checking if someone else is connected.
You also need to carefully monitor that the Start router does not overheat and is regularly cleaned of dust.
Firmware update Start Keenetic
It is necessary to update the software for correct operation home device... Later versions of the firmware are not only stable, but also have advanced functionality. Installation on Start Keenetic is done in several ways. Let's take a look at each of the options.
Through the web interface
 To update the firmware on Keenetic from a computer, you need to download the latest version of the router software from the official website. In the Start settings, go to the "System -> Configuration" sections. A list of files is visible on the page. Click on the one highlighted in blue and with a gear on the label. You will be prompted to select a new file. This is where the pre-downloaded firmware for the Keenetic model comes in handy. During the installation of the updated software, the device must never be turned off or rebooted. You need to wait until everything goes automatically.
Via mobile app
To update the device firmware via a phone or tablet, you need to do the same operations as when installing from a computer.
Resetting Start Keenetic router settings to factory settings
 To reset the settings on the "Zixel" Start modem, there is a special key located with back side devices near Wi-Fi antennas... To reset, you need to hold it down for 10 seconds. For this, it is most convenient to use a needle or an awl with a thin forend.
Output
Router Start Keenetic - good decision if you need a reliable and inexpensive modem for your home or small office. The router comes with an easy-to-use web configurator and many useful features.
Pros of Start Keenetic
Among the advantages of the router are the following:
- Choice of protocols.
- The presence of a power filter.
- Built-in system "DNS.Yandex" for filtering sites and downloaded files.
- SkyDNS to restrict access to non-children's content.
Minuses
Among the disadvantages are highlighted:
- The lack of a USB port, which distinguishes these routers from the Start Keenetic 4G and Light brothers.
- The lack of USB sharply limits the functionality: there is no torrent client, the ability to connect a printer.
Zyxel Keenetic Start is a reliable, inexpensive router for home use. It easily organizes local networks and Wi-Fi to transfer data between multiple devices. The cost of the router does not exceed 1,500 rubles, which attracts users. What else is interesting about this model, we will tell you today.
Appearance
The device is presented in the form of a rectangular case made of plastic. On the front part of the case there are indicators that fix:
- activity Wi-Fi networks;
- charging;
- the number of devices connected via the LAN;
- position (on / off);
- the authorization status of the internet service provider.
In the right sector (above) there is an option Wi-Fi control... On the back of the case there are:

- ports - 5 pcs. (one WAN port - for the Internet cable, four LAN - for connecting network equipment);
- power supply input;
- parameter reset option RESET.
Users will appreciate the simplicity and convenience of the router's control panel. Thanks to the inscriptions on the buttons and connectors of the case, the process of setting up the router will take very little time.
Connections
To gain access to the provider's services, Zyxel Keenetic Start interacts with several types of connection:
- VLAN 802.1Q;
- IPv4 / IPv6;
- 802.1X;
- VPN (PPTP and L2TP);
- PPPoE.
The total signal transmission rate for simultaneous operation of several devices is 80 Mb / s. Wi-Fi transmission is supported by 802.11n protocol.
Preparation for operation
Before proceeding with the settings, you should assemble the router. Connecting the router to a computer via a LAN cable is carried out using a wire equipped with connectors. One connector plugs into the PC's NIC, the other plugs into the router slot.

For Wi-Fi router Zyxel Keenetic Start is configured over two connections (Wi-Fi and wired) via a standard browser. Here you may need information about the password, since access to the network may be limited by encryption. This information indicated on the body of the device (or in the instruction manual). This is usually admin / 1234.
Settings can be made either manually or using the "Installation Wizard".
You can also watch the overview and configuration of the Keenetic Start router in video format:
Settings
To configure the Zyxel Keenetic Start router, just connect a PC or laptop to the router, go to the browser and specify the IP address in the address bar of the device (indicated on the router box).

If there is no IP data, you should specify the standard address for Zyxel Keenetic Start: 192.168.1.1. In case of problems during connection, it is recommended to correct the combination of numbers: 192.168.0.1.
Upon successful login, the user will be prompted to set the parameters in two ways - manual or automatic.
Manual setting
To properly manage a Keenetic Start Wi-Fi router, it is imperative to know the type of connection offered by the provider (most Internet service providers use the PPPoE protocol).
At the initial start-up of the equipment, refer to the Start parameters. With this option, it is recommended to choose not the quick setting type, but the "Web configurator".

When restarted, the parameters are set in the "Internet" option (in the PPPoE / VPN tab). Here you need to activate the "Add a new connection" option and adjust a number of settings:
- in the "Connection settings" menu you will need to mark the labels (in the first two fields);
- in the "Description" field, specify the name of the connection (any);
- "Protocol Type" - PPPoE;
- "Connect via ..." - Broadband connection;
- "Username" and "Password" - according to the data reflected in the agreement with the provider.

Save the rest of the parameters by default and commit the changes with the "Apply" option. Checking the connection status is available in the "Connections" section of the router. A label with a green mark opposite the new name will indicate the correct operation of the data transmission channel.
Automatic tuning
For automatic configuration, it is enough to activate the "Quick configuration" option and wait until the connection is verified. In the field that opens (for authorization), you will need to specify your username and password. When using PPPoE, check the box "Provider provided". If a different type of connection is used, then the login and password data must be entered manually (provided by the Internet service provider).
When the "Next" option is activated, access to updates will open (if available, it is recommended to update). At the end of the installation, the computer will reboot and fix the configuration. The PC and router cannot be turned off during the installation process.

After the reboot, you will be prompted to activate the safe internet option (Yandex.DNS). It is not recommended to connect this service if there is a low speed of Wi-Fi.
Wi-Fi setup
Keenetic configurations are responsible for configuring Wi-Fi parameters. You can activate (deactivate) the access point in the Wi-Fi menu in the "Access point" tab (by ticking).
The next field in the Wi-Fi menu displays the SSID name, which you can change as you see fit. Users are given the option to hide their network from others. This option can be activated in the "Hide SSID" field.

In this case, when connecting new devices, you will have to re-enter the username and password (in the "Connections to the wireless network" tab).
Overview of features and capabilities
Network protection
The most secure security protocol is WPA2. This is what it is recommended to select in the "Network protection" field. Next, it is proposed to set (check) the following parameters:
- password (at least 8 characters);
- region;
- version standard - 802.11b / g / n (installed in automatic mode).

If you plan to organize a public network (without a password), then the encryption field should be left blank.
Channel selection
The speed of the Wi-Fi wireless network depends on the channel selection. If one channel is used by several devices, then the data transfer rate will tend to the minimum.
It is quite difficult to find free channels. They are used by all routers operating in the same sector of the signal. The least loaded channels are 3 to 8.
Signal strength

This parameter is set independently (depending on the presence of interference in the signal range). Walls, furniture and wiring are obstacles that can significantly degrade the quality of your connection.
If the router is fixed at a height of at least 1 meter from the floor level, the signal coverage area will increase. It is also recommended to fix the router antenna in a vertical position.
WPS
The WPS option is used to connect devices with a similar function. It becomes active as with turn on Wi-Fi and during the setup process.
It should be borne in mind that if you press the WPS on / off button for a long time, the network parameters will be reset and all the settings will have to be repeated. Therefore, this function can only be activated with a short press.
Before connecting equipment using WPS, you need to enable this option on all devices. The appearance of the "Connect using WPS" button on the authorized device indicates successful connection. When you press the "Connect ..." button, access to the network opens in automatic mode (no password is required).
Setting modes
The operation of the Zyxel Keenetic Start Wi-Fi router can be configured in the following modes:
- access point;
- amplifier;
- repeater (repeater);
- adapter.

Parameter setting is available in the "Modes" section (in configurations). After setting the mode, you should reboot the device. When using a modem as an amplifier, the Internet is not needed. Internet access is required for a router, the signal of which will be amplified by Keenetic (both devices must work in Wi-Fi mode).
IPTV
It is possible to connect the set-top box after updating the software to the latest version. Next, you need to do the following:
- Connect the receiver to the LAN port.
- Go to the WAN section (in the modem configurations) and in the "Select ports" field designate the connector to which the device is connected.
- Specify IP and password (information from the provider).
IPv6 protocol
IPv6 connection settings are available in the Internet section (in the Start settings). Here you should select the required protocol and activate the "Add connection" option.
In the "Description" field, specify the name of the network (optional), and tick the first two lines. You will also need the information provided by the provider (to fill in the addresses: server and IPv6). In the "IPv6 Prefix" field, copy the previous line, but without the "/ 64" symbols and activate the "Apply" option.
Security Settings
To configure security settings, refer to the "Security" section and set restrictions on access to certain sites in the "Firewall" panel. To do this, it is proposed to perform the following actions:
- In the configurations, activate the "Add rule" option.
- In the field that opens, select a ban (or permission).
- Determine the order of the filter (personal network, external resources).
- Configure parameters for protocols: ICMP, TCP, UDP.
- In the line "Ports" set the parameter "Any".

You can add the free Yandex.DNS service (built into Keenetic) to the security settings. It will also protect your computer from infected resources: it will block the download malicious files and warns of potential threats.
Parental control
This function is supported by SkyDNS service. Here it is possible to independently determine the list of sites available to small users.
To activate the restriction, the "Schedule" option is provided (section "System").

Setting a new schedule limits both guest Wi-Fi and data transfer in general. The administrator can also select a specific device (to restrict access). The set parameters must be fixed with the "Apply" option.
Setting up a VPN server
The VPN server connection algorithm assumes the following actions:
- Select PPPoE / VPN protocol (in network settings).
- Enter "VPN" and select "L2TP" in the "Description" field.
- Login and password entry (provider data).
- Entering data in the "Server address" field (from the provider).
- Configuration activation.
Reset
Resetting the settings in some cases helps to solve a number of problems that arise during the operation of network equipment. To reset the settings, use the corresponding button located on the back of the device (next to the antenna).

Software Update
For stable operation and expanding the capabilities of the equipment, it is recommended to update the firmware every time an update is released. There are two ways to update the software on Start Keenetic:
- Through the web interface. At this way it is proposed to download the updated version of the software from the official website. Then turn to the "Configuration" section and activate the file indicated by the "gear" (blue).
- Through a mobile application. Procedure for software update via mobile app corresponds to the above method (via the web interface).
During the installation of the software, you must not turn off (reboot) the equipment.
Output
The advantages of Kinetic Start are determined by the following indicators:
- built-in service "DNS.Yandex" (ensures the security of connected devices when working in the network);
- network filter;
- the ability to choose a protocol;
- availability of SkyDNS (for parental control).
The disadvantages of this model include the fact that there is no USB port. This circumstance limits the functionality of the router (excludes the possibility of using a printer).
We hope we have answered all your questions! If something is not clear, or we did not give full overview do not hesitate to write! Our friendly admins and authors are always happy to communicate!
An inexpensive but very functional entry-level Internet center with good technical specifications is Keenetic Start. Setting it up, technical specifications and other important nuances associated with his work will be described in detail later in the text.
Device capabilities
Let's start with the technical specifications of this network device... Everything you need to deploy a full-fledged local computer home network is in ZyXel Keenetic Start. WiFi setup is easy. This wireless standard allows information to be transmitted at speeds up to 150 Mbps. But its coverage area is limited to a radius of 10 meters. This is quite enough for an apartment or a small office. Five Ethernet ports make it possible to organize a wired section of a computer network, which can exchange information with the global web at speeds up to 100 Mbps. They can be reconfigured if necessary. Also, this device has a convenient display system. The following LEDs are displayed on the front panel: power supply, indicators of operation of each wired port and wireless coverage. There is also a separate indicator of the presence of an Internet connection. The router itself is based on the MIPS® CPU model 24KEc with clock frequency 360 MHz. There is no separate USB port in it, but there is support for network printers. This allows you to turn this router into a print site if necessary. It also integrates 32 MB of RAM.

Equipment
Everything you need to work is included with this network device. In addition to the router itself, there is a power supply crimped for configuration and an antenna for transmitting a wireless signal. ZyXel Keenetic Start is described step by step and in great detail in the user manual. The second important document included in the kit is the warranty card. Also with them in a paper sleeve is a CD with the necessary software... With it, you can easily and simply configure the router.
Appearance and controls
As noted earlier, this router model has an indication system displayed on the front panel. It consists of 8 LEDs. The first one shows the presence of power. When the router is turned on and booted up, it blinks. As soon as the initialization process is finished, it starts to glow continuously. The "zero" LED is tied to the input port by default. It shows the presence of a connection to the provider's equipment. Also, the last, eighth LED, which indicates the receipt of information from the Internet, should flash synchronously with it. The next four indicators show the output of information from the network device. Setting up Keenetic Start allows you to programmatically change the assignment of each of the ports. You can even configure so that there will be two input ones, and three will work for data output. On the back side are the previously indicated ports for connecting a twisted pair. To the left of them there is a connector for installing the antenna and a button for resetting the current parameters. But on the right are the power supply socket and the power button of the router. Another important control element located on the top cover of the device is the WPS button. It allows you to quickly connect your computer, smartphone or tablet to a wireless local area network. You just need to press it and immediately start the connection procedure. In this case, the security password does not need to be entered.

Provider parameters
The ability to change the parameters allows you to use in almost all local computing ZyXel networks Keenetic Start. Configuring Rostelecom consists in setting the following parameters:
- The protocol for organizing access to the global web is PPPoE.
- Login and password specified in the contract.
- Be sure to set the option that automatically obtains the network address.
In turn, the ZyXel Keenetic Start Beeline setting provides for the introduction of the following parameters:
- The type of protocol used is L2TP.
- The server address must be tp.internet.beeline.ru.
- Login and password, as in the previous case, are taken from the contract.
Leave all other parameters unchanged. By analogy with the previously mentioned examples, you can configure this Keenetic for any provider. In any case, it is necessary to find out this information in advance, so that later you will not be distracted by its refinement in the process of parameterizing the router.

First connection
The first stage in the configuration process is the correct switching of Keenetic Start. The setup begins with this operation. When configuring a router for the first time, you do not need to be connected to the Internet. It is enough just to install the power supply unit into an outlet, and its cord into the corresponding socket of the router. On the other hand, it is necessary to use the complete twisted pair, which will organize the transfer between the network device and the computer. The latter can be a laptop, netbook or computer. We install one end of the wire into the blue port of the router, and the other into the PC connector. As soon as such a system is assembled and the correctness of the previously specified connections is checked, we turn on the computer and the router, wait until they are loaded. At this point, the first stage, consisting of switching equipment, is over, and you can now proceed with configuring ZyXel Keenetic Start. PPPoE or VPN configuration is performed in the next step.

Quick setup
Configuring a Keenetic Start router programmatically consists of the following stages:
- We go into network connections and delete all previously created connections to exclude the possibility of conflicts. To do this, in the lower right corner we find the icon of the Network Control Center and click on it. Select all networks and delete them by pressing the "Del" button.
- Then, in the same window, go to the "Adapter parameters" item. In the list that opens, we find the required wireless router and set the automatic acquisition of the network address and DNS.
- We launch any of the installed browsers. Then we enter 192.168.1.1 in it and press "Enter".
- In response, a request will appear with a login and password, which are indicated on a sticker on the top cover. It is them that need to be introduced now. After typing them, press the "Login" button.
- As a result of performing all the previously specified manipulations, the main router settings window will open.
- The next step is to go to the "Authorization" section. Here we set the connection protocol, the login and password specified in the contract from the provider, receive the address automatically.
- Then you need to save the changes made by clicking the appropriate button. We close everything earlier open windows and turn off the equipment. Then you need to disassemble the circuit.

Reconnection and installation
Now you need to install Keenetic Start to a permanent place. The configuration of its software components is over. You need to install the router so that the wire from the provider can easily reach it. There should also be a power outlet nearby. Well, to ensure maximum coverage, it should be located in the center of the apartment. After installing the router, we connect it. First, we put the cord from the power supply into the corresponding socket, and install it into the outlet. We install the wire from the provider in the blue port. If there is a wired segment of the local area network, then we connect all the necessary wires to the yellow ports 1 through 4 on the back of the router. Once the switching is done and checked, you can apply voltage to the network device by pressing the POWER button. After that, it will start downloading. At this time, the eponymous led indicator will flash. As soon as he stops doing this, the router is loaded and ready to work.

Establishing a connection
The next step is to connect your computer to the ZyXel Keenetic Start router. Setting the parameters of the network device is over and you need to connect the individual components of the local area network. To do this, the router, PC, smartphone or tablet must be turned on. It is not possible to establish a connection while loading any of the previously specified devices. The wired connection is established automatically, but in the case of Wi-Fi, certain manipulations must be performed. On the PC, we find the logo of the Network Control Center in the lower right corner of the screen and click on it. In the list of available network connections choose the name of our network. A prompt with a password will appear in response. We enter the one that was specified at the stage of configuring the router. The algorithm for setting up a smartphone or tablet is similar. The only difference is that you need to use the status menu, which is located at the top of the device.
IPTV connection
It is not for nothing that the manufacturer calls the "Internet center" this model ZyXel Keenetic Start router. Setting its internal parameters in a certain way allows you to connect to it IPTV set-top box... Physically, they can be connected using a compressed twisted pair cable. You can even use the supplied cord. The output port of the router is configured to provide information, and the IPTV set-top box itself is configured in the same way as other elements of the local area network.
Test
Now you need to test the software ZyXel settings Keenetic Start. The configuration of the network device at the final stage must be checked without fail. It runs as follows:
- The computer and router must be powered on.
- A wireless or wired connection to the global web must also be established.
- We launch any of the Internet viewers installed on the PC.
- In its address bar, enter yandex.ru and press "ENTER". If everything is done correctly, it will open start page previously specified search engine.

Outcomes
No wonder the manufacturer positions itself as an entry-level Internet center Keenetic Start. Its setup is quite simple, and its capabilities allow you to easily create a small computer network... it perfect solution for home and small office.
Many people ask themselves the question of configuring routers, because each manufacturer develops its own firmware for devices and because of this, you can easily get confused in the many nuances and subtleties of work. Even individual models from the same manufacturer may have different settings. But Zyxel's Keenetic series routers differ from competitors in that they have identical settings. Consider here how to set up a wifi router zyxel keenetic start.
Initial configuration of the router "out of the box"
So, the router is unpacked and plugged into an outlet, now you need to connect the wire provided by your ISP to the WAN port of the router. The WAN port on Keenetic series routers is always blue. And connect any of the LAN ports (they are yellow) with a patch cord to a computer or laptop. One meter long patch cord is usually included in the delivery. The port assignment can be changed later, but by default you should always connect this way.
Now you can go directly to the setup. For this on new page any convenient browser you need to dial the following address: http://192.168.1.1. The router will ask for a username and password. The default username is "admin" and the password is "1234". If you are not sure which address, username and password to type, then this data can be spied on the bottom of the router on the nameplate.
On the page that opens, a special assistant will be opened, which, with the help of prompts, will guide basic setting... In order not to delve into the intricacies and carry out the configuration as quickly as possible, you need to click on the "Quick setup" button at the bottom of the screen. It is necessary to keep before your eyes the configuration sheet, which is provided by the provider, and to find out all clarifying questions directly from him, for example, the next window asks whether the provider uses filtering by mac addresses. There are three radio buttons on the page:
- the provider does not use a filter;
- use the current mac of the router;
- specify any other mac (for example, if the connection was previously configured on the computer, then you can enter the mac address of the computer's network card).
You can call the provider and ask to change the mac address to a new one or dial in command line type "ipconfig / all" on the computer and rewrite the address into the router.
The next step is to select the parameters of the IP address. If the provider provides a static address to each of its clients, then you need to select "Static address" from the drop-down list and enter it. Usually, the provider's clients work through a DHCP server, so you need to leave the default settings, i.e. "Automatically". As additional option it is possible to manually specify data on DNS servers.
The final configuration step is to specify the user and password for authorization on the provider's server. If there is no authorization, then you need to check the box, indicating that there is no password. This is all initial, but there will be no connection to the Internet, because the setup wizard does not ask which protocol is used to authorize the user, so the router needs to be slightly "finished".
You need to click on the "Web Configurator" button, which will redirect to home page router settings. This page displays the necessary information about the operation, the number of connections, connected ports, information about firmware updates or individual components, etc.
First of all, you need to change the password to access the settings so that attackers cannot gain access to the local network. This is done automatically the first time the client opens the configurator. Later, if necessary, you can add other users with different access rights in the "Security" section.
Configuring a connection to a provider
Now, it is being configured connecting a zyxel keenetic start router to the provider. This is done in the "Internet" section. The "List" tab informs about all existing connections to the global Internet. By default, only the Broadband Connection interface is present. Having entered it, you need to make sure that the interface is turned on, the WAN connector is used, or assign any other connector. The main thing is not to forget to switch the wire to the connector that has been selected.

- Enable - enables or disables the interface.
- The used authorization protocol from the drop-down list. Issued by the provider. The following types of authorization are commonly used: PPPoE, PPTP, or L2TP.
- Use to connect to the Internet - check the box to use the interface for Internet access as the main connection.
- Connect via - indicates the WAN port. In most cases, this is the Broadband Connection we configured previously.
- Username and password are provided by the provider.
- Authentication algorithm - specified by the provider.
- Service name - the name of the connection, which will be visible in the "List" tab.
The rest of the fields are optional and are filled in according to the settings sheet provided by the provider. By filling in the fields and clicking the "Apply" button, a new connection will be added and an Internet connection will be established.
When Broadband Connection is allowed to connect to the Internet occurs automatic setting NAT, i.e. broadcast of internal network addresses to an external Internet address. This is required for many data transfer services such as online games or torrent clients. How to configure address translation for specific services, for example, a web server, has already been written earlier in the article "What is NAT in a router".
Home LAN and WiFi setup
Now you need to figure out how configuring the zyxel keenetic start router to work in a local network. For configuration you need to go to the section " home network". There are several tabs in the section:
- IP address - indicates the address of the router in the local network and the subnet mask. You can leave it unchanged or specify any convenient address from the valid range of addresses for local networks.
- DHCP server - specifies the pool of addresses for the server, the starting address and DNS servers for a local network.
- Static bindings - allows you to statically assign an address to each connected machine in the local network.
Setting up a Wi-Fi router zyxel keenetic start produced in the WiFi section:
- On the operating mode tab, a switch is put on the "Access Point" to organize the work of your own Wi-Fi network.
- The Access Point tab allows you to set the basic parameters of the wireless network, such as the network name (SSID), password or network access key, the number of a specific radio channel and the degree of protection (data encryption method).
- Guest network - allows or denies connecting to the network as a guest, without entering a password.
- Access List - sets the parameters for filtering specific devices by creating black or white lists.
- Connections - a list of all currently connected clients.
Now we know how to connect a zyxel keenetic start router to the Internet and make basic settings. there is absolutely nothing complicated about this, especially since there are good tips and descriptions for each option on each section of the settings and on separate tabs.