General information about nodes, workspaces and pages. Web node. Creating and Management What features the web node
In addition to the masters, you can use templates when developing Web nodes. They help to create a standard structure of the Web node.
To create a Web site using one of the proposed templates, follow these steps:
- On the menu File (File) Select the command Create Page or website (New page or Web node).
- On the panel that appears, select the command Website templates (Web Site Templates).
- Opening dialog box Website templates Contains templates for creating Web sites (Table 11.2).
| Template | Purpose |
| Single-page web (One Page Web) | Creates a Web node containing one page |
| Customer Support Web Customer Support Web) | Creates a Web node to support buyers of your products on which they will be able to place their comments and suggestions regarding the quality of goods and services |
| Empty Web Node (Empty Web) | Creates a blank web node |
| Personal website (Personal Web) | Creates a multiplocked personal web-node |
| Project Web Node (Project Web) | Project WEB-node. This template can be used as a coordination and discussion center for maintaining a large project. On the pages of the Web site, you can post information about the project participants, the state of affairs, discuss the most important issues, etc. |
| SharePoint Based Working Group Web Node SharePoint-Based Team Web Site) | Web node for cooperation. Contains a calendar of events, a library of shared documents, a list of contacts, tasks, etc. |
Table 11.2. Templates used to create Web nodes
Highlight the template icon, the services of which you want to use the cursor. At the same time in the area Description (Description) A brief assignment of the selected wizard appears.
- In the field (Specify the Location of the New Web), enter the location and name of the Web node being created.
- Press the button OK.
In accordance with the selected template, the FrontPage program generates the desired Web node template and opens it in viewing and editing mode. You can proceed to edit the created model of the Web node.
Single-page Web site creation pattern
The first in the list of proposed templates and masters is located template. Single-page web (One Page Web), designed to create a single-page Web node. Using this template The FrontPage program generates a web node structure consisting of folders, and adds one empty web page to it.
To view the structure of the Web node created using a template, display the panel in the program window. List of folders (Folder List) by selecting in the menu View (View) The command of the same name. The page that is included in the created Web node structure is saved in the file named index.htm. The default is meant that this page will be used as a home. Open this page by double-clicking the name of the index.htm file. The page will be opened in the edit mode in the work area of \u200b\u200bthe program FRONTPAGE (Fig. 11.36).
Fig. 11.36.
Comment
The structure of the Web node created on the basis of a single-lane web site template, in the future you can change: add new folders and any required number of pages.
Empty Web Node
To create an empty Web site used template Empty Web Node (Empty Web). When using this template, the FrontPage program generates the structure of a Web node consisting of folders _private and images.
After the template is completed, the created WEB node opens in edit mode. On the folder panel you can view the structure of the Web node. It does not contain any page.
Comment
Template Empty Web Node (Empty Web) is convenient to use in cases where to create homepage You intend to use a page with a more complex structure, for example, including a frame.
Multi-page personal web site creation pattern
Using the template Personal website (Personal Web), you can quickly create a personal Web node. In it, you can place personal information, photos of friends, reference information, as well as using links, view the most frequently visited page on the Internet. In addition, this Web site is an excellent starting area for those who proceed to explore the possibilities provided by the FrontPage program.
To create a personal Web node using a template, follow these steps:
- On the menu File (File) Select the command Create (New) and then in the submenu opened - option Page or website (New page or Web -Zel).
- On the panel appeared Creating a web page or node Select Team Website templates (Web Site Templates).
- In field Specify the location of the new website. (Specify the location of the new web) opened dialog box Website templates Enter the location and name of the Web node being created. Let's call the Web node, for example, MY. Pers_ Web.
- Double-click on the icon Personal website (Personal Web). The process of creating a template begins. After some time, the obtained WEB node for viewing and editing will open in the main window of the FrontPage program (Fig. 11.37).
On the panel List of folders The page files of the created Web node are located. Choosing the mouse cursor alternately files, browse the pages offered to you. Using FrontPage tools, you can modify them, change the names of the pages, add new pages to the Web node, insert your text.

Fig. 11.37. Personal Web node created using template
Microsoft Frontpage XP is a modern integrated shell to build separate Web pages and entire Web nodes. Even an inexperienced user, unfamiliar with programming languages, can use the FRONTPage to create your own WEB node and publish it on the Internet. WEB-editor FrontPage will be an excellent addition to the arsenal of an experienced Web designer.
Building a Web
In this lesson, you will get acquainted with the new microsoft app Office - FrontPage Web site editor. You will learn how to create and modify the structure of the node. Below lists some components and operations considered in the exercises:
- wizard WEB-node;
- task list;
- view node folders;
- navigation;
- checking hyperlinks;
- reports;
- color diagram of the node;
- shared page fields.
Web node is a set of files in HTML format located in a specific folder and related hyperlinks. One of the WEB node files is assigned to the main thing, it is a homepage and opens in the user's browser when connecting to the Web node. The remaining Web pages are displayed in the browser window as they transition to them by hyperlinks. In addition to HTML files, the node includes a set of graphic objects of GIF or JPG format, designed to design pages. With the development of browsers offering a wide variety of extensions hTML standardIn the Web sites, other formats files have become increasingly.
Creating a Web node
FrontPage XP is an integrated environment containing the web page editor, the node structure control modules and the node publish tools on the server. With FrontPage, even not familiar with hTML language Newbie can construct a well-workable WEB-node. In the hands of an experienced user FrontPage becomes a powerful tool that allows you to build Web nodes of any complexity.
Note
In FrontPage XP, three separate modules - page editor, a node linker and a Web server support tools are combined into one integrated shell, providing convenient access to all tools.
Wizard Web
To create a complete Web node, there are no multiple HTML files in one folder. A competently built knot has a well-thought-out structure. This facilitates the user search for the necessary information. If you do not have much experience with web pages, the wizard of the Web site will help to properly complicate the node, and you will only have to fill the pages of content. To resort to the wizard services, follow these steps.
- Run FrontPage.
- Select File command > Create ^ page or Web node (File > New > Web). In the application task area, the Create Web Page (New Page OR WEB) with a list of templates and masters, which can be used to build a Web site (Fig. 3.1).
- In the Creating Template section, click on the web site Templates icon (Web Site Template) and in the dialog box that appears, web site Templates (Web Site Templates) Click the Corporate Web Node Wizard .
- In the Options section field, enter the folder name in which the node files will be stored (I will use the folder with: \\ My documents \\ MU Webs \\ Corporate).
Fig. 3.1.
- Click on the OK button.
- In the first window of the wizard, click the Next button.
The second window offers a list of basic Web pages that can be enabled in a new Web node:
- Home page (home page);
- What's new (What "s new);
- Products and services (Products / Services);
- Table of contents (Table of Contents);
- Feedback (Feedback Form);
- Search form.
- Leave all checkboxes installed and click Next. The next wizard window shown in Fig. 3.2, proposes to determine the view of the home page. By installing and dropping the checkboxes of this window, you add or remove the corresponding partitions of the home page.
- Install all four check box.
- Click the Next button.

Fig. 3.2.
- The tenth window of the wizard sets the general design of all pages. Check the boxes of this window in accordance with Fig. 3.3, then double-click the Next button.

Fig. 3.3.
- Enter the full name of the company, the same name, abbreviated to one word, and the address of the company. Click the Next button.
- In the next window, enter the company's telephone, fax number, web-wizard email address and information support address. Click two times on the Next button, and then on the Finish button. The wizard will generate a new Web node and will open it in the task list mode with a list of actions that must be performed to obtain the completed node. Points of this list shown in Fig. 3.4, were added by the Master. They include operations with which you should fill the semantic content of the formed Web pages. In the process of developing a node, you can manually add new tasks associated with a particular Web page. You will learn this in the next exercise. The list of tasks is always at hand, it is stored with the WEB node files and will not allow forget about unfinished operations. To open it, just click on the Tasks button (Tasks) of the modes panel.
Website is a group of interconnected web pages located on an HTTP server on the Internet or intranet. Most websites have a homepage that is associated with other pages using hyperlinks you can use top-level sites and subsidiaries to split content on individual, separately managed sites. Upper-level websites may have several subsidiaries, each of which, in turn, may be subsidiaries. This whole structure is called the family of websites.
Such a hierarchy allows users to have one master working site for the whole group, sites for performing individual works and general sites for third-party projects. Top-level websites and subsidiaries allow control of different levels for the capabilities and parameters of sites. The website administrator controls the creation and change of content on the site, as well as access to it.
What is the workspace?
The workspace is a unique website providing members of the Group tools and services for collaboration with documents and resources related to meetings. The workspace may contain lists with data, such as related documents, group members and references. To create a website of the workspace, you need to have permission to create subsidiaries for this SteePoint site. Windows services SharePoint Services allow you to create the following work areas:
Website workspace | Description |
|---|---|
|
Working area for documents |
The template, on the basis of which the site is created to collaborate the participants of the group with documents. It contains a document library for storing a basic document and auxiliary files, a list of tasks to assign instructions, as well as a list of references to the resources related to the document. |
|
Basic Workspace for Assembly |
The template for creating a site that provides everything necessary for planning, organizing and tracking meetings. It contains the following lists: "Objects", "Participants", "Agenda" and "Document Library". |
|
Empty working area for assembly |
The template for creating an empty site of the workspace for meetings that can be configured with regard to your requirements. |
|
Working area for meetings - solutions |
A template for creating a working area for meetings that the group members can use to view related documents and record decisions. It contains the following lists: "Goals", "Participants", "Agenda", "Document Library", "Tasks" and "Solutions". |
|
Working area for meetings - social |
A template for creating a site providing planning tool for activities that includes a discussion board and drawing library. It contains the following lists and web parts: "Participants", "Guidelines", "Image / Logo", "Necessary Items", "Discussions" and "Pictures Library". |
|
Multi-page workspace for meetings |
The multi-page template for creating a website providing everything necessary for planning, organization and tracking of assembly. It contains the following lists: "Goals", "Participants" and "Agenda", as well as two empty pages that can be configured in the desired way. |
Web-sites' templates
Windows SharePoint Services has the following teamwork templates that can be used when creating sites:
Site template | Description |
|---|---|
|
Group site |
This template creates a website that can be used to create, streamline data and exchange them. It contains a document library and basic lists, such as "ads", "Calendar", "Contacts" and "Links". |
|
Blank site |
Template to create a website with an empty home page that can be configured using a browser or web page editor compatible with Windows SharePoint Services, adding interactive lists And other features. |
|
Vicky Site |
The template for creating a website where you can easily and quickly add, change and link web pages. |
|
A template for creating a website where information can be published and allow other users to comment on it. |
|
|
Application templates |
These templates are designed to meet the requirements of specific business processes or task sets. They can be used in such standard situations as the management of the service technical support or tracking campaign tracking. To learn more and download templates, see Web Page Application Templates for Windows SharePoint Services. |
What is the page?
The web page is part of the site on which lists are displayed with information that allow the group participants to organize information that they need, for example, on the topic, execution date or author. For example, you can:
Filter Content to view only the necessary data.
Hide information that you are not interested.
Change the order of information output.
Tune custom viewsthat will enable the band members to quickly concentrate on important information.
Web-site developmentals
Create a Web node for the template
In Chapter 4, you created web pages templates. In this application, create a WEB-node template yourself. Although the web-node template is more complicated than a single-page template, developing it does not cause special difficulties. You create and save the Web node as a common one, and then copy the new Web node to the template folder.
The following example demonstrates how to create a web site template and how to use the steps to use it to create nodes.
1. In FrontPage, create a new Web site based on the Empty Web template. Provide the node name webtemplate.
2. Navigate to the Navigation view mode. Click on the Standard New Page Diplot button to create a homepage.
3. Click right-click On the Patogram of the home page of the panel and activate the Rename command of the context menu. Will the new "home page" header and press the key.
4. If the Folder List panel is not displayed, activate the folder VIEW command. Click on the home page on the right pane. Run the NEW PAGE button to add another page in
Web node. In FrontPage immediately after creating the page, it is proposed to rename the name of the page file assigned by default. Assign a new page name Pagel and press the key.
5. Create three more pages by assigning them the names Page2, Page4.
6. Take the Pagel.htm page successively, page3. HTM, Page4 Page4.1-i.tm From the Folder List panel to the right panel, placing them in oneboard under the home page (by default, the names of the page files) are used as heading. Thus, these four entrances will become a subsidiary towards the home page.
7. In the Navigation view mode, run two clicks on the page of the page on the right panel (the interval between clicks must be quite large, the check program did not perceive and sample clicks) and enter the new page headers Page1, CN Rannitsa2, Pagez and Page4 WebTemplate WebTemplate Structure Shown in rice B.1! Now you can edit the contents of pages in viewing mode.
Rice B.1 WEHFEMPLATE STRUCTURE HCNAFUFION
Copying files To create a web site template by creating a Web node of the required structures, you should convert it to the template. To do this, you need to create a folder with the extension of themes (its name can be arbitrary), which should be found along the next path, counting from the Windows \\ Application Data root folder \\ Microsoft \\ Frontpage \\ Webs \\. Then you need to copy all the WEB node files in E1U folder and add files. Necessary in order for FrontPDGE to perceive the Web node as a copy pattern and file creation will be implemented in Windows EXPIOIER
1. In Windows Explorer, turnigade to the WebTemplate Web site folder (default path with \\ inetpub \\ wwn \\ root \\ webteinp! ATC \\) in the folder there must be five HTML files created in the previous section, as well as other folders with additional filesused by the FrontPage Web nodes (Rice B 2) Ei FRONTPAGE folders are described in Table B1 Click on the Right-click folder (on the left pane of Windows Explorer) and activate the Copy context menu command
2. Open the folder in which the FedPage 2000 WEB-installed Web node templates are placed (default path with \\ Windows \\ Application Data \\ Microsoft \\ Frontpage \\ Webs \\)
3 Right-click on this folder (right windows panel Explorer) and choose the Paste command of the context menu folder WEBTEM PLATE will be copied to the WebS folder as a result you will receive most files to create a full-fledged template
Note
In order for the created Web node to be used as a template, the RF can also place a folder with its files in the folder in which the Standard FrontPage templates are stored (default path with \\ Program Files. \\ Mic Rosoft Office \\ TEMPLATES \\ 1033 \\ Webs \\)
4. Right-click on the name of the new WebTemplate subfolder, which was copied to the WebS folder, select context menu Rename command and assign the name of the Webtemplate Tern name to the specified subfolder.
Note
In the WebTemplate Tern folder, you can delete all the folders listed in Tab B.1 (Do not delete only the Images folder) this will not affect the performance of the template

Rice B. 2 WEHTEMPLATE Web Node Template Structure
Table B. 1. WEB-node folder structure, in FrontPage
| Folder | Content |
| Borders. | Includes up to four HTML files that are inserted into each page along with the top, bottom, right or left common areas. |
| Private | Pages that you would like to make unavailable to view in a browser or for searching (for example, Pages included) |
| SharedTemplates. | Templates used on a Web node |
| vtibin. | Created FrontPage CGI program to control viewing, as well as to perform actions on the server by the administrator and the author |
| vTICNF. | Configuration files for each web node page containing data such as page name, creation and modification dates, developer name, etc. |
| vtipvt. | Several subfolders with both current and historical files DO LIST (make a list), as well as with meta-formation for a Web site and a dependent database |
| vtiscript. | Scripts in JavaSript and VBScript languages |
| vtitxt | Text Indices for Forms Search |
| Images | All images related to the Web node |
Creating Info and Mar Files
In addition to the already copied files, you will need two additional (with INF and MAP extensions) of the file so that in frontpage 2000 it is possible to use the Web node template. Info files contain information used to enable your template to the list located in the New dialog box. The navigation links created by you are stored in mar-files. We copy these two files from the folder of the standard Web site template, change their contents and save under the appropriate names.
1. In Windows Explorer, open the Personal Web folder folder (default path: C: \\ Program Files \\ Microsoft Off) CE \\ TEMPLATES \\ 1033 \\ WebS \\ Personal.tem).

2. Hold down the [CTRL] key, check the Personal.inf and Personal.map files. Press the key combination to copy files.
3. Return to the WebTemplate.Tem folder template created (The path to it by default C: \\ Wmdows \\ Application Data \\ Microsoft \\ Frontpage \\ Webs \\ Web-Tempiate.-EM). Right-click on the right pane and activate the Paste command to enable two files in this folder copied at step 2.
4. Right-click on the name of the Personal.inf file and rename it by setting the name of the WebTemplate INF. Personal.map file assign the name of the Web Template.map.
5. Double-click on the name of the WebTemplate.mf file and edit its contents using NotePad in the title section, enter the Test Example template name, and in the Description section - Description of the template. After processing the contents of the file should be

6. Save and close the webteinplate.inf file.
7. Open the WebT.ernpiate.map file in the NotePad editor.
8. Edit the WebTemplate.map file as shown in the following figure.

9. Save and close the WebTemplate.map file. Now that the INF and MAP files are created in your folder, FrontPage will support your template.
10. Navigate to viewing mode. Activate the Web command to the New menu command. In the new dialog box, in the list of proposed templates will be the template created - "test example" (in the Description area it is displayed).

11. Select the "Test Example" template in the list by default, you can assign the WebTenrPlale2 name to the WebTenrPLELE2 created by \\ ejo node (Do not change this name) with a button OK to create a new web site based on the template you created the Web node you created (rice B .3)
12 Delete the newly created WEB node and close the frontpage if the new Web site does not function as expected, view the files in the template. Make sure that all files are where it is supposed to be, and that the contents of inf and mar-files Complies with our recommendations and does not contain errors (which could appear because you edited these files manually)

Fig. B.3 WEBTEMPLATE2 WEB-Node, created using the Test Example template
Work with Web nodes.
Consider in more detail various administrative tasks of the node level that can be performed in IIS. We have already briefly reviewed the basic properties dialog box for WWW service, and you already know that there are ten tabs containing a variety of settings that can be configured. Nine of these ten tabs are also applied at the node level (to administer individual Web nodes); In this section, we will study these diverse tabs and their settings in detail. As an example, in this chapter, we will configure The default web site.
Tab Web site.
The website tab of the node properties window allows you to set the Web node identification, configure the limit on the maximum number of TCP simultaneous connections that implement HTTP sessions, enable or disable saving HTTP connections and turn on your server registration IIS.
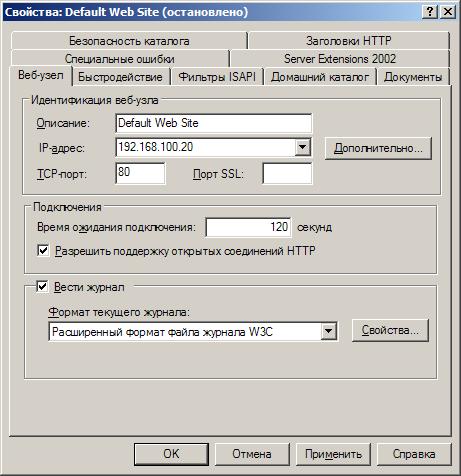
Web node identification.
Each Web node placed on the IIS computer must have a unique identification so that browsers can connect to it and download content from it. Web nodes can be determined using three different parameters: IP addresses, TCP port numbers and host title name.
The identification of the Web node is set in the Properties page of this Web site with the Web Node tab. So that the Web nodes on one computer had unique identification, they should differ from each other at least one of the three identification parameters. Consider different methods Web node identification tasks and discuss how you can have several different Web nodes on one server.
Setting up multiple IP addresses for one server network card
You can configure multiple IP addresses for one server network card or set multiple network cards so that each board has its own IP address. Select different IP addresses for each of the Web nodes. Do not change these sites to the TCP port setting (80 is standard for the HTTP protocol setting the TCP port) and do not configure the host title names. The advantage of this method is that customers are conveniently connected to each of the sites using the IP address of the site in the URL requested (or with the help of a fully qualified DNS name, if the DNS server was configured unique name Host for each of the IIS IP IP addresses).
The disadvantages of this method refers to the fact that if you contain many Web nodes on the computer, then they will have to assign a lot of IP addresses. This is not a problem for private intranets using one of the blocks of private IP addresses, such as 10.y.z.w, 172.16-31.z.z, 192.168.z.z. But on servers directly connected to the Internet, you will have to receive the desired number of IP addresses from your provider. However, this method The tasks of the identification of the Web site is most common.
Setting only one IP address for network card
Set different TCP ports (with numbers, large 1023) for each of the Web sites with which it is necessary to connect. The main disadvantage of this method is that customers need to know the ports of the ports of the Web nodes with which they need to connect. For example, if the server's DNS name is Win2003S.Test.fio.ru, and the port number on this server is assigned the port number 8023, then the client will have to use the URL http://win2003s.test.fio.ru to access this site. 8023.
Setting up one IP address while saving the standard TCP port
In this case, only one IP address for the server network card is configured, and the TCP port remains with a standard value (80) for all sites. Configure the unique name of the host header for each site using the Advanced button. Host header names are possible in HTTP 1.1 protocol. Host title name associated with each of the nodes is a typical fully qualified DNS name assigned to the node in the database of available dNS server (or in local hosts file on customers).

When you open the properties window for the default web site and the page with the tab Web siteThe IP address is as defined as all unassigned. This means that the Web node will respond to any IP-ADPEC, not specifically appointed to other Web nodes to the published computer. That is why this site is used by default and the only Web node on the IIS computer for which this method of setting the IP address is possible.
When the client requests a URL like http://vio.fio.ru.The client transmits the host title name vio.FiO.ru.in the HTTP request headers transmitted to the server. The server produces a syntactic parsing of the host title, identifies the Web node with which the client must be connected, and returns files corresponding to the query. The disadvantage of this method is that the client must also support the names of the host headers, that is, should be able to transmit the DNS site in its HTTP request headers. Names of host headers are supported by Microsoft browsers Internet Explorer. versions ranging from 3 and higher. Another disadvantage of using host header names is that this method does not work in combination with SSL connections, because in this case the HTTP sessions are encrypted.
If you work with old browsers that do not support host header names, you can implement a mechanism based on cookies, allowing browsers to distinguish WEB nodes that have the same IP addresses and TCP port numbers. Additional information This can be found in online documentation.
When the port number is changed, the server is not required to restart the server to take effect.
Connections.
The Web Node page allows you to configure for HTTP sessions to the maximum number of TCP connections acting simultaneously with the server. You can also enable or disable the Connection Save Configuration (HTTP Keep-Alive) and set the limit of the saving time for connections (Connection Timeout Value). Setting up http KEEP-ALIVES is a HTTP 1.1 tool, with which the client can save the open TCP connection with the server and after downloading the file if you want to download any other files from this server. If the clients begin to suffer due to a slowdown in the server work or become often received a message about the error "Uploading"
HTTP 500: BUSY ERRORS
then try to reduce the value in the Connection Time field so that the unused TCP connections are completed faster.
The waiting time specified on the Web Node tab is applied to the active TCP sessions. TCP has their own settings to complete the half-open TCP connections, such as those are created during DOS attacks (DENIAL OF SERVICE, refusal of maintenance), when attackers are trying to "fill up" a Web server, overwwing its network connection TCP SYN packages .
Logging.
The Web Node tab allows you to enable (or disable) logging tools for your server. By default, this setting is enabled, with its help administrators can track access to client browsers. Registered information can be stored in various formats:
- The general format of the NCSA log file. Creates a file in ASCII encoding with space separators with a predetermined field set.
- Odbc. logging. Fixed logging format in the database.
- Advanced File File W3C. This custom log format is used by default; ASCII file is created with space separators, and the set of fields is determined by the administrator.
- Microsoft IIS log file format. A fixed format file is created in the ASCII encoding.

New IIS registration files can be created hourly, daily, once a week or once a month, or when an existing registration file grows up to some specified size. By default, the log files are stored in the \\% Systemroot% \\ System32 \\ LogFiles folder, but you can change this setting using the Overview button.
Enabling IIS logging in the page with the Web Node tab does not mean at all means visiting all parts of your site will be recorded. You can use the Checkbox log on the Home Catalog tab of the WEB-site dialog box to enable or disable the content access to the contents placed in the node's home directory. Visits to other directories and even individual files You can track with other tabs.

Tab Additionally Allows you to configure advanced log parameters.
Tab speed.
The performance setting of individual Web nodes is performed on the page with the Site Properties window tab.

On this page you can configure the following settings:
- Limitation bandwidth. You can enable and set the bandwidth limit of this site in the bandwidth adjustment section. This will set the priority of access to certain sites located on one server.
- The number of connections with websites. You can limit the total number of simultaneous connections to the website. To do this, set the switch to no longer and set the value corresponding to the number of connections.
ISAPI Filter Tab.
ISAPI Filters (Internet Server Application Programming Interface) are additional dynamic DLL libraries that perform specific steps when processing HTTP client requests. iIS. With this tab, you can set the ISAPI filter set and the sequence of their IIS processing. Filters installed at the Web site level are applied only for the selected Web node. Filters installed at the server level apply to all server Web nodes.

ISAPI filters exercise their actions before the server actually respond to query http.. You can, for example, develop ISAPI filters that perform non-standard authentication, data encryption, recording traffic information into a non-standard registration file or to perform other tasks.
Tab Home Catalog.
On the Home Catalog tab, you can specify the location of the contents associated with the home directory of the Web site to set the permissions and other settings for the directory and Web applications implemented in this directory.
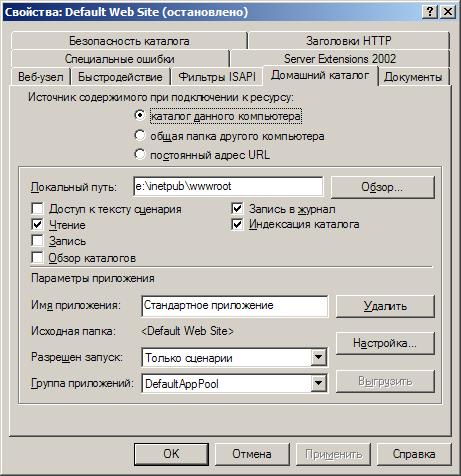
Home catalog.
Home Site Catalog Sets content location, access to which is happening using the type URL
http: //Site_name / file name
where the name_name is the name of the NetBIOS, the IP address or DNS name of the site, and the file name is named any hTML pages, or file with a pattern, or script, or some other file from the site directory.
The home directory of the site can be set using the Source Source when connecting to the resource in one of the following ways:
- As the name of the catalog being on local disk Computer (position directory this computer).
- As an UNC path to a network shared resource on file Server (position shared folder of another computer).
- As a redirection to the URL, offering the client who wants to access the contents associated with the home directory, connect to another web server, not necessarily the IIS server (permanent position uRL address). Redirection can be both temporary and constant.
Access redirection.
The ability to redirect access for a home directory (or for any virtual directory) to the URL is useful when the Web node is in the process of creating or when it is turned off due to maintenance or due to the update. IIS allows you to redirect the request to any of the files in the home directory to the same URL (for example, to the ad page goes maintenance. The site will be available in 15 minutes ") or to the same file in the network directory (so you can redirect customers to a temporary site mirror). You can also redirect access to the subdirectory of the current home directory if the maintenance declaration page or mirror content are on that same server.
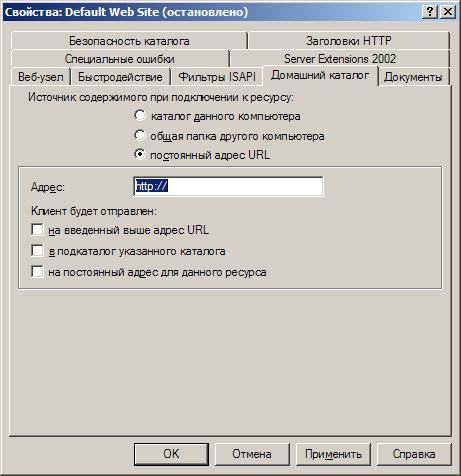
Permanent redirection Specify only when you really plan to move the contents of the site to another server, because Some browsers by receiving the message "Permanent redirection"
HTTP 301 Permanent Redirect
Permissions.
If you specify the location of the home directory as a local directory or as a network shared resource, then on the page with the Home Catalog tab, you can set the permissions and other settings for this directory.
If you set the URL redirection as a location of the homepage, then these settings will not be available. The following settings are possible:
- Script text access. When the checkbox is installed, users can access the source text of the scripts (for example, to ASP files). Note that if you do not enable the read or record setting, then this setting There will be no action. (When you enable the setting, reading users will be able to read the source texts of the scripts, and when you turn on the setup, the recording is to change scripts.) Configure access to the script text. Typically, when designing servers in which content is created. By default, it is turned off.
- Reading. If you want this check box, users will be able to see the contents of the directory or file and its properties, such as the creation time and file size. By default, the setting is enabled.
- Record. If you check this check box, users will be able to change the contents of the directory or file. Record to the server can only be performed by those browsers that support the PUT command (place) of the HTTP 1.1 protocol (it relates Internet Explorer since version 4). By default, the setting is turned off.
- Overview of catalogs. If you want this check box, users will be able to see the contents of the home directory in cases where there is no default home page. Usually, this setting should be turned off (it is turned off by default) to hide the directory structure with content from random viewing by users who want to enter where you do not want them.
- Logging. If you set this check box, then, each time you access the client to any of the files in the home directory, record will be added to the registration file. Note that before this setting starts to work, you need to check the log log on the page with the Web Node tab. By default, the registration of home directory visits is enabled.
- Indexing catalog. When the Indexing service checkbox is installed adds the contents of the home directory to the main index. By default, the indexing service is installed during installation. Windows Server 2003.
Although authority Readingand installed for Default web site But the ability to access the contents of a specific Web site depends on the set of conditions.
Setting up a web application.
If you specify a local directory or network shared resource as a home directory location, then you can set the settings for any application implemented in this directory on the Home Catalog tab.
As an example of a Web application, you can cite a set of ASP working together and providing algorithmic opportunities for site visitors. Settings that you can press in the area Application Parameters:
- Entry field Application Name. The field sets the unique name of the application.
- Source folder. The application may consist of a catalog tree and their contents. The vertex of this tree is the starting point of the application.
- Allowed to start. Using this setting, you can set the types of applications that can be run in the home directory. You can choose anything, only scripts or scripts and executable files.
- Group of Applications. This setting allows you to choose a group of applications associated with this home folder.
- Button Setting. If you click on this button, the Applying Application dialog box opens in which you can configure the options to match the application by interpreting it with scripts or programs to copy ISAPI applications (in order to increase productivity); to specify session docks; To specify the default ASP script language, for debug settings.

If you set an access authority to the directory, the entry with the script configuration and executable files will arise a security threat: the user you do not trust may be able to download a hostile program in the executable file to the server and damage.
Document tab.
On the Documents tab, the WEB Node Properties window, you can specify possible file names for standard home directory documents and the order of access to the browser.
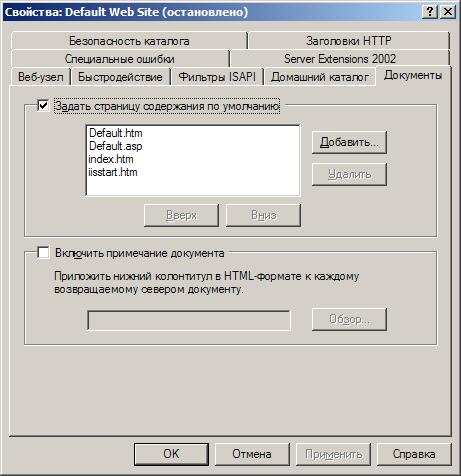
By default, four files are specified in the following order: Default.htm, default.asp, index.htm and iisstart.htm. For example, if the browser is trying to connect to the default web site on the server Win2003s.Test.fio.ru using the URL http://win2003s.test.fio.ru, then the server will first check if the directory has a file default.htm . If there is such a file, it will be returned to the client. If there is no such file, the server will look for the default.asp file. This process will continue until there is a file or until the list of documents used by default will end. You can set additional standard documents (for example, index.html) or remove the documents available in the list. You can also cancel access to standard documents, in this case, clients need to know and specify the actual file name to which they want to access the server, asking, for example, such a URL: http://win2003s.test.fio.ru/nodefault .htm.
Using this tab, you can also specify the name of the fetter file (written in HTML format); The footer should be added to the lower part of each of the files delivered from the site to the client. Handers allow you to supplement the lower part of each page by a statement of copyright or a statement of refusal of copyright. If FrontPage is applied to create content, you can create complex bottom footers to display such information as the date last change File, Popular Counter, etc.


