Optimizing ssd for windows 7 x64. System setup after installing SSD. Disable disk indexing
Hey! Decide to prepare an article in which to talk about how to properly install Windows 7 on an SSD drive, and how to configure Windows 7 on an SSD drive after installation so that it works for a long time and without problems. I recently bought a laptop, took an Asus K56CM and immediately bought a 128 GB OCZ Vertex 4 SSD drive for it, I really wanted to feel all the speed that an SSD gives.
In our case, the laptop / computer model and SSD drive does not matter, my instructions can be said to be universal. I will write what needs to be done immediately after installing an SSD drive into a computer and how to configure the operating system after installing it on an SSD. disks. I will now explain everything in simple terms.
SSD drives have a limited time to failure compared to hard drives. Simply put, they have a certain number of rewrites. Now I will not say what this number is, it is different and what is true and what is not, it is difficult to understand. For example, for my OCZ Vertex 4, it was written in the specifications that the time to failure was 2 million hours. And the operating system during operation writes a lot, deletes and writes again various temporary files, etc. Services such as defragmentation, indexing, etc. serve to speed up the system on ordinary hard drives. And they only harm SSD drives and reduce the lines of their service.
In fact, installing windows 7 on ssd almost no different from installing on a hard drive. But after installation, you will need to make some settings in the work of Windows 7, but there is nothing complicated there either, we will do everything using the utility SSD Mini Tweaker 2.1.
What should I do before installing Windows 7 on an SSD drive?
Well, first you need to install an SSD drive in a laptop or on a computer, it doesn’t matter. I will not describe this process. There is nothing complicated in this, and this is a topic for another article. Let's say that you have already installed a solid state drive, or it has already been installed.
If you use a regular hard drive next to the SSD drive in your computer, then I advise you to disable it during the installation of Windows 7, this is so that you do not get confused when choosing a partition for installing the OS, but this is not necessary.
All that needs to be done before installation is to check if our solid state drive is working in AHCI. To do this, go to BIOS, if you don’t know how, then read the article. Next, go to the tab “Advanced” and choose the item SATA Configuration.
Select the item, a window will open in which we select AHCI(if you had another mode enabled). Click F10 to save the settings.
You are now ready to install Windows 7. Installing to an SSD is the same as installing to a hard drive. I just want to give you one piece of advice:
Try to install the original image of the Windows 7 or Windows 8 operating system. I advise you to install only one of these operating systems, because only seven and eight can work with SSD drives. Do not use different assemblies, and if you install the assembly of Windows 7, or Windows 8 downloaded from the Internet, then try to choose an image that is close to the original.
Installing the operating system. You may find the following articles helpful:
After the operating system is installed, you can proceed to Windows setup for SSD.
Setting up Windows 7 to work with an SSD drive
More precisely, Windows 7 will work anyway, our task is to make sure that our solid state drive lasts as long as possible and without various errors.
As I wrote at the beginning of the article, to optimize Windows for a solid state drive, we will use the SSD Mini Tweaker utility. You can disable all unnecessary options manually, but in the SSD Mini Tweaker program, all this can be done in a few clicks. Manually, you will need to disable only the indexing of files on local drives.
We need to download SSD Mini Tweaker first. Download version 2.1 from the link below:
The program does not need to be installed, just extract from the archive and run.
Launch the SSD Mini Tweaker utility.
You can mark all the items with checkmarks, more precisely it is not possible but necessary. I checked all the items, except that you can leave only SuperFetch, disabling this service can increase the startup time of programs. Check the boxes for the required services and click the button. "Apply Changes". Almost everything, in the same utility there is an item “Manually”, which means that you need to manually disable services. There are two of them, scheduled disk defragmentation and indexing the contents of files on the disk.
If scheduled defragmentation turns off automatically after the changes we made, then file indexing on the disk must be turned off manually on each local partition.
Disable indexing of the contents of files on disk
We go to "My computer", and right-click on one of the local drives. Select "Properties".
A window will open in which you need to uncheck the box. “Allow the contents of files on this drive to be indexed in addition to file properties”. Click "Apply". 
We are waiting for the completion of the process.
When you do this procedure on drive C, then most likely a message will appear stating that you do not have rights to modify system files. I just pressed “Skip everything”, I think that eli skip a few files, then nothing bad will happen.
That's all, setting up Windows for a solid state drive is finished. You know, many say that these are different myths, you don’t need to turn off anything, etc. Maybe so, but if it was invented, then it means it is necessary and I think that in any case it won’t hurt.
It seems that he wrote everything he wanted, if you have additions, comments, or something is not clear, then write in the comments, we'll figure it out. Good luck!
» How to Tune SSD to Improve Windows 7 Performance?
How to Tune SSD to Improve Windows 7 Performance?
SSD setup under Windows 7
Introduction
Solid state drives, according to manufacturers, are noticeably faster than hard drives based on mechanics. Of course, their cost is much more expensive. Although SSD performance figures are high, many users claim that they can be improved. All that is required is the appropriate optimization and configuration of the SSD under Windows 7. The most effective ways in this article will be considered:
- Enable AHCI and TRIM
- Disabling system protection
- Disabling the paging file
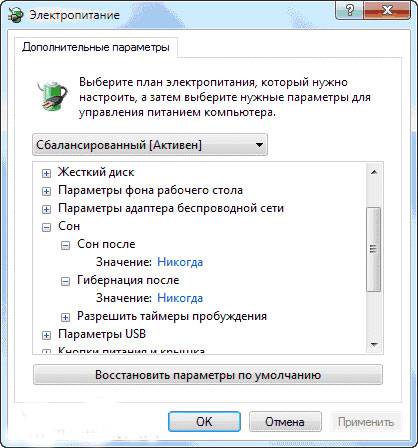
- Disabling hibernation
- Disabling Windows 7 Record Caching
- Disabling Super fetch and Windows 7 search
- Power Options Settings
Enable AHCI and TRIM
Before starting the optimization, you need to make sure that the SATA controller can work in AHCI mode and the TRIM function in Windows 7 is activated.
During system startup, press the DELETE key and see that AHCI mode is enabled in the BIOS for your SATA controller. This mode is required to support TRIMa on SSD. You can also verify this by doing the following in the system:
- In the start menu "Start" select "Control Panel"
- Select "System" and switch to classic view (small and large icons mode)
- Go to "Device Manager"
- Search for an item with a list of ATA / ATAPI and IDE controllers
- If there is such an item, your system is already loaded with AHCI mode enabled

If the operating system was installed with IDE mode, then you need to switch to AHCI mode in the BIOS, provided that the "motherboard" supports this functionality.
- Check if TRIM support is enabled
- Check TRIM to make sure mode commands are sent by Windows 7 to the SSD.
- In the start menu of applications, type [ cmd ] on the keyboard to search for the built-in command line
- Click on it with the right mouse button, choosing "Run as administrator"
- On the command line, write [ fsutil behavior query Disable Delete Notify ]
If the Disable Delete Notify parameter is 0, the TRIM function is enabled. If the value is 1, it is disabled.

Do not use parentheses when entering a command.
The SATA - TRIM protocol command will tell the OS which blocks of the previously recorded data on the SSD will never be needed in the future due to deleting files or formatting the disk.
Disabling system protection


The "System Protection" function should be disabled to limit the number of write operations on SSD drives, as well as to return the space freed up by disabling it back to the SSD.
Disable disk indexing
Description of the deactivation process:

You may see a pop-up window reporting an error in applying attributes to files, which is normal. Selecting the "Ignore all" option, continue your steps.

The meaning of disabling disk indexing boils down to the following:
- Disk indexing was developed for mechanical devices in order to provide quick access to information. Given that the response time of an SSD drive is approximately 0.1 ms, there is no need to enable this technology.
- Eliminating unnecessary read-write operations on the SSD, we get a minimal effect. But keep in mind that actions that allow you to limit the number of write cycles on the SSD will help increase the life of the SSD.
Disabling the paging file
- Right click on the "My Computer" icon
- Select "Properties"
- Select the "Advanced" tab
- In the "Performance" section, click on the "Settings" button
- Select the "Advanced" tab and click on the "Change for virtual memory" button
- Remove the checkbox "Automatically select the size of the paging file"
- Agree to accept the changes by confirming the system reboot, and the next step is to disable swap for your SSD drive.

The paging file is a Windows functionality that is designed to help the computer's physical memory in case of insufficient capacity, allowing the transfer of part of the information from the "RAM" to the hard drive to free up the available RAM. Disabling the PageFile function will free up space reserved for paging on the hard drive.
Disabling hibernation
Disabling hibernation will free up 2 Gb (possibly more, depending on the amount of installed RAM) of SSD disk space. This functionality will not provide significant benefits due to fast loading.
Description of the deactivation process:
- In the start menu search type [ cmd ] to search for Windows 7 utility
- Right click on the cmd program and run it as administrator
- At the command line type [ powercfg -h off ]

Hibernation helps to quickly restore work in the system after inactivity. When it is used, the information contained in the random access memory device is written to disk, and then read out upon awakening.
Disabling Windows Record Caching
Description of the deactivation process:
- Press the right mouse button on the "My Computer" icon, selecting "Properties"
- Select "Device Manager"
- Select "Disk Drives"
- Press the right mouse button on the SSD, choosing "Properties"
- On the "Policy" tab, remove the "checkbox" from the item "Allow caching records on this device"

The write caching functionality in Windows 7 can access high-speed RAM and accumulate commands that then need to be executed on the SSD drive. SSD drives outperform mechanical hard drives in speed, so there is no speed gain when using cache.
Disabling Superfetch and Windows Search
Description of the deactivation process:
- Press Windows Key + R to enter the application launcher dialog.
- Type and press the Enter button.
- Scrolling the scrollbar to Superfetch, right-click on it, selecting Properties
- From the "Startup type" drop-down menu, selecting "Disabled", click OK.
- After scrolling the "scrollbar" to the item "Windows Search", right-click on it, selecting "Properties"
- Click on the "Stop" button, then on "Startup Type" and select "Disabled".

The Windows Search feature creates an index of some folders, files, and additional items on your devices. It is located in the Program Data Microsoft Search folder on the TRIMa:/ drive and takes up approximately 10% of the contents of the indexed information. When searching for any file, parts of the indexes are loaded into memory. This will provide a fairly fast search. This functionality will not make a big difference, and it can also negatively affect the performance of the SSD drive.
Disabling Clear Page File At Shutdown and Large System Cache
Description of the deactivation process:
- Type in the start menu
- Select the key HKEY_LOCAL_MACHINE SYSTEM Current Control Set Control Session Manager Memory Management
- Press the right mouse button on the item "Clear Page File At Shutdown" and "Large System Cache"
- After selecting "Change", change the value from 1 to 0, and then restart the system.

This OS functionality is designed to clear the paging file. This leads to an increase in the number of read-write operations. Since the swap file was previously disabled, there is no reason to use purge anymore, since there is nothing to purge.
The Large System Cache parameter indicates whether the operating system supports a standard cache size or an increased one, and is also responsible for the frequency of processing cached data. Enabling Large System Cache mode will reduce the amount of physical memory available to applications and services.
Setting power options:
- Open your "Control Panel"
- Select "System and Security"
- Select the power settings item
- Check the box "High performance" by applying it with the OK button
- Select "Power Plan Settings" for your "High Performance" plan
- Click on Change advanced power settings
- In the "Hard Disk" item, set the drop-down menu for disabling the hard disk to the "Never" mode
- Click OK to save the setting.

Conclusion
Setting up an SSD under Windows 7 can affect system performance, both positively and negatively. Let's assume that there is no need to enable write caching when using the Intel X25M/G2, since in this case, as is usually the case, there is no increase in performance. So is it worth doing the actions discussed in the article at all?
One important factor in SSD optimization is the increase in storage capacity.
This will give an undeniable advantage if the Windows 7 operating system is installed on the SSD. It becomes possible to install more software, games and other software. Disabling system protection, disk indexing, paging file, and hibernation will result in a slight increase in performance, but the free capacity of the SSD will increase significantly.
The most discussed issue among SSD users is disabling, moving or keeping the swap file. There is no unequivocal opinion and there are many supporters of various options. If you plan to disable the paging file, then you need to check the amount of memory used by Windows 7. Make sure that the amount of installed memory is half the maximum used. In this case, the paging file can be disabled without loss of PC performance. Alternatively, its size can be reduced or even transferred.
Disabling unnecessary operations when reading and writing data to an SSD drive effectively affects the life of the device. Considering the cost of SSDs, this is an important advantage.
As a result, the user himself decides whether he needs to set up an SSD under Windows 7 or not. This OS from Microsoft already works quite well with an SSD, but with the help of additional optimization steps, there is the possibility of a small performance gain compared to working with the "default" settings.
For a long time, the main component that “slows down” the performance of even the most sophisticated home computer was hard drives. The fact is that spindle HDDs have reached the limit of development in terms of speed at some point. Physical laws were to blame for this, which did not allow the disk spindle to spin up above a certain speed, which affected the data access time, as well as the speed of writing and reading. The volume continued to grow, but the speed did not. SSDs are the next generation of hard drives.
An SSD is a computer non-mechanical storage device based on memory chips. Simply put, now the hard drive is a large and very fast USB flash drive that contains the operating system and user files.
Why do you need Windows 7 SSD optimization?
Undoubtedly, the main advantage of an SSD drive is its write and read speed, but it also has disadvantages, such as a limited number of write cycles. This disadvantage is especially relevant for outdated versions of operating systems, which can prematurely “kill” the drive, not taking into account the specifics of working with it.
That is why the important moment can be Windows optimization for SSD. This article aims to help "extend the life" of your SSD by properly configuring your computer's operating system.
Setting up an SSD drive
The Windows 7 operating system is initially optimized for working with solid state drives, but to improve reliability, you should adhere to the following rules:
1. Use an SSD solid state drive (for operating system and programs) along with a classic HDD on the spindle. In this option, you combine speed and reliability.
2. Before you start using the solid state drive, be sure to enter the BIOS and set the mode to ACHI.

3. From any other computer, go to the SSD drive manufacturer's website and check for the latest device firmware. If possible, update the firmware.
4. When partitioning a disk during Windows installation, leave about 20% of the total disk space unallocated. As the SSD wears out, it will take clusters from this area.
Optimizing Windows 7 for SSD
1. Disable the system cache Prefetch and Superfetch. There will be no sense from them when using a solid-state HDD. Most likely, Windows 7 will disable Prefetch on its own, but we will definitely check this. How:
Open the registry editor (Start - in the search bar, enter - regedit)
HKEY_LOCAL_MACHINE -> SYSTEM -> CurrentControlSet -> Control -> Session Manager -> Memory Management -> PrefetchParameters
Set - EnablePrefetcher = dword:00000000
HKEY_LOCAL_MACHINE -> SYSTEM -> CurrentControlSet -> Control -> Session Manager -> Memory Management -> PrefetchParameters
Set - EnableSuperfetch = dword:0000000
2. It is necessary to disable automatic file defragmentation. It also makes no sense now. It will only unnecessarily reduce the resource of the SSD drive.
Start - in the search bar, enter - Defragmentation. Click on the "Set Schedule" button. Uncheck the "Run on schedule" checkbox.

3. If you have a 64-bit operating system and 8GB or more of memory, then it makes sense to disable the paging file.
Computer -> Properties -> Advanced System Settings -> Advanced -> Performance Options -> Advanced -> Virtual Memory -> Change. Install - No paging file

4. Change the Memory Management parameter:
Open Registry Editor Start-Run->regedit
HKEY_LOCAL_MACHINE -> SYSTEM -> CurrentControlSet -> Control -> Session Manager -> Memory Management
Set - DisablePagingExecutive = dword:00000001
5. SSD Optimization can also enable and disable NTFS file system journaling:
Start - in the search bar, enter - cmd - click on the program icon with the RIGHT mouse button - Run as administrator.
In the command line window, enter: fsutil usn deletejournal /D C: - example for drive C:

6. Disable sleep mode. The system will boot very quickly anyway and there is no need for sleep mode.
In the already open command prompt window, enter - powercfg -h off and press ENTER.
7. Disable indexing for the SSD drive:
Start-Computer-right-click on the system drive and select properties - uncheck the option "Allow the contents of files on this drive to be indexed in addition to file properties"

8. Transfer temporary TEMP folders from SSD to HDD.
Open Computer - (right-click) Properties - Advanced system settings - Advanced - Environment variables.
We enter a new address for the TEMP and TMP environment variables, placing them on the second hard drive.

9. In the end, it remains to transfer the user's folders (Documents, Videos, Downloads, etc.) from the SSD to the HDD.
We create a user folder on the HDD in advance, in which user libraries will now be stored.
We right-click on each folder whose location we want to change. On the Location tab, click the Move button. We move to the HDD in the newly created folder.
The popularity of solid state drives is growing exponentially.
Once still inaccessible to many, due to their high cost, SSD drives are now confidently displacing HDD devices from the market.
And although the prices between SSD and HDD counterparts still vary greatly, in terms of the price per 1 gigabyte of memory, this gap is constantly decreasing and this process cannot be stopped.
The main advantage of SSD drives over others is their quiet and reliable operation, and most importantly, high data processing speed.
It would seem that having become the owner of a modern, high-tech disk, you can calm down, being satisfied with the excellent speed of its work.
But it was not there. Many users want to optimize their SSD for Windows 7/8/10 in an attempt to get even better results from this device.
And here I would like to stop in more detail. Is it possible to optimize SSD performance under Windows 7/8/10, and if so, in what ways.
Indeed, there are several such methods, but first let's talk about something else that is no less important.
Mandatory presets
Before you start optimizing SSD performance under Windows, you first need to check some settings.
Is the TRIM function enabled in Windows 7 and is the SATA controller operating in AHCI mode (checked in the BIOS).
What is AHCI.
This is a specially designed mechanism that replaced the ATA controller, thanks to which it became possible to connect various storage media to the device, including SSD drives, using the .
This mechanism makes it possible:
- 1. Disconnect and connect SSD drives, and not only, when the computer is turned on. The so-called hot swap (HotPlug);
- 2. Use Staggered Spin-Up technology.
This technology provides serial with a delay, rather than simultaneous connection of several hard drives at system startup, if they are installed in the computer.
This is done so that the power supply does not burn out if it is weak.
- 3. Use Port Multiplier technology, which makes it possible to simultaneously connect several SSD drives or other devices to a computer through a multiplier of ports.
But you need to understand that the data stream will be divided evenly between all channels, and this reduces the speed of information transfer.
- 4. Support Native Command Queuing.
Translated as a hardware setting of the command queue.
A small summary.
Not all motherboards support AHCI technology. But if it is even provided for in their chips (south bridge), then there are times when it is not visible in the BIOS.
Look at the documentation for the motherboard, and if this technology is supported, enable it in the BIOS, and if you did not find AHCI there, then you will have to update the BIOS to the latest version.

There are situations when, after enabling AHCI, with an already installed system, a blue screen immediately appeared.
This issue is resolved by installing and activating a separate AHCI driver for a specific version of the operating system.
Ideally, this mechanism is activated even before the system has been installed. During OS installation, the driver is registered automatically.
How to check the operation of controllers in AHCI mode.
Everything is very simple, go to the device manager in a way convenient for you (via the control panel or the "Computer" icon on the desktop).
Find the menu item "IDE ATA / ATAPI controllers" and open it by clicking on the triangle on the left.
Operation in AHCI mode should be displayed like this.

Otherwise, you will have to activate it.
Enable TRIM.
Many do not know what it is. Let's find out.
TRIM, this is a command thanks to which the space on the SSD disk is cleared in the background from those files that you deleted. In another way, this command is also called the "garbage cleaner".
The fact is that when deleting data from ordinary HDD disks, the areas on which the deleted information was located are marked as no longer occupied.
The new information is written on top of the deleted one. This ensures the declared speed of HDD drives.
In SSD drives, everything happens differently; from above, new files are not written to deleted ones, but simply replace them.
It happens like this. You deleted some file from the SSD drive, it is marked as unnecessary, but is not actually deleted.
When new files are sent to the disk, and if there is no free space on it, the new information replaces the old one and this greatly slows down the operation of the SDD drive.
To prevent this from happening, the TRIM command was introduced, which, through the bus controller, in the background, enters the SDD disk and clears it of unnecessary files in advance.
All this happens invisibly to the user, between other operations.
Now, when writing new files to an SDD disk, deleting unnecessary files does not waste not only extra time, but also resources, everything happens much faster.
The TRIM command has been implemented in all operating systems since 2009. It is enabled by default. All modern SSD drives support it.
On Windows XP and Vista, the TRIM command is not supported. To solve this problem, you can use third-party software from the manufacturer of flash drives and other developers, for example, the hdparm program.
But over time, this problem becomes less and less relevant.
Do not forget that the TRIM command will only work if the SATA controller is in AHCI mode, which we wrote about above. IDA TRIM mode is not supported.
Proceed as shown below.


Basic commands that can be copied and used:
- Check - fsutil behavior query DisableDeleteNotify;
- Enable the TRIM command - fsutil behavior query|set DisableDeleteNotify = 0.
SSD Optimization Methods
You need to understand that optimizing SDD drives means increasing its volume and speed.
Not always an attempt to optimize SDD devices can lead to an improvement in their speed, you need to understand this.
After the changes made, it is imperative to monitor and, if necessary, return everything to its original state.
Method 1 - disable hibernation.
The essence of hibernation is that when it is activated, data from RAM is temporarily written to disk in a specially reserved area, or rather, in a .

By starting hibernation at any stage of the computer’s operation, we thereby make a snapshot of the running system and programs, and when the computer is restarted, everything will return to its original state.
This is very convenient for laptops with an HDD, as it saves a lot of time and battery power.
In stationary computers, this is not so relevant, especially if an SDD drive is installed there. The system will start quickly anyway.
Therefore, if desired, hibernation can be disabled. In this case, there will be no strong acceleration, but it will be possible to free up additional and literally precious space on the SDD disk.
In laptops and other portable devices, it is not recommended to disable hibernation unless they are used as a stationary device.
There is only one way to disable it 100%, through the command line with administrator rights, see how to go there, see above.
Commands Used:
- powercfg.exe -h off - disable hibernation;
- powercfg.exe -h on - enable.

You can try to manually delete the file, or use the built-in power settings options.

But this usually doesn't help as the hiberfil.sys file reappears. Only through the command line will there be a guaranteed result.
Total: This method of optimizing the SSD drive is justified by 50%, a lot depends on how you will use the laptop, as a stationary device or portable.
Method 2 - deactivate disk indexing.
This function is more provided for HDD devices to provide faster access to the requested files.
SDD drives are much faster and the file indexing function is less relevant here.
By disabling it, we reduce the number of unnecessary requests to the disk, thereby speeding up its work.
To do this, just go to the logical disk manager.

Activate the SSD drive and after right-clicking, go to the properties section as shown below.
In the "General" section, see the very bottom line, where you can turn off indexing.

Confirm your intentions by clicking OK.
Bottom line: The method is 100% justified.
Method 3 - Deactivation of the protection system.
First of all, let's find out what is system protection.
Many of you have probably heard about restore points and system rollback.
So, a component that periodically creates restore points through which you can then roll back the system to its earlier state is called system protection.
These restore points are automatically created once a week and written to the system drive.
They occupy a certain disk space, on which the current and working computer settings and system files are recorded at a certain point in time.
It also provides for the automatic creation of restore points before major changes in the system, such as installing drivers and programs, or vice versa, deleting them.

The size of the disk space where all recovery point files are written can be adjusted.
If you wish, you can completely disable this component for any of the disks, and if you decide to do this for your SSD device, this will give you the following advantages:
- Increase disk space from 2 or more gigabytes;
- Reduce the number of requests to the disk, as well as write operations to it.
What will you lose:
- The ability to restore the working version of the system in case of failure in its operation;
- The ability to restore working versions of programs and drivers in case of violations in their work;
- It is safe to conduct experiments when working with unfamiliar software.
That is, by slightly optimizing the operation of the SSD drive, at the slightest failure in the system, software, drivers, big problems can arise.
Whether it's worth it is up to everyone to decide, but we don't recommend it.
But if you still decide to take this step, then to disable system protection, go to the computer properties and go to the appropriate section.

Here you can immediately restore the system if unwanted changes have been made to it, as well as configure protection settings.
You can turn them off completely, or adjust the size of the disk space allocated for this feature.

Method 4 - Deactivate the Windows Write Cache.
This feature allows you to cache the write commands coming to the disk so that they are subsequently executed as soon as it is physically possible.
Write commands are collected in high-speed RAM and are sent to the disk based on the physical ability of the latter to accept them.
The presence of the Windows write cache for HDD devices is very justified, as it greatly speeds up their work.
What can not be said about SDD drives, which work much faster.
But the whole problem is that SSD drives from different manufacturers behave differently when the Windows write cache is disabled.
How to do it.
Go to the device manager through the properties of the computer or the control panel.
Locate the Disk Devices section.

Right-click on the SSD disk icon and go to the "properties" section.

Here you can disable or enable the Windows write cache.
Method 5 - Disable the paging file.
The main role of this method is to increase the disk space on an SSD drive, which is much more expensive than on similar HDD devices.
This will not greatly affect the increase in the speed of the SSD device, and in some cases, when there is not enough RAM, it can even lead to a decrease in computer performance.
The paging file is a reserved space on the hard drive that starts to be used when the physical RAM of the computer is rebooted.
Files loaded into RAM that are not yet in use are temporarily moved to the paging file and, if necessary, are extracted from there.
If there is not enough physical RAM, or an insignificant space is allocated for the paging file, the computer starts to slow down a lot.
On SDD devices, the operation of the swap file is much more efficient than on HDD counterparts, since the former work much faster, so think carefully if the game is worth the candle.
Disabling or manually reducing the paging file is recommended only when RAM is equal to or greater than 8 GB, or another approach can be used.
For example, the computer has 4 GB of RAM. When running all the programs that the user usually uses, 2 GB of RAM is involved (look in the task manager).

Not a photo slightly different figures, but it does not matter.
We take 50% of 2 GB, i.e. 1 GB, we add them to the already used two. The result is 3 GB, which is less than the 4 GB available. So the paging file can be reduced to a minimum or disabled altogether.
As a rule, if the RAM is constantly loaded more than 50%, it is not recommended to disable the paging file (provided that if the RAM is up to 8 GB).
From 8 GB 50% will be 4 GB. And in order to load all these 4 GB into RAM, you really need to try very hard, so in this case the paging file is often disabled.
And if you decide to do this, then go to the "Computer Properties" section and go to the "advanced system settings" section.
Select "Performance" - "Options".


Here, click "Change" and make the necessary settings by unchecking "Automatically clean ...".

The changes will take effect after you restart your computer.
If these changes do not justify themselves, change everything back.
The way to optimize SSD disk 6 is to disable Prefetch and Superfetch.
What's happened ? This is a technology due to which programs frequently used by a PC user are preloaded into memory, while disk resources are also affected, since a special Prefetch file is created on it.
Since SSD devices are quite fast, this feature can be disabled.
What is Super Fetch? This technology tries to predict what programs the user will run at a certain point in time and loads all the necessary files into the computer's memory in advance.
It is relevant for HDD drives, not so much for SSD drives, so it can also be disabled.
The good news is that when you connect SDD devices to your computer, Windows OS starting from version 7 recognizes them and automatically disables these technologies.
But sometimes, for various reasons, this does not happen. In particular, when two hard drives are installed on the computer, one HDD, the other SDD.
In this case, if you disable Prefetch and Superfetch manually, then all programs and system files need to be kept only on the SDD device. Only then will all the actions described below be justified.
How to disable and manually.
Disable Prefetch. Proceed as shown below.

Required commands for copying: Windows + R, Regedit.


Don't close the window.
Disable SuperFetch. We find under the already known EnablePrefetcher string EnableSuperfetch.

The same change 3 to 0.
Restart your computer.
Also, you did not find it in the registry, you can disable this feature through the services.
Used commands: Windows+R, services.msc.
The Operating System Services window opens. Find the line there, double-click on it, go to the properties. First stop and then disable this feature.


Method 7 - Disable Windows Search.
A significant increase in performance of SSD drives is achieved by disabling the Search function.
This is an accelerated search feature that works quickly by pre-indexing documents and files on disk.
Index data is concentrated in a special Search file, which can take up quite a lot of disk space.
SDD devices have a much higher response speed than HDD counterparts, so the Search function on them can be disabled.
But you need to disable it only if you do not use the search and are not going to do it. Since in fact the function is very useful and makes life much easier for a PC user.
If you still decide to take this step, then the shutdown occurs in the "Services" section.
Commands already known to us are used:
- Windows+R;
- services.msc
We find the line Windows Search and double-click on the settings.


We press stop. We wait a few seconds and change the startup type to "disabled". Click "OK" and reboot the system.
Method 8 - Disable ClearPageFileAtShutdown.
This function should be disabled if the paging file has been disabled (see method 5).
Removes all data from the paging file when the computer is shut down. There are unnecessary requests to the disk, slowing down its work.
To disable, we use the commands already known to us: Windows + R, Regedit.
Go to the registry key as shown in the picture.
And find the line there.
As shown in the screenshot below, double-click on the settings and change the value from 1 to 0.

You can also change the parameter here, the line is below.

Change 1 to 0.
Reduces the size of RAM and periodically sends cached documents to the main drive.
When working with HDD devices, this is a useful feature; with SDD drives, you can refuse it.
Method 9 - we ensure the constant operation of TRIM ("garbage collector").
This is done through the power settings.
The point is that when certain power settings are set, the hard drive will turn off after a certain time, thereby the work of the TRIM command will be suspended. For example, if the computer went into sleep mode.
In order for SSD drives to work constantly, you need to make the necessary changes in the settings.
Through the control panel, go to the "Power Options" section.

Switch to the "High performance" mode, this may dim the screen.

Go to the "Power plan settings" section. And then "Change advanced power settings".


Find the line "Hard disk" and set "On the network" - 0.
Make the “Battery” settings at your discretion, but keep in mind that the latter will be discharged faster. Click OK.
Method 10 - disable scheduled defragmentation.
This is a controversial point, since in Windows 7, for example, defragmentation of SSD drives is not provided at all. It just doesn't make sense.
Again, for HDD drives, automatic defragmentation is fully justified.
Therefore, if two disks are installed on your computer, then you should not disable this feature. If there is only one disk, and it is SDD, then defragmentation in Windows 7 will not be performed by default.
But if you still decide on this little adventure, then to disable scheduled defragmentation, click the start button and enter the word "Defragmentation" in the bottom search bar.
Lines like this will appear.

Click on the top one.
The message "Scheduled settings are being used by another program" may appear.
This can happen because third-party software is running on the computer, such as TuneUp Utilities or O&O Defrag.

Click "Set up schedule" as shown above.

Deactivate the "Run on schedule" setting.
In Windows 8, instead of defragmentation, a disk optimizer was introduced.
Many PC users make a big mistake by disabling this feature for SSD devices, thinking that by doing so they optimize their performance.
In fact, they disable both defragmentation and additional TRIM commands that are sent on a schedule (do not confuse with those commands that run in the background).
We already know what disabling TRIM on SDD devices leads to, they start to work much slower.
Therefore, it is better not to disable the disk optimizer in Windows 8. Or look for a solution on the Internet, in which only defragmentation will be disabled, and the TRIM command will be executed.
The main mistakes in optimizing SSD drives
As a rule, SSD disk optimization errors occur when there is a second HDD device.
There is an opinion that if you move the browser cache, temporary files, ProgramData and AppData folders, user folders from the system SSD drive to the secondary HDD, this will speed up the work of the first one. And yes, there will be more space.
Yes, indeed, there will be more space. But in fact, you need to proceed from the position of which disk is faster. Obviously SDD.
So why should we move files from it to a slower HDD, because the response time on the second one is much longer than on the first one. Or not?
Using SSD Fresh under Windows 7
The program to some extent simplifies the optimization of SSD drives under Windows 7.
The program is free and easy to find on the Internet.

The program is easy to install. After it starts, select the desired disk and click optimization.

Earlier versions of the program may ask for an activation key, which can be obtained for free on the program website. This was not seen in the 2015 version.
The program itself will suggest you what needs to be optimized and what not.

Summing up
From the foregoing, we can conclude that optimizing SSD drives for Windows 7 or another OS has two sides of the coin.
On the one hand, we win in space, but we can lose in speed, on the other hand, we win in speed, but lose a number of useful functions.
Particularly controversial issues arise with disabling the paging file, transferring user files to a second, slower HDD drive, disabling indexing of files, folders, as well as hibernation, deactivating disk optimization in Windows 8.
Therefore, the optimization of SSD drives requires a competent and harmonious approach.
Each owner of this disk must decide for himself whether it is worth squeezing 100% or even greater performance out of this device, or whether he will be satisfied with its already fast performance.
And we hope that the methods of optimizing SSD drives described above will only help you figure it out.
I would be grateful if you share this article on social networks:
More recently, all computers worked with HDD, with low speed and low efficiency. But they have been replaced by a new generation of drives, the so-called SSDs, which are much faster than their older counterparts. Like all new devices, at first they were expensive, and their volumes did not differ in large capacity. But over time, manufacturers began to increase production volumes, and because of competition, the cost began to decline.
An SSD is a solid state drive that uses NAND memory that does not require electricity to store data. In fact, an SSD is a capacious flash drive that is characterized by high speed of writing and reading information.
It would seem, what else does an ordinary PC user need? But the SSD has one feature: excessive overwriting of data can completely disable it. You can avoid trouble by configuring Windows 7 to work optimally with your SSD, which will increase the life of your SSD.
Why do you need an OS setup?
All flash drives have their own memory, it is based on chips. They don't have any moving parts like HDDs, so they don't take any kind of shock. SSD memory is made up of many cells that can wear out with a lot of overwriting.

And a very important point is to properly configure the OS to transfer data to a flash drive, since calling some services and operations from the drive is slow if Windows is not configured.
The setting will reduce the use of space, accesses to it, which will certainly increase the life of the removable media. If the SSD is used in normal mode, it can last for a decade, and if you use it actively, then the period is reduced to 2 years.
To install windows on the drive, you need to prepare the system. We check:
- we go to the website of the manufacturer of the computer or SSD, check the relevance of the versions. If you intend to reflash it, then you can erase all the data, and you should know about this before installing the OS. Find information about the update, download it to your computer;
- we translate the system startup in the BIOS setup to AHCI, that is, we set the removable drive first. Use the latest modes, otherwise it will work with glitches;
- removable media must be formatted, you can use windows tools, it will cope with this task;
- then you should check the system boot from removable media, connect it, create logical partitions on it. If it was previously split, then update them, delete the previous breakdown, and split again. Now install on it the latest version of the disk controller driver, previously downloaded from the manufacturer's website.
Video: Optimizing SSD Drives
How to properly disable OS services and features
The many services and functions enabled by default in windows 7 slow down the system startup from an SSD, we will tell you how to disable them correctly, and which services it is not rational to disable. Since running services consume a lot of computer resources, disabling them will speed up the start, and the very operation of removable media.
Indexing and caching
Disable write cache, to do this, do the following:

The option to create a write cache in windows 7 constantly accesses the device's RAM, and records the most requested commands, and then they will be executed on removable media. But SSD is much faster than HDD, and this option is superfluous.
Indexing is useful only for the system with HDD, but for removable media it is not effective: it will not affect the speed, and the disk will last much less, since the index data will be constantly updated.
Disabling this feature will not affect the database, and therefore the shutdown operation will be transparent to system startup. Make a transition to disable:
- My computer;
- storage device;
- properties.
In the window that opens, uncheck the “allow indexing” option, and if the system gives you an error warning, you don’t need to return everything back, and uncheck it anyway.

defragmentation
Defragmentation is the process of redistributing fragments of files and logical structures of file systems on disks to ensure a continuous sequence of clusters. After thedefragmentation speeds up the reading and writing of files, and, consequently, the operation of programs and the operating system.
But at this stage, we do not need this function, so we turn off defragmentation in automatic mode, it will only reduce its capabilities, so we perform the following steps:
- press the Start button;
- go to Find;
- defragmentation.
In the window that opens, find the option "schedule settings", and remove it. 
hibernation
Hibernation is a computer power-saving mode that allows you to save the contents of the OP to the hard disk before turning off the power. Windows has a similar functionality to save energy, these include both sleep and hibernation. These features are designed specifically for laptops that are in power saving mode.
Hibernation is computer data when it goes into sleep mode, Windows writes it down and saves it in the Hiberfil.sys folder on the HDD.
When you exit this mode, all data is unloaded and the computer starts from where it left off. If you disable this mode, then you can significantly increase the space, and if you start the system from it, then there is no need for them. The system will start much faster, and you can disable it from the start menu:

It is important to remember that the service should be started as a computer administrator, with the right mouse button.
When the command prompt opens, enter:
Powercfg -h off and press Enter. After these steps, the service will be disabled.

System Restore
With this function, you can roll back the system if some glitches have begun. Windows creates restore points, writes everything to a separate file that takes up a lot of space. You can disable this feature, but it would be better if you limit the size of the file intended for system recovery for this:
- open the "My Computer" folder;
- select Properties;
- open additional options in the window;
- protection, then we find the system disk and click on the "configure" function;
- there is a slider in the window, with the help of which we set the value for using the volume of the file for recovery, 3% is enough.

Prefetch and SuperFetch
SuperFetch is responsible for caching the most requested files, and this service is not needed to start from the drive, and it should be disabled by following the instructions described below.

We disable the Prefetch service, it is responsible for loading programs into the computer's RAM, and in our case it is useless

Video: Disk Setup
How to move the swap file
Before proceeding with this setup, let's find out what a swap file is and why you need to move it at all.
Swap file or otherwise swap file(swap-file), is a virtual memory located on one of the hard drives, and is a "continuation" of physical random access memory (RAM). If, when an application is running, it does not have enough installed RAM, then Windows 7 uses a swap file to store application data, that is, it writes to and reads from it data that does not fit in RAM. This process of writing and reading is called swapping. In Windows 7, this file has a strictly defined name pagefile.sys, which cannot be changed.
And moving this file can just come in handy in cases where there is not enough space on the system partition (and for some reason it cannot be expanded) or, for example, in order to place the swap file on a faster drive. It is advisable to do the transfer if the OS is 32-bit, as follows:
- Control Panel;
- System;
- Additionally;
- performance;
- Parameters;
- Additionally;
- Virtual Memory

If your computer has 64-bit windows installed with more than 8GB of RAM, then you can safely disable the paging file option
To disable the paging file in a 64-bit OS, with an 8-gigabyte operating system, you must follow the following steps of the instruction:

Is TRIM enabled?
With the TRIM command, the OS transmits important information to the SSD about unused data blocks, which can be cleared by it. Since the option to format and delete files can lead to poor performance of the drive, this feature allows you to reduce the number of unnecessary files and clean it up.

TRIM is an important function (command) that can significantly extend the life of your SSD.
This is one of the most basic commands that must be enabled, otherwise the write level will be low, which will reduce the functionality of the disk space.
What is TRIM and how to enable it: detailed video instruction
Windows 7 operating systems
First, open the Command Prompt console with administrator rights. Next, the Start menu - Programs - Accessories - Command Prompt. Pressing the right mouse button - Run as Administrator.
Then the command is entered at the command line: fsutil behavior query disabledeletenotify - Run.
In the event that the output of the command shows - disabledeletenotify=1, this means that the TRIM command is disabled. We connect using the command:
fsutil behavior set disabledeletenotify 0

Be careful: 0 - enabled command, 1 - disabled command.
Setting up windows 7 for an SSD drive, SSD Mini Tweaker
SSD Mini Tweaker is a small program for tweaking and optimizing your operating system to work with an SSD solid state drive. If you are not a computer genius, but you want to transfer the OS to an SSD, then this utility is just for you, it does its job quite quickly, and is relevant for those users who are going to transfer the launch of a Windows 7 system of 32 and 64 bits to SDD .
 The window of the running program looks like this, it is here that you can immediately configure the necessary parameters.

Many functions for transferring Windows are not needed, they can only slow down the process itself:

The program will help you configure about 13 parameters that will increase performance if it starts from an SSD. The purpose of optimization is to reduce access to removable media, which prolongs its performance.
Your operating system can be activated by running it from an SSD drive, and Windows 7 adapts perfectly to run from a solid state drive. Even if you have a lot of power-hungry programs installed, with proper optimization you can debug it to run from SDD, paying special attention to Superfetch/Prefetcher and defragmentation.
If you have a lot of RAM, then it's even better: you can successfully optimize it, which will only lead to speed and long life of removable media.
Solid state drives are getting cheaper every day, and let's hope this trend doesn't change. .
Many new computer models already contain this type of drive, manufacturers themselves have optimized the operating system to work efficiently with a solid state drive.
Of course, you need to choose the optimization method yourself, and we only gave the most important tips on how to do this without losing important data when transferring the system to an SSD.