Removing programs from startup. Disable automatic updates
Many computer users are often faced with low internet speed. If you have connected a high-speed Internet, and it repeatedly or constantly freezes, then the first reason for this may be the provider. Also viruses, browser, and computer problems can affect internet speed.
Many computer users are often faced with low internet speed. If you have connected a high-speed Internet, and it repeatedly or constantly freezes, then the first reason for this may be the provider. Also viruses, browser, and computer problems can affect internet speed.
Before deciding what to do to increase the speed of the Internet, you first need to find out its speed on this moment... In this article, we will tell you how to check the Internet speed on a computer with windows 7, and with other operating systems, so that later you can fully express your claim to the provider.
Checking internet speed through Speedtest.net
The most convenient and more accurate site for checking Internet speed is considered speedtest.net
But before you start checking, find out the Internet speed declared by the provider, most often they indicate the speed "up", for example, up to 100 Mb / sec. It should be said right away that this is a lie, you rarely find the Internet, which can reach a speed of 100 MG / s, (although Rostelecom gives out even more than the speed declared under the contract.
In this case, the declared speed is 50Mb, and as you can see in the screenshot, the download speed is really higher), but our task will be to check if there is at least 2-3 Mb / s, which will be enough to play music or video more or less quickly.
- 1 ... We go to the site using the link speedtest.net.
- 2 ... Click on the "Start check" button or if you have English version site "Begin Test".
- 3 ... After pressing the button, the Internet speed test will start. You do not need to do anything, the program will check itself. It is advisable to disable all processes that load the Internet, as they can affect the bottom line. The verification process will take from a few seconds to a minute.
- 4 ... In the end, you will see ping (Ping), (a little about Ping itself. Ping (from the English ping) is the reaction time of the Internet connection: namely, how quickly the client computer, having sent a request, receives a response from the server. Ping is measured in milliseconds (ms, ms), and of course, the less Ping, the better ... The ideal value is up to 40 ms, higher is already a bad Ping, which leads to "Freezing" of network applications). Download Speed and Upload Speed. The main thing is to find out the speed of receiving, if it is 5 Mb / second, then this speed should be enough. Our task is to compare the real speed of the Internet with the declared provider. If they do not match even closely, then you need to urgently contact your provider, or change it to another one.
Checking internet speed via 2ip.ru
If you want to fully verify the speed of your Internet, you can use another site 2ip... But be warned, both sites featured might be slightly wrong, so count the average after checking the speed.
- 1 ... Go to the site using the link.
- 2 ... On the left side of the screen, click on the "Internet connection speed" button in the "Tests" field.
- 3 ... On the page that opens, check if your location and Internet provider are indicated. If all the data match, click on the blue "Test" button.
- 4 ... Wait a few seconds while the program counts the internet speed.
- 5
... After verification, a page will open in which your IP, provider, site, ping and time will be written. Slightly below the green numbers indicate the speed of your Internet.
As already mentioned, both services are checked in their own way and at different times. If the Speedtest had 2 MG / sec, and 2ip 1 MG / sec, then the average checking speed will be 1.5 MG.
Yandex. Internet meter - check internet speed
Ours has a lot of good and useful services, including checking the speed of the Internet. We go to this link - yandex.ru/internet, and press the button "Measure"
Now you know how to check internet speed on your computer. If you want to always know the current internet speed, you can download special program on computer. But such programs have a drawback - they slow down the computer and the Internet connection a little. Therefore, it's up to you whether you need such a program on your computer or not!
Is it possible to speed up the Internet at all? Easily! Below is a simple set of measures that can significantly increase the speed of the Internet in Windows.
Acceleration potential
For example, if you have 10 megabytes per second in your contract with your provider, then in reality you will get a download speed somewhere at the level of 1 megabyte per second, or even lower. The fact is that the QoS service is running on Windows, which maybe reserve up to 20% speed for your tasks. The browser also waits for a response from DNS servers. And in advanced cases, the browser may be disabled hardware acceleration rendering pages. And then the web-surfing turns into torment. Therefore, if you disable QoS, enable caching of DNS requests and enable hardware acceleration in the browser, the speed of the Internet can increase significantly.
The easiest way to speed up Internet on Windows
The simplest and safe way disable QoS and add 20% to speed - edit security policy. You do not need to go into the registry and risk the performance of the entire computer, it is enough to uncheck one box in convenient editor settings.
So, click "Start" → "Run" and enter the name: gpedit.msc. The Security Policy Editor will open. We sequentially go along the following route: "Computer Configuration" → "Administrative Templates" → "Network" → " QoS Packet Scheduler". Enable Limit Reserved Bandwidth, but enter 0% as a fallback. Ready.
Increase DNS cache to speed up the network
The role of the DNS cache is to store the IP addresses of all Internet sites that you visit most often. If you have a tendency to visit certain Internet resources very often (for example social networks VK, Facebook, Twiter, various blogs or multimedia resources YouTube, StumbleUpon), then an increase in your browser's DNS cache should have a positive effect on the loading speed of these Internet pages. To increase the cache size, follow these steps:
Click on the "Start" button, type in the search word "regedit" and press the Enter key. You should start the registry editor. Further, in the editor, you must go to the following path:
HKEY_LOCAL_MACHINE \ SYSTEM \ CurrentControlSet \ Services \ DNScache \ Parameters
CacheHashTableBucketSize CacheHashTableSize MaxCacheEntryTtlLimit MaxSOACacheEntryTtlLimit
And assign them the following values:
CacheHashTableBucketSize - set to 1 CacheHashTableSize - set to 384 MaxCacheEntryTtlLimit - set to 64000 MaxSOACacheEntryTtlLimit - set to 301
Speed up the Internet by disabling QoS
As far as it became known, in XP, Vista, Windows 7, 8 and 10 there is a system for reserving the width of the Internet channel. This system (QoS Reserved Bandwidth Limit) deliberately restricts your traffic to allow normal operation and traffic of higher priority applications such as Update Center or other priority components. The reserved channel width is about 20% of maximum speed your internet. That is, with this limitation, you actually use only 80% of the speed that your provider provides you. Therefore, changing this percentage can significantly speed up your browser and the loading of Internet pages. In order to reduce the width of the reserved channel in Windows 7, follow these steps:
As in the previous case, click on the "Start" button, type in the search word "regedit" and press the Enter key. You should start the registry editor. Further, in the editor, you must go to the following path:
HKEY_LOCAL_MACHINE \ SOFTWARE \ Policies \ Microsoft
Now right click using the newly created key in the left part of the window, create new parameter type “DWORD” and name it “NonBestEffortLimit”. To disable channel reservation, set the "NonBestEffortLimit" key to "0".
Disable auto-tuning of ТСР
In Windows 7, the auto-tuning function is enabled by default. This function can be one of the reasons why some individual sites or Internet services can load slowly, since this function does not work effectively with a large number of servers with different access speeds. In order to disable auto-tuning of ТСР, it is necessary to run on behalf of the administrator command line and enter the following command into it:
Netsh interface tcp set global autotuninglevel = disabled
In order to return the auto-tuning of ТСР back, it is necessary to enter the following command in the command line (run as administrator):
Netsh interface tcp set global autotuninglevel = normal
And then restart the computer in the same way.
Browser hardware acceleration
In some cases, you may have noticed that the browsing of certain certain Internet pages from your browser is much slower than in previous versions of the same browser. This may be due to the fact that your browser is currently using software rendering mode by default instead of GPU rendering mode (that is, rendering using hardware acceleration using GPU). This can happen to users who have outdated video cards or drivers for them, which in turn do not support or no longer support GPU hardware acceleration. Possible solution this problem might be setting latest version a video adapter driver that supports GPU hardware acceleration.
If this problem was not resolved by installing latest driver for a video card, then the only way out of this situation is to replace the current video card with a newer one that will support hardware acceleration using the GPU.
But you can make sure in which mode your browser is running. This, as a rule, can be viewed in the advanced settings of the browser, and more specifically the hardware acceleration option.
- Open Internet Explorer and go to the settings menu “Tools -> Internet Options”.
- On the Advanced tab, you should see an option to accelerate graphics.
Now make sure to check the box next to Use software rendering instead of GPU rendering. If checked, then Internet Explorer uses software rendering mode. Uncheck the box if you want IE to go into GPU rendering mode. If this option is grayed out and does not change, then your video card or its driver does not support hardware acceleration for the browser.
An example of how to see if hardware acceleration is enabled for Mozilla Firefox:
- Launch Firefox and open browser preferences using the “Tools -> Preferences” menu.
- Click on the “Advanced” tab, where on the “General” tab you should see a “Browsing” section. In this section there is an option called “Use hardware acceleration when available”. If this option is not checked, then your browser uses software rendering mode. Check the box to have Firefox start using hardware acceleration if your graphics subsystem supports it.
How to speed up internet in Windows 8 using NameBench
When your browser tries to visit a site, it first contacts the DNS name server. The problem is that this server is physically located at your ISP. What are small commercial companies famous for? That's right - the desire to save on everything. Therefore, the equipment for the DNS service is bought weak. Well, you are trying to enter the site, the browser accesses the slow DNS server of the provider, and then there is a delay, which can be several seconds. Now remember that each page of the site can contain pictures, videos, Flash, etc. from other sites. These are again DNS queries to the slow server. As a result, the losses add up and the braking becomes noticeable. What to do? The obvious answer is to use the fastest DNS servers. Find them and the program helps NameBench.
What are we waiting for? Download NameBench (free) and run it. No installation required. Once launched, select your country, browser used and click the Start Benchmark button. The program will try several dozen DNS servers and choose the fastest one for you. On average, you can find a server that is 2-3 times faster than your ISP's DNS.
After NameBench finds the fastest DNS, you will be shown the IP address of that server. It also needs to be registered in the connection settings. Everything is as usual:
You will be pleasantly surprised when you notice that the Internet works much faster!
Nobody likes it when, when loading a web page, they open for a very long time, and the download of files does not occur at the level at which we would like. Although, when ordering a service from a provider, it clearly indicated 20 or even 100 Mb / s, but in reality we do not get such a speed.
Of course, there is an explanation for this. Firstly, the system takes about 20% for its own needs, and secondly, the browser receives a response from DNS servers, although this takes time.
In order not to be there, we will now figure out how to increase the speed of the Internet several times.
Disable QoS Rate Limiting
Usually, the system has a 20% speed limit, although everyone may have a different way. To increase your internet speed, you need to disable this setting. For this we will use local group policies. Unfortunately, this function available only on Pro editions of Windows.
Open the "Run" window using the combination Win + R and in the window that appears, write the following command: gpedit.msc .
On the left side of the window that opens, go to the section: Computer configuration – Administrative Templates- Network - QoS Packet Scheduler – Limit the reserved bandwidth.
We find there the item "Limit reserve bandwidth". Click on it twice and set the parameter to position "Included", and then enter the number «0» in "Restriction bandwidth". Click Apply.
To see if it works network device with the QoS packet scheduler, you need to go to the Network Control Center and general access... You can get there by clicking on the Wi-Fi icon on the taskbar, or by right-clicking on a wired connection. On the left, go to the "Changing adapter parameters" section. Right-click on your connection and select "Properties". The parameter should appear there QoS Packet Scheduler marked with a check mark.

Disable QoS via registry
If you have another version of Windows besides PRO, this instruction may work for you. We go to the registry, for this we use the Win + R combination and enter the command regedit.
We go to the next section:
| HKEY_LOCAL_MACHINE \ SOFTWARE \ Policies \ Microsoft |
Here we find the section Windows, click on it with the right mouse button and create new section With name Psched.
Go to the created section and on the right create a 32-bit DWORD parameter with the name NonBestEffortLimit... We assign the value to this parameter «0» .

After the work done, we restart the computer.
Disable Internet speed limiting in software
It happens that when using programs that require the Internet, for example, torrent clients, there are speed limiting functions that you may have active.
Take a torrent client for example. If you right-click on an active download, then there is an item "Restriction of admission"... We point the mouse at it and look. The mode must be active "Unlimited".

It is the same with other torrent clients. In other types of programs, you will have to dig around and find something similar.
How do I increase my DNS cache to increase speed?
As many of you know, the DNS cache allows you to store the IP addresses of resources that you have already visited, and a repeat visit uses the DNS cache, which will allow you to open pages much faster. Unfortunately, its volume is not infinite, but it can be increased.
Go! Press Win + R and enter the command to enter the registry - regedit. A window opens where we must go to this section on the left:
| HKEY_LOCAL_MACHINE \ SYSTEM \ CurrentControlSet \ Services \ DNScache \ Parameters |
On the right, you need to right-click on an empty space and create 4 "DWORD" parameters and give them the following names - CacheHashTableBucketSize, CacheHashTableSize, MaxCacheEntryTtlLimit, MaxSOACacheEntryTtlLimit.
Each of them should have these values (in order to each) - 1, 384, 64000 and 301.
Restart your computer for a successful shutdown.
TCP auto-tuning - disable
The system has such a function that can cause web pages to load slowly, and all because its performance with some servers is not very good. Therefore, we just turn it off.
To complete this task, we need to open an elevated command prompt and execute the following command there:
Turbo mode browsers to speed up website loading
Many browsers have a "Turbo Mode" feature that speeds up page opening. So far, it is available on the following popular browsers: Opera and Yandex browser. For others, you can download special extensions.
In Opera, this function is enabled by clicking on the "Opera" button in the upper left corner. Find the function "Opera Turbo" and activate it.

In Yandex browser, this function is enabled in the settings - Show additional settings... Next to the section "Turbo" we put "Always on".
NameBench utility to increase page load
Many providers, especially commercial ones, always want to save on hardware. And when you start visiting websites, there is a call to the DNS servers (the equipment of the providers). If it is cheap, then your page loading speed will be very slow. To fix this problem, we need fast DNS servers, and NameBench will help us find them.
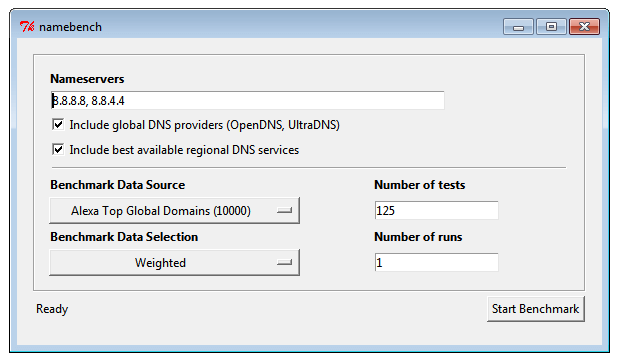
When NameBench finds the required server, it will show its IP-address, which must be registered in your connection settings.

Updating the router firmware
This is the last point, but not less important. If you are using a router whose firmware is very outdated, then do not expect a miracle from it. Look on the Internet for the firmware on your router and find instructions for installing it, as well as saving the old one in order to avoid problems.
Here are all the methods that can be used on modern Windows versions... Although, there may be something else, and if it does appear, we will not bypass it.
The Windows 8 operating system has become a pleasant surprise for many users. A completely different start screen, a beautiful tiled Metro interface, fast system loading, smooth opening of program windows. But it all takes away certain system resources and affects the speed of the operating system itself.
Let's take a look at several ways that you can use them to speed up the operation of a computer or laptop with an installed operating system. Windows system 8.
Disable visuals and gadgets
The first way is to turn off visual effects and desktop gadgets. Visual effects allow you to make the display on the screen pleasing to the eye: smooth transition between windows, displaying text, closing the program window. To configure them, press the key combination Win + E, the explorer will open. Right-click on the "Computer" button in the left menu and select "Properties".
In the System window, on the left side, open « Extra options systems ".

A window will open "System properties"... In the tab "Additionally" choose "Performance" and click the Options button.

In the next window Performance Options in the tab "Visual effects" mark the item with a marker "Provide the best performance"... Or you can choose "Special effects" and tick a couple of the necessary items. Click Apply and OK.

Although there are no gadgets on this operating system by default, those who are accustomed to using them on earlier versions of Windows install Windows 8 Desktop Gadgets. They help when working on a computer, but they also take away some of the system resources.
If you cannot do without them, leave a couple of the necessary ones, and it is better to remove the rest from the desktop.
Watching the video:
Increase the amount of virtual memory
The second way is to increase virtual memory. Open the window Performance Options as described in the paragraph above, then go to the tab "Additionally", and in the section "Virtual memory" click "Change".

Please note that the swap file is not located on that partition. hard disk where the OS is installed. The paging file size must be 2 times the size random access memory... Select the disk partition and set the size of the paging file. Click OK. Return to the previous window and click there "Apply" and "OK". Reboot your computer.

To increase the virtual memory, you can also use a regular flash drive and the ReadyBoost function. Follow the link and read how you can customize it.

Set up sleep or hibernation
The third way is to use sleep or hibernation mode. If you use your laptop several times during the day, you do not have to turn it off all the time. To do this, configure the mentioned modes.
In sleep mode everything open files and programs are stored in RAM, in hibernation mode - on the hard disk. When the computer enters one of the modes, less power is consumed, and when you resume working with the computer, the system starts up almost instantly.
Hibernation mode is designed mostly for laptops. The computer can be put into sleep mode.
Right-click on the battery icon in the tray and select "Power supply".

Now in the menu on the left, click on the item "Action when closing the lid".


If you do not have enough space on your hard disk, you can turn off the hibernation mode completely. This will free up at least 2 GB of memory. Follow the link and read how to do it.
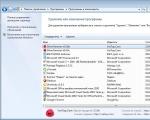
Removing programs from startup
The fourth way is to exclude unnecessary programs from startup. This will speed up the loading of the operating system. Press the key combination Win + R. In the "Open" field write msconfig, and click "OK".

Then go to the tab. If there is a list of programs that run together with the operating system, uncheck unnecessary checkboxes, click "Apply", "OK" and restart your computer. I need to follow the following link: "Open Task Manager".

In the task manager, highlight with the mouse unnecessary program and click Disable.

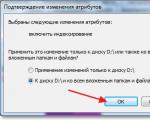
Disable search
The fifth way that will speed up the operating system is to disable indexing. This is useful for those who do not use hard drive partition search or through the Start menu. This service scans and monitors files on the computer, using its resources accordingly.
Press the combination Win + E, the explorer will open. On the left side, select "Computer" and right-click on it, from context menu select "Manage".

Now on the right side expand Services and Applications and click on the "Services" item. A list should open, find the "Windows Search" service in it and double-click on it.

In the next window, in the "Startup type" field, select "Disabled", click on the "Stop" button, then "Apply" and "OK".

Disk cleaning
The sixth method is to clean and defragment your hard drive.
How to defragment your hard drive using the built-in Windows utilities- I wrote, read the article by clicking on the link. The program for defragmentation of the hard drive Auslogics Disk Defrag will also perfectly cope with the task.

Watching the video:
Hello dear visitor!
This page provides instructions "How to Increase Internet Speed by 20%".
These changes will be very useful for watching movies.
But the instructions that are described in this article will only apply to operating systems NS windows:
* Windows 8
* Windows 7 Ultimate
* Windows 7 Professional (professional)
* Windows Vista Professional Edition
* Windows Vista Enterprise Edition
* Windows Vista Ultimate
* Windows XP Professional
It will not be possible to make settings for Windows OS:
* Windows 7 Starter Edition
* Windows 7 Home Basic
* Windows 7 Home Premium
* Windows XP Home Edition
* Windows Vista Starter Edition
* Windows Vista Home Basic Edition
* Windows Vista Home Premium Edition
In these operating systems Windiws settings cannot be made, since they do not contain the commandgpedit.msc
V Windows OS
reserved by default 20%
bandwidth of the Internet connection.
This reservation is for automatic download actual updates for Windows
and other programs.
If automatic updating is disabled for you, then lose 20%
you do not need the Internet speed.
To increase your internet speed, follow the instructions below.
I show with an example windows 7, v windows 8
configurable as well.
V windows xp almost the same for windows xp see the end of the article
And so, let's go:
Step 1: Open the START menu >> select ALL PROGRAMS >> select STANDARD >> press RUN

Step 2: In the window that opens, insert gpedit.msc and click OK

Step 3: A new window has appeared. In it we choose COMPUTER CONFIGURATION


Step 5: Next, select NETWORK


Step 7: Next, select LIMIT BACKUP CAPACITY

Step 8: A new window has opened. In it we choose TURN ON, Set the bandwidth limitation to 0% and click OK.

Step 9: Now we open START >> CONTROL PANEL >> NETWORK AND INTERNET >> NETWORK AND SHARED ACCESS CONTROL CENTER
In the window that opens, select Change adapter settings

Step 10: In the window that opens, click with the RIGHT mouse button on Local Area Connection >> push properties

Step 10: In the window that opens, check if there is a check mark on QoS Packet Scheduler
If not, then put a tick and click OK

Everything!!! All settings are now complete.
On windows XP, the settings are almost the same.
Based on the instructions provided, it is possible to easily set up and XP.
Command EXECUTE v XP located directly in the menu START on right.
After you enter the gpedit.msc command, follow the instructions below:
1. The settings window will open Group policy, we need to go to Computer Configuration> Administrative Templates> Network> QoS Package Manager Next, from the list, select Limit Reserved Bandwidth
2. In the window that appears, check the Enabled box and set the number of percentages to zero.
3. After the operations done, go to Start> Configuration> Control Panel> Network Configuration (Network Connections)> The local network(Local Connections)> Properties
3. Look for QoS Packet Scheduler in the list, check if it is checked, if not, put a check mark, and Save.