Can't reinstall windows 7 via bios. How to change Windows on an old BIOS. Reinstall Windows via BIOS. Preparing a flash card for software installation
Want to install Windows 7 on your computer or laptop, but don't know how? It's not as difficult as it sounds. Although the first time, of course, it will be difficult. But, having figured it out once, you will become a real "IT-master" and will be able to independently install Windows 7 on any computer or laptop.
Before installing Windows 7, print this page. This will greatly facilitate your task. After all, during Windows installations 7 there will be no internet access. The only exceptions are cases when you have a second PC, laptop or smartphone, from which you can, if necessary, go to the site again and see what to do next.
When is Windows 7 installed?
- You bought new laptop or a computer. Everything is clear here. In most cases, on laptops or PCs, or there is no operating system, or not the one you need (for example, the ancient MS-DOS).
- Didn't like Windows 10 or 8, and you want to install the good old "seven".
- There was a malfunction, a virus or ransomware banner ad was caught, the computer or laptop does not turn on, etc.
Let's dwell a little on the last point. If your computer or laptop has problems, do not rush to reinstall Windows. First, the reinstallation of the operating system is performed in the very last when other methods have not helped.
Secondly, remember that after installing Windows, all data is erased, at least on local disk C. And these are all your programs: browsers, video players. And you have to install everything over again.
Third, there is no guarantee that reinstalling Windows will help solve the problem. But the files on the local drive C will be permanently deleted anyway.
Therefore, first try looking for other solutions to restore your PC or laptop. For example, the following articles may help you:
You can also always look for other articles on this blog or through Google / Yandex.
Preparing to install Windows 7 OS
The first thing to do before installing Windows 7 on your laptop is to copy the entire important information... At least from the local drive C. After formatting, all data on it will be erased.
If you bought new computer or laptop, you can skip this step. In all other cases, this is a prerequisite!
Therefore, save all files, documents, pictures, audio tracks and videos from the desktop and from the folder "My Documents". It is also recommended to look at the local drive C - important information is often written to it too. Where to save? To disk or flash drive. Another option is to upload files to online services (Yandex.Disk, Google drive etc.).
By the way, sometimes you can copy some programs along with the settings. For example, bookmarks and passwords from the browser you were using.
The second point you need to do: determine which bit depth of Windows 7 you need - x86 or x64. Everything is very simple here. If you have 4 GB installed on your laptop or computer random access memory(and more), then you need to install Windows 7 x64, and if less - then x86.
Why is that? The fact is that the x86 version does not see 4 GB of RAM. The maximum that it shows is 3.25 GB.
How to find out the amount of RAM? If you have a new computer, check the documentation. And if a laptop - then the characteristics are indicated on its case (or on the box).
If you already have Windows installed, then the amount of RAM can be viewed as follows:
The third point that must be completed before installation is to burn a digital copy of Windows 7 to a disk or USB flash drive.
If you already have boot disk(bought or given out in a store along with a PC), then skip this step.
Burning a DVD is easy. After all, you've probably already recorded films, music, games? This can be done through Nero, Alcohol 120% and other programs.
As for the USB stick, there are some difficulties. Therefore, in this case, I recommend reading -.
Where to get the image or installation disc Windows 7? Can be purchased at a store or online.
And the last thing to do before installing Windows 7 is to prepare drivers for your laptop or PC. The set with the computer usually comes with driver discs. If you have them, then you can skip this point.
Laptop owners are not given discs, so you need to install drivers from the manufacturer's official website (search by the name of your model).
If you skip this step, you may be left without internet. After all, you need to install a driver for it. Also, the USB connectors may not work. That is, a mouse. And in the end, you have to go to a friend or acquaintances and download drivers from them.
This completes the preparatory process. Once again, check that you have saved all important data, then connect a USB flash drive or insert a DVD with the Windows 7 installation image and restart your laptop / computer.
BIOS setup for Windows 7 installation
Perhaps setting up BIOS is the most difficult stage for most users. Especially for beginners.
In addition, the difficulty here lies in the fact that the BIOS version may differ on different PCs and laptops. And the buttons for entering the BIOS too. As a result, some users cannot even enter BIOS. Therefore, so that there are no problems with this, we will consider in detail what and how to do.
So, when you have prepared everything, restart the computer, and immediately upon turning on the screen, repeatedly press the Del (for PC) or F2 (for laptops) button. If done correctly, you will see the BIOS screen. Something like this:

Or like this:


There are 4 devices displayed here - First Boot Device (first), Second (second), etc. By default, the first is HDD(Hard Disk or HDD). And you need to put a CD-ROM (disk) or USB-HDD (flash drive) on the first line - depending on which device the seven will be installed from.
How to do it? On a PC, you usually need to select the first item, press Enter and select the desired option from the drop-down list.

On laptops, the device boot priority is changed using the arrows or the F5-F6 buttons. Control keys are usually listed to the right or at the very bottom of the BIOS screen.

When you select First Boot Device in the first paragraph desired device(CD-ROM or USB-HDD), be sure to save the settings, and then exit the BIOS. Which button to save? This is also written at the bottom of the screen (most often F10).
If you have a UEFI BIOS ( a new version), then simply drag the desired icon (disk drive or flash drive) to the first place with the mouse and click "Exit" in the upper right corner.

After that, the laptop or computer will restart and the installation of Windows 7 will begin.
If all this is too difficult for you, there is another option to configure booting from a disk or flash drive without going into the BIOS. For this you can. But this method only works on newer PCs and laptops.
Step-by-step instructions for installing Windows 7
Immediately after rebooting, you will see a black screen with a single line.

Here you need to press any button - for example, Space.
If this inscription does not appear, it means that you have not saved BIOS settings... Check them again. If everything is fine there, then either you did not write the bootable USB flash drive correctly, or the disk is damaged and the computer / laptop does not see it (the drive may not work).
After pressing the button, you will see a black screen with the words "Windows is downloading files ...".

Wait for the system to copy everything. After that, a new window will appear on the screen. Choose Russian and click "Next".

In the new window, click the "Install" button.

If a disc or flash drive contains several Windows versions 7 - You need to choose the right one. We have already figured out the bit depth of x86 and x64, so decide for yourself here. As for the version, it is better to choose "Maximum". Although there is almost no difference between it, "Home", "Initial" and "Professional", so it is not so important. Select the desired item and click "Next".

Agree to the terms of the license (check the box) and move on.

Choose a complete installation.

A window will open with a selection of the partition for installing Windows 7. But here it is worth dwelling in more detail.
How do I partition a disk on first install?
If the installation is performed on a new computer or laptop (ie for the first time), then you will see only one line - "Unallocated disk space".

And in this case, you need to split the hard drive into 2 partitions - local drive C and D (more is possible, but this is not necessary). To do this, select this line, click the "Create" button, specify the size of the disk (in megabytes) and click the "Apply" button.

Not sure how much 50 GB will be in megabytes? Write the number at random - for example, 50,000. And then see how much the system will show for composing of this section... If it turns out not enough, select it, click the "Delete" button, and try again, specifying a higher number.

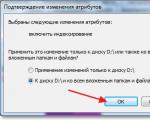
For normal operation of Windows 7, you need to create a special 100 MB partition where the boot files will be stored. Therefore, when the next window pops up, just click "OK".

When you specify the required space for the local drive C and create it, then "Partition 2" will appear. This is it.

After that, select the line "Unoccupied space" again, click "Create", and then the "Apply" button. This will bring up the local drive D ("Partition 3").

If you forget to do this, then after installing Windows 7 there will be only one local drive C. A partition D will "evaporate" in the air. You will have to reinstall Windows again. Therefore, before proceeding further, make sure that the item "Unoccupied" is no longer there.
To install Windows on the local C drive, select "Partition 2" and click "Next".

If you reinstall Windows 7, then the following window will appear on the screen:

In this case, you need to select "Section 2" and click the "Format" button. This will delete all data on it. When the formatting process is completed, select this section again and click "Next".
By the way, if you want to distribute the space between the local drive C and D differently, you can delete them and recreate them, specifying a different size. How to do this is described in the previous paragraph. But remember: in this case, the information will be deleted on the local D drive too! As a result, your PC or laptop will be clean as if you just bought it. Therefore, follow this procedure only if you have saved all the files you need.
Continuing the installation of Windows 7
So, you were able to partition the hard drive or format it before installing Windows 7 and clicked the "Next" button. The operating system will then begin to install. Wait while copying files is complete.

After that, the computer / laptop will reboot, and you will see the familiar black window with a single line again.

Never press anything on the keyboard, otherwise everything will start over.


After that, the computer or laptop will restart a second time.
Well, the main thing is already over, it remains only to fill in some fields:
- Specify the username and computer name (if you plan to play games, it is better to write in Latin).

- You do not have to set the password - in this case, just move on.

- If you have a digital copy, you do not need to specify the activation key either (usually Windows 7 is activated automatically when you connect to the Internet). Click Next to skip this step. And if you bought a disc, then enter the code here, which is written on the sticker.

- Here it is recommended to select the "Postpone decision" option (you can change these settings later).

- Choose your time zone, set the time and click "Next".

- If Windows automatically finds drivers for the Internet, then in the new window select the "Home network" item.
- Wait for the desktop setup to complete.

- Congratulations - you have just been able to install Windows 7 on your laptop or computer yourself.

What to do after installing Windows 7?
First of all, you restart your laptop or computer, go into the BIOS and change the boot priority of the devices back. That is, put the hard disk (Hard Disk or HDD) in the first place, and lower the CD-ROM or USB-HDD to the second or lower.
Also, after installing Windows 7, the Internet and USB connectors may not work. This is because there are no drivers. Therefore, in the next step, install them.
It is for this that you need to prepare everything in advance. required drivers before installing Windows 7. Especially on the Internet. After all, how do you download them if there is no network access?
And one more nuance - when you turn on your computer or laptop, you may display two Windows 7 (at boot time).

The first one was installed by you, and the second one was saved in a hidden section ("reserved by the system"). However, the extra line can be deleted. To do this, do the following:

Ready. After reboot second windows 7 will no longer be, and you will not see the operating system selection menu.
If you have any questions, ask them in the comments.
Do you have a laptop, Personal Computer or a tablet - in a word, the device on which you want to install Windows via a USB stick? Do you often have to reinstall the OS and do not want to use fragile and bulky disks?
If yes, then this guide is for you. Carefully read the instructions below, and you will definitely succeed!
You can also say that a disk image is the same CD / DVD-disk without its own material shell.
Step 1. If you own an official copy of Windows, you can create a bootable USB drive from the Windows installer provided on DVD disc or use the official ISO file that can be downloaded from the company's website. You can also purchase the ISO distribution from other sources (download from any torrent tracker). In the latter two cases, skip the next steps in this section.
Step 2.... There are many free solutions available on the Internet, one of which is the ImgBurn program, one of the most popular utilities.

Step 3. Insert the operating system disc into the DVD drive. Open the program and click on the "Copy to Image" or "Create Image" tab (the inscription may differ in different versions of the program). Select DVD as source when prompted.

Step 4. Save the ISO file. Choose an easy-to-remember file name and location. Make sure you have enough free space to save the file. An ISO file is essentially an exact replica of a bootable DVD.

Part 2. Create a bootable USB stick
Step 1. Insert your USB flash drive into the appropriate connector on your computer. To copy a disc image file (ISO) successfully, the media must be at least 4 GB in size.
Note! On creation, all original data will be erased - create backup in case of availability of important information.

Step 2. Download Windows 7 USB / DVD Download Tool from Windows official site. Despite the name, the utility works with other OS versions as well.

Step 3. Specify the path to the ISO file - the location where you saved it in the last step of creation.

Step 4. Click on the "USB Device" button. The program can also create a bootable disc by clicking on the "Disc" button.

Step 5. Wait for the download to complete. The program will prepare the drive, then download the ISO file to it. The copying process takes up to 15 minutes, depending on the speed of your device.

Part 3. System preparation
- Insert your USB stick into your computer. Press the power button or restart your computer. During the reboot, click on the so-called "Setup key" - a key combination that is shown on the first screens of the system boot. Usually, this combination is located on the same screen where the manufacturer's logo is displayed. The key varies from computer to computer, but will be on the screen anyway. After clicking, you will be taken to the BIOS menu.

Table of dependence of hot keys on the PC model at the time of the boot start

- Click on the " Boot Menu". Each BIOS is different, but they all have this tab. You will see the order in which the computer searches for a bootable operating system. Typically, computers primarily do this with hard disk so the OS boots automatically.

- Once you get to the Boot Menu, you will need to switch the order so that your USB drive is at the very top of the list. Again, exactly what this listing looks like will vary depending on the make and model of the device. Perhaps you will see the name of your drive, or perhaps just the inscription "Removable Device" or "USB". To change the order, use the "+" and "-" keys - up and down, respectively.

- After that, save the changes and exit the BIOS. The key to this action usually the F10 key. The computer will reboot from the USB drive.

Part 4. Installing Windows
Step 1. Press any key to start initializing the installer. In the event that you do nothing, the computer will automatically start loading the already installed operating system and you will have to restart the system again.

Step 2. After pressing the key, the system will start downloading data to install the operating system. On slow devices, this process can take up to several minutes.

Step 3. Follow the instructions of the installer. Once the installation is complete, the system will reboot.

Congratulations! You have installed Windows! Now you have a USB stick to use. Most new computers support installation from flash drives, use the dedicated point BIOS boot as shown above.
Video - How to reinstall Windows from a USB flash drive via BIOS
Installing Windows 7 from a USB flash drive via BIOS today is the most relevant option for solving the issue related to the independent installation process of the Seven. Why? The thing is that the time of popularity of disk drives has passed, which means that many people simply do not have DVD-ROMs. On the other hand, there is no installation procedure for Windows 7, which is actively used today when switching to the Ten. Fortunately, any computer has USB, so most users have only that option left.
To install Windows 7 from a USB flash drive via BIOS, you must sequentially implement several steps:
- Prepare a source;
- Change the equipment settings so that it becomes possible to implement the plan;
- Directly start and execute the installation process.
This article will provide all the necessary information for each of these stages. After reading it, even an inexperienced user can install Windows 7.
Of course, there are other options for creating bootable USB with a Seven, but the use is absolutely free utility Rufus makes the task as simple as possible.
So, in order to successfully complete this stage, you must repeat the following steps:
- Search for and download a workable image with the operating system that you plan to install on your PC.
- Search for utility and similar downloading. By the way, you can easily find portable version, that is, you don't even need to pre-install the program.
- To plug external storage that you plan to use for recording. Check for the presence of information important to a person on it. If there is one, move it to another location.
- Run the program.
- When a USB flash drive is connected, the utility will immediately display information about it in the "Device" window.
- In the second paragraph, it is recommended to opt for MBR for computers with BIOS or UEFI. This type is suitable for almost most options for modern technology.
- The next point can be easily ignored, since the utility will independently select the best option. file system when adding a recordable image.
- It remains only to mark the places where it is written about the fast format and creating a boot disk.
- Before starting the procedure, you only need to specify the path to the recorded image and click on the "Start" button.
- The utility begins its work, the success of which can be monitored by the slider at the bottom of the window.

After the message "ready" appears, you can proceed to the next stages in the implementation of the task.
Configuring BIOS for installation from a USB flash drive
Before starting to make such changes, it is initially recommended to go to the hard disk partition that you plan to use for the Seven. The point is that OS installation will automatically erase all information on it. Therefore, you need to make sure that nothing important is left on it. After that, the following actions are performed:
- A restart of the PC is initiated.
- At the very beginning of this process, a button is pressed that allows you to enter the BIOS. In most cases, this will require you to click on "del". There are other options though. For example, "F1", "F2" and so on, depending on the manufacturer of the equipment used.
- BIOS screen also for different models may differ. Nevertheless, in all of them you can find an item called First BOOT - it allows you to set the priority of devices from which the download will be performed.
- It should be opened and the priority should be changed to USB or USB-HDD - whoever has it.

Naturally, the flash drive must already be connected. Further, the changes made are saved and you can exit the BIOS. If everything is done correctly, the computer will start running the installation program.
Windows 7 installation process with USB
The further process is very simple - the main thing is to do the right actions:
- Select your preferred language and keyboard layout.
- Read and agree with the agreement from the developers of the operating system.
- Select the hard disk volume where the installation will be performed.
- The program will display a warning about the need to format the partition and erase all information located on it.
- You must agree to this condition and start the installation procedure.
- For some time everything will happen automatically. After the information message about the completion of work appears, you will need to click on "next".
- The personal data of the owner of the equipment is entered. If you don't need a password to enter, just leave an empty line.
- When using a licensed version of the product, a key is inserted, which the person must have.
- Temporary and network settings.

Are you going to install windows? Correctly installing is from the disk through the BIOS. To do this, you need to ensure that the download is performed using a CD-ROM or DVD-ROM. If you want to make loading with USB flash you must select an item USB HDD.
To do this, we need to restart the computer, get into the BIOS settings (Setup) - the program that provides the initial boot of the computer. When the computer boots up, a window will appear, at the bottom there is an entry Press xxx to enter SETUP, in fact, there it will be written how to get into the Bios. There are not many options - it can be a button: Del, Esc, F1, F2, F3, F10, Ctrl + Alt + Esc (simultaneously)
Also, to choose the option to boot from HDD, USB, DVD, you can use Boot Menu, keys to enter:
Monoblocks and laptops
Samsung - Esc
Dell - F12
HP - F9 or Esc and then F9
Toshiba - F12
motherboards
If you have Did not work out go to the BIOS, try to do everything again, if YES - we see the next window.
from DVD-ROM - burn a disc with windows to minimum speed, to another disk (new), select another distribution.If in BIOS, UEFIno possibility select, add boot from disk or usb flash, you need switch off Secure boot or in the operating system run from disk installation.

One of the reasons why it does not boot from a usb flash drive (black screen) is enabled UEFI, the flash drive is formatted in NTFS... Legacy BIOS supports booting from NTFS partition, UEFI to FAT32
Windows XPdoes not fit on hard driveSATA III (3)
It is worth being wary of distributions with automatic installation of Windows, an answer file, the operating system may be installed on the wrong partition and delete the data!
And so we are in the AMI Bios settings, to change the settings, click the "->" button on the Boot tab

Use the "down" button to select CD-ROM Drive, use the "+" button to move it to the first place in the list. By this we have ensured that the boot is performed from CD \ DVD-ROM. Take your time to rejoice :), you must save these settings! This can be done by pressing F10 (Save and Exit), or by clicking "->" go to Exit - Exit Saving Changes (Exit Save Changes).

If you have AWARD (Phoenix) BIOS, select the Advanced bios Features item:

Second Boot Device - HDD-0

After changing the boot option, press Esc and save the settings in the Save & Exit Setup item.

Save & Exit - Boot Override
gigabyte uefi dualbios in Russian

Select Bios Functions - Device Boot Priority - Boot Option - F10
When you boot the computer, press any key.
Tags: install, reinstall windows via Bios
Choosing Russian language


We click to install

At this stage, you will have to choose X86 architecture or x64 bit, x64 bit is worth choosing if you have more than 4 GB of RAM.

Push I accept the license terms

We choose Complete installation for further formatting drive C

Click on section C, Disk setup


Remove the daw Automatically activate Windows 7 when connected to the Internet

Hope article how to install helped.
Do you want to reinstall windows? It is very important to reinstall the OS correctly. The process can be divided into three stages: The first stage is the actions performed before installation, the second is the installation of the operating system, the third stage is the configuration.
You cannot reinstall the system via the Internet, you can reinstall Windows using a DVD rom or a usb flash.
Before reinstalling Windows, you must right choose a distribution kit that can be bought in a store or downloaded on the Internet. The disc image can be burned with UltraISO. I recommend using clean assemblies that do not have preinstalled drivers, skins, no tweaks (changes to registry settings). To improve performance and security, the latest service pack and critical updates must be preinstalled. Such an operating system will last longer!
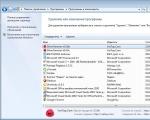
Then we get network cable(if any) from the network card so that the "evil" does not get out of the network. We check the distribution kit and all partitions of the hard disk (hard drive) for viruses with updated databases. You need to check all sections so that the virus after installing the operating system does not get into it from partitions other than C.
Copy all NEEDED files with system disk C (root, folders My Documents, Desktop, Documents and Settings, C: \ Users) to D, E, since when installing the OS, partition C must be formatted (complete loss of information). In the future, do not store documents, movies, games (do not install) on the system drive, as these files will not affect the performance for the better.
We rewrite the network settings (IP address, gateway, workgroup, etc.), if there is a home one or another. Make sure you know in advance how to set up the internet connection after reinstalling the system. Go to the website of your Internet provider and look at the instructions.
If you do not have a system disk with DRIVERS or saved on the hard drive, a program will come in handy that will help you save existing drivers, as well as find them on the Internet and update them in the future.
If you have completed all these steps, proceed to the Windows installation process. how to do it correctly you can read
After installing Windows, install antivirus, drivers for all devices, service packs, critical updates, if they were not preinstalled in the distribution kit. As well as all the necessary programs, configure the OS as convenient (folder view, theme, desktop shortcuts, etc.), update the antivirus software via the Internet, optimize the OS.
So that you don't have to install Windows again from scratch, and the reason for this may be: an attack of viruses, slow work systems caught " Blue screen death "and the like, for you there is correct solution- a special program!
I hope this article helped you reinstall Windows!
Tags: install, reinstall via Bios
how to reinstall (uninstall) preinstalled windows 8?
After buying a new Acer laptop v3 ran into a problem - it was running windows 8, this operating system is unusual for many, like me, so it was decided to reinstall it on windows 7.
Ordinary windows way 7 could not be reinstalled immediately, because when the computer was booted, there was no message on how to enter the BIOS and it was impossible to choose to boot from DVD-ROM.
You can enter bios using the F2 button, the rest of the keys for entering and setting up the BIOS can be viewed. By default, the UEFI interface was used, in which case it is impossible to choose to boot from dvd rom or a flash drive, so to reinstall windows you need to Boot - Boot Mode instead of UEFI select Legacy Bios.

Tab Exit - Exit Saving Changes(Exit Save Changes), restart the laptop.
Go to bios, in Boot priority order select download from dvd rom or flash, press F10.


asus laptop, stood Free DOS aptio setup utility


We have reviewed the features and capabilities of this operating system several times. Today we will talk about what, of course, almost every user will face. It's about. And we will consider how to install it through BIOS.
We will not tell you what BIOS is, since there have already been references to it many times. All that can be said is that every computer has this basic I / O system.
So, first thing. On different computers this is done in different ways. But still, very often when starting the computer, you need to press the Del key while starting the computer. After that you will be taken to the BIOS.
After entering the BIOS, find the menu section that is responsible for installing the OS. The location of this section can be different, since computers have different motherboards and, accordingly, different versions of BIOS.
You need to find the menu FIRST BOOT DEVICE, BOOT or BOOT DEVICE... Why exactly are they? It is through them that you need to start installing the operating system through the BIOS. Now you have to expose DVD drive or an HDD (flash drive). This completes the preparatory installation process.
Now you need to exit BIOS, saving all the changes you made before. Most often this is done like this: the F10 key to exit and the Y key - to save the changes made. Then restart your computer. After rebooting, you can see the following message: " Press any key for load from CD ...". This inscription will appear if in the previous paragraph you selected DVD as the OS distribution media. If a flash drive was used, the OS boot will start automatically after restarting.
How do you know if the Windows installation has started? If everything is done correctly, then something similar to this should appear on your monitor.

All this is just preparation for installing the operating system. Upon successful completion of the preparation, you should see the inscription " Starting Windows". And almost immediately the Windows installation window will appear. Select all the options are the same as in the screenshot below, and then click on the" Further". Immediately another window will appear in which you will need to click on the" Install".

A window with license terms will appear next. You need to check the box next to the " I accept the license terms"and then press the button" Further". Everything is the same as with any other installation of programs. Then you will be asked to select the type of installation. It is better to select the item" Complete installation".
Little remains to be done. Now you will need to select the hard drive where the operating system will be installed. There will be no difficulties with this. Next, the system will prompt you to select a partition for the OS, but since they do not exist yet, you will need to create it yourself.

Next, select the size of the partition, that is, set it yourself and click on the " Apply". After that, a window will appear informing that Windows can create additional partitions. Just click the" OK", and then " Further The installation process will begin.
After all the necessary system components are installed, the computer will restart. At this point, remove the OS distribution media from your computer.
As soon as the computer restarts, a window will open with the completion of the installation. You should see a window like this.

This process will take several minutes. After it, the initial setup of the operating system will begin. Here you will be prompted for a username, computer name, and user password. You can also skip this one by clicking on the " Further". In principle, the main stage of installing Windows through BIOS is over. You just need to enter the key, accept the recommended settings and you can use the computer. As you can see, although this process is lengthy, in fact there is nothing complicated in it.