Ssd connection via usb. Life hack. Connect the SSD to USB. How to prepare an SSD for installation
Today, wearable drives are subject to increasingly stringent requirements... To the volume of the built-in memory, as well as to the light weight and dimensions, the requirement for the data transfer rate has been added. Everything is logical: the higher the speed, the faster documents, photos, music, films will be copied.Moreover, the volumes of those very documents and media content have grown dramatically. If earlier a film of good quality "weighed" up to a gigabyte, today it is several gigabytes. The same with photographs: with an increase in the resolution of camera matrices, the volume of a photograph has increased, and if there are hundreds and thousands of them, the copying process becomes excruciatingly long.
There are more demands on wearable storage today than ever before. The requirement for data transfer speed has been added to the light weight and size, as well as the volume of built-in memory. Everything is logical - the higher the speed, the less time it will take to copy documents, photos, music and films. In addition, the volumes of those very documents and media content have grown dramatically. If earlier a film of good quality "weighed" up to a gigabyte, today it is several gigabytes. The same is with photographs - the resolution of the camera matrices has increased, which means that the volume of the photograph has also grown, and if there are hundreds or thousands of them, then throwing them from a flash drive and back will become a real torment.
New realities and opportunities
With the advent of USB 3.0 interface, it would seem that the data transfer speed should have increased 10 times compared to USB 2.0. After all, the theoretical bandwidth of the interface has grown from 480 Mbps to 5 Gbps. But this is just a theory. In reality, speeds depend on the drive itself more than on its interface. For example, ordinary flash drives with slow memory and a simple controller inside will never be able to show good speed regardless of their interface. It's the same with laptop hard drives, which are often used as external portable storage - USB 2.0 interface is, of course, not enough for them, but they cannot use USB 3.0 to the fullest either. Maximum speeds with linear reading and writing in the case of a 2.5 "HDD, they never exceed 100 MB / s.Affordable solid-state drives (SSD) connected via USB 3.0 interface should have provided significantly higher read and write speeds. Indeed, unlike hard drives, the speeds of such drives are already limited by the bandwidth of the third generation SATA interface - 6 Gb / s. That is, the speed is at the level of 500 - 550 MB / s in both directions. There are also plenty of external boxes with USB 3.0 interface, so there is no problem to make external USB 3.0 drive from fast SSD and USB 3.0 box. However, there are doubts about the SATA to USB 3.0 interface converter - how much the speed will be cut during conversion, this is the main question.

At the same time, eminent manufacturers have created fast flash drives that are based on the same SSD controllers and fast NAND memory as traditional SSDs. For example, the latest generation promises us breathtaking read and write speeds - up to 450 MB / s and up to 200 MB / s, respectively.

Here's what Corsair promised us
We at NICS Computer Supermarket are not used to taking anyone's word for it, so we decided to conduct an experiment and understand which is better: buy a fast USB 3.0 flash drive or assemble an external drive from a real SSD and USB 3.0 box.
Experiment
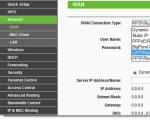
As an experiment, we used the same testing system that we use for hard drives and SSDs with a SATA interface. You can see the stand configuration.
The following components were tested, which were at hand:
| Corsair Voyager GTX 256GB | Samsung 850 EVO mSATA 120GB + Espada PA6009U3 | |
| ATTO Disk Benchmark Reading speed. Default settings, KB / s | 463962 | 150243 |
| ATTO Disk Benchmark Write speed. Default settings, KB / s | 347114 | 144320 |
| CrystalDiskMark 3.0 Sequential Read (1024 KB Block Size) MB / s | 232.6 | 156.7 |
| CrystalDiskMark 3.0 Sequential Write (1024 KB Block Size), MB / s | 129.3 | 157.4 |
| CrystalDiskMark 3.0 Random Read (512KB Block Size) MB / s | 168.3 | 154.1 |
| CrystalDiskMark 3.0 Random Write (512 KB Block Size), MB / s | 127.3 | 147.8 |
| CrystalDiskMark 3.0 Random Read (4KB Block Size) MB / s | 23.61 | 23.69 |
| CrystalDiskMark 3.0 Random Write (4KB Block Size), MB / s | 34.88 | 36.34 |
| CrystalDiskMark 3.0 Random Read (4KB Block Size, 32 Query Depth), MB / s | 25.8 | 25.9 |
| CrystalDiskMark 3.0 Random Write (4KB Block Size, 32 Query Depth), MB / s | 36.82 | 38.96 |
| AS SSD Copy Benchmark ISO MB / s | 68.27 | 66.98 |
| AS SSD Copy Benchmark Program, MB / s | 52.38 | 55.99 |
| AS SSD Copy Benchmark Game, MB / s | 65.26 | 63.15 |
As you can see, it is significantly faster than the competitor in sequential read and write operations. And since the main operations for external storage is just a banal transfer of large data, these characteristics are the most important. Note also that Corsair did not deceive, which is what many flash drive manufacturers are guilty of - read and write speeds are really high. You can transfer a gigabyte of data in 3 seconds.
The conclusion is obvious - much faster SSDs connected via USB using existing USB 3.0 boxes. In addition, it is much smaller and lighter than "SSD designs", which is also very important for portable drives.

Conclusion
No matter how hard we tried to get high speed SSD through existing USB 3.0 boxes, it didn't work out. But it turned out great. With a new 256 GB flash drive (just think about it!), You can transfer a lot of information at speeds that until recently seemed transcendental to us. Plus, it's much smaller and lighter than a box-mounted SSD. Yes, it is more expensive, but it is made of metal, weighs little and really reads and writes quickly - today there is simply no alternative to such a combination of advantages.
Terrible secret!
If a USB flash drive or portable external HDD equipped with a USB 3.0 interface, this does not mean that the speed of reading and writing will increase dramatically or even increase at all. It all depends on the drive itself. At the dawn of USB 3.0, many manufacturers of flash drives did not change anything constructively at all, except for the interface. That is, a "slow" USB 2.0 flash drive with up to 10 MB / s read and write performance was taken, the interface was changed and a USB 3.0 flash drive was already on sale. Of course, there was no increase in speed at all.
Now let's take a portable external hard drive as an example. Basically, it's 2.5 " SATA disk+ SATA interface converter -> USB 3.0. If you remember at what speed any 2.5 ”HDD for a laptop with a spindle rotation speed of 5400 rpm works, then numbers in the region of 85 MB / s pop up with linear reading and writing. Simple math will tell us that the USB 2.0 interface is not enough to realize the capabilities of this drive, but in the case of USB 3.0, only a third will be used bandwidth, best case scenario.
Before choosing SSD drive for a laptop, the buyer should know their main features, which should be paid attention to.
First of all, it is the volume of the disk and its price - the facts that influence the choice of any drive.
However, SSD has its own characteristics that require other factors to be taken into account, approaching the purchase more responsibly than purchasing other computer elements.
Moreover, the price of such a device will be almost the most expensive among all laptop components.
Benefits of buying
Buying an SSD drive for a laptop is one of the most important steps in increasing system performance and data processing speed.
On such a storage device, access to information is much faster.
Replacing the obsolete HDD to a more modern version will bring a greater increase in power than even increasing the memory or installing a new processor.
Benefits of a laptop solid state drive:
- increasing the speed of accessing data, which will speed up the launch of programs several times;
- the compact size of most devices (except for portable options), making it easy to choose an SSD for both a large 17-inch laptop and a small netbook with a 10-inch display;
- light weight, especially important when used on a laptop;
- reduced power consumption, which should improve the average battery life of your laptop;
- high level of reliability of the SSD.
Among the disadvantages that are noted in solid-state drives, attention is paid to its relatively small resource: 3000-5000 cycles.
For typical home use this time is roughly equivalent to 7-8 years of work, more than the average user works with the same disc.
The relative fragility of the SSD in this case does not really matter - it is also undesirable to drop the laptop itself.
At the same time, the relatively high price of the device is compensated by the increase in the operating speed.
Features of choice
To start choosing the solid-state drive suitable for you is worth with the main indicator, which immediately catches the eye when viewing different options in online stores.
This is the cost of equipment, which today is still several times higher than that of conventional HDDs, it depends on the volume and manufacturer of the disk.
Price and volume
The cost of an SSD can seriously affect the choice of a user with limited financial capabilities.
The only available options today are 60–120 GB drives, the price of which is in the range of 2–4 thousand rubles, almost the same as a 500–1000 GB HDD.
However, if the laptop is used only for work and not for games, a 120 GB disk will be enough to house the system and documents, and possibly enough for backups.
When choosing a storage option a large number information worth considering budget SSD 512 GB.
Their cost per gigabyte is lower than that of other devices - at the level of 20-30 rubles. instead of 40-80 rubles. for smaller or newer and larger drives.
It is worth paying attention to the 512-gigabyte variants and due to the increased data exchange speed.
Drives of this size (it can be not only 512 GB, some manufacturers produce 480 and 525 GB disks) work twice as fast as their 128 GB counterparts.
The size
When looking at SSDs, you will notice that their sizes differ from each other.
And, if for a stationary PC it is permissible to buy a 3.5 "drive, for a laptop it is worth choosing models with 2.5 and even 1.8 inches.
Some of the most popular options today are the mSATA and M2 form factors, which are cards for SATA and PCI-E slots, respectively.
The dimensions of such discs are even smaller - the width can reach only 12 mm, the length - from 16 to 110 mm.

The only drawback of mSATA and M2 drives can occur if the laptop motherboard does not have the corresponding slots.
But such outdated "motherboards" have not been released for several years.
It is hardly possible to noticeably increase the performance of an old (before 2010–2011) laptop even with an SSD drive.
Interface
The standard interfaces for connecting SSDs are PCI-E or SATA.
In terms of price-quality ratio, the best options are drives connected via a SATA III connector.
This interface will provide data transfer rates of up to 6 Gb / s - more than any solid-state drive available today.

Speed
Reading and writing speed are parameters that will affect the acceleration of work with information.
Most SSDs read faster than write.
If the cache is full, the actual speed of the drive may drop - although not as noticeably as with old-style hard drives.
However, even inexpensive SSDs have 3-4 times faster performance compared to high-performance HDDs.
Therefore, choosing a budget model of a solid-state drive (for example, a 512-gigabyte version for 10 thousand rubles), you will still get a noticeable increase in performance.
Buying an analogue costing 25-30 thousand rubles is not always justified for the average user, even with an increase in speed.
A compromise solution is the choice of an option with a lower capacity, but more data transfer capabilities.
Resource
For a conventional solid-state drive, the number of rewriting cycles reaches 5000–10000. The higher the value, the longer the disc will last.
So, for example, for a frequently used small 60 GB SSD, during a working day, the resource may decrease by 2-3 cycles.
A high-performance 512-1024 GB drive will last you about the same number of days as indicated in its cycles technical characteristics–3000 (over 8 years) or 5000 (13 years).
However, improper handling of the disk can reduce the resource much faster.

Manufacturer
Many manufacturers, from Intel to SanDisk, are involved in the production of SSD drives. Choosing a drive by brand is not easy.
But if you are looking for an inexpensive option, you should go for the Crucial brands. Intel products provide high reliability.
And the fastest, albeit expensive, are SSDs from Samsung, Western digital and Corsair.

Controller
The type of controller affects the performance of the disk. Budget options use Phison models.
Marvell controllers are installed on expensive and fast drives, providing a noticeable increase in performance.
Low- and mid-range drives can be equipped with a SandForce SSD controller, which slows down the data processing speed when the cache is full and disk space is reduced, but at the same time writes information quickly.
Installing a disc
After the SSD has already been selected and purchased, it remains to install it correctly in the laptop.
If there is not enough space, you can replace the SSD already installed on laptop HDD(which can then be inserted instead of the drive using a special adapter).

Another option that is suitable when choosing a solid-state drive with an M2 form factor is to install the disk along with the HDD; there is enough space inside the laptop for this.
In this case, the overpayment for a drive with a smaller size becomes justified.

The third option is to buy a special case to make the SSD external. Although you can buy such a drive in a design that is already suitable for connection via a USB connector.
True, the second option will cost more and will not allow, when such an opportunity arises, to install the disk inside the laptop.
Advice: External SSD should only be connected via USB 3.0 or 3.1 ports. The outdated 2.0 interface not only will not provide any speed increase in comparison with HDD, but may even decrease it.

After connecting the drive, it must be optimized by installing software from the official manufacturer or other suitable applications.
For example, the Intel SSD Toolbox will keep the drive's firmware updated and its partitions aligned. The AS SSD utility performs roughly the same task.

The interface of such programs for optimization does not require much time to master - it is quite intuitive.
Green means the SSD is working properly.
Red warns of possible problems and you need to download the utility not for checking, but for fixing errors.
One of these applications is Parted Magic, whose task is to restore lost SSD settings and return them to factory values.
SSD Operation
Immediately after installing the SSD, it is advisable to split it into several partitions (just like a regular HDD).
One partition will be used for the operating system and system files, the rest are for storing other information.
Another option is to store the bulk of the files on a regular hard drive, and place the solid-state drive at the disposal of the OS and the most frequently run programs.
Optimizing SSD space in this way will extend its lifespan.
If the size of the drive is small (economical purchase option), within the range of 60–128 GB, it is recommended to periodically free it from unused files.
The disk should not be allowed to work at the limit of its capacity - this affects both the operating speed and the service life.
To remove unnecessary information, you should use the CCleaner program.
When using solid-state drives, you should be aware of the peculiarities of deleting information from it.
It is advisable not to just delete unnecessary file built-in system tools, but also clean up the disk special utility- for example, Eraser, which you can call after installation from context menu Windows.

Another way to extend the life of an SSD, preventing premature failure of expensive equipment and loss of information, is to provide uninterruptible power supply.
To do this, you need to ensure that the laptop battery is sufficiently charged.
When connecting the device to the mains (for recharging or in case of problems with the battery), it is advisable to use a UPS.
An unexpected power outage can erase the information on the SSD, and a short circuit in the mains in 80% of cases destroys the drive itself.
Will increase the service life and efficient cooling SSD - using special laptop stands and periodic cleaning of the case.
Firstly, it will not increase the speed of work, unlike the HDD.
Second, by defragmenting the disk, you reduce the number of remaining rewrite cycles.
conclusions
The best choice for users looking to improve performance while saving money is today a 2.5-inch SSD with a capacity of 60–128 GB, suitable for most workloads.
If you have financial possibilities, the best option for your laptop is an M2 disk with a volume of 512 GB.
Good day to all, my dear friends. Today I want to tell you about how to connect a hard drive via usb to a computer or laptop. Personally, I had such a question when I replaced it on my laptop, after which the old "hard" remained restless, albeit completely serviceable. Therefore, I hasten to please you. If you have such a device, then you can make an excellent mobile data storage out of it.
However, there is one small condition. These methods are suitable only for more or less modern hard drives with an interface not lower than SATA.
USB Box (containers, pockets)
Cam Box - This is (as you understood) a certain box (plastic or metal), inside which there is a special slot for one or another disk. It is naturally worth noting that there are boxes for both large HDDs (3.5) and small (2.5) ones that fit laptops.

It is just elementary to insert the HDD into the box, and after assembly it will not differ in any way from the usual external hard disk... After that, it will be enough for you to insert into it USB cable and connect to your computer. This way you get a double benefit:
- You bring an old device back to life and use it;
- You almost get an external HDD for free
On such media, you can store any backup and archive copies, or use it in everyday life.
All the fun will cost you an average of 300-500 rubles.
Adapter (SATA-USB)
The easiest and least expensive way is to purchase a special SATA-USB adapter. The adapter itself is a cable, at one end of which there is a connector for connecting a disk, and at the other end there is a USB port.

Well, I think that you have guessed what needs to be done in this case. Yes, it's simple. Connect the hard drive to the connector, and insert the other end into the usb-port of your computer or laptop.
But just keep in mind that ordinary HDD (3.5) may not have enough power from one USB cable, so purchase a cable with two connectors and use them at the same time.

Depending on the company and product quality, such cables will cost you about 200-600 rubles.
Dock station
The most expensive but highly effective option is to purchase a docking station. These devices are somewhat reminiscent of old consoles such as Dendy or Sega. The similarity lies in the fact that instead of a connector for cartridges, there are connectors for HDD. You just have to insert a hard disk into this station, and then connect it via USB to your computer.

Such devices are different types, and in many cases you will be able to work not only with one disk, but with several at once, and even with different form factors (2.5 and 3.5).
The cheapest options with one device will cost you no less than 1,000 rubles, or even more. More powerful stations cost both 3 and 4 thousand rubles.
As you can see, there are enough ways to connect a hard drive via usb to a computer, and for every taste and color. Therefore, you no longer have to leave all your devices restless.
Well, this is where I end my article. I hope you liked it, so do not forget to subscribe to my blog updates, as well as share blog articles at in social networks... Good luck to you. Bye Bye!
Best regards, Dmitry Kostin
Connection various devices to a computer, many users find it difficult, especially if the device needs to be installed inside the system unit. In such cases, the many wires and various connectors are especially intimidating. Today we will talk about how to properly connect the SSD to a computer.
So, you have purchased a solid state drive and now the task is to connect it to your computer or laptop. First, we'll talk about how to connect the drive to a computer, since there are more different nuances here, and then we'll move on to a laptop.
Connecting the SSD to a computer
Before connecting a disk to a computer, you should make sure that there is still space for it and the necessary cables. Otherwise, you will have to disable some of the installed devices- hard drives or floppy drives (which work with a SATA interface).
Connecting the disk will take place in several stages:
- Opening the system unit;
- Fastening;
- Connection.
At the first stage, no difficulties should arise. You just need to unscrew the bolts and remove the side cover. It is sometimes necessary to remove both covers, depending on the design of the case.

For mounting hard drives in system unit there is a special compartment. In most cases, it is located closer to the front panel, it is almost impossible not to notice it. Solid state drives are usually smaller than magnetic disks. That is why they sometimes come with special sleds that allow you to fix the SSD. If you do not have such a slide, you can install it in the card reader compartment or come up with a more sophisticated solution to fix the drive in the case.

Now comes the most difficult stage - this is the direct connection of the disk to the computer. Getting it right takes some mindfulness. The fact is that in modern motherboards ah, there are several SATA interfaces that differ in data transfer speed. And if you connect your drive to the wrong SATA, then it will not work at full capacity.

In order to exploit the full potential of solid state drives, they must be connected to the SATA III interface, which is capable of transferring data at 600 Mbps. Typically, these connectors (interfaces) are highlighted in color. We find such a connector and connect our drive to it.

Then it remains to connect the power and that's it, the SSD will be ready for use. If you are connecting a device for the first time, then you should not be afraid to connect it incorrectly. All connectors have a special key that will not allow you to insert it incorrectly.

Connecting the SSD to a laptop
Installing an SSD in a laptop is somewhat easier than in a computer. The difficulty here is usually to open the laptop lid.

Most models have their own cover for the hard drive bays, so you don't have to completely disassemble the laptop.
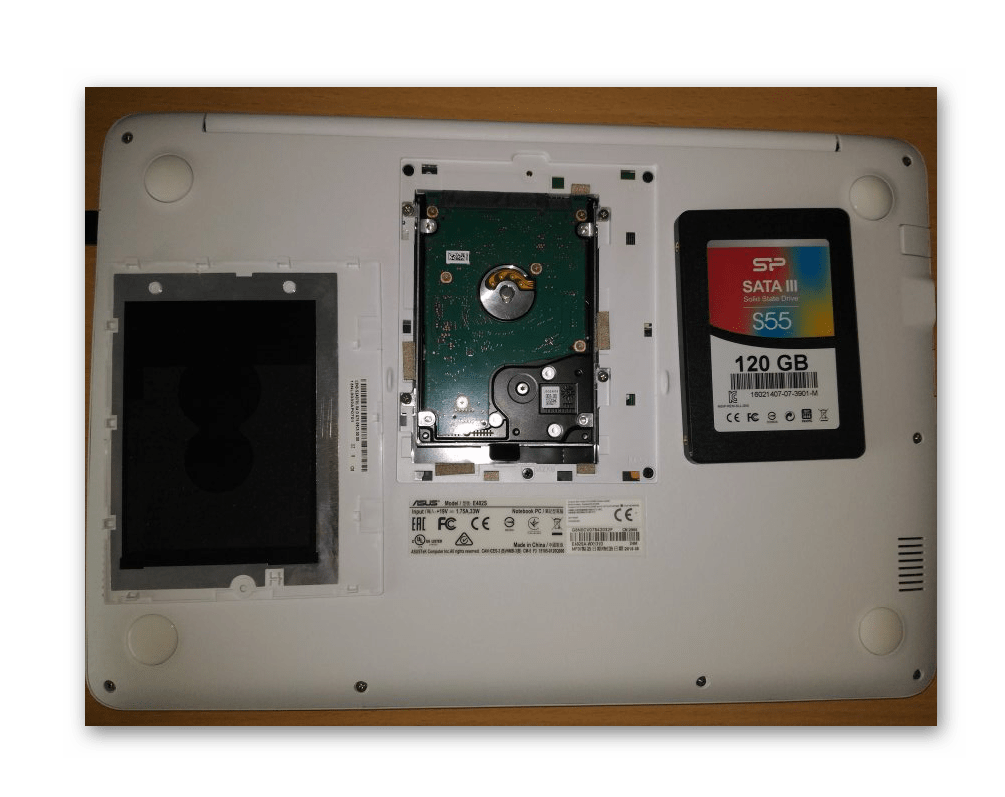
We find the required compartment, unscrew the bolts and carefully disconnect the hard drive and insert the SSD in its place. As a rule, here all the connectors are rigidly fixed, so to disconnect the drive, you need to move it a little to the side. And to connect, on the contrary, slightly move it to the connectors. If you feel that the disc is not inserting, then you should not use excessive force, perhaps you are simply inserting it incorrectly.

In the end, having installed the drive, all that remains is to fix it securely, and then screw the laptop case as well.
Conclusion
Now, following these small instructions, you can easily figure out how to connect drives not only to a computer, but also to a laptop. As you can see, this is done quite simply, which means that almost everyone can install a solid-state drive.
Often, when working with a PC, we are faced with problems that we did not expect. For example, we don't know how to connect an SSD to a computer. It would seem that the matter is not at all complicated, but it requires care and correctness of actions. Therefore, if you decide to independently carry out the components or assemble a PC, then you will need to know all about such minor difficulties.
For what?
Upgrading your computer is always a responsible business. Not all users are ready to do this. First, you need to be well versed in the components, understand the compatibility different devices, understand new products. Secondly, in addition to this, significant financial investments are needed, since what better product, the more expensive it is, respectively.
Everyone will need to learn how to connect an SSD drive to a computer. It is also necessary for those who decided to assemble a PC on their own, or for those who have “passed away” from whom. There are many instructions on this issue on the Internet, so let's get started.
Peculiarities
Before we begin to understand this issue, we need to tell those who do not yet know anything about SSD.
It is a solid state drive, which is a non-mechanical storage device. It is based on a memory chip. The device came to replace the HDD. Although it is impossible to say so unambiguously, since many experienced users prefer to install both hard disk drives and a solid-state drive in their PCs.
As a result, sometimes this device becomes the main one, replacing the place of the railway, sometimes an auxiliary one. In the second case, the system is loaded onto it, and personal information is stored on the railway.
Advantages
Now, not everyone needs to learn how to connect an SSD to a SATA computer, since most users still use this device in compact devices: tablets, etc.
However, it can also be installed in desktop computers because it brings additional benefits. Most importantly, it improves system performance. Compared to traditional railway drives, it has received a smaller size and weight and increased performance. Moreover, the speed was 6-7 times higher. Hence the high price tag for an SSD.
In addition, solid-state drives have begun to be built in tandem with hard drives to form hybrid hard drives. In this case, the flash memory became occupied by a buffer. Although, as mentioned earlier, it is sometimes used as a separate free space.

In addition, noiselessness has been added to the main advantages, since the device is non-mechanical and has no moving elements. Hence the high mechanical resistance. Reading files is stable, without interruptions and jumps. The read speed is close to the bandwidth of the interfaces.
Connection
So how do you connect an SSD to your computer? set by approximately the same method. Therefore, if you have ever encountered the work of a hard disk drive, then there will be no problems with a solid-state drive. The only difference is in size. You will need to fit the smaller device into the correct slot.
Start
To start the procedure, of course, you need to turn off your PC. For reassurance, it is better to do it completely from the outlet. Don't forget to turn off the power supply too. Usually the button for turning it off is located on the back, on the case.
Now you need to do the following operation: press and hold the PC power button for a few seconds. This is necessary so that all the current that remains on the board and in general in the entire case disappears. This will de-energize all circuits and keep yourself safe.
The next steps may differ depending on your needs. But in general, the connection principle is always the same.
We act
To figure out where to connect your SSD to your computer, you need to get to the case. First you need to open it. Usually it all depends on its design. But there are always small screws to remove the left panel and get to the "guts" of the PC. There are enclosures that may have access to ports from the other side, so here you need to act according to the situation.

If you are new to the design of a computer chassis, then you may be in trouble. But if you at least know what a railway looks like and can find it in a metal box, then half the job is done.
Usually the hard drive is placed in a special compartment. There may be several of them in the case. made specifically for the size of the 3.5-inch HDD. This is where you need to place your solid state drive.
Due to the slightly different dimensions, since it is 2.5 ", it will have to be well bolted on. They usually come with the device. Recently, slots in cases for SSDs have become more and more common. Therefore, perhaps the task will be simplified.
Once the drive is secured and well secured, you will need to figure out how to connect the SSD to your computer, to your motherboard. This is a little more complicated, since you have to google or figure out the interfaces.
Compound
Then you need to take the cable that came with the drive. You will find an L-shaped port on it. This is SATA. Apart from that, the wires you have must have a power cable. It usually looks like a bunch of wires.
First you need to plug the power cable into the socket from the power supply. Then we take the SATA cable and look for the right place on the motherboard. There are usually few options. If the board has SATA III, then it is better to use this port. If there is no such option, connect to SATA II.

These two wires will now need to be connected directly to the SSD. The power cable is placed in the wider connector, the SATA cable in the narrower one.
Other options
Not everyone knows, but for a couple of years now they have been releasing M.2 form factor SSDs. Now these models are not uncommon. Many people prefer them. In addition, new-fangled motherboard models began to be equipped with a special connector specifically for this form factor.
As a result, the situation led to the fact that we need to know how to connect an SSD M2 drive to a computer. I must say right away that this model has a lot of variations. Therefore, the connection may differ slightly. But the main point is that, unlike the previous version, we connect the solid-state drive to the "motherboard" not by wires, but by the device itself.
When you see the M.2 SSD in the photo, you will understand what the point is. It is not presented in a case like the above model. It is made by a small board that has memory chips. This board has special slots for installing them on the "motherboard".
It is impossible to describe the connection for all cases, since there are really many options. But when you buy an M.2 SSD, you will have instructions on how to do it right.

Customization
After you have assembled and connected everything, you can turn on the PC. During its loading, you need to call the BIOS. Here you should look for the AHCI mode, which is responsible for the operation of the solid-state drive.
For example, you are going to upload to the SSD operating system... But besides the new drive, you already have hard drives connected. Then you will need to prioritize the devices. To do this, put the solid-state drive first in the list. We install the ability to boot the OS from a disk or flash drive.
If you need an SSD as an additional tool, then it will be enough to check that the existing hard disk drive is the first in the queue. Otherwise, the system may simply not boot. You might want to port your OS to an SSD. In this case, after you have learned how to connect an SSD to a computer, you will need to do a very voluminous operation. This is a topic for another article.

Laptops
When you try all the above operations by your own example, you will understand that you even know how to connect 2 SSD disks to a computer. The main thing is that there is enough space on your motherboard.
But speaking of PCs, you need to remember that initially solid state drives began to be widely used in laptops, since they are compact. Therefore, you can further learn how to connect an SSD to a laptop.
Of course, it is better to consider this issue with each device model, since the cases are different, and accordingly, the placement of the disk slot is also different.
Nevertheless, the main thing is to determine where the railway is located in your laptop. Usually you have to turn off the device and open the bottom cover for this. Sometimes it can be completely removed, sometimes you can unscrew the compartment panels. One of them usually houses the railway. If you can't find it, open the instructions for your laptop.
It must be said right away that hard drives in laptops are the same size as SSDs - 2.5 inches. In order to remove a hard drive, you need to not just pull it out, but first pull it to the side. This is how it attaches to the power and SATA connector.
Then the matter is small - just install the solid-state drive. Do not forget to secure it with screws. Since laptops usually have one place for hard drives, you will have to think in advance about how you will transfer the operating system: by cloning or a new installation.

conclusions
You need to find out how to connect an SSD drive to a computer in advance, and not when you unscrew, unscrew and disconnect everything. Sometimes you have to commit additional settings, think ahead about the location of the OS.
The easiest way to do this is when you only need the solid-state drive as an auxiliary tool. Then it is enough just to plug it into one more compartment and connector. If you want to make it the main one, then you need to read the instructions for cloning hard drives and SSDs, configure and think over everything in advance.
If you are assembling a PC from scratch and decided to simply install its fast "colleague" instead of a hard drive, do not forget to configure the connection in the BIOS. It is important to set the special mode and priority of the disks.