A program for replacing windows 7 theme. How to patch system files
Before installing third party themes in Windows 7, you need to patch the system using certain utilities. These same programs will change system files, after which you will be able to install various themes (there are a lot of them on the Internet).
Where to find the software you need
Find what you need software not so difficult, to install themes in the seven you need to update the system files using the following programs:
- Theme-Resource-Changer
- Universal theme patcher
In the first utility, you just need to follow the instructions (ala further-further-continue), in the second it is still easier - click on three buttons, thereby patching each file. After these manipulations you need to restart your PC.
Installing a third-party theme in Windows 7
Use extreme caution when installing third-party themes in Windows 7. You need to make sure that the theme will be supported by your system. For example, skins are not supported in all editions. You can install the theme in the Maximum, Professional, Corporate and Home extended versions. The rest of the editions (Home Basic and Starter) do not provide themes, and it is better to refrain from installing them (it may not work, unfortunately).
First of all, we need to download the theme itself. You can find countless of them on the Internet, so I think this will not be a problem. After downloading the archive (and this is the way themes are most often distributed), we must unpack it into a folder located along the path: C: \ Windows \ Resources \ Themes

Now you should activate just now an established theme... To do this, go to Control Panel> Appearance and Personalization> Personalization, where we perform the actions we need. By the way, it will be easier to just click on the desktop right click mouse and go to personalization from the context menu.

If everything was done correctly, you will see the result immediately. However, it should be recalled that in preview screenshots, most often, the design is shown along with third-party labels. They are not in the theme itself, and you will have to install such shortcuts separately.
Also, most likely, there will be separate navigation buttons in the theme, and they will also be shown in the preview. To install them, you need to replace the system file (which should be replaced in the archive along with the theme) ExplorerFrame.dll, which is located in C: \ Windows \ System32. You do not need to delete the old file, it is best to just rename it by adding some simple prefix at the end. Something like ExplorerFrame.dllagant. In this case, the file will not be read by the system, and at the same time, you can easily return everything as it was, simply by erasing this very prefix (and deleting the replacement file, respectively).
This month Windows users 10 received the first major system update. Unfortunately, with the new version of the system neither patches for installing third-party themes are compatible(patch has already been released, see Method 3), nor the actual themes created for the first stable version (10240). The following section describes a temporary solution to this problem, and in two ways at once.
To begin with, we will immediately warn you that by using this instruction you will be able to use third-party themes, but only specially created or modified for Windows 10 1511 (aka "with the November update", aka build 10586). Some authors have already started modifying their most popular themes, but this is unlikely to be done for all previously released themes.
Method 1
Attention! On Windows 10 1511 build 10586.494 (the update was released on July 12, 2016), this method no longer works. Instead, it is proposed to use Method 2.
Now about how to patch it for installing third-party Windows themes 10 1511. Until the authors of the patches have prepared a more elegant solution, you will have to perform several actions and use the necessary system files prepared by the customizer under the nickname.
- Download and unpack the set to disk necessary tools Theme Patcher (link at the end of the article).
- Run and install patches as administrator UxStyle_0242_x86_x64_preview and UltraUXThemePatcher_3.0.4.
- To restart a computer.
- Run file Add_Take_Ownership_to_context_menu.reg and agree to make changes to the system.
- Go to folder C: \ Windows \ System32.
- Take ownership of files by clicking on each with the right mouse button and selecting in context menu paragraph Take Ownership.
- Back up files themeui.dll, uxinit.dll, uxtheme.dll or just give them new names like old_themeui.dll.
- Copy modified files themeui.dll, uxinit.dll, uxtheme.dll from folder File Patch x86 or File Patch x64(depending on the bitness of your operating system) to the folder C: \ Windows \ System32.
- Reboot (although the second reboot was not required on our test system).
Your system is now ready to install third-party skins.
Attention! We do not recommend using modified system files, this can lead to a complete inoperability of the operating system. Before using these instructions, we strongly recommend that you create a system restore point. You do everything at your own peril and risk.
If you have problems using the first method, try the second. It is safer and simpler, but less convenient due to the need to edit the theme file for each newly installed skin.
Method 2
- Create a system restore point.
- Download and install the patch (the project seems to be closed) or it.
- Rename file C: \ Windows \ Resources \ Themes \ aero \ aerolite.msstyles v aerolite.msstyles.bak
- Create in folder C: \ Windows \ Resources \ Themes \ aero \ a new folder named aerolite.msstyles
- Copy the desired theme to the created folder.
- Open theme file .theme in any text editor(Notepad will do) and replace all instructions with the standard path to the theme files:
C: \ Windows \ Resources \ Themes or% SystemRoot% \ Resources \ Themes
on new:
C: \ Windows \ Resources \ Themes \ aero \ aerolite.msstyles or% SystemRoot% \ Resources \ Themes \ aero \ aerolite.msstyles - Apply theme in panel Options -> Personalization -> Themes -> Theme Options.
Method 3
In early February 2016, one of the enthusiasts collected the same UXThemePatcher for Windows 10 1511. Manual replacement of files is no longer required, the program does all the work on its own. However, the above instructions may become relevant again after one of the future system updates is released. Updated 04.19.2016 - and so it happened: in newest versions the system patch does not work.
Many different topics for Windows 7 will help you create a unique, stylish, unlike any other shell of your operating system. You can use your favorite wallpapers, color combinations and graphic filters for windows, which in combination with the set interesting gadgets will help create your exclusive Windows 7.
In special sections of our website, you can:
See the link to download the Universal Theme Patcher at the end of the article.
For work topics in windows 7 you need to install a patch Universal theme patcher.
This small patch is intended to install new styles and themes for Windows 7.To install this program, do the following:
Step 1. Run the program as administrator (included in the kit are both for x86 and for x64 the bit version of your system).
 Figure 1. Run as administrator
Step 2. Press the button "OK" to confirm the selected language.
 Figure 2. Confirm the selected language
Step 3. Then press the button again "Yes" to confirm.
 Figure 3. Installation Information
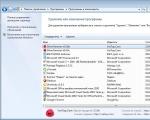
Step 4. Then a window will open, in which in this case you need to patch 3 files. To do this, opposite each file, click "Patch"... After each action, you will be informed about the successful operation.
 Figure 4. Patch information for using themes for Windows 7
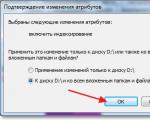
Step 5. After you have changed all the files, you will be prompted to restart your computer. Click on "Yes" to reboot.
 Figure 5. Reboot confirmation window
Step 6. Next, you need to copy the content of the theme to the folder C: / Windows / Resources / Themes.
Step 7... In chapter "Personalization" ("Start" - "Control Panel" - "Personalization") you will see a freshly installed theme.
Step 8... As a last resort, re-running this patch allows you to restore the changed files. To do this, you need to click in front of each file "Restore" and restart your computer again.
 Figure 6. Patch for installing themes for windows 7
Despite a lot of text and pictures attached below, installing third-party themes for Windows 7 is actually a very simple operation that will take you no more than 10 minutes the first time. And after that, if you follow the instructions correctly, for installation new topic you will need about 2 minutes.
Consider that all your further actions you do at one's own risk, no one except you is responsible for the possible crash of the OS. Before installing patches and replacing system files, we recommend making a restore point or backup OS.
Preparing the system to support third-party themes
1.
Download and install the patch (run the program as administrator and follow further prompts).
2.
Download and run the second patch on behalf of the administrator, in the window that opens, press 3 buttons Patch(see screenshot).
After completing the above operations, we restart the computer, your system is ready to install third-party themes.
Setting the visual style (theme)
Replacing system files
In our case, we will change the ExplorerFrame.dll file that comes in the archive with the theme (if there is none, read the notes at the end of the article).
Universal Theme Patcher - free utility, designed to change some system files of the operating Windows systems 7 / Vista / XP!
Thanks to this patch, it will be possible to easily install any skins.
Such themes most often have the .msstyles format (sometimes .theme, but less often) and they must be copied to the folder with OS Windows themes (C: WindowsResourcesThemes). After that, one has only to double-click on such a file with the mouse - and the theme has changed, without any additional programs.
Patched files can be restored by re-running the patch and pressing the corresponding buttons. Universal Theme Patcher is suitable for both 32-bit architectures and 64-bit for the following Windows versions: 7, Server 2008, Vista SP1 / SP2, Server 2003, XP SP2 / SP3.
There is nothing complicated in working with the program, the installation is simple and intuitive.
The downloaded program must be extracted from the archive and launched UniversalThemePatcher, always with administrator rights.
Choose a language, better great and mighty and click on "OK"
A window opens with information about installed system and the necessary files
Click "Yes" to continue and we see a window where it will be shown which files we need to patch.

They are different on each system, but Universal Theme Patcher will independently choose the ones that need to be patched. Press the "Patch" button next to each file in turn.
When all the necessary files are patched - Universal Theme Patcher will ask you to restart your computer.

After rebooting, you can install third-party themes, whether you have Windows 7, Windows Vista or Windows XP