Mac os won't connect to wifi. MacBook Pro and WiFi problems. Possible solutions to the problem
Reading time: 7 minutes
Let's now figure out the main reasons why your MacBook Pro or Air does not automatically connect to WiFi, although this network is familiar to it, i.e. the password is correct, but it still writes that the time has expired.
This article applies to all MacBook Pro and Air models released in different years. There may be some differences in architecture or description of the Mac OS version.
Causes of the problem
First of all, you need to determine what the problem is. Various information about the error will help you choose the right solution.
Update software
- For a Mac computer, install any available updates.
- If you are using a third-party Wi-Fi router, check if the device has the latest firmware. If an update is available, follow the manufacturer's instructions to install it.
- Check if the firmware of the Apple Wi-Fi Base Station is up to date.
Do other Wi-Fi devices show symptoms?
With Wi-Fi, problems can be associated with the network or computers connected to it, which are equipped with a Wi-Fi module. If other devices connect to the Internet without problems, then most likely the Wi-Fi router is working properly.
Ask your question to a specialist
Do not know how to solve a problem in the operation of your gadget and need expert advice?
Checking connections
Certain network problems can be caused by disconnected or loose cable connections. We check all power cables and Ethernet cables that are connected to the Wi-Fi router. You can fix the problem by checking the on state of your modem and router, disconnecting and reconnecting Ethernet cables, or replacing damaged cables.
Restarting network devices
Turn off the power of the router or modem for a few seconds, then turn it back on. This can resolve a number of network problems without taking additional troubleshooting steps.
Checking TCP / IP settings
If the device connects to a Wi-Fi network, but there is no Internet access, then you should check the TCP / IP settings. Select the "Network" area in the "System Preferences" window and perform the following steps:
Reset Wi-Fi settings
In most cases, a hard reset of the Wi-Fi settings will fix the problem. We carry out the algorithm of actions:

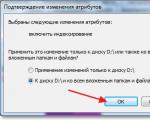
Disabling Wi-Fi module hardware

Increase
This will cause the Wi-Fi module to be disabled, which often solves the problem.
Hardware problems
The Wi-Fi module itself often breaks down, and the situation can manifest itself for no apparent reason. Wi-Fi problems can be related to the following:
- Contact with moisture.
- Voltage drop.
- Manufacturing defects.
In almost all of the above situations, it is necessary to change the Wi-Fi module. Even when a problem appears, you need to check the Wi-Fi antennas. They rarely break on their own, since they are very securely placed in the display case, and are almost not subject to wear and tear.
To set up Wi-Fi on Mac OS, you need to have certain skills.
On the Internet, you can find many detailed instructions and recommendations with which it will not be difficult to set up WiFi on your own.
We offer 2 ways that will allow you to set up Wi-Fi on Mac OS X Lion and unite all wireless gadgets into a common network.
Follow our tips to get things done.
Method 1
This is an easy and quick way to set up WiFi on Mac OS:
- in the upper right corner of the screen, find the shortcut for the wireless network and click on it once;
- in the window that appears, select "Connect to another network ...";
- select "Show networks";
- a window will open in which a list of currently available networks will be displayed. Select your network and password (if required) and click Connect.
Happened? If not, then go to the second method.
Method 2
This is a more complex way to set it up:
- go to "System Preferences";
- go to the "Network" section;
- select an AirPort option from the list;
- activate AirPort and go to the TCP / IP tab;
- select "Configure IPv4" from the list;
- select the option "Manually" from the list;
- fill in all empty fields with your data. If the “Subnet Mask” and “Router” fields do not change, go to the “PPPoE” tab and disable “Connect using PPPoE”. Then go back to the TCP / IP tab and select Manually. Enter the settings;
- click on Airport status;
- select Wireless;
- click "Apply".
And this completes the configuration of the wireless connection.
Note to users: you should protect your network by making it hidden. You can also restrict access to data with a password.
If you came to this page, then most likely you also encountered a problem when your MacBook does not see Wi-Fi network... At the same time, the Wi-Fi network quite exists for itself, and everyone else around it successfully uses it. Why, then, doesn't the MacBook find it at all?
I got into this situation twice ... and each time there was a smart guy who started joking about MACs in general. " How so? Such an expensive MacBook, and even cannot connect to Wi-Fi ...”.
Why MacBook Can't See Wi-Fi Network
Let's dig a little deeper into the theory of wireless networks ... Stop! Don't go away! I'll just give you a quick glimpse of what the problem is, and then go straight to the solution.
Most Wi-Fi routers operate at frequencies ranging from 2.412GHz to 2.484GHz. Moreover, this range is usually divided into 14 channels. Each channel has its own specific frequency.
So your Wi-Fi router works at a certain point in time on one channel. Usually, in the settings of the router, Automatic channel selection is indicated (at the discretion of the router).
The router chooses the channel itself depending on how many third-party Wi-Fi networks are nearby. You probably already think why I am crucifying here? So, in the channel (in fact, in the frequency), there is the whole catch through which your MacBook does not see the Wi-Fi network.
The thing is that most of the MacBooks were brought to us according to gray schemes from America and Canada. By overseas standards, the Wi-Fi receiver built into the MacBook does not work on all frequencies, but only on those corresponding to channels 1 through 11.
Thus, if your router automatically switches to channel 12, 13 or 14, then the MacBook simply will not see this Wi-Fi network.
This fact explains the situation when you successfully used wireless Internet on your MacBook, and at one point the network stopped being detected, although other devices still see it.
I hope that you have learned at least a little useful for yourself from the two paragraphs above. Let's now move on to solving this problem. To do this, we will need to manually specify any of the first 11 channels in the router settings.
Selecting a Wi-Fi router channel
So, we have already figured out the essence of the problem and the way to solve it. Regardless of your router model, follow the steps below to select a Wi-Fi channel.
STEP 1 - Take your Wi-Fi router in hand and turn it upside down. On the underside there is a sticker with various information. We are interested in the login / password to access the settings.
Pay attention to the IP address for the Web configurator. Usually it is the same for all routers: https://192.168.1.1.
STEP 2 - Enter the IP address https://192.168.1.1 in the address bar of any browser. Since there was no other computer at hand, I used an iPhone.

STEP 3 - A window should appear for login and password which you should have seen on the router sticker. In my case, this is admin / 1234.
You will have something like this. If the login and password from the sticker do not fit, someone could have changed them (for example, the administrator who set up the network).
STEP 4 - The picture may differ depending on your router model, but the meaning remains the same - in the settings you need to find the item with the channel number.

STEP 5 - Going into the settings, I found that the router is working on channel 13. Manually change to any one from 1 to 11. I chose 7.

STEP 6 - Press “ Apply”And wait for the router to make changes to the wireless network.
Immediately after completing the procedure, my MacBook detected a wireless network and successfully connected to it. Many users begin to sin on the Wi-Fi router itself and even run to buy a new one.
Others start trying to install new firmware and do completely unnecessary things. Who would have stopped them? After all, the reason that the MacBook does not find the Wi-Fi network is completely different.
As you already understood, the only restriction that may arise on your way is getting a login / password to access the settings of the router. After all, if you want to use the public Internet, you can hardly get that deep. Although, try it, and then write in the comments.
Apple computer owners have been complaining about Wi-Fi problems for several years. From time to time, Cupertinos release software patches that should fix the bugs. However, the developers from Apple have not been able to completely solve the problem with Wi-Fi. Moreover, judging by the reviews, Wi-Fi malfunctions can be episodic and appear and disappear.

In this article, we tried to collect a few different ways that can help fix Wi-Fi problems in macOS Sierra. The latter include:
- turn off Wi-Fi after the computer exits the "Sleep Mode";
- spontaneous disconnections from the Wi-Fi network;
- high ping or just low speed of the wireless connection.
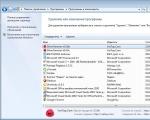
Reset Wi-Fi settings
The problems described above can be solved by full demand for Wi-Fi connection settings. For this you need:
- Disable wireless connection completely. This can be done in the upper right corner of the desktop or in the system settings in the Network section.
- Open Finder and use the key combination Cmd + Shift + G to go to the address:
/ Library / Preferences / SystemConfiguration /
- In the folder that opens, select the following files:
com.apple.airport.preferences.plist
com.apple.network.eapolclient.configuration.plist
com.apple.wifi.message-tracer.plist
NetworkInterfaces.plist
preferences.plist

- Move the selected files to the trash or a separately created folder. In case of problems, always return them "to their place".
- Restart Mac.
Once your computer boots up, you can turn on Wi-Fi and connect to a wireless network. Also, along with the reboot of the "poppy", you can reboot the router.
In most cases, the above method will fix Wi-Fi glitches on macOS.
Create a new Wi-Fi network with custom DNS
If the first method does not solve the problem with Wi-Fi, then the owners of apple computers can use to try to create a new Wi-Fi network with custom DNS. For this you need:
- Open System Preferences and go to the Network section.
- Open the drop-down list of Placement and go to Edit Placement.

- Create a new network in a new window.
- Connect to your wireless network.

- Go to the Additional section in the wireless network settings.

- In the TCP / IP tab, click the Request DHCP address button.

- In the DNS tab, in the DNS servers subsection, add a new DNS server. You can use 8.8.8.8 or 8.8.4.4.
- In the Hardware tab, in the Configuration menu, select the Manual item.

- Change Max. packet size (MTU) to Arbitrary and specify 1453 in the field that opens.
If everything is done correctly, then after these manipulations the problems with Wi-Fi should disappear.
Other Ways to Solve the Wi-Fi Problem
- Update macOS to the latest version.
- Restart your Mac in Safe Mode (hold down the Shift keys while booting), then do a regular restart. Thus, you can throw off the cache memory.
- Update the firmware of the Wi-Fi router.
- The most radical solution is to rollback the operating system to Yosemite or Mavericks.
2013 Macbook Air users complain about wireless Wi-Fi problems. A lot of assumptions are made in search of answers to a number of questions. Is this flaw inherent in this model at all or did it affect only one batch of goods? Is the problem in OS X or only in the network protocols of the operating system?
PC Magazine reviewed some known issues and provided suggestions for troubleshooting tips for MacBook Air owners who are having difficulty.
Lost internet connection and slow data transfer
First of all, it is unclear if most of the claims relate to a loss of Internet connectivity or an outage within the home network, such as connecting to a router or other network devices such as a NAS. Based on the posts on the Apple forum, a significant number of users are complaining about Internet connection failures. Several technical reviewers and analysts have noted the slow data transfer rates of the new MacBook Air in their articles. This indicates a more local issue - perhaps within OS X, or, as some browsers believe, related to the network protocol used by the operating system.
However, the true cause of the failures is still unknown. Apple has not made any statements about the problem, although there have been reports that Apple Genius Bar employees have been instructed to collect information ... and MacBook Airs that are being complained about. But until we find out more and receive confirmation from Apple, it is premature to search for the culprit.
We've been testing the new 13-inch MacBook Air for several days with the latest 802.11ac AirPort Extreme Base Station. During testing, there were no interruptions in communication.
Possible solutions to the problem
Update the firmware of your router... Making sure your router has the latest firmware is the first step to troubleshooting communications failures. Go to the router manufacturer's website, download the software for your model, and follow the update instructions.
Disable some of the router's features... Some browsers have reported problems with TCP window scaling. This usually happens automatically in the operating system to improve network performance. There is no definite indication that the problem is precisely with the window scaling. However, it makes sense to disable several features that serve network traffic that may be involved in the router.
Double NAT... For example, it is helpful to check if your network is performing double network address translation (NAT). Sometimes ISPs provide users with a cable or DSL modem that is already doing the conversion. You could add a NAT wireless router to it. Only one device should be configured for network address translation.
Quality of Service (QoS) and other features... Try disabling QoS features or program prioritization rules (if applicable). It is also recommended that you back up your router configuration (many devices provide this option) and then disable features such as port forwarding rules, DMZ, and any others that might be unnecessary without compromising security. In particular, do not disable firewall or wide area network (WAN) protection, but try to disable firewall rules for specific applications.
Of course, you shouldn't disable all of these features at the same time! If QoS or any other traffic-shaping feature is active that improves video streaming or the performance of other programs, disable them, work with your MacBook, and see if this fixes the problem. If not, disable something else. The step-by-step approach is the only one possible in this case.
Restore your router to factory settings... Most users will probably not like this recommendation as it involves a complete reconfiguration of the router. However, it is sometimes helpful to start with a clean slate. If you have the time and desire to set up the router again, try resetting the router to factory settings and see how it affects the quality of the connection.
Put the network into 802.11n mode... A lot of complaints have come from users of newer MacBooks running pre-802.11ac routers. If you own an 802.11ac router that connects your MacBook in 802.11ac mode, we'd recommend replacing this mode with the older 802.11n 40MHz channel. This may fix the problem for a while, at least until new information emerges.
Try the new Airport... In our tests, there were no connectivity issues with the 13-inch MacBook Air and the new AirPort Extreme. It doesn't follow that the new AirPort fixes some of the problems that MacBook Air might have. If you're looking to buy a new router and network with many Apple devices, then the new 802.11ac AirPort is worth considering.