Code blocks famous programs on it. Code Blocks IDE - setup and use. Installing the MinGW compiler
Code :: Blocks is a free open source integrated development environment (IDE) that supports the use of various compilers. By default, Code :: Blocks uses the MinGW compiler, which is included in the kit (you can download the distribution kit without a built-in compiler). MinGW is the Windows variant of the GNU C / C ++ compiler. MinGW stands for Minimalist GNU for Windows. The MinGW suite includes open source programming tools that do not depend on any paid third party libraries. It is used by many development environments (Visual Studio uses its own compiler). MinGW includes the GNU Compiler Collection (GCC), including C, C ++, ADA, and Fortran compilers. Code :: Blocks has an open architecture, which allows it to scale due to plug-in modules (you can write programs both for windows, linux, and for various microprocessors such as avr and stm32). The code debugger in Code :: Blocks supports breakpoints in the source code or in the data that the program processes.
Code :: Blocks is available for Windows, Linux and Mac OS X. The project site is codeblocks.org.
Installing the MinGW compiler
Installing Code :: Blocks itself is easy. It is advisable only to install it in a folder in the path to which there are no spaces or Cyrillic. Consider installing the MinGW compiler. Typically, the Code :: Blocks distribution contains old version the MinGW compiler, so it is advisable to download Code :: Blocks without the MinGW compiler and install the compiler separately. First, download the installer from the mingw.org project site. After starting, the following window will appear.

Click Install and we get the next window.

Here in the field Installation Directory specify the location of the compiler files. By default it is C: \ MinGW, and leave it. Push Continue and starts downloading and installing the manager for installing MinGW.

Push Continue and we get the next window.

For C ++ programming, select packages to install mingw32-base-bin (A Basic MinGW Installation) and mingw32-gcc-g ++ - bin (The GNU C ++ Compiler), and then click on the menu Installation -> Apply Changes... A window will appear showing the download of the selected packages.

When the packages are downloaded, click on the button Close
The first time you run Code :: Blocks, it will automatically detect the installed compiler. If you have any problems, you need to go to the menu Settings -> Compiler ... and in the tab Toolchain executables check the correct path to MinGW, as well as the names of the compiler and linker files. Now you can create a project.
Project creation
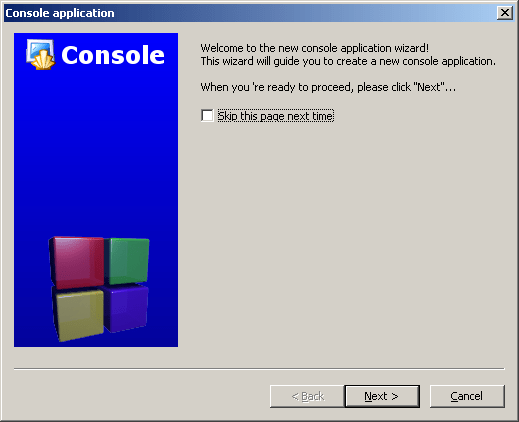
To create a project, go to the menu File -> New -> Project ...

In the window that appears, select the required type of project. Here we can see that Code :: Blocks has a large number of project templates. In our case it is Console application(console application).

In the next window, select the programming language used. Select C ++ and click on the button Next.

Further in the field Project Title enter the name of the project. In our case it is Test... We immediately indicate the location of the project on the disk (field Folder to create project in). In the folder we specified, Codeblcoks will automatically create a folder with the previously specified project name. After specifying the folder name and file name, click on the button Next.

In the next window, select the compiler. By default, the GNU GCC Compiler is selected, which we will be using.

We press Finish and we get a minimal program, the so-called Hello World!

Press F9 to compile and run the program and get the following window.

Cyrillic support in the console
The standard project code generated by the Code :: Blocks environment does not support input and output of Cyrillic characters in the console. To solve this problem, you must first make small changes to the project code. An example source code is shown below.
Source
#include
Next, you need to run the program, left-click on the window title (where the path to the running.exe file is shown) and select the item Properties... Then on the tab Font install font Lucida Console and choose a convenient font size. After that, messages in console applications will support Cyrillic characters.
Preliminary (unfinished) version
1 Installing and configuring the development environment
1.1 General
First, you need to install a development environment, which will be used as an integrated programming environment Code :: Blocks. The main benefits of Code :: Blocks include:
- free license GPL v3.0, in particular, free distribution and use is allowed;
- environment can work in operating systems ah families Windows, Linux, OS X (that is, it is cross-platform);
- the ability to work with various compilers.
This file installs both the Code :: Blocks environment itself and the MinGW environment, which provides the GCC family of compilers. The MinGW environment is also free software.
1.2.1.2 Installation process
You need to run the file codeblocks-10.05mingw-setup.exe. The installer window will appear.
You must click "Next". A window with the text of the free GPL v3.0 license will appear.
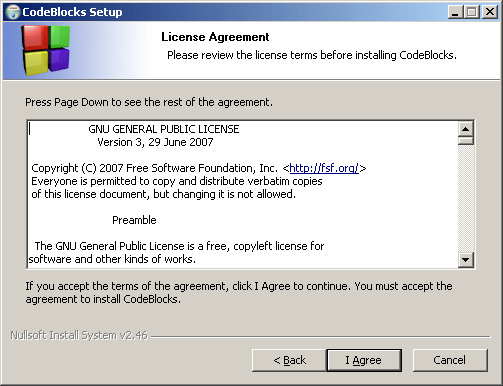
Pressing the "I Agree" button means agreement with the license terms and allows you to continue installing the program, during which a window for selecting components will appear. In this window, select the installation type "Full: All plugins, all tools, just everything".

After that, you need to click the "Next" button. A window will appear with the name of the installation directory. It is better that the full directory name does not contain spaces and other letters, except for Latin ones. Therefore, for example, it is better to replace the name C: \ Program Files \ CodeBlocks with something else, for example, C: \ CodeBlocks or C: \ Programs \ CodeBlocks.
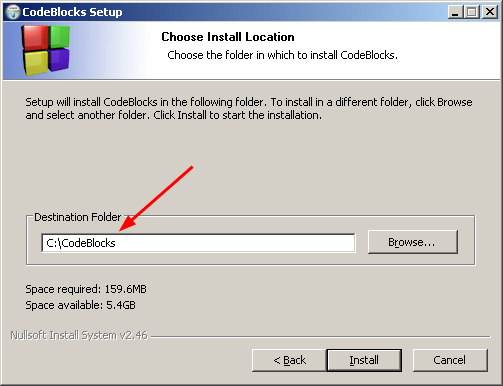
After that, you can click the "Install" button, which starts the actual installation process.
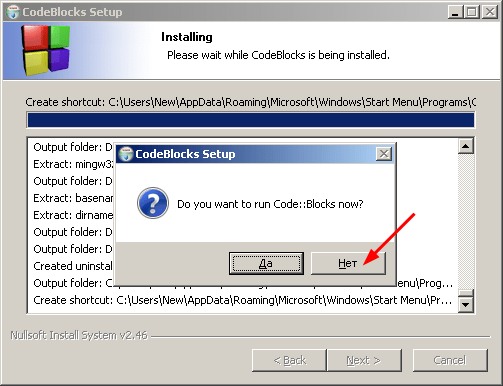
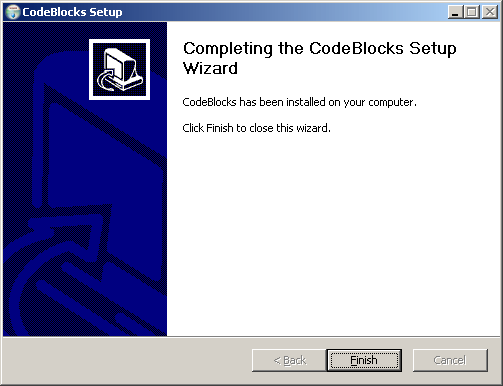
At the end of the process, a window will appear asking if you want to start Code :: Blocks. It is better to click "No" here, so that later you can check the launch of Code :: Blocks in the usual way.
After that, it will be enough to click the "Next" button, and then "Finish" to complete the installation process.

1.2.1.3 First start-up
The shortcut to launch Code :: Blocks should appear on the panel quick launch... Also a similar shortcut should appear on the desktop.
Code :: Blocks can be launched using these shortcuts, as well as using the standard system menu of programs.
At first When you run Code :: Blocks, an automatic compiler detection window should appear.
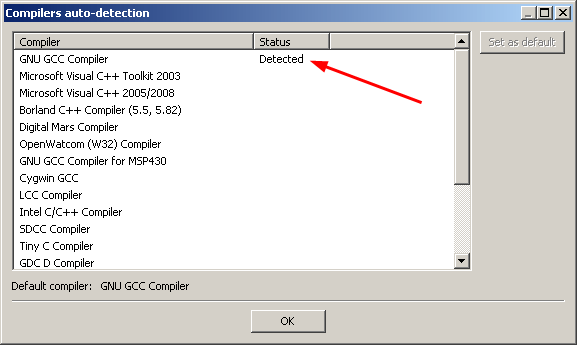
Note that the first line should contain the word "Detected". This means that the compiler has been found. You must click "OK". The first run process will continue and the development environment will be launched. This will bring up a window with the advice of the day.

If you do not want this window to appear every time you start Code :: Blocks, then uncheck the "Show tips at startup in this window" box. Click "Close" to close this window.
After that, the following window may appear.

It's better to click "OK" here so that the C / C ++ related files are linked to Code :: Blocks.
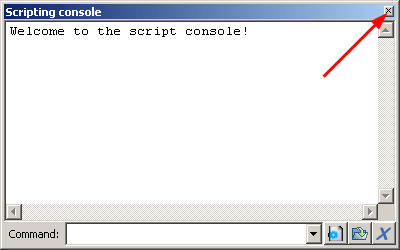
You can also close the Scripting console window.

1.2.2 Installation for an operating system of the Linux family
In the case of Linux, you can install Code :: Blocks using the package for the desired distribution among those listed on this page.
You can also try looking for Code :: Blocks in the repository of your Linux distribution. For example, Code :: Blocks (10.05-1) is available in the Ubuntu 11.04 repository.
1.3 Setting
For starters, you can arrange the toolbars more compactly at the top of the window.
After that, you need to make a few changes to the basic settings.
Select the "Settings => Compiler and debugger ..." menu. The settings window will appear.
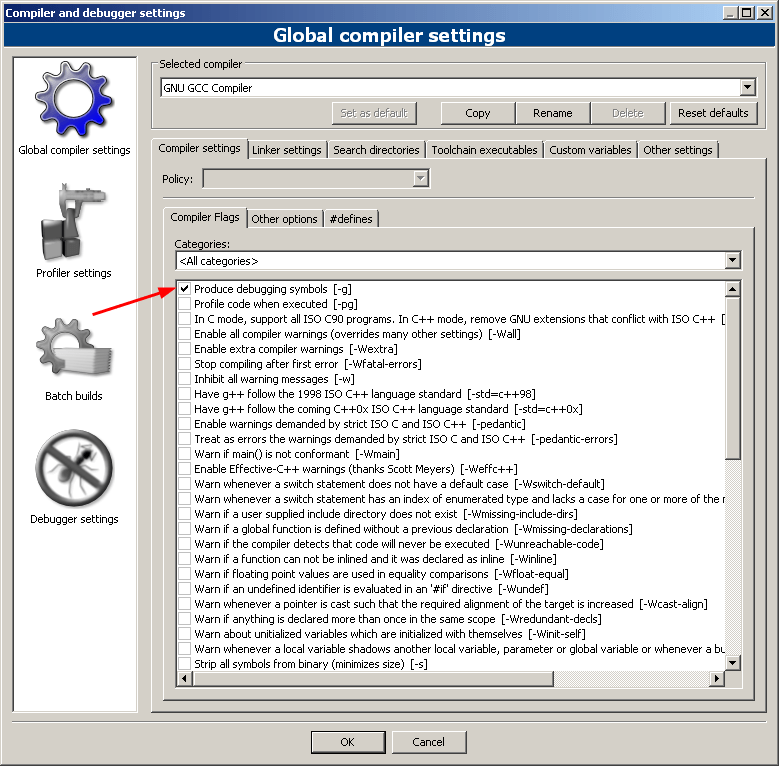
In this window you need put a checkmark for "Produce debugging symbols". This change will enable debug mode, which will be covered in a later chapter.
Without closing this window, you need to click the "Other options" tab.
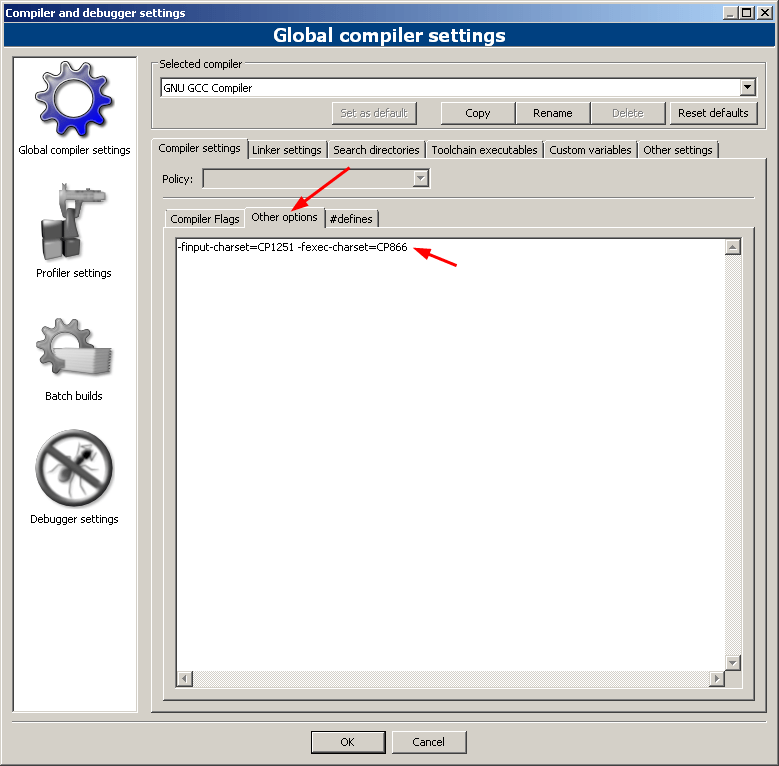
And in the edit field, add the following line.
Finput-charset = CP1251 -fexec-charset = CP866
This will allow the correct display of the Cyrillic alphabet in the console in the case of an operating system of the Windows family. When using Code :: Blocks on other operating systems (for example, Linux) this line does not need to be added..
Without closing this window, you need to click on the left image with the inscription "Debugger settings", and then put a checkmark for "Evaluate expression under cursor".
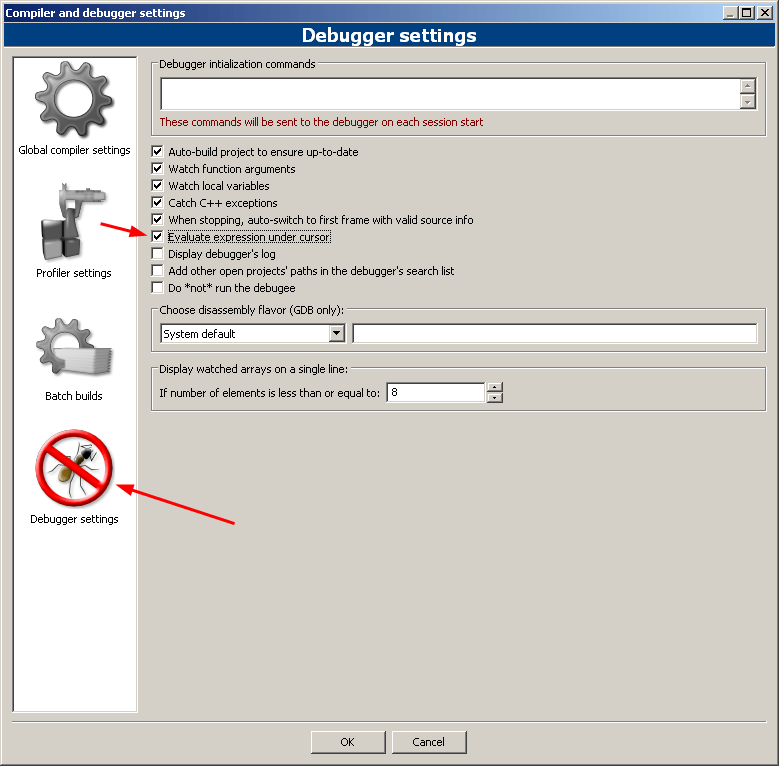
Then click "OK". All changes made should take effect.
2 First project
2.1 Project creation
Now let's try to create a C program.
To do this, you need to create a project. In general, a project is needed to combine several files into a single whole. But in this case, it is more convenient to create a project for one file as well. In addition, in the future then it will be more customary to work with the project.
So, to create a project, select the "File" menu, then select "New" in the list that appears, then select "Project" in the list that appears (for brevity, such an action can be designated as "File => New => Project", and in the future will be use such shorter designations). Finally, a dialog box should appear.
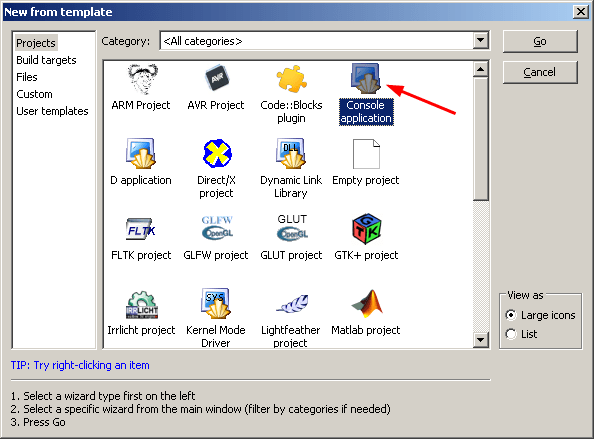
In it, select "Console application" and click "Go". The New Project Wizard will appear.
Click Next. The following window will appear.

Here you need to select C (not C ++) and click "Next". The following window will appear.

In the "Project title" line, enter the name of the project, for example, Project01. Note that on the "Project filename" line this name will be copied. You can change this file name (to be different from the project name), but for convenience it is better to leave them the same. Then, in the line of the "Folder to create project in" line (the folder for creating a project in it), you must specify the folder where the folder with the project will be located. You can either select any of the available folders using the "..." button, or manually type the folder name, for example, C: \ Projects.
Then it is in the selected folder that a folder with the name of the project will be created, where the project itself will be located. You can check this by looking at the "Resulting filename" line.
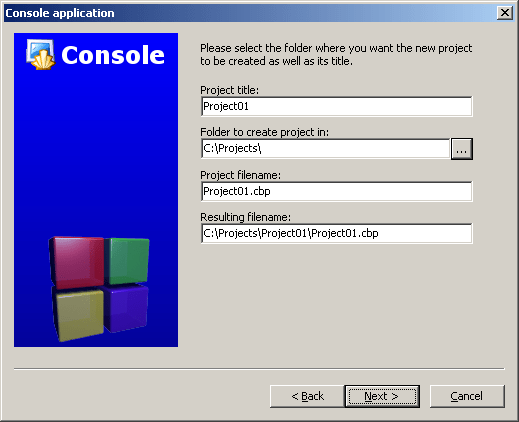
When specifying the project and folder name for the project, do not use folder names with spaces or letters that are not Latin(the string "Resulting filename" should not contain spaces in folder names, and should not contain other letters than Latin).
Click Next. The following window will appear.
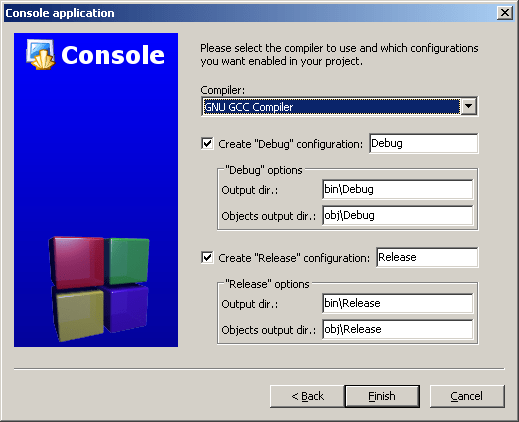
Leave these settings unchanged. Click Finish. The project will be created.
In the upper left part (in the "Management" window) the project with the "Sources" folder will be displayed.
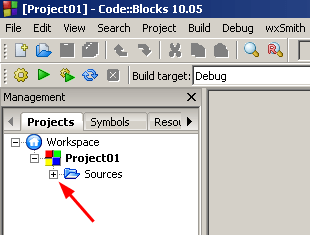
You need to click on the "+" (or double-click on the folder) and this folder will open.

It will contain a single main.c file. You need to double-click on it, then the editing field will open on the right, in which the contents of this file will be displayed (in the upper part there will be a tab with the file name).

The edit window will display the text of the first highlighted program. Note that different parts of the text use different colors to make the text easier to read.
This is the first simplest program which outputs the text "Hello world!" ("Hello, world!"). Traditionally, such a program is used as the first program when familiar with a programming language. In the case of Code :: Blocks, this program is automatically created when a new project is created.
The font size in the editing window can be changed very easily. To do this, rotate the wheel on the mouse while holding down the Ctrl key.
You can also use the "Settings => Editor" menu and, by clicking the "Choose" button in the upper right part, change not only the font size, but also the font itself. Just keep in mind that for writing programs it is better to use fonts in which all letters have the same width. These fonts, for example, include fonts: Courier New, Courier, Liberation Mono, Lucida Console, Monospace, etc.
If it turns out that the "Management" window or some other necessary window is missing on the screen, then select the View menu and select the item corresponding to the required window in the menu that appears.
If suddenly the project turned out to be closed, for example, when you exit and re-enter Code :: Blocks, you can reopen it. To do this, select the "File => Recent projects" menu, where, then, in the list that appears, select the desired project. Alternatively, you can use the "File => Open" menu and then select the Project01.cbp file.
2.2 Building and running the program
This program will be considered in detail a little later, but now let's try to run it.
For this to be done compilation the text of the program (Compiling), and using layout(Linking) an executable file with the extension .exe must be created, which will be launched. This whole compilation and linking process is called assembly(Building).
It should be noted that the process denoted here by the word Compiling is also often referred to as a process. broadcasts... There are various terminology options in this area. For example, the above build process can be referred to as compilation, which in turn consists of translation and linking steps. But now we will not delve into the issues of terminology, and will simply use the English version of the terms as a basis, of course, with a translation into Russian. So we will talk about assembly(Building) consisting of stages compilation(Compiling) and layout(Linking). In this case, this option seems more convenient, since in the corresponding names on English language can be observed in the build process.
Integrated development environment Code :: Blocks allows you to automate the build and run (Run) of the program. To build and run the program, just execute the "Build and run" command by pressing the button or the F9 key. Another option is to select the "Build => Build and run" menu.
In the lower window (messages about the build process), the inscriptions "Compiling", "Linking", etc. will appear, which reflects the progress of compiling and linking the program.
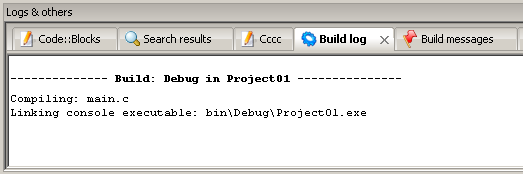
As a result, a console window should appear, where the sentence indicated in the program in quotes will be displayed at the top, namely the sentence "Hello world!".
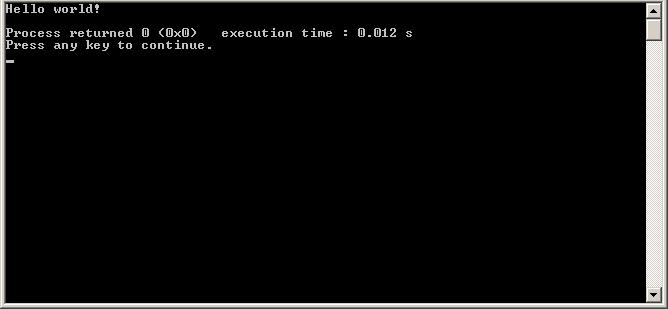
Thus, the program prints the given string to the screen.
There will be two lines below this line. The first one gives the return code of the program and the time it took to execute the program. The second displays a message stating that you must press any key to continue. These two lines are generated automatically if the program is launched from Code :: Blocks.
The font used in the console window can be changed if necessary. For example, in the case of an operating system of the Windows family, for this you can try the following steps.
Click on right by clicking on the icon in the upper left corner of the console window. A pop-up menu should appear where you need to select the "Defaults" item.
The settings window will appear.

In this window, you need to select the desired font (for example, Lucida Console). Then, for this font, you need to select the desired size (for example, 14). After that, you need to click "OK" to save the settings.
Then, you need to close the console window by pressing any key.
After that, you need to restart the program by pressing the button or the F9 key (or by selecting the "Build => Build and run" menu).
The console window should now have a new font.
2.3 Explanation of the program
Now, after successfully launching the program and checking its operation, you can take a closer look at the component parts of the program, which was automatically created when the project was created. Let's consider the text of this program.
#includeThe word main is given in, from which the execution of any program begins. This means the main function from which it all starts. There may be calls to other functions inside this function, but it all starts with executing the contents of main. The name of this function is followed by parentheses with nothing in between. This means that this function has no arguments. Every function must have parentheses, even if it has no arguments.
The content of the function, in this case the content of the entire program, is between the curly braces. They correspond to begin and end as applied to Pascal.
Before the name main is the word int, which specifies the type of the value returned by the function. In this case, it is an integer type (in what follows, different data types will be considered separately). The main function (that is, in fact, the main program) returns the exit code of the program. It is generally assumed that a program should return 0 on normal execution. Returning this value is done with return 0 with a closing curly brace.
Also between the curly braces is a call to a function named printf. This function is used in this case to display text on the screen. The parentheses for this function are its arguments. The only argument here is a string, enclosed in double quotes. It is this line that is displayed on the screen by the printf function. However, the combination of characters \ n is not displayed on the screen. This combination denotes the transition to new line, which is not printed on the screen, but means that a new line should be performed at this point.
To understand the meaning of the newline character, try removing the \ n combination from the line, run the program and see the result. Also try to put the combination \ n several times in a row, run the program and see the result. Then return the original version of the program.
There is a semicolon after the call to printf. This separates the individual operators from one another. In particular, it separates the call to the printf function from the return statement.
It remains to be understood what the line in this program is for. Without going into details, we can say that the line is needed in order to make it possible to use the printf function, since this line provides information about this function. This line includes the file stdio.h, the name of which is indicated in parentheses in the form of characters< и >... The #include command denotes the inclusion of this file. This connection allows you to use the functions declared in this file, in particular, the printf function. the line in this program is actually not needed, but its principle of operation is similar, only here another file (stdlib.h) is included.
2.4 Changing the program
Now you can start editing the main.c file.
In the edit field, you can type any text, as in a regular editor. In the future, sample programs and program fragments can be simply pasted into the edit field using the usual copying of blocks of text. Consider a similar action in the following example.
The content of the main.c file was automatically generated. But such a program can be written a little more succinctly, and also slightly modified by adding exclamation marks.
#includeNow this program needs to be transferred to the editing window using ordinary copying. To do this, select the program text and copy the selected text to the clipboard, for example, by pressing right button mouse and selecting "Copy" from the menu). Then, you need to switch to the Code :: Blocks editing window, highlight the text there, and paste the text from the clipboard, for example, by selecting the "Edit => Paste" menu or by selecting, after pressing the right mouse button, the "Edit => Paste" menu). This version of the program should appear in the editing window.
Save the new version of the program. To do this, just press Ctrl-S (or select the "File => Save file" menu). Train yourself to save the file after every, even small, change in the text of the program. Otherwise some work may be lost if it hangs.
Try running this new version of the programs.
Self-control tasks
- Change the text "Hello world !!!" on some other, while using the Russian language. Run the program to check the changes.
- Change the value 0 after return to some other numeric value, for example 5. Run the program and check that after "Process returned" the new numeric value is displayed in the console window.
- Make it so that when you run the program, before the output of the string "Hello world !!!" there was a shift one line down on the screen. To do this, put the combination \ n at the very beginning of the line used as an argument to the printf function. Run the program to make sure the task is completed correctly.
- Make sure that when you run the program, before printing the "Hello World!" there was a shift several lines down on the screen. To do this, put the combination \ n several times in a row at the very beginning of the line used as an argument to the printf function (meaning the string inside the brackets in quotes). Run the program to make sure the task is completed correctly.
- Output the string "Hello world !!!" three times in three consecutive lines on the screen (one copy per line), placing the combination \ n in the right places.
- Make it so that when you run the program, the string "Hello world !!!" displayed exactly in the center of the screen. To do this, you need to shift the line down and to the right, using \ n and spaces.
- Print three different words at the same time in three places on the screen: in the upper corners and in the center of the screen. Use two printf calls in a row with different strings as arguments, using \ n and spaces in a special way in each case.
2.5 Running the program outside the development environment in case of Windows
In the project folder, the path to which was specified when creating the project (see), there should be a bin / Debug folder. And in this folder the executable file Project01.exe must be located, which is obtained as a result of building the program.
This executable file (application) can be launched by standard means (for example, using "Explorer"), that is out development environment Code :: Blocks. Also, for example, you can make a shortcut to this file and place it on the desktop, so that later you can run it from there.
But with such a launch, the console window with the output line appears and immediately disappears, since the program terminates immediately, without waiting for the user's command. Why is this happening? The thing is that when launched from Code :: Blocks, waiting for any key press is automatically added, and the application itself does not provide this.
To implement waiting for a pressed key (in the case of Windows), you need to change the program by adding several lines. Then it will take the following form.
#includeTry running this program from Code :: Blocks. To do this, place the specified program in the edit field instead of available, and run the program by pressing the button or the F9 key (or by selecting the "Build => Build and run" menu).
Note that after the output "Hello world !!!" now nothing else is displayed, as it waits for a key to be pressed. But after pressing the key, the already familiar two lines are displayed ("Process returned ..." and "Press any key to continue."). After these lines, the wait for a key press is performed again (which is provided by the Code :: Blocks environment).
Now if you run this program out Code :: Blocks, by running the Project01.exe file, the specified text will be displayed in the window and the program will wait for a key press to complete.
This modification of the program requires two lines: one containing conio.h and one containing getch. conio.h is needed to be able to call getch. This is analogous to connecting stdio.h to be able to call the printf function. The getch function provides waiting for a key press.
In the future, such changes will not be indicated, but if necessary, you can always make them in order to similarly ensure that you wait for a key press before exiting the program.
2.6 Messages about warnings and errors in the program
When building a program (when you try to run it after changes), warnings and errors may be displayed. Let's look at an example of how this happens. Try running the following program.
#includeThis program does not contain a return, but it will run. Try to run it.
However, during compilation, a warning will be issued related to the fact that there is no return statement. When the program is launched, this warning disappears as it does not affect the launch of the program. But you can read it if you only build the file (without starting the application). To do this, create the "Build" command by pressing Ctrl-F9, or by clicking the button, or by selecting the "Build => Build" menu.
But if the program has not changed since the previous build or launch, then the new build will not be performed. And in the window below you will see a message that the assembly is already the most recent, and nothing else needs to be done for this command ("Target is up to date. Nothing to be done.").

In this case, you need to reassemble. To do this, create the "Rebuild" command by pressing Ctrl-F11, or by clicking the button, or by selecting the "Build => Rebuild" menu. After the formation of this command, a window appears to confirm it. To confirm this command, click "Yes" in the specified window.
Then in the lower window you can see a line with a warning (blue), as well as a message about the presence of one warning (1 warnings).
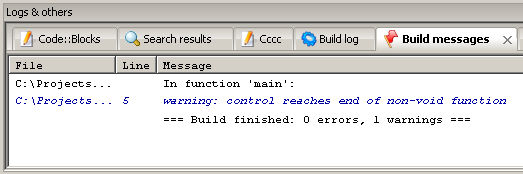
In general, a warning allows the execution of the program, but signals the programmer about possible mistakes or inaccuracies.
In the future, the return statement for the main function can be omitted for brevity, as is done in. But it must be borne in mind that a warning appears because of this.
Now try running the following program.
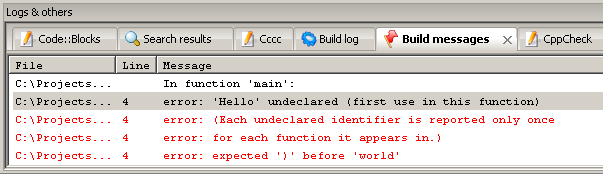
#includeNote that the program will not start. Instead, lines in red will appear in the lower window to indicate errors.
The line in the program where there is an error is highlighted with a red square.
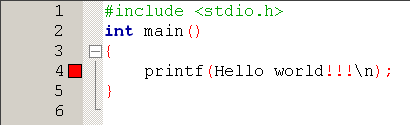
It should be borne in mind that one valid error can lead to several error messages at once. In this example, 5 errors are generated, so 5 lines are displayed in red.
Comparing the program as well, it is easy to understand that the error occurs because the quotes are not specified. Accordingly, the error "" Hello "undeclared" is displayed. The word "undeclared" means "not declared", that is, the compiler tries to figure out what Hello stands for and what to do about it. He cannot find this word among the known words, so it gives an error. If this word is in double quotes, then it is perceived as some string, inside which there can be anything. The string can be displayed. Therefore, after correcting the program (adding quotes where necessary) everything should be fine.
Correct the program and check if it is executed correctly.
Self-control tasks
- Try removing the last curly brace and running the program. Note that the error is noted on the line containing printf, that is, on the previous line. Rebuild the correct program.
- Try removing the two parentheses after main. Note that the error is noted on the line containing the curly brace, that is, on the next line. Rebuild the correct program.
- Try removing the first parenthesis after main. Note that the error is noted on the line containing main, that is, on the same line. Rebuild the correct program.
Considering the tasks for self-control, it is easy to notice that the error may be contained next to the line marked with a red square. Therefore, if an error occurs, it is necessary to analyze the adjacent lines as well.
3 Basic information
3.1 Integers
To work with data, in particular with integers, you need variables that are used to store such numbers. First, the variable must be declared in order to start working with it.
Variable declaration is performed as follows.
Variable_type variable_name;
For example, an integer variable a is declared as follows.
int a;In this case, the variable a is of type int, which denotes an integer type.
A variable declaration specifies a block of memory for storing data of the specified type. Naturally, several such blocks can be distinguished. To distinguish them from each other, these blocks are named. For example, the declaration int a allocates a block named a, the declaration int b allocates a block named b, and so on. In this case, you can simultaneously declare several variables, that is, allocate several blocks of the same type with different names. To do this, the names of these blocks are listed separated by commas after the type designation.
int x, y, z;In this declaration, three different blocks of the same type with different names are allocated.
To write a value to the selected data block, you need to assign this value to the corresponding variable, for example, the expression
performs the assignment of the variable a to the value 10. You can also assign one variable the value of another variable, for example, the expression
performs the assignment of variable a to the value of variable b. You can assign the same value to several variables at once. To do this, for example, you can use the following expression.
X = y = z = 100;
Remember that a variable can only be assigned a value if that variable has been declared (in particular, its type has been specified for it).
The value of a variable can be printed to the screen using the printf function. Check the following program as an example.
#includeNote that the program has the comment "variable declaration a". A comment is a fragment that is needed to describe a particular part of the program. The comment does not affect the final program, it is just an addition to the text, which is not used in the future when executing the program. The comment must start with a combination of characters / * and end with a combination of characters * /. In this case, the comment can be located on several lines, for this the combination / * will be located at the beginning of the first line of the comment, and the combination * / will be located at the end of the last line of the comment.
At the very beginning of the main function, the variable a. Then this variable is set to 10. On the next line, use the printf function to set the variable to the screen. To do this, add an additional argument to the printf function, separated by a comma after the quoted string. This additional argument is the variable a itself, the value of which should be displayed. To tell the printf function where to print the value of a variable, a two-character combination is added to the output string, namely% d. These characters themselves will not be displayed on the screen, but instead the value of the variable, separated by commas after the line, will be displayed. Run the program and check its work.
As you type in your program, note that uppercase and lowercase letters are different letters from the compiler's point of view. Therefore, for example, typing Main instead of main will result in an error.
Self-control tasks
- Change the value of the variable a to some other value and
- Try adding comments to different parts of the program. Make sure they do not interfere with program execution. Check the use of comments spanning multiple lines in a row.
- Check what happens when you change the case of a letter, that is, for example, when you change a small letter to a capital letter and vice versa.
For the declaration of the variable a and its initialization, two consecutive lines (s) are obtained. But you can combine the declaration of a variable and its initialization. Instead of these two lines, you can write only one line of the following form.
int a = 10;Check that the program is working correctly after such a change.
Using the printf function, you can also print the values of several variables at once. To test this possibility, declare the variable b and assign some value to this variable before calling the printf function. It is important to note that a variable declaration can be performed anywhere within the curly braces of a function, in particular the main function. Then convert the printf string as follows.
Printf ("a =% d, b =% d \ n", a, b);
Check if the program is running correctly.
Thus, to display the values of several variables at once, it is necessary to arrange appropriately the formatted output characters% d in the output line, and also list the variables separated by commas immediately after the output line in the output order. Then, instead of each combination of% d, the value of the next variable from the list of variables, separated by commas, will be substituted.
In this case, an expression can also be specified as an argument to the printf function. For example, you can use the * sign for multiplication to square and cube a variable. Add the following snippet after the existing call to printf.
Printf ( "a =% d \ n (a squared) =% d \ n (a cube) =% d \ n", a, a * a, a * a * a);
Check if the program is running correctly.
Note if a function call is too much long line, then it is convenient to divide it into several lines by commas. For example, as it was done in this text, but the same fragment can be written in one line at the request of the programmer.
3.2 Arithmetic expressions
Now, in order to square or cube some integer, it is enough to correct the initial assignment to the variable a, and restart the program. Experiment with this. In addition to squaring and cube, you can use various expressions based on arithmetic operations: +, -, *, /.
Self-control tasks
- Implement the calculation of some formula using all 4 arithmetic operations. Set the value of the variable in the program. Check if this formula is calculated correctly.
- Make a formula calculation in two variables. Set the values of the variables in the program.
The C language also has the ability to more concisely record some of the frequently used constructs. So, to increase a variable by a given value, the + = operation is used. It turns out that the expression
A + = 10;
is equivalent to the expression
A = a + 10;
in this case, in a similar way, instead of the + sign, there can also be signs -, *, /, as well as some other signs of operations.
The following program fragment illustrates examples of using these features, while the comments indicate the values that the variable takes as a result of calculating an arithmetic expression.
int i = 10; i = (i * 2 + 1) / 3 - 5; / * i = 2 * / i + = 5; / * i = 7 * / int j = 3; i * = j; / * i = 21 * / i / = 7; / * i = 3 * /Self-control task
- Implement the calculation of some formula using the specified capabilities (more concise form of writing some arithmetic expressions).
Moreover, the expression
denotes incrementing the variable a by 1, which is equivalent to the expression
A = a + 1;
Similarly, the expression
here means decrement by 1.
It is important to note that there are also expressions like
A ++; a--;
They also represent an increase of 1 and a decrease of 1.
However, there is a difference between the prefix (++ a) and postfix forms (a ++) in more complex expressions.
When prefix form (++ a) first increases (decreases) by 1, and then calculates the rest of the expression.
When postfix of the form (a ++), the expression is evaluated first, and then the increment (decrement) by 1 is performed.
The following example illustrates this difference.
Consider the same snippet that uses ++ y (prefix form).
int x = 10; int y = 2; x = x * (++ y); printf ("x =% d y =% d \ n", x, y);X = 30 y = 3
Here, first, y will receive the value 3 due to ++ y, and after that, 10 will be multiplied by 3.
Consider the same snippet that uses y ++ (postfix form).
int x = 10; int y = 2; x = x * (y ++); printf ("x =% d y =% d \ n", x, y);During the execution of this fragment, the following line will be displayed on the screen.
X = 20 y = 3
Here, first, 10 will be multiplied by the value of y, which is 2, and after that, y ++ will be executed.
It should be noted that it is not at all necessary to put parentheses around ++ y and y ++ in these fragments.
Self-control tasks
- Check the execution of the specified program fragments. It should be borne in mind that these are just fragments of programs. They must be added inside the curly braces of the main function.
- Try removing the parentheses around ++ y and y ++ in these snippets. Make sure that the result does not change.
3.3 Types of integers
So far, we've only looked at the int type for integers. What limit values can be set for a variable of type int?
Guaranteed you can set values in the range from -32768 to 32767, since for a variable of the int type not less 16 bit.
But nowadays you will often come across compiler implementations where 32 bits are allocated for a variable of type int, that is, this variable can take values in the range from -2147483648 to 2147483647.
However, you can be sure that the range permissible values for variable x will not be less than the range from -32768 to 32767.
When using the suggested version of Code :: Blocks and the gcc compiler supplied with that environment (or a similar compiler previously installed), you are likely to find yourself in a situation where variable of type int can range from -2147483648 to 2147483647.
Let's check this with the following example.
#includeX1 = -2147483648 x2 = 2147483647
If so, then it shows that a variable of type int can take such values.
Now, before the printf line, you can make the variable x2 by 1
#includeWhen this program is executed, the following line will most likely be displayed.
X1 = -2147483648 x2 = -2147483648
Notice that the value of the variable x2 has become a negative limit. We can say that when trying to add 1 to the maximum positive value (value 2147483647), an out of range occurred and the value "in a circle" went to the extreme negative value (value -2147483648). The so-called overflow.
If you increase x2 not by 1, but by 2, then the variable x2 will take on the value -2147483647 (which is 1 different from the negative limit). Check it.
If you increase x2 not by 1, but by 3, then the variable x2 will take on the value -2147483646 (which is 2 different from the negative limit). Check it.
Thus, one can understand the principle of behavior of integer variables in case of overflow.
Self-control tasks
- Similarly, check for the overflow of the variable x1 towards the extreme negative value, that is, when subtracting some number from this variable.
- Overflow also occurs when a simple attempt is made to assign a value to a variable that is outside the allowed range. Check it.
In addition to the int type, there are other integer types for declaring variables.
For example, the long type is guaranteed to provide -2147483648 to 2147483647 (the int type does not provide such a guarantee for all compilers).
Also, in modern compilers of the C language, the long long type (written in two words) has appeared, which allocates 64 bits for a variable. And that corresponds to the range of numbers from -9223372036854775808 to 9223372036854775807.
Let's check this type with the example of the following program.
#includeX1 = -9223372036854775808 x2 = 9223372036854775807
Note that in this case, when calling printf, the character combination is% lld, not% d. This is necessary for printf to correctly display large numbers that are of type long long.
Self-control tasks
- Similarly, check the overflow of variables of type long long in this example (as was the case with variables of type int).
- For this example, try using% d instead of% lld in the printf function.
In addition, new integer types if you add before its name keyword unsigned, which shifts the range of possible values to the positive range, that is, makes the type unsigned. The following program example explains this.
#includeWhen executing this program, a string should be output.
X1 = 0 x2 = 4294967295
Note that in this case, when calling the printf function, the combination of characters is% u, not% d. This is necessary for the printf function to correctly display numbers that are unsigned.
Self-control tasks
- Similarly, check the overflow of unsigned int variables in this example (as was the case with int variables).
- For this example, try using% d instead of% u in the printf function.
- Based this example try displaying the maximum value that can be written to an unsigned long long variable (namely the number 18446744073709551615). For correct display using the printf function, the combination of characters% llu (instead of% u) is used.
3.4 Real numbers
To specify real numbers, you can use the float type or the double type. In this case, a variable of type float occupies 4 bytes, and a variable of type double occupies 8 bytes. Therefore, in general, the double type provides a wider range of possible numbers and more decimal places after the decimal point, but its disadvantage is double the memory consumption compared to the float type.
There is also a long double type, and the variable of this type can be 8 to 16 bytes depending on the compiler implementation. Therefore, long doubles often provide even more precision in exchange for more memory consumption.
Let's check the execution of the following program.
#includeThe screen will display:
X = 10.500000
Note that% f is used instead of% d, which is due to the use of a real type instead of an integer type. Check what happens if you put% d instead of% f.
How to remove extra zeros when displaying a number? To do this, you can specify the number of digits after the decimal point, for example, as follows.
Printf ("x =% .1f \ n", x);
In this case, the number after the point indicates the number of digits after the decimal point. Experiment with this.
In addition, you can set the number of characters used to display the number, for example, you can set this number to 10 as follows.
Printf ("x =% 10.1f \ n", x);
Check to see what changes.
In addition, instead of the letter f in combination with%, you can use the letter e to display a number in exponential form, as well as the letter g to automatically select the output format depending on the size of the number. In addition, the letters E and G can also be used.
Self-control tasks
- Try it various options output a real number and see what it does (including using the letters e and g instead of f in combination with%).
- Determine for yourself how using the letters E and G versus the letters e and g leads.
- Implement the construction of a real number to a square and to a cube, ensuring that the obtained values are displayed on the screen. Select a suitable format for outputting a real number.
Code :: Blocks is a free cross-platform C / C ++ development environment. On the this moment it is the best free C development environment.
Code :: Blocks is developed for Windows, Linux and Mac OS X.
IN Windows environment It is most convenient to download this environment as part of an assembly, which already contains all the necessary libraries to get started. The assembly does not require installation and works according to the principle: "Unpack and work".
Code :: Blocks supports the following compilers:
- GNU GCC (incl. G77) (Linux)
- MinGW GCC (incl. G77) (Win32)
- MSP430 GCC (Win32)
- TriCore and PowerPC GCC (Win32, Linux)
- Apple GCC (Xcode) (Mac OS X)
- Microsoft Visual C ++ Toolkit 2003 (Win32)
- Microsoft Visual C ++ 2005 (Win32)
- Borland's C ++ Compiler 5.5 (Win32)
- DigitalMars C / C ++ (Win32)
- OpenWatcom (Win32)
- Intel C ++ compiler (Win32)
- Small Device C Compiler (SDCC)
- Digital Mars D
- GDC D Compiler
- LLVM D Compiler
Ready templates
CodeBlocks has ready-made templates projects that allow you to quickly build a minimal application.
Code editor

The code editor has all the features for the comfortable work of the programmer:
- Syntax highlighting (can be customized)
- Tabbed interface
- Code completion
- Class browser
- Smart indent
- One click exchange between .h and .c / .cpp files
- Custom keyboard shortcuts
- External customizable "Tools"
- To-do list management with different users
The number of editor settings is huge:

except general settings also configurable:
- Collapsing code
- Fields and cursor
- Syntax highlighting (separately by file type)
- The default code for generated files(auto signature can be inserted)
- Abbreviations (when you enter an abbreviation, it is automatically expanded into the code)
- Code formatting
- A way to save and return to lines of code
- Code completion
- Setting up code statistics
- Generating Documenting Code
- and much more
Plugins
The editor's capabilities can be extended with plugins. For example:
- HEX editor
- Nassi Shneiderman diagrams
- Exporting source code to other formats
- Keystroke macros
- Menu shortcuts
- Incremental search
- Environment Variables
- and many others
Debugger
As the default debugger, CodeBlocks uses GDB - the most popular C debugger, which was developed by Richard Stallman.
The debugger lets you set breakpoints and then step through your code while monitoring variables and arrays. Also you can keep track of the stacks of the called functions.

Outcomes
The number of possibilities and settings of the CodeBlocks environment make it possible to turn this environment into an excellent tool for a C programmer.
Integrated Development Environment (IDE) Code :: Blocks (hereinafter CB) is a complete product for developing applications in C / C ++. CB is a cross platform framework developed using the wxWidgets tool library. There are versions of the environment for both Windows and other operating systems (OS) - Linux and Mac OS. This IDE is completely free, open source source and built entirely using open source technology. One of the most strengths CB is to support the creation of wxWidgets applications - i.e. such software(Software), which for drawing a graphic user interface(GUI) uses OS API. In other words, CB allows you to create cross-platform software for every taste.

CB knows how to work with a large number of compilers. If there are several of them installed in the system, you can easily switch between them, depending on your needs. Plus, the IDE itself, at the installation stage, will scan the system for available compilers and offer to use one as the main one. It is possible to later change these settings both globally and separately for projects. For global environment settings, there is a whole Settings section in the CB main menu. To make any specific settings specific to a specific project, you need to open the project properties window. To do this, you need to call context menu project by clicking on it with the right mouse button, and select the item "Properties". The projects themselves (currently open in the IDE) are displayed as a tree in the "Management" dock, in its "Projects" tab. Now, in the properties window that opens, you can configure a wide variety of parameters, from editing build targets to connecting third-party libraries. The “Project’s build options” button on the “Project Settings” tab of the same properties window will allow you to very flexibly configure the build configuration for a specific project: compiler keys, select the compiler itself, connect libraries for the linker, etc. All this can be done for individual modes: "Release" "Debug".

The CB GUI is built around floating and stretching docks that can be docked to any side of the main IDE window by simply dragging and dropping. Thanks to this, it is possible to very flexibly customize different layouts of the interface for different screen sizes, optimizing the ergonomics of the GUI. If there are several monitors, it is convenient to separate some panels from the main window and place them on adjacent monitors.
Highlighting, code completion and editing tools in CB make the process of working with code easy and comfortable. A huge arsenal of settings allows you to fine-tune the environment "for yourself". It is very useful to have support for working with environment variables. Thanks to this feature, CB can be very tightly integrated into the system and extend its capabilities, for example, in this way, you can connect the wxWidgets library.
By the way, for developing GUI applications based on wxWidgets, CB has a built-in RAD GUI design tool, wxSmith. It's pretty powerful utility, although not quite easy to learn.
Code :: Blocks is a free cross-platform development environment. Code :: Blocks is written in C ++ and uses the wxWidgets library. Having an open architecture, it can be scaled due to plug-ins. Supports programming languages C, C ++, D (with restrictions).
Code :: Blocks is developed for Windows, Linux and Mac OS X. The environment can be built from source for almost any Unix-like system. [http://ru.wikipedia.org/wiki/Code::Blocks]
In order to enable the Russian language, you need to do the following:
1. The archive must be unpacked into the program subfolder (where it is installed), for example C: \ Program Files (x86) \ CodeBlocks \ share \ CodeBlocks
2. After starting the program, select Settings -> Environment -> View, put a check mark on "Internationalization" and select "Russian" from the list.

3. Restart the CodeBlocks program and get Russification. 
The Russian language has been successfully connected to Code :: Blocks version 13.12.
The archive already contains the locale \ ru_RU folder structure (for placement in \ CodeBlocks \ share \ CodeBlocks)
Top condition:
Messages: 2173
Translated: 2173 (100.0%)
Untranslated: 0 (0.0%)
Shared between Ubuntu and upstream: 2173 (100.0%)
Translated differently between Ubuntu and upstream: 0 (0.0%)
Only translated on this side: 0 (0.0%)


