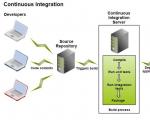
Custom firmware for smartbox beeline router. How to set up a Beeline Smart Box router: detailed instructions. Connecting a router from Beeline
Router from Beeline SmartBox ONE- a device that is used to distribute traffic when connected to the Internet. You will learn how to set up your router by reading the description below. Such a router costs about 2,500 rubles. An alternative in the absence of a cable connection is the ZTE MF90 4G router.
Characteristics of the router from Beeline
SmartBox ONE - on this moment the most new model router from Beeline. One of the advantages of the product is that the device is equipped with a more powerful transmitter capable of operating in two frequency ranges: 5 GHz and 2.4 GHz. This negates the likelihood that any device used by the user will not be able to connect to the World Wide Web.
The advantages of using WiFi router Beeline Smart Box ONE also makes sense to include the following:
- Convenient software interface used to set up a network connection;
- Ergonomic modern design;
- Support for connecting to digital TV;
- The maximum data transfer rate is 300 megabits per second;
- 802.11 standard, which is supported by most modern high-tech devices.
In the case of using a 4G device, data is transmitted at speeds up to 74 Mbps. The set with the device comes with a SIM-module from Beeline, which opens access to the use of 30 GB of traffic throughout the month. Subscription fee- 1200 rubles. At night, when connected to a 4G network, there is no limit.
How to set up a 4G / WiFi device from Beeline
There is nothing difficult in connecting a router. The rear panel of the product has 7 connectors. To the Power socket, you need to connect the power cable from the mains, and to the WAN connector - the Internet cable, which is routed to the apartment. In the next step, by connecting a cable to one of the LAN connectors, connect the device to the computer. The 4G router is connected to a laptop or stationary PC via a USB port.
- After making sure that all the indicators of the Beeline SmartBox ONE router are on, launch any browser installed on the computer, and enter 192.168.1.1 in the address bar;
- On the welcome page that appears, enter the admin password and the same username (standard settings) in the appropriate fields, click on the button labeled “Continue”;
- In the opened main menu, inexperienced users can perform the procedure quick setup, if you have experience in this plan, you can go to the advanced settings.
Simple configuration of the Beeline router
If you want to quickly set up a router from Beeline, then there are 4 points. They are as follows:
- "Home Internet";
- "WiFi network";
- “Guest network”;
- “TV”.
The “Home Internet” item is used to connect to the network of the Beeline operator. Since all the required parameters are already contained in the installed software (firmware), the user only needs to enter a password and a name (both values are admin).
"WiFi network" - an item in quick settings, which gives access to parameter settings wireless network... Here it is necessary to register in the appropriate fields the name displayed in the connection menu on the devices used, as well as a password of at least 8 characters.
“Guest network” is an item for making settings in order to provide guest access to the Internet.
The “TV” item is used to select the LAN port to which the cable from the IPTV set-top box will be connected, if available.
Connecting a router from Beeline
After entering all the required data and making the necessary settings, you need to click on the “Save” button and wait until the device connects to the network. In time, this should take no more than a minute. If everything is done correctly, the value “Internet connected” will be displayed in the “Status” line. At this, all operations are considered completed, you can proceed to work in the network.
Software update for Beeline router
The software installed by the manufacturer ensures the functioning of the router. In order to avoid malfunctions in the operation of the router, the firmware should be updated in a timely manner. But it is necessary to act with extreme caution when performing such procedures. Otherwise, if something goes wrong, only the service center specialists can restore the Beeline router to work.
Important! Software download should only be from the official site.
The process of downloading and installing firmware updates consists of the following steps:
- We launch the browser, enter 192.168.1.1 in the address bar;
- Enter the password and login (admin);
- Go to the advanced settings menu;
- Select the "Other" item at the top of the page; In the window that opens, on the left, click on "Software Update", then select the address on the computer where the downloaded software will be located;
- We click on the button “Execute update”.
After a few minutes, the router will reboot and be ready to operate again with the new software.
The firmware of this wonderful router with excellent functionality is not carried out.
- In contact with
- Google+
Router connection
Configuring the router
Configuring a router for L2TP
Setting up a router for IPOE
Configuring a router for L2TP


4. « Home Internet»
"Wi-Fi router network"
"Guest Wi-Fi network"


Setting up a router for IPOE
1. Open a browser and enter 192.168.1.1 in the address bar. You will be taken to the welcome page. Click the Continue button.
2. The router will prompt you for a username and password. Enter admin in the first field, and admin in the second. Click the Continue button.
3. You will be taken to the main menu of the router. Select Quick setup.
4. "Home Internet"
"Wi-Fi router network"- here you can configure the wireless network of your router. In the Network name field, enter the name of your network, for example my_wifi, and in the password field, enter the password to access it. Please note that the password must contain at least 8 characters.
"Guest Wi-Fi network"- here you can set up your router's guest wireless network.
"Beeline" TV - if you have connected the service "Beeline" TV, you need to select the port of the router to which you connect the set-top box. If you are browsing terrestrial channels on your computer or using the Xbox 360 console, then you don't need to configure anything.
To save the parameters you entered, click the Save button.

Fill the form:
Click the Login button.


Firmware upgrade
Reset
Firmware upgrade
2.0.38: (14.7 MB)


Reset
MCPE

Router connection
Connect the cable that our installers brought to your apartment to the Internet (WAN) port, and connect your computer to any of the Ethernet (LAN) ports. You can also connect your PC to the router wirelessly, but it’s better to use a cable for the initial setup.
Configuring the router
Configuring a router for L2TP
Setting up a router for IPOE
Configuring a router for L2TP
1. Open a browser and enter 192.168.1.1 in the address bar. You will be taken to the welcome page. Click the Continue button.

2. The router will prompt you for a username and password. Enter admin in the first field, and admin in the second. Click the Continue button.

3. You will be taken to the main menu of the router. Select Quick setup.

4. "Home Internet"- v this section the connection to the Beeline network is being set up. All the configuration data required for connection is already contained in the router's memory, you just need to enter your username and password in the appropriate fields.
"Wi-Fi router network"- here you can configure the wireless network of your router. In the Network name field, enter the name of your network, for example my_wifi, and in the password field, enter the password to access it. Please note that the password must contain at least 8 characters.
"Guest Wi-Fi network"- here you can set up your router's guest wireless network.
"Beeline" TV - if you have connected the service "Beeline" TV, you need to select the port of the router to which you connect the set-top box. If you are watching live feeds on your PC or Xbox 360, then there is nothing to set up.
To save the parameters you entered, click the Save button.


Setting up a router for IPOE
1. Open a browser and enter 192.168.1.1 in the address bar. You will be taken to the welcome page. Click the Continue button.
2. The router will prompt you for a username and password. Enter admin in the first field, and admin in the second. Click the Continue button.
3. You will be taken to the main menu of the router. Select Quick setup.
4. "Home Internet"- in this section you need to enter any number or letter in the fields "Login" and "Password" (the setting does not affect anything).
"Wi-Fi router network"- here you can configure the wireless network of your router. In the Network name field, enter the name of your network, for example my_wifi, and in the password field, enter the password to access it. Please note that the password must contain at least 8 characters.
"Guest Wi-Fi network"- here you can set up your router's guest wireless network.
"Beeline" TV - if you have connected the service "Beeline" TV, you need to select the port of the router to which you connect the set-top box. If you are watching live feeds on your PC or Xbox 360, then there is nothing to set up.
To save the parameters you entered, click the Save button.
6. Launch your browser, open the page http://login.beeline.ru
Fill the form:
Login - enter your personal account number (type 0891234567);
Password - enter a password for Internet access;
Click the Login button.
Firmware update and factory reset
Firmware upgrade
Reset
Firmware upgrade
Be careful when following the instructions in this section. In case of an error in the actions, a visit to the service center will be required to restore the device.
1. Download the firmware. The current firmware version is 2.0.22: (14.5 MB)
2. Open a browser and enter 192.168.1.1 in the address bar. You will be taken to the welcome page. Click the Continue button.
3. The router will prompt you for a username and password. Enter admin in the first field, and admin in the second. Click the Continue button.
4. Click on the "Advanced Settings" button.
5.In top menu select "Others".
6. The page with the basic settings of the router will open. In the left menu, select "Software Update". Click the "Select file" button and specify the location of the firmware file that you downloaded earlier.
7. After that, click the "Execute update" button.
8. Wait while the router is updating the firmware, this process takes approximately 5 minutes, after which the router must be rebooted and it will be ready for use.
Reset
Use a hard reset if you need to configure the device again (delete all user settings), you cannot access the web page of the router settings interface, after setting up the router, the Internet connection was not established or the password to access it was lost.
Attention! When performing a hard reset, all user settings will be reset to factory settings!
On the body of the device there is a deep RESET (RESTORE) button that allows you to reset the settings to the factory settings. The RESET button (RESTORE) can be found on the same side of the router case where the rest of the connectors and buttons are located. In rare cases, the button may be located on the bottom of the router.
In order to reset the router settings to factory settings, do the following actions: Turn on the power of the router and wait until the device is fully loaded. Press the RESET, RESTORE button using a pointed thin object (such as a paper clip) for 30 seconds, then release the button. After that, the router will reboot with the default settings (factory settings) and you will need to re-configure it.
You can also reset the setting through the MCPE platform
Or through the web interface of the router. Click on the "Revert to factory default settings" button.
Router connection
Connect the cable that our installers brought to your apartment to the Internet (WAN) port, and connect your computer to any of the Ethernet (LAN) ports. You can also connect your PC to the router wirelessly, but it’s better to use a cable for the initial setup.
Configuring the router
Configuring a router for L2TP
Setting up a router for IPOE
Configuring a router for L2TP
1. Open a browser and enter 192.168.1.1 in the address bar. You will be taken to the welcome page. Click the Continue button.

2. The router will prompt you for a username and password. Enter admin in the first field, and admin in the second. Click the Continue button.

3. You will be taken to the main menu of the router. Select Quick setup.
4. "Home Internet"- this section configures the connection to the Beeline network. All the configuration data required for connection is already contained in the router's memory, you just need to enter your username and password in the appropriate fields.
"Wi-Fi router network"- here you can configure the wireless network of your router. In the Network name field, enter the name of your network, for example my_wifi, and in the password field, enter the password to access it. Please note that the password must contain at least 8 characters.
"Guest Wi-Fi network"- here you can set up your router's guest wireless network.
"Beeline" TV - if you have connected the service "Beeline" TV, you need to select the port of the router to which you connect the set-top box. If you are watching live feeds on your PC or Xbox 360, then there is nothing to set up.
To save the parameters you entered, click the Save button.
Setting up a router for IPOE
1. Open a browser and enter 192.168.1.1 in the address bar. You will be taken to the welcome page. Click the Continue button.
2. The router will prompt you for a username and password. Enter admin in the first field, and admin in the second. Click the Continue button.
3. You will be taken to the main menu of the router. Select Quick setup.
4. "Home Internet"- in this section you need to enter any number or letter in the fields "Login" and "Password" (the setting does not affect anything).
"Wi-Fi router network"- here you can configure the wireless network of your router. In the Network name field, enter the name of your network, for example my_wifi, and in the password field, enter the password to access it. Please note that the password must contain at least 8 characters.
"Guest Wi-Fi network"- here you can set up your router's guest wireless network.
"Beeline" TV - if you have connected the service "Beeline" TV, you need to select the port of the router to which you connect the set-top box. If you are watching live feeds on your PC or Xbox 360, then there is nothing to set up.
To save the parameters you entered, click the Save button.
6. Launch your browser, open the page http://login.beeline.ru
Fill the form:
Login - enter your personal account number (type 0891234567);
Password - enter a password for Internet access;
Click the Login button.
Firmware update and factory reset
Firmware upgrade
Reset
Firmware upgrade
Be careful when following the instructions in this section. In case of an error in the actions, a visit to the service center will be required to restore the device.
1. Download the firmware. The current firmware version is 2.0.15: (22.2 MB)
2. Open a browser and enter 192.168.1.1 in the address bar. You will be taken to the welcome page. Click the Continue button.
3. The router will prompt you for a username and password. Enter admin in the first field, and admin in the second. Click the Continue button.
4. Click on the "Advanced Settings" button.
5. In the top menu, select "Others".
6. The page with the basic settings of the router will open. In the left menu, select "Software Update". Click the "Select file" button and specify the location of the firmware file that you downloaded earlier.
7. After that, click the "Execute update" button.
8. Wait while the router is updating the firmware, this process takes approximately 5 minutes, after which the router must be rebooted and it will be ready for use.
Reset
Use a hard reset if you need to configure the device again (delete all user settings), you cannot access the web page of the router settings interface, after setting up the router, the Internet connection was not established or the password to access it was lost.
Attention! When performing a hard reset, all user settings will be reset to factory settings!
On the body of the device there is a deep RESET (RESTORE) button that allows you to reset the settings to the factory settings. The RESET button (RESTORE) can be found on the same side of the router case where the rest of the connectors and buttons are located. In rare cases, the button may be located on the bottom of the router.
To reset the router settings to factory settings, follow these steps: Turn on the power of the router and wait until the device is fully loaded. Press the RESET, RESTORE button using a pointed thin object (such as a paper clip) for 30 seconds, then release the button. After that, the router will reboot with the default settings (factory settings) and you will need to re-configure it.
You can also reset the setting through the MCPE platform
Or through the web interface of the router. Click on the "Revert to factory default settings" button.

Router connection
Connect the cable that our installers brought to your apartment to the Internet (WAN) port, and connect your computer to any of the Ethernet (LAN) ports. You can also connect your PC to the router wirelessly, but it’s better to use a cable for the initial setup.

Configuring the router
Configuring a router for L2TP
Configuring a router for L2TP

"Home Internet"- this section configures the connection to the Beeline network. All the configuration data required for connection is already contained in the router's memory, you just need to enter your username and password in the appropriate fields.
"Beeline" TV - if you have connected the service "Beeline" TV, you need to select the port of the router to which you connect the set-top box. If you are watching live feeds on your PC or Xbox 360, then there is nothing to set up.
"Router security"
To save the parameters you entered, click the Save button.

Firmware update and factory reset
Firmware upgrade
Reset
Firmware upgrade
First, define the revision of your router!

1. Revision B1 / B2 / B3 with firmware versions 1.2.100 to 1.2.119: current firmware 1.2.120
If on a router of revision B1 / B2 / B3 the software version is lower than 1.2.100 (1.2.99 and lower), then you need to update first to 1.2.100, THEN to the current firmware 1.2.120
For revision B5 / B6, you need to update to firmware 1.2.254, then to the newer 1.2.255
2. The D-Link DIR 300 / NRU router, revision B1 / B2 / B3 / B5 / C1, works correctly in the Beeline network only with a specially developed firmware from the D-Link company. This firmware has been optimized by D-Link specialists to work in our network.
if you have D-Link router DIR 300 / NRU revision B1 / B2 / B3 / B5 / C1 with factory firmware, you can update the firmware to a customized one at the nearest D-Link service center, the update procedure is free, you need the device itself and a valid subscription agreement.
Please note that services for restoring unsuccessfully flashed routers and returning from a customized firmware to the factory one are provided at the D-Link SC on a paid basis.
For routers of revision C1, after a successful firmware update, you must reset the router by holding the RESET button on the side panel for 30 seconds. Then produce standard setting router.
Do not install the firmware for DIR-300 / NRU hardware revisions B1, B2, B3 on the DIR-300 / NRU router with hardware revision B5. This leads to the inoperability of the router.
3. Open a browser and enter 192.168.1.1 in the address bar. The router will ask you to enter your username and password. Enter admin in both fields. Click OK.
5. On the left in the menu, go to the "System" section, then the "Software update" subsection. Click on the "Select file" button, and in the window that appears, select the file with the firmware. Click the Update button.

6. Wait while the router updates the firmware and reboots, this process can take up to 5 minutes. Do not unplug the router at this time.
Reset
Use a hard reset if you need to configure the device again (delete all user settings), you cannot access the web page of the router settings interface, after setting up the router, the Internet connection was not established or the password to access it was lost.
Attention! When performing a hard reset, all user settings will be reset to factory settings!
On the body of the device there is a deep RESET (RESTORE) button that allows you to reset the settings to the factory settings. The RESET button (RESTORE) can be found on the same side of the router case where the rest of the connectors and buttons are located. In rare cases, the button may be located on the bottom of the router.
To reset the router settings to factory settings, follow these steps: Turn on the power of the router and wait until the device is fully loaded. Press the RESET, RESTORE button using a pointed thin object (such as a paper clip) for 30 seconds, then release the button. After that, the router will reboot with the default settings (factory settings) and you will need to re-configure it.
4. You will be taken to the router's quick setup page. Click on the "Advanced Settings" button.

D150L

Router connection
Connect the cable that our installers brought to your apartment to the Internet (WAN) port, and connect your computer to any of the Ethernet (LAN) ports. You can also connect your PC to the router wirelessly, but it’s better to use a cable for the initial setup.

Configuring the router
Configuring a router for L2TP
Configuring a router for L2TP
Open your browser and enter 192.168.1.1 in the address bar. The router will ask you to enter your username and password. Enter admin in the first field and 1234 in the second. Click OK.
You will be taken to the router's quick setup page. It also consists of three sections, let's consider the purpose of each of them:
"Home Internet"- this section configures the connection to the Beeline network. All the configuration data required for connection is already contained in the router's memory, you just need to enter your username and password in the appropriate fields.
"My Wi-Fi network" - here you can configure the wireless network of your router. In the Network name field, enter the name of your network, for example my_wifi, and in the Password field, enter the password to access it. Please note that the password must contain at least 8 characters.
"Beeline" TV - if you have connected the service "Beeline" TV, you need to select the port of the router to which you connect the set-top box. If you are watching live feeds on your PC or Xbox 360, then there is nothing to set up.
"Router security"- here you can change the password for accessing your router.
To save the parameters you entered, click the Save button.
After clicking the Save button, the router will take approximately 1 minute to establish a connection.
As soon as the router establishes a connection, opposite the Status line, you will see "Internet connected". Congratulations, you have completely configured your router to work in the Beeline network.
Firmware update and factory reset
Firmware upgrade
Reset
Firmware upgrade
Be careful when following the instructions in this section. In case of an error in the actions, a visit to the service center will be required to restore the device. It is recommended to flash the router by connecting a cable from a PC to any of the LAN ports. When flashing a router via Wi-Fi, there is a risk of getting an inoperative device that can be restored only in a service center, or not restored at all.
1. Open a browser and enter 192.168.1.1 in the address bar. The router will ask you to enter your username and password. Enter admin in both fields. Click OK.
2. You will be taken to the router's quick setup page. Click on the "Advanced Settings" button.
3. On the left in the menu, go to the "System" section, then the "Software update" subsection. Click on the "Select file" button, and in the window that appears, select the file with the firmware. Click the Update button.

4. Wait while the router updates the firmware and reboots, this process can take up to 5 minutes. Do not unplug the router at this time.
Reset
Use a hard reset if you need to configure the device again (delete all user settings), you cannot access the web page of the router settings interface, after setting up the router, the Internet connection was not established or the password to access it was lost.
Attention! When performing a hard reset, all user settings will be reset to factory settings!
On the body of the device there is a deep RESET (RESTORE) button that allows you to reset the settings to the factory settings. The RESET button (RESTORE) can be found on the same side of the router case where the rest of the connectors and buttons are located. In rare cases, the button may be located on the bottom of the router.
To reset the router settings to factory settings, follow these steps: Turn on the power of the router and wait until the device is fully loaded. Press the RESET, RESTORE button using a pointed thin object (such as a paper clip) for 30 seconds, then release the button. After that, the router will reboot with the default settings (factory settings) and you will need to re-configure it.
You can also reset it through the web interface of the router. Open your browser and enter 192.168.1.1 in the address bar. The router will ask you to enter your username and password. Enter admin in both fields. Click OK.
4. You will be taken to the router's quick setup page. Click on the "Advanced Settings" button.
5. On the left in the menu, go to the "System" section, then the "Configuration" subsection. Click the "Factory Settings" button.

N150L

Router connection
Connect the cable that our installers brought to your apartment to the Internet (WAN) port, and connect your computer to any of the Ethernet (LAN) ports. You can also connect your PC to the router wirelessly, but it’s better to use a cable for the initial setup.

Configuring the router
Configuring a router for L2TP
Configuring a router for L2TP
1. Open a browser and enter 192.168.1.1 in the address bar. The router will ask you to enter your username and password. Enter admin in the first field and 1234 in the second. Click OK.
2. You will be taken to the router's quick setup page. It also consists of three sections, let's consider the purpose of each of them:
"Home Internet"- this section configures the connection to the Beeline network. All the configuration data required for connection is already contained in the router's memory, you just need to enter your username and password in the appropriate fields.
"My Wi-Fi network" - here you can configure the wireless network of your router. In the Network name field, enter the name of your network, for example my_wifi, and in the Password field, enter the password to access it. Please note that the password must contain at least 8 characters.
"Beeline" TV - if you have connected the service "Beeline" TV, you need to select the port of the router to which you connect the set-top box. If you are watching live feeds on your PC or Xbox 360, then there is nothing to set up.
"Router security"- here you can change the password for accessing your router.
To save the parameters you entered, click the Save button.
Attention! When performing a hard reset, all user settings will be reset to factory settings!
On the body of the device there is a deep RESET (RESTORE) button that allows you to reset the settings to the factory settings. The RESET button (RESTORE) can be found on the same side of the router case where the rest of the connectors and buttons are located. In rare cases, the button may be located on the bottom of the router.
To reset the router settings to factory settings, follow these steps: Turn on the power of the router and wait until the device is fully loaded. Press the RESET, RESTORE button using a pointed thin object (such as a paper clip) for 30 seconds, then release the button. After that, the router will reboot with the default settings (factory settings) and you will need to re-configure it.
You can also reset it through the web interface of the router. Open your browser and enter 192.168.1.1 in the address bar. The router will ask you to enter your username and password. Enter admin in both fields. Click OK.
4. You will be taken to the router's quick setup page. Click on the "Advanced Settings" button.
5. On the left in the menu, go to the "System" section, then the "Configuration" subsection. Click on the "Reset" button.

Wi-Fi router"Beeline"

| Default wireless network name (SSID) | Beeline_router |
|---|---|
| Default wireless (Wi-Fi) password |


The tale of how I made a candy rocket, or rather translated the software of the router to the Padavan firmware.
Hardvar, IT specialists, owners of Smart BOX Pro, please, under the cut!
"Without buldrabyz" ®
Clause 18 is carefully present,
Post from the section / category do it yourself! This is a technical post!
Sak bulygyz- Important: The article is written on people with hands that can hold a soldering iron and can google!
Foreword: (Pain) can be skipped:
I had an asus rt16 router, I lived and did not grieve. (this could have ended)
It's 2014. I had to become a young dad, a daughter was to be born soon.
I wanted myself, a powerful router, no worse than asus rt16 and there was support for wifi 5 ghz!
I started choosing a router for myself: take kinetic, the bowels of the forums shouted, the wallet said: we won't pull it.
Then an advertisement flashed “hey, guy, you want a router for free, take it — the advertisement said, and in the conditions it was you take the Internet for 1 year and you get the router for free.
I immediately googled and came across an article on Habré "no router from the provider, no need".
It seemed that nothing boded trouble - beautiful hardware CPU1: MediaTek MT7621AT (880 MHz, 2 cores)
RAM: 256 MiB (ESMT F59L2G81A-25T), gigabit ports, wifi 5 hertz, two usbi ports, that's what I thought!
An inner voice said: listen! - and the guy who takes the vpn from you will take it for 1 year? - Yes, I answered in my thoughts! And then the wallet shouted: “The budget has been allocated - adjustments have been made.
That's how I became the owner of Smart BOX Pro.
Having put the router after RT16 for 3 months, I got bogged down with work, and forgot about it.
Little by little, the flaws of the router began to surface, ahaahhah naive Chukchi boy - free cheese only in a mousetrap!
The router was created by Sercom, commissioned by Beeline.
From himself, he represented a redrawn simple gui, but there is no torrent, and someone did not declare it.
There is no vpn server. There is a long server, but when meeting with the Cyrillic alphabet on the disk, it hung up tightly.
Percentage load at idle 23%, the settings of the thrown ports are forgotten after a restart, increased googling alternative firmware said
: "There won't be a miracle"
Memory in Nand device with locked bootloader.
On the ixbt forum, people like me were traced. After reading many pages, I came to the short conclusion that rgmi 2 was cut from the van port to light bulbs and it became a pseudo gigabit.
As a result, on the forum you could find a statement throw it out, buy a normal router.
It was all very sad.
The thought that the investment was in vain, but then I remembered that it was worth a whopping 5990 rubles at that time. I remembered about the detected jamb for the server and decided to make a ticket to the technical support of the provider, it was 2015 July / June month.
Technical support worked quickly, connected from a remote location revealed that the problem was real and that was all.
Once every six months since 2014, I called Beeline and asked how things were with my ticket, to which they endlessly threw me - once to the head of the department with claims clients. There they answered me “the young man the router is working, what are the complaints? to which I objected: but after all, the server does not work correctly, but it is declared in the router and your experts confirm this, to which this inadequate person answered me - this is not our router, but from Sercom, please contact them.
I objected - the router created by order of the Beeline sold under the Beeline brand - from the Beeline, immediately became not a Beeline router, for which they simply dropped the call.
A call to Moscow Sercom did not give anything: if a short piece of iron is ordered, ask the customer.
Time passed, a daughter was born in December 2014, in 2016 I also called unsuccessfully, to which I received an answer like wait for the firmware, the firmware is not written so quickly, well, probably just the programmer was not born) I already had a son, then in my head and the thought came up that the router will inherit it, maybe they will write the firmware by this time.
In July 2018, firmware 2.0.19 appeared, I do not know what they have already changed there, the promise to call back when the firmware is released, they have already forgotten.
My knowledge grew in the field of it and iron. And already in 2018, at the end of March and beginning of April, I looked askance at Smart BOX Pro and wondered if the time had passed to open you up and do something good.
Hands were itching, but a sober mind said that knowledge was still not enough, until at the Muska I came across a comment saying “the guys change and sew for a spy flash, and I asked for a link. And how it started ...
After talking with people on the forum, I came to understand how to change nand memory to spi.
Oh man - that he wanted to remake the router -
Further, a one-way journey, be careful!
Remember everything is stated as it is, and there is a great risk of not reaching the end if you break your equipment, then only you are to blame! In general, "The road will be mastered by the one walking!"
Given:
Router smart box pro -1 pc
Straight arms - 1 pair
Soldering iron -1 pc
Flash memory W25Q128FVSIG 1 piece
Light heads - Legion :)
It is not necessary, but desirable to have:
1) Soldering Hair Dryer or Wood Alloy / Rose-friends with or without programmer!
Action plan:
1) Make a backup of calibrations and firmware. (important and necessary, until you make a backup, do not go to step 2)
2) Parsing and soldering: resistor chip / flash / nand soldering
3) Build firmware from the Prometheus project: yes, it's there!
4) Return of native calibrations.
Stage 2 can be performed last, to whom it is more convenient, but it is more convenient for me 2)
Let's Go: Stage 1
1) We connect to the smart box pro-super user login SuperUser, the password will be Beeline $ martB0x or SFXXXXXXXXXX where XXXX is serial number devices behind the router on a sticker or in the router menu as a regular user. Rewriting the LAN and Wifi poppy addresses come in handy.
Thank you for the info of "Mad Geek" for starting to remodel a simple smart box (another model), but unfortunately did not reach the finished result.
Having received the rights of a super user, we open access via SSH, connect with the PuTTY program, do not forget to insert a USB flash drive with the "FAT32" file system into the router
In PuTTY, after the login and password, type in the command "sh" ("), you do not need to drive in quotes!
then each line is a separate command, wait for its execution
"
cd / mnt / shares / A
mkdir mtd_backup
cd mtd_backup
dd if = / dev / mtdblock0 of = mtd0
dd if = / dev / mtdblock1 of = mtd1
dd if = / dev / mtdblock2 of = mtd2
dd if = / dev / mtdblock3 of = mtd3
dd if = / dev / mtdblock4 of = mtd4
dd if = / dev / mtdblock5 of = mtd5
dd if = / dev / mtdblock6 of = mtd6
dd if = / dev / mtdblock7 of = mtd7
dd if = / dev / mtdblock8 of = mtd8
dd if = / dev / mtdblock9 of = mtd9
dd if = / dev / mtdblock11 of = mtd11
dd if = / dev / mtdblock12 of = mtd12
"
should work about like this
collapse / expand
view @ Smart Box Pro> sh
BusyBox v1.15.3 () built-in shell (ash)
Enter "help" for a list of built-in commands.
~ # cd / mnt / shares / A
/ tmp / mnt / shares / A # mkdir mtd_backup
dd if = / dev / mtdblock1 of = mtd1
523264 + 0 records in
523264 + 0 records out
/ tmp / mnt / shares / A # dd if = / dev / mtdblock1 of = mtd1
2048 + 0 records in
2048 + 0 records out
/ tmp / mnt / shares / A # dd if = / dev / mtdblock2 of = mtd2
2048 + 0 records in
2048 + 0 records out
/ tmp / mnt / shares / A # dd if = / dev / mtdblock3 of = mtd3
40960 + 0 records in
40960 + 0 records out
/ tmp / mnt / shares / A # dd if = / dev / mtdblock4 of = mtd4
2048 + 0 records in
2048 + 0 records out
/ tmp / mnt / shares / A # dd if = / dev / mtdblock5 of = mtd5
8192 + 0 records in
8192 + 0 records out
/ tmp / mnt / shares / A # dd if = / dev / mtdblock6 of = mtd6
8192 + 0 records in
8192 + 0 records out
/ tmp / mnt / shares / A # dd if = / dev / mtdblock7 of = mtd7
dd if = / dev / mtdblock8 of = mtd8
61440 + 0 records in
61440 + 0 records out
/ tmp / mnt / shares / A # dd if = / dev / mtdblock8 of = mtd8
dd if = / dev / mtdblock9 of = mtd9
61440 + 0 records in
61440 + 0 records out
/ tmp / mnt / shares / A # dd if = / dev / mtdblock9 of = mtd9
dd if = / dev / mtdblock10 of = mtd10
102400 + 0 records in
102400 + 0 records out
/ tmp / mnt / shares / A # dd if = / dev / mtdblock10 of = mtd10
102400 + 0 records in
102400 + 0 records out
/ tmp / mnt / shares / A # dd if = / dev / mtdblock11 of = mtd11
122880 + 0 records in
122880 + 0 records out
/ tmp / mnt / shares / A # dd if = / dev / mtdblock12 of = mtd12
2048 + 0 records in
2048 + 0 records out
/ tmp / mnt / shares / A # dd if = / dev / mtdblock0 of = mtd0
523264 + 0 records in
523264 + 0 records out
/ tmp / mnt / shares / A #
Files with the name mtd (X) X should appear in the root of the flash drive or the folder "mtd_backup" - numbers from 0 to 12.
We take out the USB flash drive from the router and save a copy of the firmware in a safe place.
2) We order in advance a USB flash drive for 16 mb W25Q128FVSIG, with the help of the ch341 programmer, you can also order it on Ali (for firmware use the software "caliber or analog")
Stage 2A) we open the router. Unscrew one screw (closed with a decorative cap), a little pressure on the edges and the router case is disconnected, release the board, unscrew 3 screws - along the way, figuring out what we have in the bins and what to put on the processor as a radiator.
Stage 2B) The most dangerous stage, so we have a board in front of us, and in order for the download to go with the spi flash, you need to re-solder 2 resistors, resistors from position R136 -> to R145 and R156 -> 157, just 2 small resistors near the same others! We take a soldering iron, put a tip of type K - a soldering iron at a temperature of 300 degrees, since it is lead-free soldering, a little solder flux for a quick fight, we rattle / solder / find the desired pad and solder it. Next, we solder our 8-foot USB flash drive to position U8.
Where is it on the board?

all right? Didn't they solder anything superfluous, didn't they kill the board with static? -NO!
Stage 2B) Tracks with spi and nand flash intersect, we need to unsolder nand memory. It's simple: we smear a little flux, take a soldering hair dryer - (my temperature is about 360 g), heat it, blow off / raise the microcircuit!
Where is she!

Stop - what kind of hairdryer? no hair dryer! It doesn't matter, we go to the glad market (or to our bins), buy a wood / rose alloy, take a couple of scales, tinker abundantly on 2 sides of the legs at the flush. Melted? raise, clean the tracks from alloy, and where did we solder everything with alcohol?

The sign that you did / unsoldered everything was correct and did not kill anything, you can check something like this: on the router we clamp bottom of the board the reset button and turn it on, the LED will start blinking in a different rhythm, indicating that it is in recovery mode.
Soldered and almost ready

But it is not exactly
Congratulations, you made it to the third stage)
Stage 3) We are not assembling the router yet, but why? - and suddenly it was soldered crookedly, turned out to be a flash bat?
We connect the wire to lan 2 well, or any that you liked, but not wan. Download the ASUS Firmware Restoration version 2.0.0.0 utility and change the ip on the network card 192.168.1.2 mask 255.255.255.0.
We launch the utility and indicate the firmware to it, press it on the router bottom of the board the reset button and turn it on, in Firmware Restoration, click load, it will see the router and flash it!
We return the settings on the PC network card.
Was it done? Yes, let's go to Stage 4!
-NO?
- I don’t know - doesn’t sew, and doesn’t see everything.
No problem! Take a USB flash drive with the "Fat32" file system Copy the firmware to the root of the USB flash drive, rename it to "root_uImage" without ("). bottom of the board the reset button and turn it on, we hold the reset until the lights at the router blink quickly, about 5-8 seconds as soon as the blinking ends. Has the Asus wifi network appeared? Congratulations!
Now we collect everything back! We put a heatsink on the processor, drill into the case
air circulation holes

Or maybe we even put a cooler from vidyahi or even print a new case on a 3D printer. Yeah, I was dreaming :), but a radiator with ventilation is needed because MT7621AT is hot, it can burn out at work)
Aaaa where to get the firmware?
-I'll have to collect it myself!
Thanks to me and kind people, in the project in the project. The line Sercom has appeared in the linaro repository - and you can select it - then a smartbox. Putting together the firmware.
The buttons on the router are caught. The reset will become a restem, the mode switch will switch modes, the wps button will work as you specify in the menu! - HAPPINNES EXISTS!
Respect the work of Padavana, do not distribute ready-made firmware assemblies. Yes, the one walking will master the road)
Like we all won? - NO!
Stage 4- Final!
Remember step one? We take our dump - namely mtd2.
We are interested in the first 64KB !!! Cut out with Vinex /
About Winnex
open our mtd2 dump in it, click Edit / there / define a block / in the window that appears, start 0 and type in the second line "FFFF" (") without quotes, click OK, immediately click / Edit / there / copy blok or copy the block, looking from whom, as it is written in the menu / select in / a new file, save it.
In the saved dump, we drive in our poppies at offset addresses 0x4 for a 2.4 hertz network and 0x8004 for a 5 hertz network.
We give a name for example ibykota.bin, the file size will be 64KB
We copy our calibrations to the router - I used winscp, copy it to / tmp on the router and in PuTTY we give the command
"mtd_write write /tmp/ibykota.bin Factory" without (")
Getting our calibration poppies from the factory!
after we give the command "Reboot"
Is stage 4 required? does it work?
-yes is required, since the bootloader is assembled with corrected other calibrations, which should not be in the bootloader, it is not complete and most likely the 5GHz wifi will not start.
- Why then did you assemble a loader with calibrations?
-The loader with calibrations is assembled in order to be less tormented with the programmer, Vinex, TTL adapter, because with a clean bootloader, the firmware will not start.
-Now I'm doing well? - if you received a working router, returned your calibrations -YES!
If all is well, it will look something like this:

Having loaded the router with six torrent downloads, the load on the cpu increased to 23-27%. Copying a 15 GB movie from a computer to a disk showed 20-30-40 MB / s at its peak, file system ext4 disk.
The load on the cpu at the time of copying the file also kept about 27% when the service was turned on online viewing screwed usb web cameras(0.3 mpx 640x480) the load at the time of copying rose to 34%. The iperf3 tests showed a pure etheret speed of 930mbit / s at its peak and an average of 910mbit / s. It should be noted that the router is in the access point mode, the head is mikrotik rb3011.
Bottom line: From a powerful router with bad software, we made a candy that makes our life happy with a VPN, a torrent download, a print server, with 2 usb ports, a powerful process, large RAM, gigabit ports and the ability to install additional packages from the repository.
Acknowledgments: Padavan for the firmware, Freize for the prometheus project, linaro for adding a smart box pro to his repository, another gray cardinal who decided to stay in the shadows - he helped me in adapting the firmware and bootloader. Well, I have mastered this road for everyone. Plus (+) sy them in karma and budget!
Separately, I express my thanks to the store for the tool provided, only mentioning it in this review made me too lazy to write this review, having honestly worked it out. Use good tool for work, I soldered it for them, because straight hands and a good tool, a couple of bright minds 90% success in business! brick, and only a month later, when I received the soldering iron revived. The soldering iron itself on the muska was surveyed - along and reproached, so I see no reason to survey it barely. I can say that if you decide to go into amateur radio or switch from EPSN or switch from Hakko 900, this is what you need! It is convenient as an EPSN soldering iron, there is no input lag like with Hakko, and has all its advantages. All this alteration is a coincidence, to roll out the striped more or less the promised normal firmware - this post would never have happened!
Have you read it? Do you have such a router, but your hands are not from there? - Think ...
Success to everyone!
Hello friends.
Probably, there is no such person who would not have heard about the Beeline company and their Internet of the same name. Like any "serious" provider, they like to install branded routers in the Beeline.
The pros are obvious: ease of setup and operation, as well as user support - the hardware is the same and possible problems have been known for a long time. And the castrated, sharpened for the majority, settings do not allow the user's playful hands to break everything.
This article discusses one of the most popular, widespread and, in general, a good router Beeline SmartBox.
As befits in such cases 🙂 is an OEM device. True, these are not typical repainted DLinks, but exotic from SERCOMM)
In fact, the router is a slightly modified reference Realtek_RTL8197D.
You can see more details about it or below
Brand name: Beeline SmartBox.
Chip: Realtek 8197D (600 MHz)
RAM: 64 MB
Wi-Fi: 802.11b / g / n 300Mbps, 2 internal antennas: 2 × 2 MIMO
Interfaces: 5 RJ-45 connectors with auto-sensing cable type, USB 2.0 port
From software features: DLNA, FTP-server, SAMBA-server (connection usb devices as a network drive), which makes it an interesting option for creating the simplest home media center.
In general, the device is not bad and worked stably for me, giving out the tariff maximum over Wi-Fi.
However, as an enthusiast, I lacked freedom, SSHa and the ability to dig deeper inside, as well as the ability to fine-tune. That is why I started looking for alternative firmwares for the "smart box" and soon realized that they did not exist and would not be available in the near future ...
Well, the situation is unpleasant, but not hopeless. 🙂
Since there are no alternatives, you need to squeeze the most out of the stock, if possible, get a normal console and raise the privileges to root. To do this, you need to merge and unpack the stock firmware.
Let's get started:
Attention... The following points are taken from under Linux systems and I do not guarantee that you will be able to do it all under Win-like OS.
When preparing, the following were used: Debian Lenny, binwalk, squashfs-tools, a little savvy and red-eyed.
1) I merge the latest firmware from here
wget http://static.beeline.ru/upload/images/help/devices/routers/SmartBox/SmartBox2019.zip
2) Unpacking 7zip, I find img file of incomprehensible, at first glance, content.
7z x SmartBox2019.zip
3) Run by passing as an argument img Schnick, to which he cheerfully reports about Secomm signatures and even tells us hardware id, but this is not the main point. Inside we find a pinched binar ( bin-file), unpack the archive and get
Binwalk output
S1000_Smart_box_SERCOMM_BEELINE_2019.bin which once again emphasizes the SERCOMM origin of the device 🙂
4) Here he is a binar, it would seem, happiness is near. But it was not there.
By itself, the binary does not provide any human-readable information ( binary, cap).
And here the very anal carnival begins:
We set it again on it and among the signatures, bootloader and garbage we find squashfs ‘ Ofsky image (Briefly: Read-only file system, widely used for compressing * nix boot images).
Happiness is near, I thought. It remains only to unpack ...
Merging from the repository squashfs-tools containing everything you need to unpack and anticipating ... I break off, unsquashfs is talking
Filesystem uses lzma compression, this is unsupported by this version
Which means the file is craftily reaped lzma and he cannot unpack it.
Hmm, I climb on Github for latest version squashfs-tools, collect from source and ... I break off again.
After scratching the turnips and combing makefile I notice that support lzma disabled by default. I change the parameter and ... pay attention to the comment, which for LZMA required LZMA SDK.