Do-it-yourself laptop hard drive repair. Self-repair of laptop hard drive. Defective disk head
In this article you will find the answer to the question "". Refusal hard disk inevitable. When this happens, the first question that comes to mind is "is it maintainable?"
How about your important files stored on your hard drive? Is it possible to recover them? Good questions, aren't they ...
This guide will help you answer these questions, recover important data from a bad hard drive, and ultimately recover. HDD, if possible.
Hard Drive Repair Guide
Below is tried and tested with success the method of repairing HDD in the following state of the hard disk:
- Unbootable hard drive
- Dead hard drive
- Broken hard drive
- Damaged hard drives
- Windows could not detect hard drive
- It is not possible to detect the hard disk via Disk Management
- Hard drive not detected in BIOS


However, in some cases, which are represented by mechanical problems ("pancakes" of the hard disk do not rotate or there is extraneous sound, the methods described below give less success.
Does this mean that you shouldn't try to repair your hard drive? Of course not, it won't hurt, and the hard drive recovery rate is still high. Let's start.
You see a pop-up windows message: Hard disk problem detected, Windows has detected a hard disk problem.
If nothing happens, the solution might not apply to your situation. Let's move on to the next step. To proceed, I need you to familiarize yourself with the hard drive recovery tools below.
Hard Drive Recovery Software / Tools
- Ideally, you need to create either boot disk or bootable USB drive:
- Create live CD / DVD
- Live USB creation
Hard Disk Low Level Format Tool- this is simple utility to work with hard drives. It will format the hard drive at a low level, erasing partitions and wiping the MBR.
 This makes your hard drive the same as with the manufacturer's default state. (Note: using this tool will make your data unrecoverable).
At this point, I am assuming that you now have enough knowledge of the hard drive recovery software / tools that I mentioned a while ago.

First, even if you suspect that your hard drive is damaged, it is still wise to do the hard drive diagnostic procedure below:
Make sure the power cable of the molex connector / SATA hard drive, IDE / SATA cable is properly connected.
Make sure the IDE / SATA cable is on motherboard correctly secured. Check again if the problem is resolved. If all else fails, it's time to test the health of your hard drive.
Ideally, you need to run the program for working with hard drives "Victoria" from a bootable USB flash drive.
Scan the entire HDD sector by sector and see the result: if there are a lot of green ones, it is still tolerable.
If there are a lot of yellow ones - because of these sectors, the computer speed will be slow. If there are many red ones, the hard drive “dies”. There are blue ones - you need to restore this disk or buy a new one.
Hard drive recovery

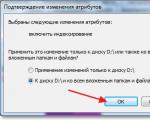
We need hdd program ll format tool. Install and run "as administrator".
Click Continue Free. Select the damaged hard drive and click Continue. Hard Drive - Low Level Format Recovery
Wait a few minutes or hours for the process to complete. It may vary depending on the speed of your hard drive. Patience is our everything. Then restart your computer.
At work Windows desktop click right click mouse “My Computer” → “Management” → “Disk Management”. Click on the unallocated hard drive → select “new simple volume” → follow further instructions until “Finish”.
The result of low-level formatting is different for all disks. You can succeed or fail. In fact, some experts do not recommend using this program for recovery hard drives.
However, based on my experience (I'm not an expert, but a regular technician), the low-level format has saved several hard drives from both my own and my clients.
My advice: whenever you are fortunate enough to recover a hard drive after a low-level format, do not store important data on it again.
Repairing a hard drive by replacing it printed circuit board

Is the circuit board damaged? If your hard drive is not available in Windows, but is detected in BIOS, parted magic, disk management and diskpart command will help you.
Get the appropriate tools; hex screwdriver. Loosen the screws one by one and slowly remove the PCB.
Replace it with a new one. (Note: You must replace it with exactly the same one-to-one as. Replacing or altering the printed circuit board may delete all stored data and cannot be restored).
You can now try starting your hard drive. If this "" guide resolved the issue - Congratulations! If not, buy a new hard drive.
) is the place where all information is stored. But, like any equipment, over time this device can also break down. Most often, laptop computers suffer from this disease. And before you repair a laptop hard drive with your own hands, you need to figure out what the principle of this mechanism is.
In case of minor breakdowns, you can repair the laptop hard drive yourself.
The HDD or hard drive of a laptop is a 2.5-inch magnetic disk. There can be several such "pancakes", enclosed in a solid body. It rotates all the time and the faster it happens, the higher the data transfer rate.
And when the hard drive breaks down, the operating system stops loading or hangs and reboots when accessing files. According to the statistics of the company - the manufacturers give a guarantee for this device for 12 months, but this does not mean that in a year it will break. Usually an average hard drive "lives" for about 4 years.

Diagnosis and causes
When determining problems with a hard drive, first of all, you should listen to the work of the computer, then visually examine the outer and inner sides of the disk. The main reason for hard disk breakdowns in the first year of "life" is a manufacturing defect. And only after 3 years of service can we talk about wear and tear of mechanical parts.

Do-it-yourself Hard Disc Driver repair
Defective disk head.

Defective disc surface
With such a breakdown, the HDD heats up a lot and can emit a dull strong grinding noise. This usually occurs when the laptop is dropped or if the disc is scratched. Here you can also repair the hard drive by replacing its heads.
Such a malfunction is a fairly common reason for the failure of this mechanism. To rectify the situation, you should also disassemble the laptop case and pull out the hard drive. Carefully remove the cover and carefully handle the board elements:

Chip problems
This nuisance can also completely stop the operation of the hard drive. When it overheats, soot appears on the chip, and a broken leg (can be seen with a magnifying glass) may be the reason for buying a new disc.

Damage to information
In this case, the laptop does not detect the hard drive or does not see the amount of its information. There is a breakdown here disk program... It can also emit a characteristic unpleasant sound, which means that one of the heads is out of order, and therefore information can be restored only partially, reducing the capacity of the carrier. If the heads are in good condition, you can overwrite the data using certain programs, for example, Acronis Recovery Expert or Activ Partition Recovery Pro etc.
Semi-dead disc
If the hard drive periodically turns off, is not detected by the operating system, or failures occur when writing and reading files, first of all, you should copy important information on removable media... Then check the disk surface with programs such as Victoria (HDD Regenerator).

The program will determine in which sectors the failure occurred and you can either try to restore it yourself, or do a full formatting. In general, such a hard drive can still work for some time, but in the future it will be more and more destroyed.
You should be aware that repairing a laptop hard drive is a very delicate process. If there is a guarantee for the equipment, then it is better to contact service center store where it was purchased. Well, if you nevertheless decided to repair the hardware with your own hands, you need to understand that information from a hard drive will most likely be lost.
In this article we will consider such an unusual question as "do-it-yourself hard drive repair." Probably, every second computer owner was faced with the fact that yesterday a hard drive that was working today stubbornly does not want to be determined motherboard.
Of course, if the device is not over yet, then it’s probably not worth doing a hard drive repair with your own hands. But in the case when "there is nothing to lose", you can try to restore the HDD performance on your own.
About breakdowns
Before you start with your own hands, you need to clearly understand that not all breakdowns can be fixed at home. It all depends on the complexity of the malfunction. So, for example, you should not even try to repair a hard drive after a fall, but it is better to immediately contact a service center (SC). But failures in the transmission of a signal through the loop and some similar "little things" can be completely eliminated.
DeviceHDD

Structurally, the hard drive consists of two blocks: a HDA with a set of magnetic disks and a drive for reading heads, as well as an external electronics board. It is impossible to open the HDA casing without creating special conditions. The fact is that dust particles that will inevitably get inside when the cover is removed will subsequently damage the magnetic coating of the disks. If it is necessary at least to read the data, the cover is still removed in the SC and after the repair the dust particles are blown out with a stream of air from the can. But after that, you should not count on long-term operation.
Roll up your sleeves ...
Do-it-yourself hard drive repair begins with removing it from the case system unit, disconnecting the power cable and interface loop and careful inspection. There should be no burnt elements on the electronics board (sometimes the microcircuit breaks down due to overheating). In most HDD models, all elements are on the outside and can be seen without removing the board. In others, they are turned towards the HDA. So, with the help of a magnifying glass on the removed board, it is necessary to inspect the soldering points of the connectors: sometimes one fallen off leg interferes with the operation of the entire device. Soldering can be restored with a pulse soldering iron and a steady hand.

V old HDD with an IDE interface, inaccurate wiring often resulted in one or more copper pins bending. If such a malfunction is revealed during inspection, then it can be eliminated with the help of a small tweezers, aligning the contacts. The next problem is the breakdown of the electrical contacts of the board and HDA. Since the transmission of signals (and power) is performed not by a loop, but by simply pressing the copper points-surfaces, then gradually, due to oxidation, their resistance increases. The solution to this problem is simple: you need to wipe the contacts on the HDA and the electronics board using a stationery eraser.
It has been noticed that some hard drives are unstable in high-speed modes. Therefore, it is useful to switch the hard drive to slow mode using a jumper (it is available in most models). For SATA, the transfer will be not 3, but 1.5 Gb / s. "By eye" the deceleration will be almost imperceptible.
Repairs are carried out in the same way. Let's note one important fact: many are convinced that by simply replacing the electronics unit with one removed from a known working identical model, it is possible to "revive" the device. This is only partly true. The fact is that there is a ROM on the board, into which specific information is entered (for example, about bad areas). Therefore, a simple replacement is not always effective, as a flashing may be required.
Computer technology has made great strides in recent decades. Today, almost every home has a computer. But, despite the high-tech nature of this kind of technology, breakdowns of some of its components still occur. So, the main place for storing all your information is a hard disk, from a serviceable one can turn into a faulty one. Fix hard drive it is possible if carefully…
The main thing! Never disassemble your computer's hard drive! Fixing the breakdown in this way will not work, but just the opposite, you can aggravate the situation.
And so, let's deal with the symptoms of this "disease". First, the signs of a faulty "hard drive" can be:
- the operating system is not loaded;
- problems with reading information from the disk;
- the disk is not found in the system.
Secondly, the first measures to be taken in any of the above problem situations are cleaning the contacts and checking the quality of the connection between the hard drive and the computer motherboard. You may need to replace the ribbon cable (SATA or IDE). If you are convinced of the absence mechanical damage the disk itself and connecting cables, you can proceed to the next step.
If the disk is not completely visible in the system, you need to examine the BIOS for initialization this disk... In addition, it will not be superfluous to find out if partitions have been created on your hard disk? If there are none, then this is the reason that the disk is not visible in the system. This problem can be easily solved regular means operating system. In the case of Windows OS, look in "Control Panel" - "Administrative Tools" - "Computer Management" - "Disk Management". Here you will need to initialize your hard drive and create partitions on it.
If all of the above does not fit the definition of your hard drive problem, then most likely there is a logical failure on the "hard drive". We will be helped by specialized programs that will help to repair a hard drive: MHDD or Viktoria. These programs are designed to work outside operating systems... Therefore, to use them, you either need to create a bootable floppy disk (disk) or a bootable USB flash drive. The interface of the above two programs is almost identical. You just need to select the disk you want to manipulate and select the type of action to be performed.
MHDD and Viktoria programs allow you to completely clean the disk from information, scan the disk surface to identify bad sectors, restore or mark bad sectors as unused. Thus, following the instructions for using these two programs, you will need to scan the hard drive, and if bad sectors are identified, try to "close" them.
If you have more detailed questions about the work of MHDD and Viktoria - ask in the comments.
This article is written so that every user understands what to do when a hard drive with important data unexpectedly refuses to work... Many will immediately recall the described successful cases of freezing a hard disk. We will not argue, perhaps this way and it works, we haven't tried it. But we would not recommend that you conduct such experiments with a hard drive that contains really important data that needs to be recovered.
So the situation. At some point, your hard drive refuses to work. Without any warnings, clicking or clicking, no shock or mechanical damage. He worked a few minutes ago, and now he refuses.
It soon becomes clear that something more serious than a normal system crash has happened. After rebooting, the hard disk starts spinning, beeps 12 times and stops. Looking into the BIOS, we see that the disk is no longer detected by it, which negates any chance to recover data from it using data recovery software.
In this article, we will consider possible ways and the steps an average computer user needs to take in such a difficult situation to recover a modern hard drive.
If the hard drive is detected in the BIOS, then the data recovery software will be able to cope with the recovery of data from it. But in this article we will try to focus on the failure situation. hardware and what the user should do in such a situation.
One of the reasons for writing this article is also the need to convey to users that data recovery is not an easy task and a process that is not always possible to perform according to the same algorithm.

Step 1: Determine the general type of problem
There are two general types of problems that can damage a hard drive: problems with the drive board or failure of other internal components of the hard drive. If the problem lies inside the hard drive, see Step 3. If the suspicion falls on the disk board, then there is still hope for a possible recovery.

The simplest thing that can happen to a board is the burnout of the voltage regulator, the so-called TVS diode. As stated in the FAQ section of the Seagate hard drive manufacturer's website, the TVS diode “is designed to protect against overvoltage of integral and hybrid circuits, radio-electronic components ". In the event of an overvoltage, such a diode burns out. Since the diode is no longer functioning, the disc does not turn on. If you remove the diode, the hard drive will function normally again, only in unprotected mode. It remains only to copy the necessary data from it to another serviceable disk, and consider that you are lucky.

In our case, the hard drive has lost its functionality for other reasons. There are no visible signs of damage to the board, but after disassembling it, a burnt contact was found.
Step 2: Determine Next Steps
There are two options: you can replace the board itself or purchase a donor hard drive. But here it is very important that the donor disk is as much as possible the same as the original configuration hard disk, and even better, exactly the same. In our case, this means that we need to find the disk board that matches the number of our hard disk, the board version, and the disk family.


It should be understood that simply replacing the hard drive board will almost certainly not cure the hard drive. Each drive has unique parameters for specific device... If the parameters of your hard disk differ from those of the donor disk, then it will not work.
In our case, it was decided to replace the board itself, which was purchased separately. After that, 12 beeps were eliminated. But nothing else. There was no sound signal, the disk did not work - it was spinning up, but was not recognized in the BIOS.
After it was discovered that the hard disk board was not working, it was decided to try to restore the burnt contacts on the motherboard. There are two options: buy a conductive pencil / marker to restore tracks and contacts, or use something more modest. We chose the second option: we went to the nearest car dealership and took a set for repairing heated rear window of the car. The contact was treated with conductive paint and dried within 12 hours.

But nothing has changed. The drive continued to spin, emit 12 beeps and stop.
This was another disappointment, followed by the next step.
Step 3: Resist the urge to do stupid things
After searching the Internet for a few minutes, you will surely find people there who recommend that you do one of the following:
- Place the hard drive in the freezer
- Stuff it in the oven
- Knock him a few times
These people will swear to you that in this way they have already cured 15 hard drives. Don't listen to them. We are not suggesting that no hard drive was brought back to life using any of the suggested methods, but it is much more likely that such manipulations will cause irreparable damage to the hard drive.

Each action that is aimed at restoring the disk's functionality should not in any case cause the device even more harm. That is why it is not recommended to open the hard drive case. And if putting a hard drive in the freezer is a bad idea, then disassembling it is highly discouraged. You are not qualified to adjust the alignment of heads and plates, which usually rotate at high speed and are aligned in tolerances, which are measured in microns.
Step 4: Show to a professional
After contacting several data recovery services, it was determined that rebuilding hard disk in such a case as ours can cost two to three times more than the cost of the disk itself. The expediency of this event for himself is decided by everyone.
But with that said, here are some tips on what to look for and what to avoid.
- No data, no payment: Avoid companies that charge fees with no data recovery guarantee.
- Low cost of testing equipment and payment for return: many services offer free diagnostics, but they set a significantly higher cost of equipment delivery.
- Avoid Extensive Testing: No firm can fully diagnose a hard drive remotely, but that doesn't mean they can't get an idea of the problem over the phone. Beware of companies that, along with diagnostics, offer a whole range of work that you do not need.
- Check the cost of replacement parts: Labor costs generally include the cost of replacement parts. Many companies point out that parts that are hard to find will cost more. Sometimes, purchasing a donor will be much cheaper than purchasing one of the required parts.
Step 5: Use a backup solution
There are several important lessons to be learned from this case. The first is that different models hard drives are more or less hardy, and the same applies to quality. Perhaps, if four years ago, when this hard drive was bought, they would have approached the issue of its choice more carefully, then there would have been fewer problems with recovering data from it.
Of course, even if you use one of the data backup tools, a hard disk failure does not guarantee you one hundred percent data safety. But still, if you are not the lucky one who simply burned out the TVS diode, then at least some of them can be saved.