Wireless router tl wr841n how to connect. Router tp link tl wr841n: enter settings. Factory reset
Front Panel
LED indicators located on the front panel (from left to right).

Back panel

The rear panel contains the following items (from left to right):
ON/OFF : Power on/off.
POWER
:
Power connector. Use the power adapter included with the TL-WR841ND Wireless Router
1,2,3,4 (LAN)
:
These ports (1,2,3,4) are used to connect the router to computers local network.
WAN
:
The WAN port is used to connect an Ethernet network (provider).
WIFI ON/OFF: Used to enable/disable wireless broadcasting.
WPS/RESET
:
This button is used to enable WPS and to reset the router settings. To turn WPS on/off, simply press this button without holding it for more than five seconds; To RESET settings, press the button and hold it for more than five seconds. .
Wireless antennas
:
are used to receive and transmit data via a wireless connection.
Connecting a router
- Choose a suitable location for the router. It is recommended to place the router in the center of the wireless network.
- Adjust the antenna position. Most often the vertical position is best.
- Connect your computer to your local network through the router's LAN ports (if you already have a wireless network adapter and if you want to use a wireless network connection, you can skip this step)
- Connect the incoming Ethernet cable to the WAN port of the router
- Connect the power adapter to the appropriate connector on the router, and plug the other end into a power outlet. Turn on the router by pressing the ON/OFF button.
Setting up a computer to connect to the router:
- In your computer's TCP/IP protocol settings, select Obtain an IP address automatically.
To access the router configuration, open a web browser and enter the default address http://192.168.0.1 in the browser's address bar.
A login window similar to the one shown in the image below will appear. In the User and Password field, enter admin, using lowercase. Then click the button OK or key Enter.
Setting up the router
After entering your Login and Password, the main Status window and the router configuration menu will open. The equipment can be configured in two ways: Fast And Individual setting.Quick setup
To carry out quick setup, you need to select the item in the Main menu Quick setup
After this, a dialog box will open that allows you to select the necessary connection parameters. In the first window you need to select Further.
Then a window will appear asking you to select your connection type. The router supports the five most common methods of connecting to the Internet - Dynamic IP address, Static IP address, PPPoE, L2TP and PPTP. 
When choosing a connection type Dynamic IP You will be taken directly to the Wireless settings page.
When choosing a connection type Static IP address, the following window will be displayed 
The settings that need to be entered in the appropriate fields are provided by the provider.
IP address– This is the WAN IP address visible to external users on the Internet (including your Internet Service Provider). Enter the IP address in this field.
Subnet mask– Subnet mask used by the WAN IP address.
Main gate– If necessary, enter the IP address.
Primary DNS server– If necessary, specify the IP address of the DNS server.
Secondary DNS Server– If you received a different DNS server address from your ISP, enter it in this field.
When choosing a connection type PPPoE, the following window will be displayed 
Username: Password– Please indicate Username And Password, received from your Internet service provider. These fields are case sensitive.
Confirm password - Re-enter the password you received from your ISP to make sure the password you entered is correct. If the password differs from the value entered when confirming the password, a window will appear in which it will be written that the password does not match the previously entered one.
Dynamic IP address– Use dynamic IP address provided by your Internet service provider to connect to your local network.
After pressing the button FURTHER A window with wireless network settings will appear. 
Wireless broadcasting– By selecting the appropriate item from the drop-down menu, you can enable/disable the function.
Wireless network name– Specify a value of up to 32 characters. The default SSID is TP-LINK_XXXXXX (XXXXXX is the last six unique characters of the router's MAC address). This field is case sensitive. For example, TEST And test- these are different meanings.
Region– Select a value from the Russia drop-down list.
Mode- Mode wireless transmission router data. Allows you to select the broadcast standard b, g, n or mixed. Optimal setting is mixed mode, because it allows you to automatically connect to any device, regardless of the broadcasting standard (device).
Channel width– Select the appropriate value from the drop-down list. Default value Auto in which the device automatically adjusts the channel width for clients (it is better not to change).
Channel– This field specifies the operating frequency to be used. Default value Auto, so the access point will select the appropriate channel automatically. Change channel wireless connection not necessary.
Disable protection– The security function can be turned on or off. When the function is disabled, wireless stations can connect to the router without encryption (without a password - the network is not protected). We strongly recommend that you select one of the options to ensure security.
WPA-PSK/WPA2-PSK– WPA selection based on PSK password.
PSK Password– You can use format characters ASCII or Hexadecimal symbols
When choosing ASCII the key can contain numbers from 0 to 9 and letters from A to Z and its length must be from 8 to 63 characters. When choosing Hexadecimal, the key can consist of numbers from 0 to 9 and letters from A to F, and its length must range from 8 to 64 characters. Please note that the key is case sensitive. This means that the use of uppercase and lowercase letters affects its meaning. You should write down the key and other wireless data security settings somewhere.
Without changes– When selecting this option, the wireless data transfer configuration will remain unchanged!
By pressing the button Further, You'll find yourself in the window Completion. Click the button Complete to complete Quick settings. 
The router is configured and ready to go.
INDIVIDUAL ROUTER CONFIGURATION
hAfter successfully logging into the router, you will see fifteen main menus on the left side of the web utility. The right side contains help information and instructions. 
First menu item STATE. It displays general information about the device status. The information in this window is read-only and cannot be edited. 
To individually configure the router, you need to select the item in the menu NET, and select a section from the pop-up menu WAN.

By selecting Network - WAN you can configure network settings.
Setting up a DHCP connection
If you are using DHCP to obtain an IP address (automatically obtain settings), select Dynamic IP, and the router will automatically receive the IP parameters.
This window shows how WAN settings, including IP address, subnet mask, default gateway, and so on, are dynamically assigned by your ISP. To update the settings, you must click the button Update. To reset the values, use the button Release.
MTU size– Usually meaning MTU(maximum packet size) for most Ethernet networks is 1500 bytes. We recommend that you do not change this value.
Primary DNS and Secondary DNS are assigned automatically. Use this function It is not necessary when assigning IP addresses dynamically.
Node name- This option allows you to assign a hostname to the router (not used on your network).
Get an IP address using Unicast DHCP– Some ISPs' DHCP servers do not support broadcast applications (this option is not used on your network).
Click the button Save to save settings.
Setting up a PPOE connection
If you are using a connection via the PPPoE protocol, then you should select the WAN option: PPPoE/Russia PPPoE. 
When setting up a connection via PPPoE, you must specify the following parameters:
Username: Password– Enter the username and password you received from your provider from your provider. These fields are case sensitive.
Secondary connection– In this field you must select the connection type Dynamic IP.
Connection modeWAN- IN this section you need to select an item Connect automatically ( If the connection fails, it is automatically restored).
After selecting the parameters on this page, you must click the button Save.
Setting up a wireless connection
On the menu Wireless mode need to choose Settings wireless mode
. 
In this menu item you can basic setup parameters. 
Network name– At this point you need to enter the name of your network to which you will connect. Enter a value of up to 32 characters. The default SSID is TP-LINK_XXXXXX (XXXXXX is the last six unique characters of the router's MAC address). This field is case sensitive. For example, TEST And test– these are DIFFERENT meanings.
Region– At this point you must select Russia.
Mode– Select mode 11bgn mixed. This mode allows all wireless stations of the 802.11b, 802.11g and 802.11n standards to connect to the router.
Channel width– Select channel width Automatically.
Channel- In this field you set the operating frequency that you are going to use. The default mode is Auto, thus, the access point will automatically select the most suitable channel .
This parameter should be left in Auto mode.
Maximum transfer rate (Tx)- In this field you can limit maximum speed router data transmission (Tx).
Enable wireless broadcasting– The router's wireless mode can be enabled or disabled to allow access to wireless stations. Wireless broadcasting can be turned on/off using the WIFI ON/OFF button on the router. By default, this item should be enabled.
Enable SSID Broadcast- When wireless clients search for the wireless network they want to connect to, they will see the SSID (network name) sent by the router. If you check the box Enable SSID Broadcast, That wireless router will openly broadcast its name (SSID). If the checkbox is not checked, then the network name will not be displayed in the list of networks and to connect you will need to manual mode enter network parameters for connection.
WDS- This field should be disabled (blank).
Click the button Save to apply your settings.
Setting up wireless network security.
By selecting from the menu Wireless mode- Wireless Security, you can configure the security settings of your wireless network.

Disable protection– If you do not want to use wireless security, click on the appropriate option. In this case, your network will not be protected and any connection will be possible. WiFi devices without password. (Not recommended)
Version– You must select the WPA-PSK encryption algorithm version from the drop-down list. The optimal mode is type WPA-PSK(WPA shared key).
Encryption- When choosing WPA-PSK or WPA You can specify one of the following values for the Authentication Type: TKIP or AES as an encryption algorithm. ( Not recommended enable encryption type TKIP, because this encryption is not supported by the 802.11n broadcast standard). In this setting item you need to select a standard AES.
Wireless password– Here you can specify a password of length from 8 to 63 characters in ASCII encoding (that is, it is acceptable to use uppercase and lowercase letters and numbers of the Latin alphabet).
Group key update period– This field must contain the value 0.
This completes the setup of your router and it is ready to use.

1. By default, login is admin, password is admin.
2. Courier-setters must change the password in the settings to the Serial Number indicated on the box (S/N). When reconfiguring, it is also recommended to use S/N as a password for the router and wi-fi ( serial number).
3. Resetting the router settings is done by pressing and holding the Reset button on the back panel of the router for 10 seconds.
In order to get to the router’s web interface, you need to open your Internet browser and type http://192.168.1.1, User Name in the address bar admin, Password – admin(provided that the router has factory settings and its IP has not changed).

Change the factory password.
For security reasons, it is recommended to change the factory password.
Default: Login admin, password admin.
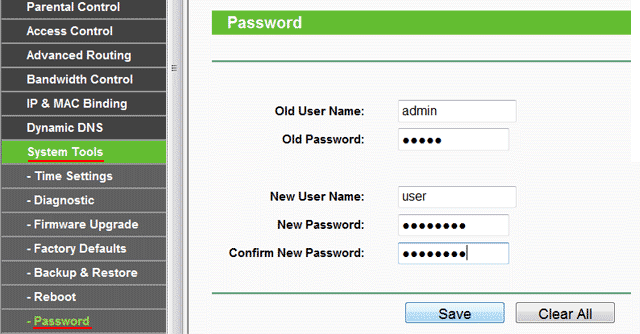
In the router interface, you need to go to the tab System Tools and choose Password.
In field Old User Name enter admin, Old Password enter admin.
Into the fields New User Name, New Password, Confirm New Password enter new login(you can leave the same “admin”), as well as a new password and repeat it, respectively.

Then click the button Save.
SettingsWiFion the router.
In the router interface, you need to select the tab on the left “ Wireless ", in the list that opens, select " Wireless Serrings».
We set the parameters as follows:
1. Field " SSID": enter the name of the wireless network.
2. Region: Russia
3. Chanel: Auto
4. Mode: 11bgn mixed
5. Channel Width: Automatic
6. Max Tx Rate: 300Mbps
7. Click the button below “ Save»

On the left menu select “ Wireless", Further " Wireless Security"and set the parameters:
1. Set the point to WPA-PSK/WPA2-PSK
2.Version: WPA2-PSK
3. Encryption: Automatic
4. PSK Password: you must enter any set of numbers ranging from 8 to 63. They also need to be remembered so that you can specify them when connecting to the network. It is recommended to use the device serial number as a key (indicated on the box, in the form S/N########).
5. Click the button below “ Save»

Setting up an Internet connection.
SettingsPPPoEconnections.
1. Select menu on the left Network, Further MAC Clone
2. Click Clone MAC address, Further Save (for more details see In chapter "MAC Cloning addresses»)
3. Next, select on the left WAN
4.WAN Connection type: PPPoE
5.User Name: Your login from the contract
6.Password:Your password from the agreement
7. Set the point to Connect Automatically
8. Press the button “ Save».

Configuring PPtP (VPN) while automatically obtaining a local IP address (DHCP).
1. Select menu on the left Network, Further MAC Clone
2. Click Clone MAC address, Further Save (for more details see In chapter "MAC Cloning addresses»)
3. Next, select on the left WAN
4.WAN Connection type: PPTP
5.Username: Your login from the contract
6.Password: Your password from the agreement
7.Server IP Address/Name: ppp.lan
8. Set the point to Connect Automatically
9. Save the settings with the “ Save»

Setting up PPtP (VPN) with a static local IP address.
1.WAN Connection type: PPTP
2.Username: Your login from the contract
3.Password: Your password from the agreement
4. Set the point to Static IP
5.Server IP Address/Name: ppp.lan
6.IP Address: We enter your IP address according to the contract
7.Subnet Mask: We hammer in the mask according to the contract
8.Gateway: We drive in the gateway according to the contract
9.DNS: 212.1.224.6
10. Set the point to Connect Automatically
11. Save the settings with the “ Save».

NAT when automatically obtaining an IP address (DHCP).
1. Select menu on the left Network, Further MAC Clone
2. Click Clone MAC address, Further Save (for more details see In chapter "MAC Cloning addresses»)
3. Next, select on the left WAN
4.WAN Connection type: Dynamic IP
5. Save the settings with the “ Save».

MAC address cloning (required when setting upPPPoE, PPTPWith dynamic settings AndDHCP)

Saving/restoring router settings.
menu Backup & Restore.
To save the current router settings, you must press the button Backup. The settings file will be saved in specified place on your hard drive.
To restore settings settings from a file, you must click the file selection button, specify the path to the settings file, then click the button Restore.
Hello! Now we will connect and configure the Tp-link TL-WR841N Wi-Fi router. If you have a TL-WR841ND model, then these instructions will also suit you. Let's look at the entire process of connecting the router, setting up the Internet, Wi-Fi network and setting a password for the Wi-Fi network.
All this with photos, and detailed description. So you shouldn’t have any problems setting up the Tp-link TL-WR841N router. Just follow the instructions.
A few words about Tp-link TL-WR841N (TL-WR841ND). Very successful model Wi-Fi router, which is very popular. Indeed, a successful model, with an excellent price/quality ratio. It seems to me that for home use, an undemanding user cannot find a better router. I myself, in practice, tested the operation of the Tp-link TL-WR841N. It has been working perfectly for more than five years, distributing Wi-Fi to a large number of devices. It works very stably, I don’t even remember that the Internet was lost on it or something else. You can read more about Tp-link TL-WR841N at. There you will find short review, and my review.
If you have already purchased this router, then it’s time to move on to configuration. Let's do everything according to this scheme:
- Connecting the Tp-link TL-WR841N router.
- Setting up an Internet connection (WAN).
- Setting up a Wi-Fi network on the TL-WR841N.
- Setting a password for Wi-Fi protection networks.
- Changing the admin password, which protects the router settings.
Connection Tp-link TL-WR841N
Connect the power adapter to the router and plug it into a power outlet. If the indicators on the router do not light up, then turn on the power using the button located on the rear panel.
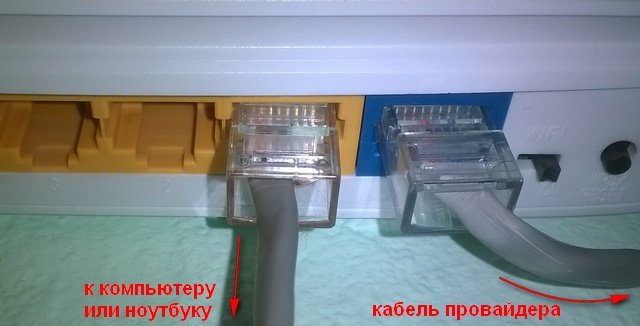
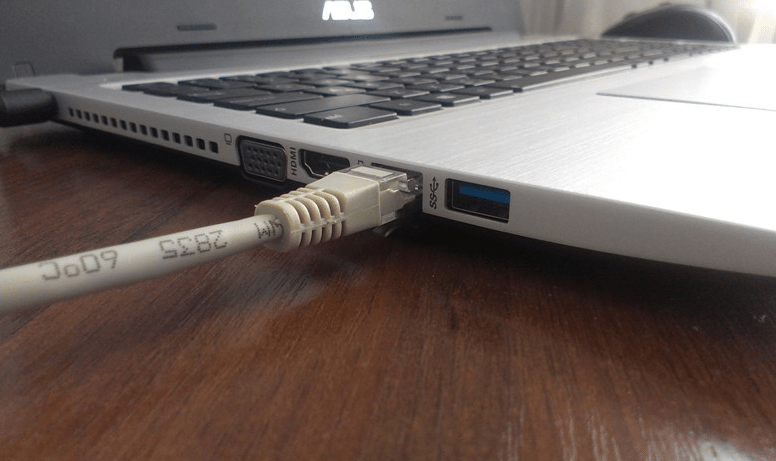
If you configure the router via cable (which comes included), having connected it to a computer or laptop, then take a network cable and connect the computer to the router. On the router, connect the cable to the LAN connector (one of 4):

Second end network cable on the computer we connect it to the connector network card:


Connecting and setting up a Wi-Fi network
If you want to configure the router via Wi-Fi, and not by connecting via cable, then just connect to the Wi-Fi network, which will appear immediately after turning on the power on the Tp-link TL-WR841N router. The network will have a standard name (something like this: "TP-LINK_084313"), and will not be protected.
You can even connect to this network from a tablet or phone and set up a router without a computer.
You probably found a disk included with the TL-WR841N. There is a utility for configuring the router. So, we will configure without a disk, through the router’s web interface. We will not need the disk in this instruction. If you want to configure via the utility from the disk, you can do this according to the instructions.
The Internet must be connected to the router. And your computer, tablet, laptop, etc. must be connected to Tp-link via cable or Wi-Fi. The router's power must be turned on. If everything is ready, then you can proceed to configuration.
The router settings will open.
And if the router has already connected to the provider and is distributing the Internet, then you can continue setting up.
Setting up a Wi-Fi network and setting a password on the Tp-link TL-WR841N router
For Wi-Fi settings you need to open the tab on the settings page Wireless - Wireless Settings. On this page we need in the field Wireless Network Name come up with and write down a name for your Wi-Fi network, and in the drop-down menu Region select the country where you live. Leave the rest of the settings as they are in the screenshot below.

To protect our wireless network password, go to the tab Wireless - Wireless Security. There you need to select the security type WPA/WPA2 - Personal (Recommended).
In field PSK Password create and write down a password that will protect your Wi-Fi network. You can read more about setting a password on the TL-WR841N router in the article.

Save the settings by clicking the button Save.
Change admin password. Protecting your router settings
I already wrote in a separate article about how to do this in the router settings. Let's go while we're at it Tp-link settings TL-WR841N we will immediately change the password that is used to protect the settings page. So that everyone who connects to your network will not be able to go into the router settings and change them.
Open the tab System Tools - Password. Enter your old username and password first (default - admin). Then enter your new username below (you can leave admin) and a new password. I advise you to write down this password somewhere so you don’t forget. Save the settings with the button Save.

That's all, the configuration of the Tp-link TL-WR841N router is complete. All that remains is to reboot the router. This can be done by turning off/on the power, or from the settings. On the tab System Tools - Reboot, you need to click on the Reboot button.
After setup and reboot, a Wi-Fi network will appear with the name that we set during the setup process. And to connect to a wireless network, use the password that we also set when setting up the router.
You can already connect your devices to the router. If you set up via cable, but want to connect via Wi-Fi, then the laptop can be disconnected from the router and connect via a wireless network.
You can leave your feedback and questions in the comments!
Good afternoon, dear readers!
Today I will tell you how to set up TP-LINK router using the example of the TL-WR841N(d) model
My thoughts on this model:
I believe that this model TP-LINK turned out very well, as it is easy to set up and has a good price/quality ratio. It is perfect for the average home user who just needs Internet and Wi-Fi. I advise you to take this model if you are a simple user who doesn’t require anything more from a router. Many of my friends have had this model (on my recommendation) for more than 3 years. Works stably, performs its function on 5+
!
So, if you have already purchased this router, then let's configure it. Our procedure:
- Setting up a Wi-Fi network on the TL-WR841N(d)
Connecting the TL-WR841N(d) router to a PC
To begin, connect the power supply to the router and plug it into an outlet. If the indicators on it (on the router) do not light up, then turn it on with the button on the back.
You probably noticed the disk that came with the router, so here we are going to configure without its use.
We insert the second end of the wire into the network card of the laptop/computer from which we will configure the router.
If you did everything correctly, then we can move on to the next point.
Setting up an Internet connection (setting up a WAN connection) on the TL-WR841N(d)
We need to go into the settings of the TL-WR841N(d) router. To do this, on the computer to which it is connected, open any browser and in the address bar go to 192.168.1.1 , or 192.168.0.1 . You should be prompted for your username and password. Specify admin And admin (standard password and username). By the way, how to enter the router settings, the standard IP and standard login/password are indicated on the bottom of the router on a sticker

So, we entered everything correctly, entered the username and password. The router settings page should open to us.
The most important thing is to configure the router to work with your Internet provider. If this is not done, or done incorrectly, the Internet through the router will not work. A Wi-Fi network will appear, but without Internet access.
In settings go to the tab Network - WAN. Us in the dropdown list WAN Connection Type you need to select the type of connection that your Internet provider uses. It could be: Dynamic IP, Static IP, PPPoE, L2TP, or PPTP. For example, for me personally PPPoE(the most common type of connection).

Setting up PPPoE, L2TP, and PPTP
If your provider uses one of the above connection methods, then select the one you need and set the necessary parameters that the provider should give you: username, password, IP address. This depends on the type of connection and provider you choose.

The main thing that needs to be achieved from the settings on this page is that the router connects to the Internet and starts distributing it. If the Internet works, then press the button Save, and we continue. If you can’t set it up, then call your Internet provider and ask them for all the information needed to set up the router.
If your computer has a high-speed Internet connection configured, then we no longer need it. There is no need to run it. Our router will now launch such a connection. You can remove it altogether.
It may also be that the provider binds by MAC address (you need to check with the provider), in which case you can clone the MAC in the router settings, on the tab Network - MAC Clone. Or, you can change there MAC address router. You can also call your provider and ask them to remove the old MAC from the binding and bind your new MAC address.

If the router has connected to the provider and is distributing the Internet, then you can continue setting up. To check whether the router distributes the Internet, just try to go to any website from the computer with which you are setting up the router (which is connected to the router port LAN)
Setting up a Wi-Fi network on the TL-WR841N(d) and setting a Wi-Fi password
To configure Wi-Fi, you need to open the tab on the settings page Wireless - Wireless Settings. On this page we need in the field Wireless Network Name come up with and write down a name for your WiFi network, and in the Region drop-down menu select the country where you live. Leave the rest of the settings as they are in the screenshot below.

To protect our wireless network with a password, go to the tab Wireless - Wireless Security. There you need to select the security type WPA/WPA2 - Personal(Recommended).
In field PSK Password create and write down a password that will protect your WiFi net.

Save the settings by clicking the button Save.
Changing the default admin user password
While we are in the settings Tp-link TL-WR841N, I advise you to immediately change the standard password that is set to protect your router settings. So that everyone who connects to your network will not be able to go into the router settings and change them (for example, we gave the Wi-Fi password to a neighbor/friend).
Open the tab System Tools - Password. Enter your old username and password first (default is admin). Then, below, enter a new username (you can leave admin) and a new password. I advise you to write down this password somewhere so you don’t forget. Save the settings with the button Save.
That's all, the configuration of the Tp-link TL-WR841N router is complete.
All that remains is to reboot the router. This can be done by turning off/on the power, or from the settings, on the tab System Tools - Reboot, you need to press the button Reboot.
After setup and reboot, a Wi-Fi network will appear with the name that we set during the setup process. And to connect to a wireless network, use the password that we also set when setting up the router.
I hope this article helped you! I did my best. If you have any questions, ask them in the comments to the post. If you have a suggestion, you can send it to the email address
In the next article I will tell you
Thank you for your attention! See you again!
For initial setup, you need to connect the included Ethernet cable to the computer’s network card and to one of the router’s LAN ports. The cable coming from the provider must be connected to the WAN port.
1. Setting up a network card
Windows XP
In Control Panel, switch to Classic View, then go to Network Connections.


A window with connection properties will open. Highlight Internet Protocol (TCP/IP) and click the Properties button.

- IP address
- Subnet mask: 255.255.255.0;
- Main gate: 192.168.1.1;
- Preferred DNS Server: 10.0.0.1;
- Alternative DNS server: 10.0.0.2.
Then click OK → Close.

The network card is configured.
Windows Vista
Click the "Start" button, select "Control Panel".

In Control Panel, switch to Classic View, then go to Network and Sharing Center. shared access».

In the Network and Sharing Center, select Manage Network Connections.

Click on the “Local Area Connection” icon right click mouse and select “Properties” from the menu that appears.


In the Internet Protocol properties, check the box next to “Use the following IP address” and enter the following parameters:
- IP address you can select any one from the range 192.168.1.2-192.168.1.254. For example, 192.168.1.100;
- Subnet mask: 255.255.255.0;
- Main gate: 192.168.1.1;
- Preferred DNS Server: 10.0.0.1;
- Alternative DNS server: 10.0.0.2.
Then click OK → Close.

The network card is configured.
Windows 7
Click the "Start" button, select "Control Panel".

In Control Panel, in the View menu, select Large Icons, then go to Network and Sharing Center.

In the Network and Sharing Center, select Change adapter settings.

Right-click on the “Local Area Connection” icon and select “Properties” from the menu that appears.

A window with connection properties will open. Highlight Internet Protocol Version 4 (TCP/IPv4) and click the Properties button.

In the Internet Protocol properties, check the box next to “Use the following IP address” and enter the following parameters:
- IP address you can select any one from the range 192.168.1.2-192.168.1.254. For example, 192.168.1.100;
- Subnet mask: 255.255.255.0;
- Main gate: 192.168.1.1;
- Preferred DNS Server: 10.0.0.1;
- Alternative DNS server: 10.0.0.2.
Then click OK → Close.

The network card is configured.
Windows 8
From the Start panel, select Desktop.

On the desktop, move your mouse to the lower or upper right corner of the screen and a panel will appear. In it, select the “gear” icon.

In the panel that opens on the right, select "Control Panel".

In Control Panel, in the View box, select Large Icons or Small Icons to display the entire list. Go to Network and Sharing Center.

In the left pane, select Change adapter settings.

Right-click on the local network connection in this window and select "Properties".

In the window that opens, find “Internet Protocol version 4 (TCP/IPv.4)”, double-click on the inscription itself or click on it once, and select “Properties” below.

In the Internet Protocol properties, check the box next to “Use the following IP address” and enter the following parameters:
- IP address you can select any one from the range 192.168.1.2-192.168.1.254. For example, 192.168.1.100;
- Subnet mask: 255.255.255.0;
- Main gate: 192.168.1.1;
- Preferred DNS Server: 10.0.0.1;
- Alternative DNS server: 10.0.0.2.
Then click OK → Close.

The network card is configured.
2. Setting up the router
Web interface
To configure the router, open a browser (recommended Internet Explorer), enter http://192.168.1.1/ in the address bar and press Enter.
In the “Connect to 192.168.1.1” window that appears, enter the username and password, by default it is admin - admin.
On some models TP-Link router assigned address 192.168.0.1. You can find out this information on the sticker on the router itself. If the address is 192.168.0.1, the settings network card are made in the same way as these instructions.

Firmware update
Before you start using the router, it is recommended to update the firmware version; errors and shortcomings are often fixed in them previous versions. To update the firmware on the device, open the “System Tools” item on the left and find the “Firmware” item there. In the window that opens, click the “Browse” button and find the firmware file downloaded from the manufacturer’s official website. Next, click the “Upgrade” button. The device will update the firmware and reboot.

Network and Internet
To configure the connection, find the “Basic Settings” item on the left, in the “Network” section, go to the “WAN” sub-item.
IN in the window that opens, select “WAN Connection Type: L2TP/Russia L2TP.”Next, fill out in order:
- User Name - login for VPN connection
- Password - password for VPN connection
- Static IP
- Server IP Address/Name - vpn.akado-ural.ru
- IP Address - IP address
- Subnet Mask - 255.255.255.0
- Gateway - Your gateway
- DNS - 10.0.0.1
- WAN Connection Mode - Connect Automatically
Click the "Save" button. The router will apply the settings and should connect to the Internet.

Routing
Routing
For internal resources to work, you must configure static routes. Find the “Static Routing List” item on the left in the “Advanced Routing” section and click the “Add New” button.

Fill in the following fields:
- Destination IP Address - 10.0.0.0
- Subnet Mask - 255.0.0.0
- Default Gateway - gateway
- Status - Enabled
- Click the "Save" button.

Route added.

WiFi
To set up a wireless network, open the “Wireless” item on the left and go to “Wireless Settings”. To turn on the wireless network,
Check the box next to “Enable Wireless Router Radio”. In the “SSID1” field, enter the network name that will appear in the list of wireless networks.
It is recommended to select “Channel - Automatic”. (For more information on why to choose channels, see the article"Low speed over Wi-Fi" .)
In the “Enable SSID Broadcast” item, uncheck the box if you want yours to be hidden in the list of available networks. In this case, to connect
You will need to additionally enter the name that is indicated in the “SSID” field. This opportunity slightly improves network security.

To make your wireless network secure, you need to set up encryption.

Go to "Wireless" -> "Wireless Security".It is recommended to set the parameters as shown in the screenshot below.
Password - password for connecting to wi-fi networks. Without knowing this phrase, it will be impossible to connect to your network. Click the "Save" button.
Wi-Fi setup is completed.
Peer-to-peer network
Not all programs can work correctly through a router. For some programs (DC++, Radmin/RDP/HTTP/FTP servers) you need to configure port forwarding. Let's consider this procedure using the example of a P2P client.
In the P2P client for our network version 5, you need to go to File → Settings → Connection Settings. The TCP and UDP port numbers specified there will need to be specified in the router settings, as indicated below. If several computers are connected to the network, then the ports in P2P clients should be different; if necessary, the values can be changed.

In other versions of P2P clients, you need to select the " Manual setting firewall":

Let's configure port forwarding on the router. Find the “Forwarding” item on the left and go to the “Virtual Servers” section. Click the "Add New" button to create a new rule:


- Service Port - port for TCP connections specified in the P2P client
- Protocol - TCP
- Status - Enable
- Service Port - port for UDP connections specified in the P2P client
- Internal port - can be left empty
- IP Address - IP address of your network card
- Protocol - UDP
- Status - Enable
To add, click the “Save” button.
The ports must be different, the IP address must be the same.

You did everything according to the instructions, but something is not working for you? - Read the article carefully"Features of connecting via a router" , check if you did everything correctly.
For questions about setting up equipment, you can contact