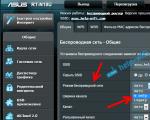
Setting up a network card to configure the router. Network settings Where are the network card settings in windows 7
This article will look at the settings of the network card, which theoretically can reduce high ping in the game, overcome lags and somehow affect fps. From the first part we realized that dynamic multiplayer online games use the UDP protocol, so we will take this into account when setting it up. I would like to draw your attention to the fact that this is how you can bring down a high ping and remove lags if you have a weak computer and a “good” network connection, or vice versa. When playing with these parameters, you need to try to shift the load to the hardware that you do not experience performance problems. And the result of all this battle and torment may be a gain of a few milliseconds.
Why is the ping high and how to lower it?
In the first part (of a series of articles) we tried to overcome high network latency by adjusting the MTU. In this article, we’ll look at and find out what network card settings will be useful for game lovers. Jumbo Packet -
Using this parameter will probably only hypothetically help reduce ping in games, and there will probably be some benefit during long massive battles and sieges, when a very decent amount of traffic is generated per second. The fact is that the use of large frames must be configured for all participants in the interaction, both the client and server, and transit nodes. But outside of your provider (and even at the provider itself), mtu is always approximately 1.5 kB plus/minus tens of bytes. If you use it on local networks (where you can precisely control this setting for everyone), then the ping there is often quite low.
What's the plus? If you use 9 kB for all participants, instead of 1.5 kB, then to calculate one frame you will need to use the processor 6 times less often. Which should have a better effect on the increase in FPS.
What's the downside? If you use it only on the client, when sent to other nodes the packet will be fragmented, at best into 6 parts, and with mtu<1500 может и на более. Которые в итоге будут переданы на каждый последующий узел, и где он должен попасть на сервер без потерь и корректно собран в один целый. В век высоких технологий, сбор и разбиение проходят быстро, но тем не менее, не всегда возможно предсказать насколько будет загружено оборудование обрабатывающее эти фрагменты. И эта фрагментация и загрузка транзитных узлов и может привести к росту пинга.
Value: Off
Checksum Offload - IPv4 Checksum Offload - IPv4 offload checksum:
If your adapter has this feature, then enable it. This will free the central processor from calculating and checking checksums for sent and received packets. Which should have a positive effect on FPS in the game. But there are also the opposite cases, when disabling this function allows you to improve ping and reduce lag. So, try playing with this parameter if you have lag and ping fluctuations.
Value: On for Tx and Rx
Speed & Duplex - Link Speed/Duplex Mode - Speed and duplex
Here you need to check that you have 10\100\1 GB duplex. When using half-duplex mode, the ping becomes higher.
You can verify this by switching modes and pinging any server.
Value: Duplex mode
Flow Control - Flow control
This setting is designed to solve the problem when incoming traffic arrives at such a speed that it creates a threat of buffer overflow on the network equipment, and then a command is sent to the source so that it waits a pause and repeats sending the data again after a certain period of time. If such a command is not sent, then due to overload some of the data will simply be lost, i.e. In the game this is a guaranteed lag. It seems to be a good, correct and necessary function, but only for those who download large volumes. In games, as a rule, traffic does not come in such an intense mode. If a pause frame is sent, the ping will immediately increase. Those. If your games experience frequent lags and high network latency, try playing with this setting.
Value: Disable
Transmit Buffers -Transmission Buffers / Receive Buffers - Receive Buffers
Often the reception buffer in the settings is larger, since we download more traffic than we send. The main thing here is to adhere to the rule that the minimum receive buffer should be equal to 100*mtu. If mtu=1500 bytes, then the buffer size must be at least 147 kB. If it is less, then in massive events in the game, with the generation of a large amount of traffic, packet loss is possible. These settings do not have a direct effect on ping. Rather, it concerns lags. So make sure these settings are set to default and not too small.
For the transmission buffer, the factory value is quite suitable. It is unlikely that it is possible to generate so much traffic on the client in the game that the packets would not fit into the buffer.
TCP/UDP Checksum Offload IPv4/IPv6 - TCP/UDP IPv4/IPv6 Offload Checksum
To find out whether the packet reached the recipient intact and without errors, a checksum is added to it for verification on the other side, which is calculated based on the packet data. If you have this feature configured, try enabling it for both types of traffic. Thus, all calculations will be carried out not by the processor, but by the network adapter, which ultimately should have a positive effect on the FPS in the game.
Value: Rx & Tx Enable
Interrupt Moderation - Moderation of interruptions
When receiving one packet, the network adapter causes an interrupt. When there is intensive traffic exchange, such interruptions create a load on the processor. And to reduce it, they came up with the idea of accumulating events over a period of time and then triggering an interrupt (IRQ). Thus using the processor less often. This method has its advantages, described earlier, and we can also say that all the beauty of this function is revealed for those who download a lot.
On the downside, for the packet to be processed, it waits for the timer to expire. This is what adds ping to the game.
Value: Disable  Receive Side Scaling - RSS -
This is an interesting and necessary mechanism for owners of multi-core processors. When enabled, packets are divided into threads and each thread can be processed by a separate processor. Those. All cores are used, which should have a positive effect on performance in general and ping in particular. If this feature is disabled, all traffic is processed by one core.
But all these advantages will exist if the driver is written without errors. Otherwise, there are cases when, after switching on, problems and performance degradation begin. If this is your first time turning it on, watch the network carefully for a while.
Value: Enable
Large Send Offload IPv4/IPv6 - Giant Send Offload -Offloading for large IPv4/IPv6 sending
The fragmentation of data packets when sent will be handled by the network adapter, not the software. Ideally, hardware fragmentation is faster, the processor is used less, which ultimately should have a positive effect on ping and FPS for game lovers.
There is another setting Large Send Offload v2, it performs the same function, only for larger packages. Sometimes turning it on has a bad effect on network performance.
Value: Enable
And in conclusion, briefly about ping and the presented settings
Some parameters are called differently by different manufacturers. If you don’t find them, it means the manufacturer did not provide for their configuration.
You should understand that the recommended values here are aimed at reducing ping. Therefore, for torrent lovers, these settings may negatively affect performance and cause increased load on the system.
Be sure to carry out all manipulations with the network adapter settings step by step. You shouldn’t put everything you see into practice immediately and simultaneously. On different network cards, these settings may show different behavior.
The final result also depends on the directness of the hands of the programmers who wrote the drivers.
I hope this article discovered something new for you and helped, at least a little, reduce the high ping in your favorite game.
Continued here: and parts
How to properly configure a network card
Internet 35% (Wi-Fi)
Internet is the best invention of mankind, it unites more 35% population of the Earth, and also opens up unlimited opportunities for learning, work, recreation and communication. It appears on your computer using a network adapter that has wireless (Wi-Fi) or wired interface. In this article I will talk about setting up an adapter to connect to the network.
There are several types of Internet connection:
- Phone line
- DSL, cable or wiring
- Mobile communications (2G,3G,4G - LTE)
- Optical fiber
- Satellite Internet
Each of them has its own specific features, but the computer is most often connected using a conventional twisted pair — RJ-45 cable, or using WiFi connections to the router (which, in turn, also works via twisted pair or USB modem).
Setup. Since most users use Windows 7, I will tell you using it as an example.
To do this we go to Control Panel-> Network and Internet -> Network and Sharing Center, then select from the menu on the left Change adapter settings.
Here you can see a list of all computer adapters and their connection status, including Bluetooth adapters, as well as virtual adapters like Hamachi.
Normal connection via twisted pair (without routers, modems)

There are also 2 options: You need to set up a connection and connect every time, or your provider supports DHCP technology and you just need to plug the cable into the connector.
Depending on your option, you need to configure the adapter correctly.
Go to the list of adapters. Select the desired one (Local Area Network Connection.) and right-click on it (RMB), select here Properties. In the list that opens, select the component Internet Protocol Version 4 and press the button Properties. Here you need to enter the settings issued by your operator.
The operation is similar to Option 1, only in the protocol properties you need to check the boxes Obtain an IP address automatically, Obtain a DNS server address automatically.
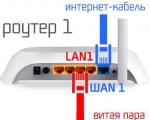
Connecting using a router
Typically a router has 5 connectors( 4 LAN and 1 WAN). You connect the cable from the Internet to the WAN port (it is separate from the others), and then use a second cable/Wi-Fi adapter to connect the router and computer. After this (See Option 2 in connection via twisted pair), these settings are set by default in the Wi-Fi adapter.
To further configure the Internet, you go to the local address of the router( 192.168.0.1 or 192.168.1.1 — default) and perform the necessary actions.
I won’t describe the other types; you can ask all questions in the comments.
Now in more detail about the adapter settings
To see these settings, you need to go to the list of adapters, right-click on the desired adapter, select Properties, then under the line with the full name of the adapter, click the button Tune. Go to the tab here Additionally.
Basically, the properties are the same for all adapters, but there are still slight differences.
READ ALSO: How to properly configure source live audio
I will tell you with an example D-Link DGE-560T.
Below there will be a table indicating the property name and its description.
Disable - the function is disabled.
Disable - the function is disabled.
Re-Link, Battery - shutdown when operating on battery power.
Re-Link, Battery or AC - always disabled.
Disable - the function is disabled.
Disable - the function is disabled.
Disable - the function is disabled.
Enable—energy saving is enabled.
Disable - the function is disabled.
Enable—enabled control. flow.
Disable - the function is disabled.
Rx Enabled - the function is enabled to receive files.
Tx Enabled - the function is enabled for sending files.
Rx & Tx Enabled - the function is enabled for sending and receiving files.
Disable - the function is disabled. Standard value.
xKB MTU - feature enabled, where X is the length of the large frame in KB.
Disable - the function is disabled.
Disable - the function is disabled.
Enable—fragmentation is enabled.
Absent—function disabled.
Value—you must enter the required MAC address.
Disable - the function is disabled.
Enable—The adapter is not enabled to respond to the request.
Disable—Disables hardware VLAN tagging.
Enable—enables hardware VLAN tagging.
Disable - disables RSS.
Enable - allows RSS.
Disable - prohibits WOL.
Enable - allows WOL.
Auto Negotiation - auto-negotiation with a network device.
10/100Mbps/Half/Full Duplex,
1.0 Gbps/Full Duplex - Operating modes.
Disable - the function is disabled.
Enable—fragmentation is enabled.
Disable - the function is disabled.
Enable—fragmentation is enabled.
Disable - the function is disabled.
Enable—fragmentation is enabled.
Disable - the function is disabled.
Enable—fragmentation is enabled.
Disable - the function is disabled.
Enable - the function is enabled.
Disable - the function is disabled.
Enable - the function is enabled.
100Mbps First - sets the initial speed to 10/100 Mbps
Do you have any questions? Do you want to add to the article? Did you notice the error? Let me know below, I'll be sure to hear from you!
If this article helped you, write about it in the comments. And don’t forget to share the article with your friends on social networks;)
The article is copyrighted, so if you copy it, do not forget to insert an active link to the author’s website, that is, this one :)
Comments
Information
Network technologies
Iron
Translation
Use of materials No ideas permitted only with the prior consent of the copyright holder.
Source: http://idej.net.ua/internet-technologies/51-nastroyka-setevogo-adaptera.html
Configuring the network card in the required mode
The network card needs to be configured if you have a static IP address from your provider, or if the device (network card of a computer/tablet/laptop) cannot obtain an IP address from the router
If the Internet stops working on your computer after upgrading to Windows 10, then it is also recommended to update the BIOS of your computer or laptop
You can get additional instructions and options for solving problems associated with poorly functioning Internet from the Computer Help section
In the system tray, right-click the connection icon, then select “Network and Sharing Center”, or press Win + R, enter “control /name Microsoft.NetworkAndSharingCenter” (select the text with the mouse, copy it and paste it into the “Open” field ") without quotes and click OK
READ ALSO: How to configure readyboost correctly
The wired network adapter icon looks like this
In the window that appears, click Wireless connection(if we set up Wi-Fi).
Or LAN connection(to set up a wired connection)
You can also call up the adapter properties like this: click the “Change adapter settings” link, and then double-click on the icon of the required network connection (wired or wireless)
In the “Status” window, click the Details button
Fields IP address, Subnet mask, Default Gateway IPv4 And Ipv4 DNS Server must be filled out if the computer is connected to a wired or wireless network. Typically these values are:
IP address- 192.168.1.49. In your case, the last two octets (numbers “1” and “49”) will be different
Default Gateway IPv4— 192.168.1.1 (the third octet, with the number “1”, may have a different meaning)
Ipv4 DNS Server— 192.168.1.1 (if an IP address is automatically assigned, it coincides with the gateway value; the third octet, with the number “1”, may have a different meaning)
If the fields in the Details window are filled with values starting with 169 or others, then click the Close button
In the “Status” window, click the Properties button
Choose Internet Protocol Version 4 and click on it twice
Ideally, the network card (wired or Wi-Fi) should receive an address automatically immediately after connection. In this case, the settings should look like this:
In most cases, routers distribute addresses starting with “192.168”, so to manually configure a network card you only need to know the value of the third octet (the one that comes after 168)
In order to find out the address that we will set wireless network card, use the ipconfig utility. Connect the computer to the LAN port of the router with an Ethernet cable, press the Win+R hotkeys, enter CMD, press Enter, in the black console that appears, enter “ipconfig /all” without quotes, then press Enter, wait a few seconds until everything appears in the window settings. Now scroll up with your mouse wheel until you see something similar to the illustration below - here the wired card received the address 192.168.1.49; router WEB interface address - 192.168.1.1
To find out the address that will receive wired network card, use the table, or check the address on any other computer, laptop or smartphone connected to this Wi-Fi router.
Now let’s set the address manually - in the “Properties: Internet Protocol Version 4” window of the network adapter, set the radio buttons “Use the following IP address” and “Use the following DNS server addresses”, and then fill in the fields indicated by arrows
The number circled in red must be anything in the range from 2 to 255
The numbers circled in green are the router's subnet. They must be the same (take this value from the table or from the results of the ipconfig command - illustration above)
For a D-Link router, for example, these are addresses in the format 192.168.0.x
Click OK, OK again
The network card setup process is complete - you can enter the router settings, check the Internet on your computer, or return to the previous page if you came from the Computer Help section
Attention! When manually setting up a network card, your computer will only be able to connect to routers with similar IP address settings (the subnet will need to be changed manually). If the Internet on the computer only works when manually setting up the card, then also update the network adapter driver, and then the BIOS firmware of the motherboard
The network card needs to be configured if you have a static IP address from your provider, or if the device (network card of a computer/tablet/laptop) cannot obtain an IP address from the router
If the Internet stopped working on your computer after upgrading to Windows 10, then it is recommended that you also use your computer or laptop
You can get additional instructions and solutions to problems associated with poor working Internet in the section
In the system tray, right-click the connection icon, then click "Network and Sharing Center", or press Win + R, enter "control /name Microsoft.NetworkAndSharingCenter" (select the text with the mouse, copy it and paste it into the "Open" field ") without quotes and click OK

The wired network adapter icon looks like this

In the window that appears, click Wireless connection(if we set up Wi-Fi)...

Or LAN connection(to set up a wired connection)

You can also call up the adapter properties like this: click the “Change adapter settings” link, and then double-click on the icon of the required network connection (wired or wireless)

In the "Status" window, click the Details button

Fields IP address, Subnet mask, Default Gateway IPv4 And Ipv4 DNS Server must be filled out if the computer is connected to a wired or wireless network. Typically these values are:
IP address- 192.168.1.49. In your case, the last two octets - (the numbers "1" and "49") will be different
Subnet mask - 255.255.255.0
Default Gateway IPv4- 192.168.1.1 (third octet, with the digit "1", may have a different meaning)
Ipv4 DNS Server- 192.168.1.1 (if the IP address is automatically assigned, it coincides with the gateway value; the third octet, with the number “1”, may have a different meaning)

If the fields in the Details window are filled with values starting with 169 or others, click the Close button

In the "Status" window, click the Properties button

Choose Internet Protocol Version 4 and click on it twice

Attention! When manually setting up a network card, your computer will only be able to connect to routers with similar IP address settings (the subnet will need to be changed manually). If the Internet on the computer only works when manually setting up the card, then also the network adapter, and then the motherboard
The network adapter is one of the main components of a computer, because it is difficult to even imagine a PC that is not connected to the Internet. Microsoft is aware of this, so support for the vast majority of network cards is already included in the distribution of the Windows 7 operating system. But time and progress do not stand still: almost eight years have passed since the release of Windows 7, new network controllers and even methods have appeared data transfers, and with them new network adapters. The use of such components requires additional settings both at the stage of OS installation and during its operation.
Why configure a network card in Windows 7
Changing the basic settings of the network adapter may be necessary to expand the range of tasks performed by the network client computer:
- fine-tuning Wi-Fi in operating conditions with a large number of wireless devices (apartment building, office building);
- installing drivers for a network card that is not supported by the OS out of the box;
- some Internet providers (VPN, pptp, wimax) require additional configuration of network parameters;
- installation and configuration of long wireless communication channels using RadioEthernet adapters.
How to find out what kind of network cards are installed in the system
You can find out the presence and number of active network adapters on your PC using one of the following methods: viewing the “Network Adapters” branch in the “Device Manager” system utility or analyzing the contents of the network connections in the control panel.

Or open Device Manager using the command line:

If you have installed software packages for working with a 3G modem, VPN clients or virtual machines, then both the “Device Manager” and “Network Connections” will additionally display software network cards created by these programs.
Forcibly turning off such adapters can lead to the most unpredictable consequences, including the inability to boot the PC.
Video: how to find out the model of your network card
How to enable or disable a network card (including using BIOS)
For laptops, turning network interfaces on and off is available using a key combination; for desktop PCs, using the BIOS or Control Panel settings.

Windows 7 supports the vast majority of network cards. Moreover, most modern network equipment is designed specifically for Windows, with all the ensuing problems, because Windows is not famous for its stability. However, Microsoft quickly solves most of the problems that arise with network equipment, honor and praise to them, but those that inevitably arise will be discussed in detail in this article.
First of all: in order to expand the potential range of tasks that a client computer performs on the network, there is a need to change the basic parameters of the network card.
Here are examples of such tasks:

How to view a list of available network adapters (network connections) in Windows 7?
The list of available devices on Windows 7 can be seen in two ways:

The second method begins by opening Device Manager using the Run window:

Enabling a network card, including using the BIOS
Read the instructions for all BIOS versions in the article -
On laptops, turning the network interface on and off is done by pressing a keyboard shortcut; on desktop computers, through the BIOS menu.

To enable the wireless network adapter on laptops there is a combination “Fn + F12”, although some manufacturers make a special key for this function.

Installing a network driver on Windows 7, including without the Internet
Since the network adapter is equivalent to the Internet, its absence makes it very difficult to download a driver to the network card. The issue is resolved by pre-recording drivers onto media.
- Drivers are downloaded and written to a flash drive, CD, etc.
- The media is connected to the PC.
- After this, the “Device Manager” opens using the “Run” window (called by pressing the “Win + R” keys), in which the “devmgmt.msc” command is entered.

- There is a section “Sound, game and video devices”, a subsection “Unknown device”, which has not yet been installed. You need to start installing drivers for an unknown device (future network adapter) after selecting it with the right mouse button and selecting “Properties” in the drop-down menu.

- Left click - “Update”.

- Manual setting is selected.

- The path to the driver media is written or indicated.

- Finally, the installation begins. It takes no more than a couple of minutes.
The network card without drivers was located in the "Device Manager" under the "Unknown Devices" section. After the update, it takes its rightful place - in the "Network Adapters".

Video - How to install a network adapter driver without access to the Internet
Setting up a network connection in Windows 7
Although companies providing Internet services prefer to configure their clients' network equipment themselves, sometimes it is necessary to carry out more advanced configuration. This is typical for computers with multiple adapters.
For this:
- Go to the context menu "Start", open the "Control Panel".

- In the “View” category, set the value to “Category”, find and open the “Network and Internet” section.

- Click on the "Network and Sharing Center" link.

- Click on the "Change adapter settings" link.

- Right-click on the network connection shortcut and select “Properties”.

- Check the box “Internet Protocol Version 4 (TCP/IPv4)” and click on the “Properties” button.

- Check the box “Use the following IP address” and fill in the fields with data.

On a note! The fields and “Default gateway” are in the agreement with the Internet provider, the remaining fields contain the same values for all users.
Video - The computer does not see the network adapter
How to view and change network card settings (IP, Mac, and more) in Windows 7?

It is easy to see the adapter parameters and its MAC address thanks to system programs.
For this:

How to reset all network driver settings?
If you want to completely roll back all settings to their original level, then do the following:

Is it possible to create two network cards?
Many users are thinking about getting a second network card. Physically, there are no problems here: most laptops and computers support a second network card. But there are exceptions, as well as damaged slots, as well as netbooks and tablet computers. In this situation, you need to use a virtual card, which distributes Internet traffic no worse than physical traffic.
It is possible to install such a virtual card in the Windows system itself:
- In the Start menu, type “manager” in the field, open “Device Manager”.

- In the “Device Manager”, click on the “Network adapters” section, select “Actions” in the top menu, and select “Install old device” from the drop-down menu.

- The installation wizard will open. You need to select the manual option to access the list of drivers for all devices.

- Scroll through the categories, highlight Network Adapters, and click Next.

- Then click on the "Micrsoft" item, add "Micrsoft loopback adapter" or "Microsoft Loopback Adapter", which will then appear in the network connections window.


- Confirm. The network adapter should now appear in Network Connections.


Complete reset of network driver settings
If your Internet is down or most of the Internet pages are not opening, then resetting all parameters and the TCP / IP stack can be an excellent solution to this problem.
Disabling a network card
To disable the network adapter, the best way is to use the most standard and convenient Windows tool for keeping all such equipment - the Device Manager. Do the following:
In this case, the shutdown will occur immediately, it will not even be necessary to reboot the OS.
Important! After the adapter is disconnected, the Internet connection will be severed along with it and a disconnection from the local network will occur. Therefore, it is recommended to finish all your business on the Internet in a timely manner before turning off the network card.
The network adapter does not have valid IP settings
A common problem for Windows 7 users is when problems arise with Internet access and the network diagnostic tool displays a message that the network adapter does not have valid IP settings.

In this case, you can first try resetting the router. If you have a wired connection, then disable and then re-enable your network connection in the network connections menu. If this does not help, then you can move on to further steps.
Step 1. Renew your IP address - this is the easiest method, although not always helpful in this case. To do this, open Command Prompt (as an administrator) and enter the following commands:
Check again to see if the error is still displayed? If yes, then move on.
Step 2. You can try resetting the network settings, namely the IP protocols. It is recommended to reset the TCP/IP protocol stack to factory settings in the most extreme cases, when problems arise as a result of malware, etc. To do this, open a command prompt in administrator mode and enter:

Network card settings are lost
When setting up a network, users may encounter the following situation: when the IP address, gateway, DNS are manually entered - the prescribed parameters are not saved, but reset to factory settings, and thus it becomes impossible to change network settings from automatically receiving addresses from the router. One of the common reasons for this is the incorrect removal of an antivirus that has firewall functions.

What should be done:
- Reset the TCP/IP protocol stack to factory settings (see how to do this earlier in the article).
- Reboot.
If this does not help, then do the following:

After doing this, the problem should be resolved.
What to do if there are problems with the network card?
Many plug-in network adapters, due to their vulnerability to electricity, can temporarily fail during periods of severe thunderstorms, or power outages in a building. In most cases, difficulties arise in situations with wired equipment, since multi-story buildings have long cable runs laid by Internet providers in places that are not intended for this purpose, next to telephone and television cables and high voltage wires. High humidity, dampness and low temperature in this area - all this has an extremely negative effect on the insulation of wires, so breakdowns appear in them .

Sometimes also, in more rare cases, breakdowns occur due to emergency situations such as a major thunderstorm. Network adapters quite often burn out, or users begin to experience difficulties logging into the network. In this case, the equipment will function, but there may be no Internet connection during such periods.
Unfortunately, this problem can only be solved by purchasing another network adapter model. For a desktop computer, the PCI standard complies, for a laptop - USB and PCMCIA.

It is also not recommended to plug in a network cable into the router and then connect a computer to it, because even if the router breaks down, replacing it will be relatively inexpensive compared to replacing the network card built into the computer (or even the entire motherboard).
Windows 7 does not see the network adapter

When integrated network equipment is not shown either in the “Network Connections” window or in the “Device Manager”, and is not even reflected in the “Unknown Devices” section (which would be explained by the lack of drivers), then most likely there is something wrong with it physically. It is quite possible that some transistors on the network card board have burned out, or a chip has fallen off - in this case, it is more advisable to buy a new card.
Video - How to configure a wired network card on Windows 7