Broken laptop screen how to connect an external monitor. DIY. We make a monitor from a laptop matrix. Where and how can I use this monitor
Sooner or later, everyone thinks about improving or increasing the capabilities of their laptop. The most common and fairly simple way to upgrade is connect a second monitor to the laptop via the VGA connector. In the same topic, you can consider how to connect projector to laptop, since the algorithm of actions in these two situations is exactly the same.
If our devices are functioning normally, then we need to perform only 3 simple steps:
1.
Turn off laptop.
2.
Connect an external monitor (or projector) to the laptop via the VGA port.
3.
Turn on the monitor (projector), then the laptop.
Let's explain this algorithm. It is best to connect the first time with the laptop turned off, as some laptops check for a second monitor when they boot up. Our second screen is connected via a VGA port (rarely DVI).
After turning on the laptop, an image should appear on the external monitor. If this did not happen, while the computer booted up, then we have to supplement the above procedure:
4. Manually switch laptop to external monitor.
To do this, you should carefully study a number of function keys on the keyboard (F1, F2, ..., F12).
The F4 key is responsible for switching the monitor mode
Depending on the laptop model, one of the function keys on your device is responsible for switching the screen to an external monitor or projector. It can be F1, F4, F5 and others. If nothing happens when you press it, then you need to use a key combination, such as Fn + F1 or Fn + F4. If again to no avail, you can use - Win + P (P-English).
We figured out how connect external monitor to laptop, however, did not consider the nuances of such a symbiosis. Let's go to the following links:
Start -> Control Panel -> Display -> Display Settings

Here we can specify which screen will be the main screen and which will remain the secondary screen. This menu can also be useful when we put the second monitor to the left or right of the laptop, and select its appropriate position in the settings. In fact, complete connecting monitor to laptop remains an indication of the optimal settings for screen resolution and orientation.
With the same "hot keys" F1, F4, Fn + F4 or others, you can set the screen mode (you may have different names for the modes):

1. Extend - laptop screen and external monitor work separately.
2. Duplicate - the image on two screens is the same.
3. Turn off the projector (external monitor).
4. Only the projector (monitor) - the laptop screen is disabled.
- practically not inferior in performance to full-fledged desktop computers. At the same time, the laptop user is not tied to one point and can move freely along with his PC. So lately everything more people prefer to use a laptop as the main computer. However, for home use, the laptop has one drawback - a small screen. To neutralize this problem, you need to connect a full-fledged laptop to the laptop. In this article, we will talk about how to connect a monitor to a laptop.
To connect a monitor to a laptop first
VGA is the most common interface and can be found in almost all laptops. VGA is a legacy analog interface. However, it is still quite up to date and can be used to connect or projector to your laptop without any problems.
HDMI is also a very common interface for connecting a monitor or. Often used in conjunction with VGA. Also, the port can often be found on other computer equipment. For example, on tablets or smartphones.

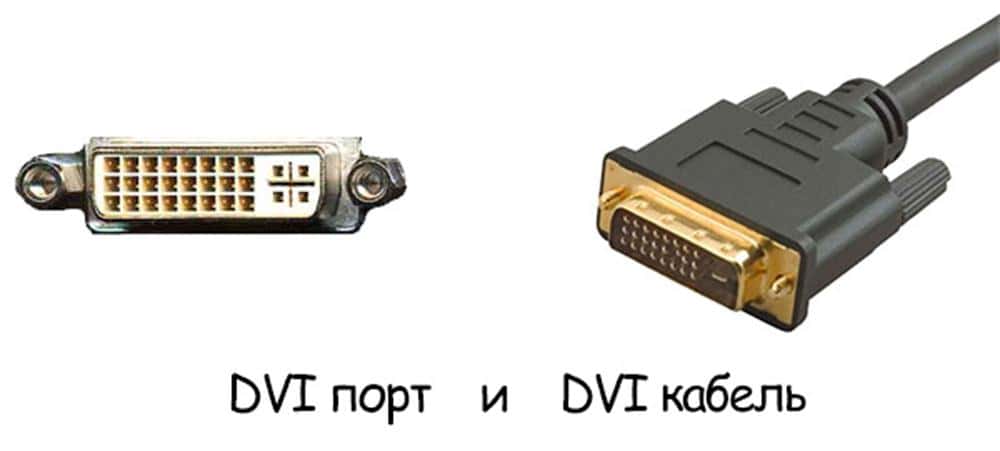
DVI is ideal for connecting a monitor to a laptop. On the this moment considered the standard for connecting monitors. However, the DVI interface is quite rare on laptops.
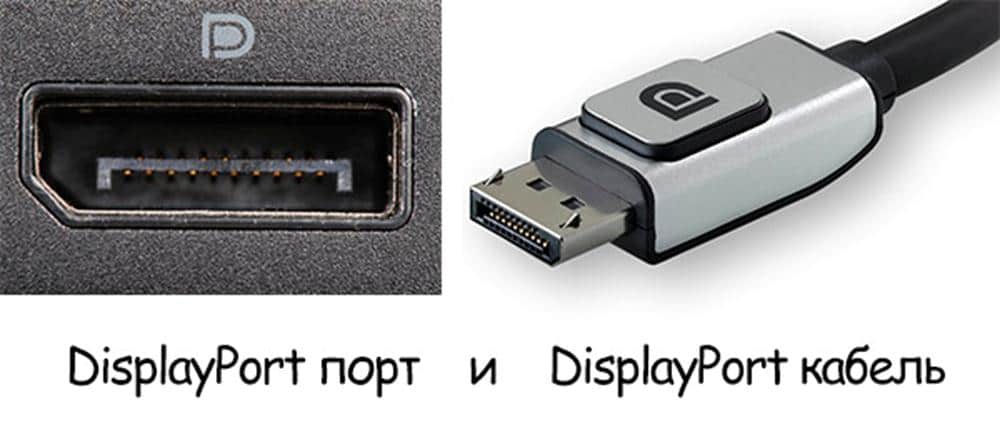
DisplayPort is one of the newest display interfaces. Recently, it is rapidly gaining popularity and it can be increasingly found in laptops.
After you have examined your laptop and determined what interfaces it is equipped with for displaying images, you need to do the same with the monitor. In general, you need to find interfaces that are on both the monitor and the laptop. With their help, you can connect the monitor to your laptop.
To connect a monitor you just need to connect two identical ports on the monitor and on the laptop using a cable suitable for the ports. After that, the laptop should determine additional monitor and a picture from the laptop will appear on it. If the monitor is not detected after connecting, restart the computer.
Also, a situation may arise when you do not have the same ports on your laptop and monitor. For example, a laptop only has an HDMI port, but the monitor does not have an HDMI port. In this case, you will need adapters.
Now you can find an adapter from almost any interface to any:
- DVI-VGA;
- DVI-HDMI;
- HDMI-VGA;
- DisplayPort-DVI;
- DisplayPort-HDMI
- etc.
Setting up a monitor connection to a laptop
After you have connected the two ports, a picture from the laptop should appear on the monitor screen. However, working in duplicate screen mode is not always convenient. To change the mode, you need to enter the "Screen Settings". To do this, click right click mouse on the desktop and select "".

In the window that opens, you can select the mode for displaying images on connected screens. The following modes are available:
- Duplicate screens. In this case, both screens will work simultaneously, both on the laptop and on the monitor. In this case, the picture on both screens will be the same. This mode is especially useful when connecting a projector or monitor for presentations.
- Expand screen. In this case, the connected monitor will expand the screen of your laptop. By selecting this mode, you can work with two screens at once and move windows between them.
- Show desktop only on 1 (or 2). In this case, you select only one of the screens. while won't work. This mode is suitable if you only want to work with the connected monitor.
Welcome! This blog is dedicated to the Internet and computers, or rather was dedicated to them.
Probably, it is immediately clear that for many years no new articles have appeared on the site. Yes, that is the fate of most blogs. Once this project was an ambitious undertaking, and the author, like many others writing at that time, had ambitious plans to become one of the best Russian bloggers. Well, if you look now, of those blogs that were created at the same time as mine, most have already disappeared into eternity. And I simply didn’t have enough time to blog. So yeah, it's not updated anymore. Although once we won the contest "Runet Blog 2011" with this site.
I even thought about deleting all this, but then I reviewed the old materials, and realized that they could still be useful to readers. Yes, some articles are outdated (if I have the strength, they will receive appropriate marks), but the site, for example, can be useful for beginners - here you can read about the basic concepts of the Internet, learn how to configure the Internet, Windows, or even decide to switch to Linux. So look at the categories and choose the one that suits you.
And yet, I hope that this is more than just a blog, but a real guide to the Internet. The site can be viewed in directory mode, where all available articles are structured by category. And, who knows, maybe one day new quality articles will start to appear here.
sander
Picodi.ru is a discount portal from International Coupons, a Polish expert in the field of savings and cheap shopping. The Poles are considered one of the most economical nations in the world, so it is not surprising that this type of project grew out of the Polish startup kodyrabatowe.pl. How can this portal be useful to an ordinary Internet user in Russia?
Modern android phones are more than phones. You get used to the set installed programs, to your call history and text messages, photo collections and more. But time goes by, and the device that suits you completely starts to slow down, fail, or simply loses presentable appearance due to chips on the case or scratches on the screen. There is a question of choosing a new phone and changing android phone. And if we now bypass the issue of choice, then "moving" to new phone remains a serious problem - you absolutely do not want to start all the data from scratch. That's what we'll talk about today.
Most of the readers of this blog, most likely, have never encountered version control systems and will not encounter them in the near future. It's a pity. This extremely convenient invention is widely used by programmers, but, in my opinion, it could be very useful for those who actively work with texts. But, probably, now there is not a single version control system that would be easy to start using for "office" ( Microsoft office) work. Nevertheless, I think that the material presented in the article may be of interest to all readers.
If you have been thinking about how to watch movies on the network and access the Internet from your TV, this article is for you. No, I am aware that some TVs already have Smart TV functionality, but I have never seen it work properly. This is probably why Google recently demonstrated an absolutely amazing device that immediately became a sensation. We are talking about the Chromecast media streamer (Chromkast), a more advanced and affordable version of last year's failed Nexus Q player.
The 2" Chromecast Dongle plugs into your TV's HDMI port and lets you enjoy streaming web content. To control the streamer, you can use any device (tablet, PC, smartphone) based on the operating platform iOS, Windows, Android or Mac OS.
This article is about the device system android memory, problems that may arise due to its lack and ways to solve them. I myself recently encountered the fact that my phone is on android base began to regularly issue messages about the lack of memory when trying to install a particular application. What was very strange for me, given that, according to the description on the market, there should have been about 16GB, and even I increased this amount with an additional memory card. However, there was a problem, and it took a lot of fiddling before I found the right solution that did not require root access or full recovery phone to factory condition.
First of all, look at the connectors on your laptop. On one side you will find a connector for connecting an external monitor. The most common are VGA, DVI and HDMI. On modern devices, you can also find DisplayPort.
Port VGA on a laptop. 
connector HDMI.
After detecting the connector on the laptop, we examine the existing monitor for the presence video port- it is located at the back of the device. 
Ideally, the port on a laptop should be the same as on the monitor, but if there are no identical connectors, adapters (video converters) come to the rescue. Exists a large number of adapters from DVI to HDMI, from VGA to DVI, etc. There are also universal adapters with many interfaces.
How to connect and set up a monitor
Connecting is better when the device is turned off, as some laptops only check for a second display at startup.
To connect, we take a cable with the appropriate connector.

VGA cable

HDMI cable

Cable and DVI connector
A more exotic option is the VGA to miniVGA cable. 
Such a cable can be used, for example, to connect to a TV.
We connect one end to the monitor, and the other to the laptop. 
Immediately after connecting, you will see the same picture on both displays - it will be duplicated (clone mode). 
However, it is not always necessary to display the same image on both the laptop and the monitor. In addition, the resolution is often chosen incorrectly, based on the smallest resolution of the two displays used. Therefore, it will be necessary make settings.
On the desktop, right-click - "". 
If the monitor is not immediately detected, then in the window that opens, click the " Find». 
Then you should determine which of the displays is the main one, which screen will be to the right and which to the left. This can be done using the " Define' in the same part of the window.
Note that in the field Multiple monitors» you can choose to duplicate the image, extend it to both screens, or display it only on one. 
The first option can be used, for example, when showing presentations. In this case, one of the screens is in front of you, and the second is in front of the audience (often a projector is used for such purposes).
The second is the most convenient, and therefore more frequently used. 
When this mode is selected, it becomes possible to change the resolution for each screen separately.
After making changes, click " OK' and let's get to work.
In this mode, you can move icons and files between two screens, which is very convenient when working with a lot of software at the same time. The size of the visible space is doubled. You can watch a movie and chat at the same time in social networks. No need to constantly switch between applications. This will undoubtedly lead to performance improvement your work.
The third option is used, for example, if the laptop screen is faulty and you decide to use another one for your tasks.
If you want to quickly switch between monitors, then there is a combination of hot keys Win + P. Pressing such a combination opens a window for selecting the mode of operation of several screens. This is how it looks for Windows 7. 
For Windows 8 and 10, a pop-up appears " projection» on the right with similar parameters. 
The setting can also be done using specialized utilities. For example, if you have integrated video from Intel, then right-click on the desktop, open the graphics settings and further, as shown in the picture. 
Algorithm projector connection similar.
Many of you have old or broken laptops that are lying around, but some of the parts in them are quite working, so it's a pity to throw away the device. And if you suddenly want to make a second or third additional monitor for your computer, then this laptop will come in handy. Today I will tell you how to make a monitor from a working laptop matrix that can be used everywhere.
The first thing we need is a working laptop matrix. At this stage, you must be 100% sure that it really works, otherwise the execution next steps useless. So my patient HP Pavilion dv9000, in which one of the display mounts is broken and the video module burned out, but the matrix is 17 inches and a resolution of 1440 × 900 is working.
We carefully disassemble the laptop and remove the display, and then the matrix itself. For most devices on the network, there is detailed instructions by disassembly. I also removed the speaker and webcam. As a result, we get approximately the following picture.

1) Jack for connecting LVDS cable.
2) A plug that connects to the backlight inverter.

We look carefully at the stickers and find the matrix model. As you can see, I have a laptop HP, and the matrix from SAMSUNG, we are interested in the inscription LTN170X2-L02, this is the matrix model. The fact that after the “-” sign can be ignored when searching, only the marking is important to us LTN170X2.

If you do not need any video inputs, then you can easily find, for example, a board with one of the inputs you are interested in. By doing so, you can also reduce the cost of the device.

1) 12V power supply input
2) HDMI input
3) DVI input
4) VGA input
5) Audio input
6) Audio output
The following items are included in the package (they may vary slightly according to appearance and connection methods):

1) LVDS cable that connects directly to the monitor matrix.
2) The inverter responsible for the operation of the backlight.
3) Main board with controller.
4) Button interface to adjust image parameters.
5) Cable for button interface connection.
6) Cable for connecting the backlight inverter.
There should be no problems with the connection, it will also not work to confuse the wires. When assembled it looks like this:

Next, we should check if our device works at all. We connect the LVDS cable to the socket in the matrix, there is also a backlight cable on the matrix, we connect it to a free socket of the backlight inverter. We find in the bins or buy a 12V power supply, perhaps it will work from your broken laptop. Be sure to make sure that the plug is easily connected to the socket on the control board. Then we connect the video output of the computer to the video input of the control board with one of three cables (HDMI, DVI, VGA). We supply 12V by plugging our power supply into an outlet. Oops! Nothing happens. Like on a regular monitor, the device has an on / off button. We press the button "ON\OFF" on the button interface. And about a miracle! We see an image. If you still have a black screen at this stage, check if you have connected all the wires correctly, whether they sit well in the board sockets, and whether your power supply is working at all. I got it right the first time.
Next, all this bunch of wires and boards need to be beautifully fixed on the monitor. I screwed all the boards to the rear plastic wall of the monitor, pre-drilling two holes for the LVDS cable and the backlight inverter cable, since they connect directly to the matrix. I also screwed two metal corners to the back wall in order to put the monitor on the table without any problems. You can attach mounts to mount the monitor on the wall if needed. That's what happened in the end, my brutal monitor =)
Where and how can I use this monitor:
The first two points apply only to video cards with multiple video outputs.
1) As an additional desktop. For example, you start a movie on one screen, and on the second you surf the net or type text. And there is no need to open / close, minimize / maximize interfering windows.
2) As a backup monitor. You can take it to another room and watch, for example, a movie or your favorite show already there. My board has an audio input and output, you can easily connect acoustics. It's also not a problem to find a long video cable, I worked with a VGA cable that was over 20 meters long.
3) If you are familiar with Raspberry Pi, then you can also connect this monitor to it without any problems.
P.S. I will answer all your questions in the comments.