Creating push-button forms: Guidelines for performing laboratory work. Creating a button form Creating a main button form in access description
Topic 2.3. Presentation software and office programming basics
Topic 2.4. Database management systems and expert systems
2.4.11. Training database with the main button form "Training_students" - Download
DBMS and expert systems
2.4. Database management systems and expert systems
2.4.7. Creating the main Access database button form
The main button form is created for the purpose of navigating the database. This form can be used as the main menu of the database.
The elements of the main button form are form and report objects. Queries and tables are not elements of the main button form. Therefore, you can use macros to create Query or Table buttons on a button form.
First, create the “Open Query” or “Open Table” macros in the database window with
unique names
- , and then create buttons in button form to call these macros.
- You can create several button forms for one database. Buttons should be grouped on button form pages in such a way that it is clear to the user in which button forms certain commands can be executed (queries, reports, data entry and editing).
- It should be noted that subordinate button forms must have return buttons to the main button form.
- The technology for creating button forms is as follows:
- create a main button form (GKF) page;
- create the required number of pages of subordinate push-button forms (for example, forms for data entry, for reports, for requests, etc.);
create elements of the main button form;
create elements for push-button report forms and forms for entering or changing data;
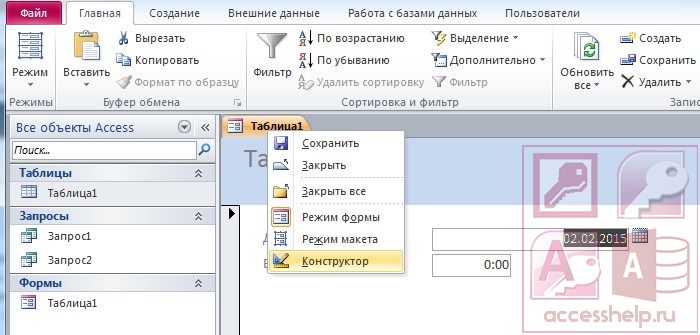
To create the main button form and its elements, you need to open the database (for example, “Student Progress”) and execute the command Service / Utilities / Button Form Manager. If a button form has not been created before, the “Push Button Form Manager” dialog box will open.
![]()
Rice. 2.
In the dialog box, click the “Yes” button, thereby confirming the creation of the button form. As a result, the Main Button Form page will be created.
![]()
Rice. 3.
Next, you can create three more button form pages: Data Entry Forms, Reports and Queries. To do this, click on the “Create” button and enter a name in the window that appears new page“Data entry forms” and click on the “OK” button.
![]()
Rice. 4.
The “Data Entry Forms” button form page will be created. In a similar way, you need to create two more pages, in the end we get four pages of push-button forms, which are displayed in the “Push Button Forms Manager” window.
![]()
Rice. 5.
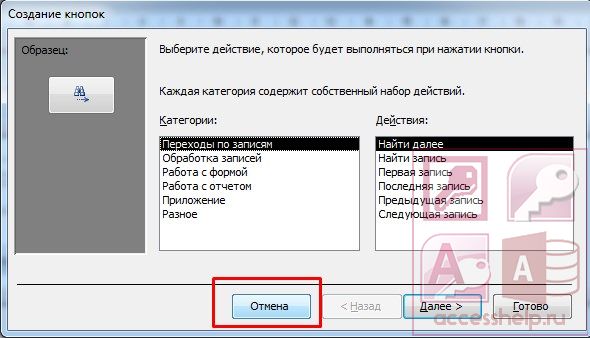
After this, we create GCF elements; to do this, in the “Push Button Form Manager Window”, select the “Main Push Button Form” page and click “Change”, a new window “Changing Push Button Form Pages” will open.
![]()
Rice. 6.
In this window, click on the “Create” button, a new window “Changing a button form element” will open.
![]()
Rice. 7.
In the window we do the following:
- enter the text: Forms for data entry;
- select the command from the drop-down list: Go to button form;
- select a push-button form from the list: Entering data into forms, click on the “OK” button.
The “Edit Pushbutton Form Page” window displays the “Data Entry Forms” button form element.
![]()
Rice. 8.
Using a similar method, you need to create the elements: “Queries” and “Reports”, and then the element (button) “Exit DB”.
![]()
Rice. 9.
As a result, all elements of the main button form will be displayed in the “Edit Button Form Page” window.
![]()
Rice. 10.
The button form appears in the list in the database window area on the Forms tab in the Objects panel, and the Switchboard Items table appears in the lists on the Tables tab.
![]()
Double-clicking on the "Pushbutton Form" text will open the Main Pushbutton Form.
Rice. eleven.
![]()
In order for this form to be displayed when starting the database, you must execute the Tools/Launch Programs command, and in the window that opens, select “Push Button Form” from the drop-down list, in addition, you must uncheck the Database Window and Status Bar checkboxes. You can also enter a title and icon for the application.
But the creation of push-button forms is not yet complete, since there are no elements on the subordinate push-button forms (Data Entry Forms, Reports, Queries). We'll look at how to place elements on subforms in the next section.
Laboratory work
Computer science, cybernetics and programming
Create a main button form that allows you to open the following button forms from it by clicking on the buttons: List of forms List of reports List of tables List of queries and the last item Exit Each button form must contain a list of buttons for opening ALL corresponding database objects. Forms must contain a meaningful title background picture list of buttons with captions. Creating the Main Button Form To create the main button form in ccess, there is a special utility program, Button Form Manager....
c) Parshikov P.A.
Laboratory work No. 9
Laboratory work is carried out according to the chosen topic of the course work!!!.
Create main button form, allowing you to open from it by pressing the buttons, the following button forms:
- List of forms
- List of reports
- List of tables
- List of requests
and the last item Exit
Each button form must contain a list of buttons to openALL relevant objectsDatabase. Form “List of Forms” - buttons for opening all forms , “List of reports” form - buttons for opening all reports , “List of tables” form - buttons for opening all tables , form “List of requests” buttons to openall fetch requestsetc. In forms with a list of objects, the last item should be the “Back” item, which transitions tomain button form.
Forms must containmeaningful header, background image, list of buttons with captions.
Brief theory
The concept of "Main button form"
It is a user-created form with buttons that allows you to access previously created database objects from a single window. Basically, a button form is used as the main menu of an application.
Creating the “Main Button Form”
To create the main button form in Access there is a special utility programButton Form Manager. To open the manager, open the database and on the tab in the menuWorking with databases press the button Button Form Manager.
If the button form was not in the database before, you will be prompted to confirm the creation of the button form, click the button Yes .
After this, the list of forms will appear in the database Button form and in the list of tables Switchboard Items. DO NOT touch the table under no circumstances should you delete or modify it. Form IT IS FORBIDDEN delete and edit with GREAT caution.
After an affirmative answer to creating a button form, a window will openButton form manager, on the list Button Pageswhich has only one button formMain button form.
Fig.1. Button Form Manager
This list can only contain button forms. By clicking on the appropriate buttons you can create, edit and delete forms. Using the button Create you need to add new button forms subordinate to the main one: List of forms, List of reports, List of tables, List of queries. At the click of a button Create window opens Creation , in which you need to specify the name of the button form to be created.

Fig.2. Create window
After adding all the button forms in the listButton Pagesthere should be five forms:

Fig.3. List of added button forms
After this, you need to move on to editing the created button forms and adding buttons to them. Let's start editing withMain button form. To do this, select it in the list and click on the button Change .

Fig.4. Change Button Page Window
The “Edit button form page” window opens, in the upper part of which the name of the button form is indicated, and below is a listElements of this button form. These elements represent the buttons that will be placed on the button form. Using buttonsCreate, Edit and Delete, you can edit the list of buttons on the button form.
The main button form, according to the task, should contain buttons for opening created button forms and the last item Exit . To do this, click on the button Create, a window will open.

Fig.5. Edit Button Element Window
Let's create the first button to open the button form List of forms . We indicate the text that will be next to the button, the command and select the desired button form from the list.

Fig.6. Setting parameters for a button form element
Similarly, buttons are created to open the remaining three button forms with a list of database elements. For button Exit you need to specify the commandQuit the application.

Fig.7. Options for the Exit button
As a result, the structureMain button form will take the form:

Fig.8. The final structure of the main button form
To edit or remove any of the created buttons, select its name in the listand press the button Change or Delete . If you need to change the order of button form elements, select the element in the list and use the buttons Up or Down.
When you've finished creating your button form, click the button Close.
After constructionMain button formLet's move on to editing the forms opened from it, they are empty for now. To do this inButton Form Managerselect a form from the list List of forms and click on Edit.

Fig.9. Changing the form List of forms
You need to add buttons to subforms to open the corresponding objects. In the form List of forms buttons to open ALL forms from your database. Let's fill out the listElements of this button form. To do this, click on the button Create and move on to specifying the parameters of the first button. In the window you must indicate that the button will be labeledForm of enterprise, team Open the form for modification, in the list form Form for entering enterprises.

Fig. 10. Creating a button to open a form
This creates the first button to openForms for entering enterprises. Buttons for opening all other forms are created in the same way. Last button Back should provide a transition toMain button form.

Fig. 11. Creating a Back Button
As a result, we get the structure of the form List of forms , containing a list of buttons for opening forms.

Fig. 12. Form structure List of forms
Click the Close button and move on to editing the form structure List of reports . Add buttons to this form to open reports. In the windowChanging a button form elementspecify the text for the first buttonOpen the report “List of enterprises» command Open report and in the drop-down list we find the reportReport "List of enterprises".

Fig. 13. Creating a button to open a report
Similarly, we create buttons for opening other reports that are in your database. The last thing to do is add a button to the button form again. Back:

Fig. 14. Creating a Back Button
As a result, we get a form with a list of buttons for opening reports and a button to return to the main button form:

Fig. 15. Completed form List of reports
Before you move on to editing the form with a list of tables and queries, you need to study the macros that are used to open tables and queries from button forms.
Macro concept
Macro is an Access object , which, along with other objects, is presented in the database window. A macro consists of a sequence of macro commands. Macro command this is an instruction focused on performing a specific action. Using a macro command, you can open a form, report, print a report, run a query, apply a filter, assign a value, create a custom menu or command bar. The set of macro commands available in Access implements almost any action that is necessary when developing small personal user applications.
We will create macros designed to open tables and queries. These macros will consist of one macro command.
Creating Macros
To start creating a macro in the database window, select on the tab Create Click Macro Button . The macro window will open (Fig. 15).

Fig. 15. Creating a Macro
Macros , making up the macro, are entered into the column Macro command . To enter a macro command, click the button to expand the list of macro commands in this column and select OpenTable to open the table. Table name"Enterprises" select from the list in the sectionMacro Argumentsat the bottom of the macro window (Fig. 16).

Fig. 16. Adding Macros
The following macro commands are possible:
OpenTable opens the table. The name of the table and its opening mode are specified by the arguments of the macro.
OpenRequest opens a request. The name of the request and the mode of its opening are specified by the arguments of the macro.
Once a macro command has been entered, the macro can be saved with a name, for example,Macros for opening are created in the same way ALL five tables you created in your database.
After this, you can proceed to creating a macro to open a request. In this case, you need to select a macro command OpenRequest. The request name is selected in the corresponding list, the opening mode is left as is, do not change. Macro for opening a request The average age is:

Fig. 17. Editing a macro to open a request
As a result, macros for opening ALL tables and ALL SELECT queries should appear in the list of macros.

Fig. 18. List of macros
After creating macros, you can start editing button forms again. OpensButton Form Managerand start editing the form List of tables . We add buttons to it to open all database tables. To do this, in the window for adding a button to create the first one, specify the textOpen the “Enterprises” table,select from the list of commandsRun macro, and in the list of macros selectMacro for opening the Enterprise table.

Fig. 19. Creating a button to open a table
Similarly, adds buttons for opening other tables and the last button Back to return to the main button form.

Fig.20. List of added buttons to the form List of tables
After that we go to the windowButton form managerand start changing shapeList of requests.In this form we add buttons for opening requests. For the first button, specify the textOpen request Average age, team Run macro, and macro Macro for opening the query Average age.Similarly, we add buttons to open ALL selection requests and at the end we create a button Back .

Fig.21. Editing the Request List form
Thus, all button forms are completed and can be closedButton Form Manager. You can launch a button form from the list of forms by openingPush-button form.

Fig.22. Built button form
Now you need to edit this form in the designer, remove unnecessary color panels, add a meaningful title and select the item from the toolbar Drawing , stretch the drawing on the form and in the window that opens, select the drawing you found for the subject area (in our case, this is a drawing with an enterprise).
In order for the buttons to be located above the picture, you need to select the picture with the mouse, and then in the menu Format select Send to back. The buttons can be placed closer to the upper left corner, the buttons DO NOT DELETE. The resulting button form allows you to conveniently access any objects of the created database.

Fig.23. Created button form
Output of the "Main Button Form" when opening the database
Last step specify that the button form should be launched when the database is opened.
- In the Tools menu select teamLaunch parameters.
- In the dropdown listForm/page outputselect from the dropdown list Button form.
- In the window you can also specify Extra options applications: title, icon, etc.
The button form we created will open when you open your database.
PAGE 2
As well as other works that may interest you |
|||
| 51775. | The lesson is the main form of playing sports games at school | 116.5 KB | |
| Lesson duration ranges from 30 45 minutes to three or more hours. The lesson plan involves dividing it into several interconnected parts in which various tasks are solved. The duration of the parts depends on the total duration of the lesson, the preparedness of the students, the conditions of the lesson, etc. The preparatory part aims to organize and prepare the students to perform the main task of the lesson. | |||
| 51777. | Development of Ukrainian language | 59.5 KB | |
| Meta: become aware of the historical stages of the development of the Ukrainian language; with the trends in the development of the Ukrainian language and vocabulary in our days; instill patriotism in the Ukrainian language as a sovereign and motherly love; develop respect for logical, imaginative thinking, improve skills, work with a helper, and refine the vocabulary of students. Science confirms that over the course of a decade, the vocabulary of the language changes by about 25. From the turn of marriage to national traditions... | |||
| 51780. | A comprehensive description of the development of culture and literature of the 19th century, the stylistic development of literature. Realism as directly in secular literature | 2.76 MB | |
| Lesson type: combinations. Guy de Maupassant HIDE LESSON I. Guy de Maupassant: Please me; comfort me; let me die; rozchulte me; let me shudder; let me cry; give me a reason for thinking about the beast before the end of the lesson. Stunned by the topics in lesson IV. | |||
| 51781. | TURNINGS TO JAZZ | 530 KB | |
| Jackson points out how pop music plays an important role in people’s lives; explain to students the meaning of understanding the spirituality of blues jazz improvisation;. develop vocal choral skills of zokrem, skills of cantilena singing in accordance with the rhythm of hearing; develop interest in creativity of Russian pop stars; feel the aesthetic taste of learning; develop students' interest in light music and jazz FORMATION OF COMPETENCIES: CREATIVE MUSICAL LIVING MUSICAL... | |||
| 51782. | Current school graduate – special features have been formed | 36 KB | |
| The current school graduate has formed the speciality of the teaching profession and human knowledge, which has a constant and uninterrupted penetration into the complex spiritual world of people. The main characterological guidelines for a graduate’s specialness are unique. This particularity has a high level of self-awareness and self-discipline. So much so that he respects himself and is aware of his value and the value of other specialness is meant to bear responsibility before oneself and to be of service. Humane specialness shows mercy, kindness, giving to... | |||
Hi all! In this article I will tell you how to create a button in the database Microsoft Access.
Creating buttons on a form does not depend on what version of Access you have installed (2003, 2007, 2010, 2013 or 2016). In this article I will show 2 ways to create buttons on a form in the Acceess database: using a wizard and using a macro.
How to do it?
Step 1: Create a form
If you don't have a form, you need to create one. You can see more details on how forms are created. Go to the “Creation” tab, “Form Wizard” item. Next, select the table or query on the basis of which the form will be created. Next, select the required fields and click “Next”.
Choose appearance forms.

Set a name for the form and click “Finish”.

Open the form in design mode. How to create a button in Microsoft database Access will be described in the second step.
Step 2: Create a button using the wizard
On the toolbar, select the “Button” item and place it on the form. The Button Wizard window appears. Here you need to select the required category and set a specific action. Select “Previous Entry” and click “Next”.

Choose what to display on the button: text or image. Leave the default image and click “Next”.

Set a name for the button and click “Finish”.


Now let's create a button with text. Let’s go to the button wizard again and select “Next entry”.


Step 3: Create a button using a macro
On the toolbar, select the “Button” item and place it on the form. The Button Wizard window appears. Click “Cancel”.

Double-click on the created button to open the properties window. Go to the “Events” tab, “Button Press” item. Click the button with three dots.

Select “Macros” and click OK.


In this lesson, the user will learn what form creation capabilities the mode offers Constructor, will see how to add controls to a form, and will also look at how to create a main button form that will allow you to combine forms from different tables with each other.
Topic: Technologies for searching and storing information
Lesson: Creating the main button form and controls
In the previous lesson we looked at the mode of working with forms Layout. There is another mode for working with forms, it is called Constructor. In this mode, we can place additional elements on the form, the so-called controls or dialog box elements. These are well-known elements to us: buttons, lists, list boxes. We can create all these elements in the mode Constructor.
As soon as we go into mode Constructor form, a tab immediately appears on the ribbon Constructor, and on it we will see all the controls available to us (Fig. 1). It is these elements that we can place on forms.
Rice. 1
Let's see how we can add these elements to the form in practice. To do this, let's go to Design mode (Fig. 2), then the Design tab will automatically appear on the ribbon, and we will see all the available elements (Fig. 1).
Let's select an element button(Fig. 3), right-click on it and mark the dimensions of the future button on the form (Fig. 4). A button creation dialog box will automatically appear where we can select a category and action (Fig. 5). For example, find the entry, and click Next. On the button we can place either text or the corresponding standard image or the overview icon (Fig. 6). Let's click next and we will see that the next step is to set the name of the button, after which we click Finish (Fig. 7). The button has appeared, we can adjust the dimensions and switch to the mode Form in order to see how the button will be reflected on the form and try out its action (Fig. 8). Let's click on it; yes, indeed, as it should have been, a window appeared Search and replace(Fig. 9). Let the surname Blok be the example, let the search be carried out in the category “museum-apartments of St. Petersburg”, let the match be in any part of the field and look through all records (Fig. 10). Let's click next, the button actually works correctly, and the information we need is found in the table (Fig. 11).
Rice. 2

Rice. 3

Rice. 4

Rice. 5

Rice. 6

Rice. 7

Rice. 8

Rice. 9

Rice. 10

Rice. eleven
In addition to command buttons, you can also place lists on the form. Selecting from a list provides more Fast passage to the desired entry. Let's see how you can create a drop-down list on a form.
Let's create another control on the form and switch to the mode Constructor and select the control Combo box(Fig. 12), let us designate its location and dimensions (Fig. 13). After this a dialog box will appear Creating Combo Boxes, in which we can choose how the combo box will receive the value, select, for example, the third option and click next (Fig. 14). Let's select a field Name and click Next (Fig. 15) and Finish. But we see that the title field already existed, it turned out to be an overlay, but we can simply delete the second title. Let's switch to mode Form, to try out the list. The list opens, we select a name museum-apartment A.S. Pushkin(Fig. 16) and we see that there is a transition to her picture (Fig. 17). That is, the combo box works.

Rice. 12

Rice. 13

Rice. 14

Rice. 15

Rice. 16

Rice. 17
If there is not one table in the database, but several and, accordingly, several forms, then you can create main button form, containing buttons, and by clicking on the buttons we can load a particular form.
Let's look at the steps involved in creating the main button form.
If the database has several tables and a corresponding number of forms, then it makes sense to create a main button form, which will serve as a kind of screen saver for the database in which all other forms can be loaded. Click on the tab on the ribbon Working with databases(Fig. 18), select the button form manager command there, and the message appears: Cannot find the button form in this database, so we press the button Create(Fig. 19). A dialog box will appear Button Form Manager, in which we can select the command Change, a window will appear Changing a button form page. Let's create the first button on it (Fig. 20). Let the text of this button be museum apartments and the command will be executed Open form for modification, and the form is . Let's create another button, which we'll call writers, when clicked the command will also be executed Open form for modification and shape writers(Fig. 21). Let's close the open dialog boxes, and we will see in the list of objects that new forms and corresponding tables have appeared (Fig. 22).
Let's open the button form. By default, it has this design (Fig. 23), there are two buttons on it, when you click on the first button, you go to the form museum-apartments of St. Petersburg, by clicking on the second one we will open the form writers, i.e. the button form works correctly. Now let's try to change its standard design, go to the mode Constructor, and we will see the properties window here. Thus, we can select any of the elements and change, for example, the background color (Fig. 24). And then we can place, for example, an image (Fig. 25). To do this, select an arbitrary image on our computer and go to the mode Form. Now our main button form has taken the following form (Fig. 26). You may not necessarily have an image of a computer, but the drawing that you chose at the previous stage. We can note that our design has changed for the better.

Rice. 18

Rice. 19

Rice. 20

Rice. 21

Rice. 22

Rice. 23

Rice. 24

Rice. 25

Rice. 26
Bibliography
- Ugrinovich N.D. Computer science-9. - M.: BINOM. Knowledge Laboratory, 2012.
- Gein A.G., Yunerman N.A. Computer science-9. - M.: Education, 2012.
- Solovyova L.F. Computer Science and ICT. Textbook for 9th grade. - St. Petersburg: BHV-Petersburg, 2007.
- Lessons-tva.info().
- Office.microsoft.com().
- Lessons-tva.info().
Homework
- What operating modes does the Form object support?
- How to add controls to a form in MS Access?
- What is the main button form?
- Is it possible to visual editing forms?
Typically, to work with an application, a special form is created, which is called the Main Switchboard and contains buttons that allow you to select the main functions or subsystems of the application. Such a form can be created, as usual, using the Form Builder, or you can use a special wizard called the Swithboard Manager. A Main Switchboard was created in the Northwind database without using a wizard. Let's see how to create a similar form using the Button Form Manager.
Select menu command Service, Utilities, Button Form Manager(Tools, Database Utilities, Swithboard Manager).
Since the database does not contain any button forms (at least not known to the wizard), a dialog box appears asking whether to create a button form. Click Yes.
Now the wizard creates a table “Switchboard Items” and a button form (Switchboard), which we will look at later. After this, a dialog box appears with a list of button form pages (Fig. 14.15).
Rice. 14.15. Dialog window Button Form Manager
This window lists all pages of the button form (there may be several of them). So far, only one page has been created, and we see it in the list. To create on it necessary buttons, press the button Change(Edit). A dialog box (Edit Switchboard Page) opens (Fig. 14.16), containing a list of form elements.

Rice. 14.16. Dialog window Changing a button form page
In this window, you can add, edit, and delete elements from the selected form page. You can also change the order of their placement on the page (using the buttons Down(Move down) and Up(Move up)).
In field Button name(Swithboard Name) We can change the standard name if necessary. The list of form elements is still empty and only one button is available Create(New). To create the first element, click this button. The Edit Switchboard Item dialog box appears (Fig. 14.17).

Rice. 14.17.
In field Text(Text) enter the name of the button to be created, for example Products. Second field Team(Command) allows you to define the action that will be performed after clicking this button. The list of these actions is presented in Fig. 14.17. There are 8 of them in total. This can be opening a form in the mode of adding records or editing, opening a report, running a macro or VPA procedure, launching the wizard to edit a button form, moving to another button form and exiting the application. Let's select, for example, Open form to edit(Open Form in Edit Mode). Then in the next field you need to enter the name of the form to open, “Products List” (Fig. 14.18) and click the button OK.
Comment
The name of the last field in the form in Fig. 14.18 changes depending on the selected command in the second field. If the action selected in the list does not require specifying an argument, the third field disappears altogether.

Rice. 14.18. Dialog window
Similarly, we will add buttons for other application objects: “Types” (Categories), “Suppliers” (Suppliers), “Orders”. Let's create a button Reports, which will open the Sales Reports Dialog form and an exit button from the application Exit. Let's close the dialog box Changing a button form page(Edit Switchboard Page) by clicking the button Close(Close).
The number of buttons on one form page is limited to 8. This does not mean that you cannot create more of them, you just have to do it manually. However, there is another way to overcome this limitation. If the number of actions that you would like to place on buttons exceeds 8, you can group some of the actions on a separate page of the button form. For example, let's create another page of our button form and place customer action buttons on it. To do this, in the dialog box Button Form Manager(Switchboard Manager) click button Create(New). In the dialog box that appears (Fig. 14.19), enter the name of the new page Clients and press the button OK.

Rice. 14.19.
Further in the page editor already in a known way let's create the elements: Customers, Customer stickers, Customer phone numbers, Customer orders, which open the corresponding forms. Don't forget to create a button that will allow you to return to the Main Switchboard. To do this you need to associate the command with it Go to button form(Go to Switchboard) (Fig. 14.20). Close this window to return to dialog box Button Form Manager(Switchboard Manager). You should have two pages appear in the list of pages.
Now you need to edit the first page - add an element to it that can be used to go to the second page. To do this, select the page (Main Switchboard) in the list and click the button Change(Edit). In the page editor window, add a new Clients element, also using the command Go to button form(Go to Switchboard).

Rice. 14.20.
Now both pages are linked. You can close the wizard window and see what we have done by opening the Switchboard form. A window similar to the one shown in Fig. should appear. 14.21.

Rice. 14.21.
You can check how the buttons work. For example, if you press the button Clients, The contents of the form will change and you will see the second page of the form. The form doesn't look very attractive, but now you can go to Design mode and customize its appearance using all the Design tools.
When you open this form in Design mode, you will not see its elements; the form seems completely empty. However, if you open the module associated with this form, you will see a fairly large amount of code that organizes the form to work properly. Moreover, for this purpose, information stored in a special table is used, which we mentioned at the beginning of the section: Switchboard Items(Pushbutton elements). You will see this table in the list Tables(Tables) windows Database(Database). In this case, it will look something like the one shown in Fig. 14.22.

Rice. 14.22. Table "Pushbutton Form Elements"
The first column contains the page ID, the second column contains the number of the element on the page. This number determines the order in which elements will appear on the page. The third column contains the text that appears to the right of the button. The last two columns define the command associated with the element: the command code (as we remember, there are 8 of them) and its argument. Code 0 corresponds to a special element that specifies the title of the page and defines its beginning.
Thus, using the Switchboard Manager, you can create a hierarchical system of switchboard pages, which can be an alternative to the usual hierarchical menu. True, unlike a menu, this form is not constantly visible on the screen; it can be covered by other forms. If you want to allow the user to open several forms and reports at once, you will have to create a button on the toolbar that would allow you to display the Main Switchboard at any time.