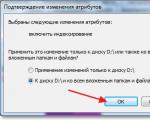
Microsoft Access. Drawing objects in the form. How to Create a Button in Microsoft Access Opening the Attachments Dialog Box from a Form or Report
- to add a background image to the form, for example, to the main button form, you need to start the database ("Student performance" with the main button form) and click on the button on the toolbar Database window.
- the Database window will open, in which open the button form in the mode Constructor.
- open a dialog box Button form properties which can be opened in several ways. Let's consider one of the ways: open a window Properties by right-clicking on the button form and select the command Properties... A window will open Drawing: Picture on tab Layout.
- to enter the path and name of the picture, you need to click on the browse button, a dialog box will open Selecting a pattern.
- in this window you must specify the name and type of the file. By default, Microsoft Office Access supports the .bmp, .dib, .wmf, .emf, and .ico file formats. Therefore, select a picture with one of the specified extensions and click on the button OK in the dialog box Selecting a pattern.
- further in the window Drawing specify the type of picture, it can be embedded or linked. The main differences between binding and embedding (embedding) are where the data is stored and how the data is updated after it has been placed in a document. The embedded drawing is an integral part of the form, i.e. will be stored in the database, increasing its size.
A linked object is data (an object) created in one file and inserted into another file with support for linking between files. The linked object is not part of the file in which it is inserted, but is stored in the original file in one of the PC directories, without increasing the size of the database. If a picture or company logo needs to be placed on each form and in reports, then it is advisable to insert the picture as a linked object.
- select the embedded image, since it is an integral part of the database, which ensures copying (downloading) of the database file from the site by Internet users.
- the next step is to set the size of the picture. The scale of the figure has the following meanings.
Access 2002 allows you to specify not only smooth colors as the background of a form, but also bitmap images stored in a variety of graphic formats, such as WMF and BMP. Access 2002 ships with several bitmap graphics, which are stored in the Microsoft OfficeOfficelOBitmapsStyles folder.
To set a background image for a form:
- In Design mode, select the entire shape. To do this, left-click on the square in the upper left corner of the Form Builder window, where the vertical and horizontal rulers intersect. After selecting the shape, a black square will appear at the intersection of the rulers.
- On the toolbar Form constructor(Form Design) click the button Properties(Properties). The form properties window will appear (Fig. 5.24).
Rice. 5.24. Form properties window
- Expand the tab Layout(Format) in the properties window of the form and use the scroll bar to move to the bottom of the list of properties, where the property is located Drawing(Picture).
Rice. 5.25. Dialog window Selecting a pattern
- In the property field Drawing enter the path and file name of the drawing or use the Builder: place the insertion point in the field Drawing, then press the button Build(Build), which will appear to the right of the field as a small square with an ellipsis on it, after which a dialog box will open Selecting a pattern(Insert Picture) (Fig. 5.25), with which you can find and specify the required picture file. This dialog box is the standard Windows file open dialog box. After the picture file is found, select its name, and then press the button OK. Access will display the path and file name in the property box Drawing.
- To close the form properties window, click the button Close(Close) at the top of the window.
Unlike background colors, the background is applied to all sections of the form. To remove the background picture, just remove the content of the property text box Drawing.
Also, using the properties grouped in the tab Layout form properties window, you can customize the display of the background image. Property Pattern type(Picture Type) defines the method that Access uses to attach a picture to a form. Select an item from the drop-down list of this property Rooted(Embedded) if you intend to distribute the application between users and the form should not use external files that can be moved or deleted. If there are many shapes using the same background, select Connected(Linked), which will reduce disk space usage by including a wallpaper on a form by linking to a picture file.
Using the property The scale of the drawing(Picture Size Mode) You can define the size of the wallpaper. To display the picture in its original size, in the drop-down list of this property, select the item Fragment(Clip). When choosing a value Fit to frame(Stretch) the picture is stretched or shrunk horizontally and vertically to fit the shape; in this case, it is possible to change the proportions of the picture. Selecting a value Fit to frame(Zoom) will stretch or shrink the picture proportionally to the maximum possible size without cropping the picture.
To determine the position of the wallpaper, select one of the following property dropdown items Aligning the picture(Picture Alignment): Top left(Top Left), Top right(Top Right), Center(Center), Bottom left(Bottom Left), Bottom right(Bottom Right) either Center of the form(Form Center).
Comment
To have the background image centered on the form and not on the form window, set the property Aligning the picture meaning Center of the form, not Center.
If the property Mosaic filling(Picture Tiling) is set to Yes, then in the form window or in the entire form (depending on the value of the property Aligning the pattern) a repetitive image of the pattern is displayed.
After you change the value of a property, the result of that change is immediately displayed on the form.
Form printing
The form, like any other document, can be printed. First, you need to prepare the form for printing.
1. Open the sample database Sales department.
2. In the Navigation Pane, double-click the name of the form Main form Clients to open it.
3. Right-click on the header of the form and select the item Constructor.
4. Now right-click in the data area and select Properties... The properties window discussed in the previous sections will open.
5. In the properties window go to the tab Layout and for property Striping background color specify a color similar to the background color.
Form data can be printed out by interleaving the color of the data area so that you can easily see where the data area of another record begins. Another method that can be used is to output data for each record from a new page.
1. Right-click in the annotation area and select Properties... The properties window will open.
2. In the properties window go to the tab Layout and for property Output mode indicate Screen only.
There are no annotations in our form, so there is no need to print the annotation area.
3. Go to the tab Constructor and from the group Control elements select tool Insert page break.
4. Specify the location for the page break by clicking on the bottom edge of the data area.
The form is now ready to print. You can use the preview function to check what the printed data will look like.
1. Open the main menu of the application by pressing the button Office in the upper left corner of the Access window.
2. In the menu, select Seal.
4. In a group Scale select a two-page layout on one sheet (Figure 3.25) to see how the first and second pages will look.
Rice. 3.25. Preview
5. Press the button Seal
in the tab Preview... A window will open Seal(fig. 3.26).
Rice. 3.26. Print window
6. In the field Name select your printer from the list of printers installed on your system. In field State the printer is ready to print. If the condition is different from Ready, select a different printer or troubleshoot.
7. If you want to print to a file, select the checkbox. print to file group a printer.
8. In a group Print specify the range of pages to print.
9. In a group Copies specify the number of copies.
10. Press the button Customization, after which a window will open Page settings(fig. 3.27).
Rice. 3.27. Page Setup window
11. In a group Fields specify the sizes of the fields. The results of the changes you make are displayed in the preview window. Sample.
For a split form, you can also specify which part to print.
12. Press the button OK.
If you want to check the properties of the printer, press the button Properties... The window that opens and its contents depend on the type of printer.
13. When ready to print, press the OK.
14. If you are printing to a file, a window will appear Print to file(fig. 3.28). Specify a file name and click OK.
Rice. 3.28. Print to file window
15. If you have selected an existing printer for printing, a message will immediately appear informing you that the printing is in progress. Now you can use any form in Microsoft Access 2007. In the next section, we'll look at using a form as an interface for working with data.
Next chapter>
|
Change the background color of a form and its elements The main parameter that determines the appearance of a form is its background color. Therefore, when choosing a background color, it is necessary to be guided by the purposes for which the developed form is intended and how it is planned to use it in the future. As a reminder, it is better to use less vivid colors for printed forms, since a colored background or background with a pattern will require a lot of printer consumables. The background color of a section of a form or its element is determined by the value of the property Background color(Back Color). In a form created using the Form Wizard, the background of all its sections depends on the design style selected when it was created. For example, an autoformat was applied to the "Form_Employees" form Standard(Standard), which sets the background color to light gray. To change the background color of a section of a form or its element:
Note that the background color of a section of a form in Access is set independently of the background color of other sections. Therefore, in order to change the color of all sections, you need to set a new color for each section separately. The background color of a section of a form does not affect the background color of controls within it. You can also choose a different background color and font color for each control. For control labels, a transparent background color is usually set, that is, the background of the label is used the part of the background of the section of the form that it occupies. By default, text boxes use a white background color, so the color of the text boxes (and the data they contain) contrasts with the background color of the form. You can set a transparent background color not only for labels, but also for controls such as text boxes and drop-down lists. To do this, select a control of one of the mentioned types, and then in the list Fill / background color select item Transparent(Transparent). Note that applying a transparent background color to the entire section of the form is not allowed. Setting a transparent background to a text box or drop-down list will have the following effect: in Shape mode, the color of this control will become transparent when that control is not active, that is, when the focus (insertion point) is on another control. When the insertion point is placed in this text box or drop-down list, it will take on the opaque background color that was previously assigned to it. An example of this display of fields can be seen in the Customer Orders form in the Northwind demo database (these are the Company Name and Country fields). The fact is that the value "transparent" does not actually correspond to a property of the element. Background color(Back Color), and the property Background type(Back Style). The background type of an element can take one of two values: Normal(Normal) (when losing focus by an element does not change its color) or Transparent(Transparent). Hello everyone! In this article I will show you how to create a button in Microsoft Access database. How to create a button in Microsoft Access databaseThe creation of buttons on a form is independent of which version of Access you have installed (2003, 2007, 2010, 2013, or 2016). In this article, I will show you 2 ways to create buttons on a form in the Acceess database: using a wizard and using a macro. How to do it?Step 1. Create the formIf you don't have a form, you need to create one. More details on how forms are created can be found HERE... Go to the "Create" tab, the "Form Wizard" item. Next, select a table or query, on the basis of which the form will be created. Next, select the required fields and click "Next". Choosing the appearance of the form.
Set the name of the form and click "Finish".
Open the form in design mode. How to create a button in Microsoft Access database will be described in the second step.
Step 2. Create a button using the wizardOn the toolbar, select the "Button" item and place it on the form. The Button Wizard window appears. Here you need to select the required category and set a specific action. Let's select "Previous entry" and click "Next".
Choose what is displayed on the button: text or image. We leave the picture by default and click "Next".
Give the button a name and click Finish.
Now let's create a button with text. Let's go to the master of buttons again, select "Next entry".
Step 3. Create a button using a macroOn the toolbar, select the "Button" item and place it on the form. The Button Wizard window appears. Click "Cancel".
Double click on the created button to open the properties window. Go to the "Events" tab, item "Pressing the button". Press the button with three dots.
We return to the "Table 1" form. Let's rename the button, set the label "Exit".
Go to the form mode and check how the "Exit" button works. The microsoft Access app should close. In this article, we have discussed how to create a button in the Microsoft Access database. If you need a ready-made Access database, then check out the list provided HERE. Microsoft Access provides the ability to insert pictures into forms and reports. The use of pictures can improve the appearance of the forms and reports you create. For example, you can include a company logo in reports, and in the form you can provide an opportunity to view not only data about company employees, but also their photographs. Special controls are used to insert pictures into forms and reports - free and attached object frames (Unbound Object Frame, Bound Object Frame), as well as a control Drawing(Image). How you insert a picture depends on how you intend to use it.
To add a background image to a form:
Comment Several standard wallpaper files are located in the MICROSOFT OFFICE \ OFFICE \ BITMAPS \ STYLES folder.
Rice. 15.1. Dialog window Selecting a pattern
An example of using a picture as a background in a form is shown in Fig. 15.2. The background image is inserted into the report in the same way. An example of using a picture as a background in a report is shown in Fig. 15.3. The picture can be inserted into the form and as a form control. There are two types of controls that can be used for this: Drawing(Image) and Free object frame(Unbound Object Frame).
Rice. 15.2.
Rice. 15.3. If you do not need to directly change the picture in the form or report, then it is better to use Drawing(Picture) (the form will run faster). If you plan to change the picture frequently, you need to insert it using the free object frame. To insert a control Drawing(Image), you need:
Rice. 15.4. Using an element Drawing to insert a picture into a form To insert a picture into a form or report using a free object frame, you must:
If you have yet to create a drawing, follow these steps.
Rice. 15.5. Window Microsoft Access, used to insert a picture using a free object frame
If you already have a file with a picture, in order to insert it directly from the file, you need to:
Rice. 15.6. Window Microsoft Access when inserting a picture from a file into a report using a free object frame
Rice. 15.7. Insert a picture Microsoft Paint to the report using a free object frame
An example of inserting a picture created using Microsoft Paint into a form using a free object frame is shown in Fig. 15.7. After inserting an object, you can change its dimensions and proportions using the property Setting dimensions(Size Mode). In most cases, changes to a free object can be made in the Design mode of a form or report. In order to be able to modify an object in form mode, you must set the property Access(Enabled) the free frame of the object to Yes, and for the property Blocking(Locked) - value No(No). To edit an object, double-click on it. To do this, it is only necessary that an application be installed on your computer in which a file of this type can be edited. An example of editing an embedded bitmap is shown in Fig. 15.8.
Rice. 15.8. An example of editing a bitmap using Microsoft Paint To exit the editing mode, just click outside the picture. Unlike other controls on a form, which are associated with records in the source table, the picture in the free frame of the object does not change as you move through the records in the form — it is associated with the form itself, and not with the data that is displayed on the form. Pictures that are stored in table records are displayed on the form using an attached object frame. Access tables use a special field type to store pictures and other OLE objects: OLE Object(OLE Object). Control element Attached object frame(Bound Object Frame) is created in one of the standard ways:
Rice. 15.9. You can insert a picture into a table field both in a table opened in the Tables mode and in a form. For this you need:
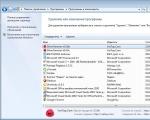
The picture will be inserted into the record in the table. In this case, in the Shape mode, a picture or other object will be automatically displayed on the screen. In Tables mode, only the object type will be displayed, for example Bitmap drawing. Graphic files are inserted either directly or using separate graphic filters. These filters are installed during the installation of Microsoft Access. You do not need a graphics filter to embed Enhanced Metafile (EMF) files, Windows bitmaps (BMP, RLE, DIB), Windows Metafile (WMF), and Icon (ICO) files. However, such filters are required to insert all other graphics format files listed below: AutoCAD Format 2-D (DXF) Computer Graphics Metafile (CGM) CorelDRAW (CDR) Encapsulated PostScript (EPS) Graphics Interchange Format (GIF) JPEG File Interchange Format (JPG) Kodak Photo CD (PCD) Micrografx Designer / Draw (DRW) PC Paintbrush (PCX) Portable Network Graphics (PNG) Tagged Image File Format (TIFF) Targa (TGA) WordPerfect Graphics (WPG) HG Graphics Language (HGL, PLT) Macintosh PICT (PCT) There was a task of storing (loading, displaying) pictures (photos, etc.) in an Access database. At first glance, an experienced programmer ;-) nothing is easier - we store pictures in a table field with a type, and display them on forms using a control Attached object frame, well, or if required Unbound Object Frame (Bound Object Frame)... But it was not there!; It turned out that if you write data directly (in Visual Basic code), for example, using the method AppendChunk, in a field with the type OLE Object Field, then in the control Attached object frame the image just isn't displayed like that. It is displayed only if you load data into this field using the context menu of the field itself or the specified control by selecting correct OLE object type (something like Picture, Picture ...). Such flexibility and clever data processing did not suit me very well. A control with a beckoning type Image designed to work exclusively with static images: at the design stage (well, in general, and from the Visual Basic code), you can specify a file on disk that will be displayed on the form. After examining the DB of examples - Northwind in the English version, Borey in Russian - and having scanned the Internet pretty much, it became clear that the lack of normal work with images in Access is a generally recognized fact. There are two options: 1. Storing pictures in the form of files on the disk, and the paths to them in the database. Displaying on a form using a control Image by assigning the path as a value to the property Picture. 2. Storing pictures in the database in the fields OLE Object Field... Similar display on a form using a control Image... In this case, the method is used to download the file AppendChunk, and to display a picture, the data is uploaded to a temporary file using the method Getchunk, the path to the resulting file is assigned to the property Picture control element. This method is given with an example. The disadvantage of the first method is that when moving the file storage directory, the paths to the files saved in the database must be correctly changed. The disadvantages of the second method - you need to figure out how to achieve the uniqueness of the temporary file name (since theoretically several users can work with the database "from the same place"), and direct work with files on the disk still slows down the work. And both of these methods are not suitable for use in Continuous Forms, but only in Single Form. Already inclined to the 2nd option, as more acceptable, a thought flashed - and not try to use the control Image not only for display, but also for converting data into the desired graphic format using the property PictureData object Image?! And it worked! No temporary files are needed (although, of course, for Tape form it still does not fit, but this is not critical). So, the idea is that the file is loaded by assigning the path to it to the property Picture control element Image, and then reading data from the property PictureData- in this way we ensure that the data is saved in a format that Access is guaranteed to display. And the display of the picture is performed by reading data from the field with the type OLE Object Field and assigning them to the property PictureData control element. Example. Let in our table MyTable there is a field MyImage type OLE Object Field... On the form MyForm we need a control Image - MyPic... At the same time, in order to place this control on the form, you must select a picture, and then in the designer in the property Picture point out (absent) ((none)) - with brackets. Answer affirmatively to the question about deleting the picture. The download can be done like this: Set dlgFile = Application.FileDialog (msoFileDialogOpen) dlgFile.AllowMultiSelect = False strFilePath = Trim $ (dlgFile.SelectedItems (1)) MyPic.Picture = strFilePath Set rs = CurrentDB.OpenRecordset ("MyTable", dbOpenDynaset) rs.AddNew MyPic.Picture = "" "clear picture, if necessary Property Picture(Image) lets you define a bitmap or other type of image for a button, Image control, radio button, page in a set of tabs, or the background of a form or report. Returns a read / write value of type String. expression.Picture expression(necessarily). An expression that returns one of the objects from the Use list. RemarksProperty Picture contains the value "(bitmap)" or the path and file name of the bitmap or other image type that you want to display. This property can be set in the following ways: On the property page. Click the button Build to the right of the property box (for buttons and radio buttons). If from the list Available drawings select one of the bitmap files, the property value will be "(bitmap)". Using a macro. Using Visual Basic for Applications (VBA) Code. You can use a string expression that includes the path and name of the picture, as shown in the following example: btnShowLogo.Picture = "C: \ Windows \ Winlogo.bmp" Using the command Image in a group Elements and fields in the tab Constructor in design mode (for images or backgrounds on forms and reports), which allows you to select a bitmap or other type of image. By default, this property is set to "(absent)". After the image is loaded into the object, this property is assigned the value "(bitmap)" or the path and name of the image file. Deleting the "(bitmap)" value or the path and file name of a picture from the property cell removes the picture from the object. The property then gets the value "(missing)" again. If for property PictureType(Picture Type) is set to Embedded, the picture will be saved with the object. You can create bitmaps in Microsoft Paintbrush or other applications that support this feature. The image file must have BMP, ICO or DIB extension. It is also allowed to use files in WMF and EMF formats and any other formats for which a graphic filter is available. All graphics are supported in forms, reports, and image controls. Only bitmaps are supported for buttons and switches. The buttons can display either captions or pictures. If both are assigned to the button, only the picture will be visible, but not the signature. When you delete a picture, the caption becomes visible. Microsoft Office Access 2007 displays the picture in the center of the button and crops it if it is larger than the button. Advice To create a button or switch with a caption and picture, you can add a caption to the bitmap and assign it to the Picture property of the control. ExampleThe following example sets the background image "Logo.gif" for the "Purchase Order" report. Reports ("Purchase Order"). Picture = _ Popular in the heading:
© 2021 Interesting and useful programs
|