Microsoft access labs. Microsoft Access Lab Information technology in the industry
Transcript
1 Lab 1 Introduction to Access. Creation of tables Database (DB) is an ordered collection of data intended for storage, accumulation and processing by means of a computer. To create and maintain databases (update them, provide access on request and issue data on them to the user), a set of language and software tools called a database management system (DBMS) is used. 1. Access database objects Access database objects include: 1 Tables are designed to store data in an orderly manner. 2. Queries are designed to search, retrieve data, and perform calculations. 3. Forms are designed for easy viewing, changing and adding data in tables. 4. Reports are used to analyze and print data. 5. Data access pages are designed to view, enter, update and analyze data over the network or from anywhere on your computer. 6. Macros are used to execute a common set of macros that process data. 7. Modules are designed to describe instructions and procedures in the VBA language. The main object of the database is a table, which consists of records (rows) and fields (columns). At the intersection of a record and a field, a cell is formed that contains data. Each field in the table is assigned a unique name that cannot exceed 64 characters. Each field contains data of the same type. 1 Koshelev V.E. Access How-to Guide. M., S
2 Data types Type Text Field Memo Numeric Date / Time Currency Counter Boolean OLE Object Field Hyperlink Substitution Wizard Description Used to store character or numeric data that does not require computation. The Field size property specifies the maximum number of characters that can be entered in this field. By default, the size is set to 50 characters. The maximum number of characters that can be contained in a text field, 255 Intended for entering text information exceeding 255 characters; can contain up to characters Designed to store numerical data used in mathematical calculations. On the General and Lookup tabs, you can set the properties of a numeric field, including Field Size, Field Format, Number of Decimal Places Used to represent the date and time. The choice of a specific date or time format is set in the Date format property. Designed to store data, the precision of which ranges from 1 to 4 decimal places. The integer part can contain up to 15 decimal places. Designed to automatically insert unique sequential (increasing by 1) or random numbers as the number of a new record. The number assigned to the entry cannot be deleted or changed. Fields with this data type are used as key fields of the table. Designed to store one of two values interpreted as “Yes / No”, “True / False”, “On. / Off. " Contains data created by other programs that use the OLE protocol. These can be, for example, Word documents, Excel spreadsheets, pictures, sound and video recordings, and others. OLE objects are linked to or embedded in an Access database. You cannot sort, group, and index fields of OLE objects. Special type for storing hyperlinks Intended for automatic field detection. It will create a combo box from which you can select data contained in another table or in a set of constant values 2
3 Creating a database 1. Start Microsoft Access Click the button. 3. Name the new database "Notebook.accdb". 4. On the Create tab of the ribbon, on the Tables toolbar, click the Table Design button. 5. Enter the field names and specify the data types to which they relate. Field name Data type p / p Counter Surname Text Name Text Address Text Index Numeric Phone Text Hobby Text Email e-mail Hyperlink 6. Exit the Constructor mode, having previously saved the table under the name "Friends"; do not specify key fields. 7. Open the table "Friends" by double-clicking and fill in 10 lines in it. 8. Add the fields "Patronymic" and "Date of birth", for this: 1) place the cursor on the field in front of which you want to insert a new column; 2) run the command: ribbon tab Table mode toolbar Fields and columns Insert; 3) by double-clicking on Field1, rename it to "Patronymic", and Field2 to "Date of birth". 9. Switch to Design mode with the command: tab of the ribbon Home Modes Design. 10. For the field "Date of birth" set the data type Date / Time; in the field properties, select Short Date Format. 3
4 11. Format the table as follows: 4) the color of the grid is dark red; 5) background color is blue; 6) text color is dark red, size 12 pt, italic style. 12. Rename the "Hobbies" field to "Hobbies". 13. Delete the entry numbered. Resize the cells so that all data is visible. To do this, just double-click the left mouse button on the border of the fields. 15. Arrange the fields in the following order: Last Name, First Name, Patronymic, Phone, Date of Birth, Hobbies, Address, Index, Photo, Email. 16. Fill in the blank cells in the table. 17. In Design mode, add a field "Marital status", which will contain a fixed set of values married, not married, married, not married. To create a drop-down list, we will use the Substitution Wizard: 7) set the Substitution Wizard data type; 8) in the dialog box that appears, select the line "A fixed set of values will be entered" and click Next; 9) the number of columns is 1; 10) enter the details of the list married, not married, married, not married; 11) click Finish. 18. Use the drop-down list to fill in the new column. Since the table turned out to be wide, some inconveniences arise when filling out this column: the surname of the person for whom the "Marital status" field is filled in is not visible. To make the last name permanently visible when filling out the table, you must use the Freeze Columns command from the context menu of the Last Name field. 19. Show the work to the teacher. 4
5 Test questions 1. What is called a database (DB)? 2. What is a database management system (DBMS)? 3. What is the difference between Microsoft Excel and Microsoft Access? 4. What Microsoft Access database objects do you know? 5. What is the main object in the database? 6. What are called fields and records in the database? 7. What types of data do you know? 8. How can I rename a field? 9. How can I create a dropdown box? 10. With what extension is the Access database file saved? 5
6 Lab 2 Creating relationships between tables 1. Start Microsoft Access Let's create a database "Company". Employees of this organization work with clients and fulfill their orders. If you put all the information in one table, then it will become very inconvenient to work with. It will start repeating data. Every time an employee Ivanov works with a company, you will have to re-register the data about the employee and the client, as a result of which many mistakes can be made. To reduce errors, you can split the source table into multiple tables and establish relationships between them. It will be more rational than before. Thus, you need to create 3 tables: Employees, Customers and Orders. Employees Field name Data type Employee code Counter Surname Text Name Text Patronymic Text Position Text Phone Text Address Text Date of birth Date / Time Salary Money Photo Object OLE E-mail Hyperlink 6
7 Customers Field name Customer code Company name Address Phone number Fax E-mail address Notes Data type Counter Text Text Text Numeric Hyperlink Field MEMO Orders Field name Order code Customer code Employee code Placement date Execution date Amount Completion mark Data type Counter Numeric Numeric Date / Time Date / Time Monetary Logical 3. Separate tables containing information on a specific topic must be linked into a single database structure. Key fields must be specified to link tables. A key consists of one or more fields, the values of which uniquely identify each record in the table. The most suitable as a key field is "Counter", since the values in this field are unique (that is, do not duplicate). 4. Open the Employees table in Design view. 5. Right-click on the Employee ID field and select the Key field command in the context menu that appears. If you need to set several key fields in the table, you can select them by holding down the Ctrl key. 6. For the Customers table, set the key field Customer Code, and for the Orders table, the Order Code. 7
8 7. The Orders table contains the fields Employee Code and Customer Code. When filling them out, some difficulties may arise, since it is not always possible to remember all the enterprises with which the company works, and all employees with a code number. For convenience, you can create drop-down lists using the Lookup Wizard. 8. Open the Orders table in Design view. 9. For the Employee ID field, select the Lookup Wizard data type. 10. In the window that appears, select the command "The lookup column object will use the values from the table or query" and click the Next button. 11. In the list of tables, select the Employees table and click Next. 12. In the Available Fields list, select the Employee Code field and click the arrow button to enter the field in the Selected Fields list. Add the Last Name and First Name fields in the same way and click the Next button. 13. Select the sort order for the list by the Last Name field. 14. In the next dialog box, set the desired width of the drop-down list columns. 15. Select the Hide Key Column checkbox and click Next. 16. At the last step of the Lookup Wizard, if necessary, replace the label for the lookup field and click Finish. 17. Create a drop-down list for the Customer ID field in the same way. 18. After creating the key fields, you can start creating links. There are several types of relationships between tables: 12) in a one-to-one relationship, each key field record in the first table corresponds to only one record in the related field of the other table, and vice versa. This type of relationship is not used very often. In- 8
9 where they can be used to split tables containing many fields to separate parts of the table for security reasons; 13) in a one-to-many relationship, each record in the first table corresponds to several records in the second, but the record in the second table cannot have more than one related record in the first table; 14) in a many-to-many relationship, one record in the first table may correspond to several records in the second table, and one record in the second table may correspond to several records in the first. 19. Close all open tables, as you cannot create or modify links between open tables. 20. Run the command: ribbon tab Work with databases button. 21. If previously there were no links between the database tables, then when you open the Data Scheme window, the Add Table window opens at the same time, in which you select the Employees, Customers and Orders tables. 22. If relationships between tables have already been defined, then to add a new table to the data schema, right-click on the data schema and select Add Table from the context menu. 23. Establish a relationship between the Employees and Orders tables. To do this, select the Employee Code field in the Employees table and drag it to the corresponding field in the Orders table. 24. After dragging, the Edit Links dialog box will open (Fig. 1), in which enable the Ensure integrity condition check box. This will prevent you from deleting records from one table and leaving the associated data from other tables unrelated. nine
Fig. 10 1. Creating a relationship between tables 25. The check boxes Cascade update of related fields and Cascade delete of related records ensure that data in all subordinate tables is updated or deleted at the same time when it changes in the main table. 26. Communication parameters can be changed by clicking the Union button. 27. After setting all the necessary parameters, click the OK button. 28. Establish the relationship between the Clients and Orders tables yourself. 29. The result should be the data schema shown in fig. 2. Fig. 2. Data Scheme 10
11 This example uses one-to-many relationships. In the data schema, they are displayed as connecting lines with special icons next to tables. A one-to-many relationship is marked with a "1" near the master table (which has a primary key) and near the subordinate table (which has a foreign key). A one-to-one relationship is marked with two “1s” (both table fields have primary keys). An indefinite relationship has no signs. If a join is set, its direction is indicated by an arrow at the end of the connector (none of the combined fields are key and have no unique index). 30. In the Employees table, enter the data for seven employees. 31. In the table Clients enter data on ten companies with which this firm works. 32. In the Orders table, fill out several orders received by the company. 33. Show the work to the teacher. Test questions 1. With what can you create tables? 2. What is a key field? 3. How to set multiple key fields? 4. How to establish relationships between tables? 5. What are the relationships between tables? 6. What do "1" and mean in the data schema? 7. Why is the Substitution Wizard needed? eleven
12 Lab 3 Selecting Data Using Queries Queries are the primary means of viewing, filtering, modifying, and analyzing information that is contained in one or more tables in a database. There are various types of queries, but the most common are fetch queries, so let's start our acquaintance with them. 1. Open the Firm database you created earlier. 2. Run the command: Create ribbon tab Query Wizard Simple Query. 3. In the dialog box that appears (Fig. 3), specify the Employees table and select the Surname, Name, Phone fields. Press "Next. Rice. 3. Create a simple query 4. Enter the query name Phones and click Finish. You will see a request in which you can view the phone numbers of employees. 5. Try to create the next query using the Designer, for this run the command: ribbon tab New Query designer. 12
13 6. In the Add Tables dialog box, select the Customers table and click the Add button and then the Close button. 7. To transfer the required fields to the request form, double-click on them with the left mouse button (Fig. 4). Rice. 4. Creating a query in Design mode 8. To sort the records in the Company name field in alphabetical order, select ascending from the Sort drop-down list. 9. Save the query with the name "Client Addresses". 10. Create a request "Birthdays" on your own, in which you can view the birthdays of employees. 11. Let's say we want to know which of the employees has a birthday in the current month, for example, in April. To do this, open the query in Design mode. 13
12. In the line Criteria for the field "Date of birth" enter the value * .04. *. In this record, * means that the date and year of birth can be any, and the month is the 4th (that is, April). After that, the request window should look like it is shown in Fig. 5. Fig. 5. Creating a Query 13. Close the Designer and view the result. If there are no records in the Birthdays query, then there is not a single person born in April in the Employees table. Add multiple people born in April to the Employees table and see how the query changes. Queries are automatically refreshed each time it is opened. 14. If we need to find out which of the employees was born in May, we will have to create a new request or change the condition in the existing request Birthdays. This procedure is inconvenient and time-consuming. If you have to frequently execute a query, but each time with new values of the conditions, use a query with a parameter. When you run such a request, screen 14
15, a dialog box is displayed for entering a value as a selection criterion. To create a request with a parameter, the user needs to enter the message text in the line Selection condition of the request form (Fig. 6). Rice. 6. Creation of a query with the parameter 15. The entry Like [Enter the date] means that when the query is opened, a dialog box will appear (Fig. 7) with the text “Enter the date” and a field for entering the selection condition. If you enter the condition * .04. *, Then the query will display a list of employees born in April. Run the query again and enter the value * .05. *, See how the query has changed. Rice. 7. Window for entering selection conditions 15
16 16. Modify the "Phones" query so that when you run it, a dialog box with the message "Enter your last name" appears. Since you need to display a specific surname in the query, you do not need to write the word Like in the selection condition. 17. Modify the "Phones" query so that when it is launched, not only the surname, but also the name of the employee is requested. 18. Create a request "Completed orders" on your own, containing the following information: the name and surname of the employee, the name of the company with which he works, the completion mark and the amount of the order. Take query data from several tables. 19. In the selection condition for the Boolean field Completed status, enter Yes so that only completed orders are displayed in the query. 20. Make sure the Completion Flag column is not displayed. 21. Create a request Order amount, which will display orders worth more than RUB. 22. Change the request so that the order amount is from to RUB. For these queries, you can use the comparison operators> in the filter condition,<, =, >=, <=, < >and logical operators And, Or, Not, etc. 23. Sometimes in queries it is required to perform some calculations, for example, to calculate income tax of 13% for each transaction. To do this, open the Order Amount request in Design view. 24. In an empty column of the query design, right-click on the Field cell and select Build from the context menu that appears. You will see the Expression Builder window (Fig. 8), which consists of three areas: the expression field, operator buttons and expression elements. At the top is the expression field, in which it is created. Items entered in this field are selected in the other two areas of the Builder window. 16
17 25. In the list on the left, open the Requests folder and select the Order Amount request. In the middle list, highlight the Amount field and click the Insert button. The identifier for this field appears in the Expression field of the Builder. 26. Click on the * button and enter 0.13 (see Figure 8). Thus, we will calculate the income tax of 13%. Rice. 8. Expression Builder 27. Press the OK button, after which the value "Expression1: [Amount] * 0.13" will appear in the Field property cell. 28. Replace Expression1 with Tax and close the Constructor. 29. Open the request and see what you get. 30. Using the Expression Builder, add a Profit field to the Order Amount query to calculate the order revenue (that is, amount minus tax). 31. Create a query Managers, by means of which in the table Employees find all the managers of the company. 32. Show the work to the teacher. 17
18 Security questions 1. What are queries for? 2. What types of queries do you know? 3.What can you use to create queries? 4. What is a parameter query used for? 5. How can you make calculations in queries? 6. What does the entry in the query condition "= 50" mean? 7. Can you create queries based on multiple tables? eighteen
19 Lab 4 Using Forms in a Database Forms are database objects designed to view data from tables and queries, to enter data into a database, correct existing data, and perform specified actions. A form can contain graphics, pictures, and other embedded objects. You can enter data into tables without using any forms. But there are several reasons that make forms an indispensable means of entering data into a database: 15) when working with forms, access to tables (the most valuable in the database) is limited; 16) different people may have different access rights to information stored in the database. They are provided with different forms to enter data, although the data from the forms can enter the same table; 17) it is easier to enter data into a form than into a table, and more convenient, since, as a rule, one table record is displayed in the form window; 18) in most cases, information for databases is taken from paper forms (questionnaires, invoices, invoices, certificates, etc.). Screen forms can be made an exact copy of paper forms, thereby reducing the number of errors in input and reducing staff fatigue. You can create forms based on several tables or queries using the Wizard, using the AutoForm tool, “manually” in Design mode, saving the table or query as a form. The form created in any way can then be modified in Design mode. Let's consider some of the listed methods. 1. Run the command: ribbon tab Create toolbar Forms Other forms Form wizard. 2. In the Create Forms dialog box, select the tables (queries) and fields that will be placed in the form. Click the Next button. 23
20 3. In the next dialog boxes of the wizard, select the appearance of the form, style, set the name of the form. Click the Finish button. 4. Using the Wizard, create the forms Employees, Customers, Orders, Managers. 5. Open the Employees form in Design mode. This mode is intended for creating and editing forms. 6. Place the elements in the order convenient for you, change the size and color of the text. 7. In the heading of the form, add the text Company employees. 8. Add a Button object to the form note (ribbon tab Constructor toolbar Controls). 9. After you "draw" the button with the pointer, the Create buttons dialog box will appear on the screen (Fig. 9). Rice. 9. Create buttons on a form 10. In the Form Tools category, select the Close Form action, and then click Next. 11. Select a picture or text to place on the button. 12. In the last dialog box of the Button Wizard, give the button a name and click Finish. 24
21 13. The Button Wizard has written a procedure for this button in Microsoft Visual Basic. You can view the event handling procedure using the Event handling command of the button context menu. 14. Create the Exit Application, Search Record, Delete Record buttons on your own. 15. Sometimes on the form it is required to place several pages containing data from various sources, reference or auxiliary information. A set of tabs can be used for this purpose. 16. Create an empty form. 17. To add a set of tabs to the form, click the Tab button on the Controls toolbar. First, only two tabs will be added with the formal names Tab 1 and Tab Add another tab. 19. Rename the tab labels so that they display the names of the data that will be located in them: Employees, Managers, Help. 20. Go to the Employees tab and drag the Employees form from the database onto it. 21. Similarly, place the Managers form on the Managers tab. 22. On the Help tab, put some tips for working with the database. 23. Save this form with the name Company employees. 24. In Microsoft Access, you can create button forms. They contain only buttons and are intended to select basic actions in the database. To create a button form, select the Button Form Manager command on the Working with Databases ribbon tab. 25. If there is no button form in the database, you will be prompted to confirm its creation. Click Yes in the confirmation dialog. 25
22 26. You will see the Button Forms Manager, in which click on the Create button. 27. In the Create dialog box (Figure 10), enter a name for the new button form and click OK. Rice. 10. Setting the name of the button form 28. The name of the new button form will be added to the Pages of the button form list in the Button form manager window (Fig. 11). Highlight the name of the new button form and click the Change button. Rice. 11. Button Form Manager 29. In the Edit Button Form Page dialog box, click the New button. The Edit button form element dialog box will appear (Fig. 12). Rice. 12. Creating buttons on the form 26
23 30. In the Text box, enter the caption text for the first button on the button form, and then select a command from the drop-down list in the Command box. In the Form field, select the form for which this command will be executed. 31. Add the Customers, Orders, Exit buttons in the same way. 32. In the Button Form Manager dialog box, select the name of your button form and click the Default button. The inscription "(by default)" will appear next to the button form name. 33. To finish creating the button form, click on the Close button. 34. The result should be the form shown in fig. 13. Fig. 13. Main Button Form 35. Add a drawing to the form. 36. In order for the main button form to appear on the screen when starting the application, in the main menu, click on the Access Options button (Fig. 14). For the current database, set the "button form" view form. 27
Fig. 24 14. Set parameters for Access 37. Show the work to the teacher. Test questions 1. What are the forms for? 2. Why is the form an indispensable tool in the database? 3.What can you use to create forms? 4. On the basis of what can you create forms? 5. How to create a button on a form? 6. How can you place several tables and queries on one form? 7. How do I create a main button form? 28
25 Lab 5 Creating Reports Reports are designed for printing information. Often the data in them is in tabular form. In contrast to printouts of tables or queries, the report provides wider possibilities for sorting and grouping data, it provides the ability to add totals, as well as explanatory labels, headers and footers, page numbers, styles and various graphic elements. There are several ways to create reports in an Access database: 19) using the Report Wizard; 20) based on tables or queries; 21) in Constructor mode. 1. In the database window, run the command: ribbon tab Create toolbar Reports Report wizard. 2. Select a table (or query) from the list that will be used as a data source (for example, the Client Addresses query). 3. In the Generating Reports dialog box that appears (Fig. 15), move all available fields to the "Selected Fields" area. Rice. 15. Report Wizard 29
26 4. Using the Report Wizard, create a report named Birthdays. Use the Employees table as the data source. 5. If you want to print mailing labels, Access provides this option. To do this, select the Clients table and run the command: ribbon tab Create toolbar Reports Labels. 6. In the dialog box that appears (Fig. 16), specify the size of the sticker, system of units, type of sticker and click Next. Rice. 16. Dialog box Create labels 7. At the next step of creating a report, set the font, size, text color and style. Press "Next. 8. Select the margins to be displayed on the label. For example, Company Name, Address, Phone and Fax. If you want to display specific text on each sticker, enter it into the sticker prototype. 9. If necessary, change the name of the Label Report and click Finish. 10. Sometimes reports need to calculate totals, average, minimum or maximum values, and percentages. To do this, start the Report Wizard and specify the Order Amount request as the data source. thirty
11. In the dialog box of the Wizard, in which the order of sorting records is set, click the Totals button (Fig. 17). Rice. 17. Calculation of totals in reports 12. In the Totals dialog box (Fig. 18) for the Amount and Tax fields, check the boxes in the sum column to calculate the total amount. Rice. 18. Calculation of the total values of the sum 13. Then follow all the steps of the Wizard and click Finish. 14. Create a Birthdays report using the Birthdays query as a data source. 31
28 15. Create a report Completed orders, which will contain information about the company and the amount of the order. Calculate the grand total, average (Avg) and maximum amount for each firm. 16. Show the work to the teacher. Security questions 1. What are the reports for? 2. What methods of creating reports do you know? 3. How can the totals be calculated in the reports? 4. What totals can be calculated in the reports? 5. How do I print mailing labels in Access? 32
29 Tasks for self-fulfillment Option 1 1. Develop a database "Electronic library", consisting of three tables with the following structure: Books book code (key field), author, title, publication year, number of copies. Readers library card (key field), surname, name, patronymic, address. Issued books book code, library card, date of issue, date of return, date of actual return. 2. Establish relationships between tables. 3. Use a query to select all books from 1990 to 2007. 4. Create a query with a parameter to select books by a specific author. 5. Create data entry forms, reports, and a main button form. Option 2 1. Develop a database "Grocery store", which consists of four tables with the following structure: Products product code (key field), product name, quantity of product. Goods receipt goods code, date of receipt, purchase price of goods per unit, supplier code. Sale of goods product code, month of sale, quantity sold per month, sale price of the product. Suppliers supplier code (key field), supplier name, supplier address, supplier phone. 2. Establish relationships between tables. 33
30 3. Using the request, select products with prices ranging from 100 to 450 rubles. 4. Create a query with a parameter to select products sold in a specific month. 5. Create data entry forms, reports, and a main button form. Option 3 1. Develop a database "Session", consisting of four tables with the following structure: Students student code (key field), last name, first name, patronymic, course, group. Exams student code, date, discipline code, grade. Offsets student code, date, discipline code, credit. Disciplines discipline code (key field), discipline name, number of hours. 2. Establish relationships between tables. 3. Use a query to select students who passed exam 4 or Create a query with a parameter to select students who did or did not get credit. 5. Create data entry forms, reports, and a main button form. Option 4 1. Develop a database "Wholesale warehouse", consisting of four tables with the following structure: Warehouse product code, quantity, date of receipt. Products product code (key field), product name, shelf life. Applications application code (key field), organization name, product code, required quantity. 34
31 Goods issue order code (key field), goods code, released quantity, date of goods issue. 2. Establish relationships between tables. 3. Using the request, select goods, the quantity of which is from 50 to 200 pieces. 4. Create a request with a parameter to select goods received at the warehouse of a certain number. 5. Create data entry forms, reports, and a main button form. Option 5 1. Develop a database "Applicants", consisting of four tables with the following structure: Application form applicant number (key field), last name, first name, patronymic, date of birth, graduated secondary educational institution (name, number, locality), date graduation from an educational institution, the presence of a red diploma or a gold / silver medal, address, phone number, specialty code. Specialties specialty code (key field), specialty name. Discipline discipline code (key field), discipline name. Entrance exams applicant number, discipline code, examination score. 2. Establish relationships between tables. 3. Make a request to select students who passed exams without triples. 4. Create a query with a parameter to select students applying for a specific specialty. 5. Create data entry forms, reports, and a main button form. 35
Option 6 1. Develop a database "Transport", consisting of three tables with the following structure: Transport car brand, state number (key field), fuel consumption. Applications application code (key field), date of application, name of the cargo, amount of cargo, point of departure, point of destination. Delivery p / p, date and time of departure, date and time of arrival, application code, license plate of the car, distance traveled. 2. Establish relationships between tables. 3. Using the request, select applications with the amount of cargo from 100 to 500 kg. 4. Create a request with a parameter to select vehicles by car brand. 5. Create data entry forms, reports, and a main button form. Option 7 1. Develop a database "Sports equipment rental", consisting of three tables with the following structure: Clients client code (key field), last name, first name, patronymic, telephone, address, passport data, deposit. Warehouse equipment code (key field), name, quantity, collateral value, balance. Rental p / p, client, equipment, date of issue, return period, return mark, rental payment. 2. Establish relationships between tables. 3. Create a request to select equipment with a collateral value of up to RUB. 36
33 4. Create a query with a parameter to select customers who returned equipment. 5. Create data entry forms, reports, and a main button form. Option 8 1. Develop a database "Bank", consisting of three tables with the following structure: Clients client code (key field), last name, first name, patronymic, passport, phone, address, salary. Types of loans loan code (key field), loan name, interest rate, terms of granting. Provided loans, p / p, client, loan, date of provision, term, date of repayment, amount, mark on refund. 2. Establish relationships between tables. 3. Create a request for the selection of clients who have taken out a loan from up to rubles. 4. Create a query with a parameter for selecting loans at an interest rate. 5. Create data entry forms, reports, and a main button form. Option 9 1. Develop a database "Travel company", consisting of four tables with the following structure: Clients client code (key field), last name, first name, patronymic, telephone, address, passport. Employees employee code (key field), last name, first name, patronymic, position, phone number, address, passport data. 37
34 Tourist routes route code (key field), name, description of the route, country, voucher cost, number of days, type of transport. "Orders" order code (key field), client, route, employee (manager who placed the order), date, payment mark. 2. Establish relationships between tables. 3. Create a request to select routes with a cost from to RUB. 4. Create a query with a parameter to select customers who have chosen a certain type of route. 5. Create data entry forms, reports, and a main button form. Option Develop a database "Polyclinic", consisting of four tables with the following structure: Doctors doctor's code (key field), full name, position, specialization, work experience, address, telephone. Diseases p / p (key field), name of the disease, treatment recommendations, preventive measures. Patients patient code (key field), full name, address, phone number, insurance policy, passport. Diagnosis p / p (key field), patient, disease, attending physician, date of treatment, date of recovery. 2. Establish relationships between tables. 3. Select dentists and orthopedists using the request. 4. Create a query with a parameter to select patients with a specific type of disease. 5. Create data entry forms, reports, and a main button form. 38
CREATING DATABASES IN MICROSOFT ACCESS 2007 Practical work 1. Acquaintance with Access. Database creation. Creating tables 1. Start Microsoft Access 2007. 2. Click the button. 3. Give a name to the new
N 1 CREATION OF DATABASES IN MS ACCESS. Tables and Relationships In the modern world, the amount of information that needs to be stored increases every second. Therefore, the use of databases is an integral part of the professional
Laboratory work 1 STUDY OF THE POSSIBILITIES OF MICROSOFT ACCESS 2013 WHEN CREATING TABLES Objectives of the work: 1. To study the procedure for creating tables with specified attributes and data using MICROSOFT ACCESS 2013.
Laboratory work 2 STUDY OF THE POSSIBILITIES OF MICROSOFT ACCESS 2013 WHEN CREATING RELATIONS BETWEEN TABLES Objectives of the work: 1. To study the procedure for creating relationships between tables using MICROSOFT ACCESS 2013.
Tasks for self-fulfillment Option 1 1. Develop a database "Electronic library", consisting of three tables with the following structure: Books - book code (key field), author, title,
1 Lab 2 Creating relationships between tables 1. Start Microsoft Access 2007. 2. Create the "Company" database. Employees of this organization work with clients and fulfill their orders. US
UGLTU DEPARTMENT OF INFORMATION TECHNOLOGIES AND MODELING Informatics Methodical instructions on laboratory work for full-time and part-time students in the direction 38.03.05 Business -
Laboratory work 4 "Creating relationships between tables" Purpose of work: studying the technology of creating the structure of a relational database in Microsoft Office Access 2007 1. Brief theoretical information Word
1 Lab 3 Selecting Data Using Queries Queries are the primary means of viewing, filtering, modifying, and analyzing information that is contained in one or more tables in a database.
Specialty 100400.62 "Tourism" Academic discipline "Information networks and databases" Practical lesson 7 Exploring the possibilities and order of using MS Access 2007 when creating relationships between tables
Practical Activity 17 "Selecting Data Using Queries" 1. Open the previously created database "Organization" 2. Run the command: New ribbon tab Query Wizard Simple Query. 3. In the appeared
Laboratory work 3 STUDY OF THE POSSIBILITIES OF MICROSOFT ACCESS 2013 WHEN SELECTING DATA USING REQUESTS Objectives of the work: 1. To study the procedure for creating requests for selecting data using MICROSOFT ACCESS 2013.
Specialty 100400.62 "Tourism" Academic discipline "Information networks and databases" Practical lesson 8 Studying the possibilities and order of using MS Access 2007 when selecting data using queries
Laboratory work 4 RESEARCH OF THE POSSIBILITIES OF MICROSOFT ACCESS 2013 WHEN CREATING AND USING FORMS IN THE DATABASE Objectives: 1. To study the procedure for creating and using forms in MICROSOFT ACCESS 2013.
DEPARTMENT OF EDUCATION AND SCIENCE OF THE TYUMEN REGION STATE AUTONOMOUS PROFESSIONAL EDUCATIONAL INSTITUTION "TYUMEN FORESTRY TECHNICUM" NV Bortsova, OV Zhuravleva Control system
MICROSOFT ACCESS: CONNECTIONS, CALCULATED FIELDS, CREATING A BUTTON FORM FOR A DATABASE I. TABLE CONNECTIONS Modern databases usually consist of many tables linked together. One of the goals of creating a good structure
MINISTRY OF EDUCATION AND SCIENCE OF THE RUSSIAN FEDERATION Federal State Autonomous Educational Institution of Higher Professional Education NATIONAL RESEARCH TECHNOLOGICAL
Laboratory work 5 RESEARCH OF THE POSSIBILITIES OF MICROSOFT ACCESS 2013 WHEN CREATING AND USING REPORTS IN THE DATABASE Objectives of the work: 1. To study the procedure for creating and using reports in MICROSOFT ACCESS
1. Explanatory note 1.1. Requirements for students The student must have the following initial competencies: basic provisions of mathematics and natural sciences; possess the skills of body work;
BASICS OF WORKING IN MICROSOFT ACCESS. DATABASE DESIGN. DATABASE CREATION. CREATION OF FORMS, REPORTS, INQUIRIES 1. Designing databases 2. Creating a database 3. Creating forms, reports, queries
1 Practical work 18 "Using forms in the database" Initial database "ORGANIZATION" Task-1: 1. Using the Wizard, create the forms Employees, Clients, Orders, including all the available fields.
Specialty 100400.62 "Tourism" Academic discipline "Information networks and databases" Practical lesson 6 Studying the possibilities and order of using MS Access 2007 when creating tables Educational questions
Ministry of Education of the Tver Region A. N. Konyaeva "Tasks for performing independent work in MS Access 2007 in the discipline" Information technology "for the specialty
MINISTRY OF EDUCATION OF THE RUSSIAN FEDERATION FEDERAL STATE BUDGETARY EDUCATIONAL INSTITUTION OF HIGHER EDUCATION "IVANOVSK STATE POLYTECHNICAL UNIVERSITY"
Lecture plan: Working with database objects in MS ACCESS 1. Working with tables. 2. General information inquiries. 3. Working with forms 4. Working with reports. 2 Question 1 Ways of creating tables: 1. in table mode; 2.in
2 DBMS ACCESS The database management database Access is one of the programs - applications of the integrated Microsoft Office package. The boot file for a program named msaccess.exe is usually located
LABORATORY WORK 2 CREATING FORMS IN MS ACCESS Objectives of the work: studying the main ways of creating forms using MS Access; creating calculated fields in MS Access forms. The content of the theoretical minimum.
TEST: "DBMS ACCESS 2007 - CONTROL TEST". Task # 1 How many fields are selected to be included in the generated REPORT Choose one of 5 answer options: 1) 1 2) 2 3) 3 4) 4 5) 5 Task # 2 Will the specified
Laboratory work 4 Fundamentals of working with data arrays in the Access DBMS Purpose of work: 1) acquisition of skills to work on creating a database and its main objects; 2) sorting data in tables and others
MINISTRY OF AGRICULTURE OF THE RUSSIAN FEDERATION
1.1. Database Basics 1.1.1. Databases and database management systems. Data Models Database (DB) is a named collection of structured data related to a certain
Practice 3 Create a Form A form is a database object that you can use to enter, modify, or display data from a table or query. Forms can be used to manage
Work 2. Creation of the database "Students" Task 1. Creation of the structure of a new table. Use the table designer to create the Students table. 1. Start the MS Access DBMS program and create a new DB
Workshop on working with the database. Task 1. Create a new database and make the structure of the table with information about the students of the "Computer School". Operating procedure. Start Microsoft Access. In the Microsoft dialog box
Practical work on Access 2007 Grade 10. TASK 1. CREATION OF A MULTI-TABLE DATABASE. Purpose of work: To acquire skills and abilities when working with tables: create tables using a constructor, set
LABORATORY WORK 1 Creation of a new database. Creating a database using templates Purpose: to develop skills and abilities to create a new database and database based on templates. Lead time:
Database management system OpenOffice.org Base Note: Databases (DB) are a type of software designed for storing and processing information. For example, the "library" database can store
MOU "Lyceum 43" Saransk Methodical development "RESEARCH DBMS ACCESS WHEN CREATING AND EDITING A DATABASE"
"Informatics and information and communication technologies in professional activity" specialty 44.02.01 "Preschool education" 2.6 course, 24.24 (9), 64 (1.2, 3) groups teacher Gerasimova
NATIONAL AVIATION UNIVERSITY Department of Applied Informatics Course work Topic: Microsoft Access DBMS Creation and processing of databases Purpose of work: theoretically and practically master the basic techniques of work
Laboratory work 11. Formation of queries to the database in the MS Access DBMS The purpose of the work is to acquire the skills of creating various types of queries to the database. To defend the laboratory work, the student must submit
➀ Information systems and data banks. The most important condition for ensuring the effective functioning of any organization is the presence of a developed information system. An information system is a system
Designing a database of Internet purchases Let the Internet shop carry out bulk purchases of goods from trading bases in Moscow and nearby regions to satisfy requests from customers. When purchasing large
Getting Started with Access Access is a database application or database management system (DBMS). Computer databases are used in almost all areas of activity. Skill
Federal Agency for Fisheries Federal State Budgetary Educational Institution of Higher Professional Education "Astrakhan State Technical University" Development
Introduction to ACCESS First of all, Access is a database management system (DBMS). Like other products in this category, Access is designed to store and retrieve presentation data in a convenient form.
WORKING WITH THE MICROSOFT ACCESS DATABASE MANAGEMENT SYSTEM 1 KEY TERMS Query - Queries are a powerful tool for manipulating data stored in Access tables. Using queries, you can view,
1 Practical exercise 16 "Using relationships between tables" 1. Start Microsoft Access 2007. 2. Click on the button: 3. Create a database "Organization", whose employees work with clients
Chapter 8 Creating and Using Forms As noted in Chapters 1 and 2 of this book, database objects such as forms are primarily designed to work on only one record at a time.
4. Databases 4.1. Databases and data models. Basics of design of relational databases Database (DB) is a named collection of structured data related to a specific subject
Topic: Practical work 14-2 Creating a database consisting of one table. Entering data into the table. Using forms. Purpose: To learn how to create databases in MS Acces (create tables and forms,
Task 4. Creating and editing forms and reports The purpose of the task: To learn how to create and edit forms and reports. The previously developed database "Journals" is used. Sequencing:
Laboratory work 2 "Creating a relational database" Purpose of work: studying tools for managing databases in Microsoft Office Access 2007 1. Brief theoretical information In the modern world, a person
LABORATORY WORK N 1 BASIC PRINCIPLES OF WORK IN Microsoft Access 97 PURPOSE OF THE WORK The purpose of the work is a general acquaintance with the Microsoft Access 97 database and the acquisition of skills in using the reference
LECTURE 7 Microsoft Access program. Lesson plan: Introduction Database. Database structure. Creating a database using Microsoft Access. Working interface and main menu of Microsoft Access. Filling the first
Work 6 Creation of complex forms and reports Purpose of work: to learn how to create complex forms and reports. Content of work: 1 Development of a complex form 2 Development of a complex report 3 Development of a button form-menu
Task 3. Creating and editing queries The purpose of the task: To learn how to create and edit queries to the database. The previously developed database "Journals" is used. Sequencing:
Practical work 18 Topic: CREATING TABLES IN MICROSOFT ACCESS DBMS Purpose of the lesson. Study of information technology for creating a database in a database management system (DBMS) Microsoft Access. Exercise
9. LABORATORY WORK 9 9.1 Creation of a database of a commercial company MS Access Purpose of work: to study the technology of creating databases in MS Access. Learn to create tables, link them between
@ DB, DBMS 1. A data structure characterized by subordination of lower-level objects to upper-level objects is called A. tabular B. relational * C. hierarchical D. network 2. Distinctive
P. 1 of 109 BAXIŞ Testlər / 1625 # 01 # Y15 # 01 qiyabi / 1625 # 02 # y15 # 01qiyabi / baxış TEST: 1625 # 02 # Y15 # 01QIYABI Test Fənn Təsviri Müəllif Testlərin # vaxtı Suala vaxt Nö15 1625 # 02 # 02 - Verilənlərin
Introduction
In the modern world, the amount of information requiring storage is increasing every second. Therefore, the use of databases is an integral part of a person's professional activity.
The simplest databases can be created without resorting to special software: for example, in Excel spreadsheets. But there are several differences between them. First, database management systems (DBMSs) are designed to efficiently process large amounts of information, much larger than those that spreadsheets can handle. Second, the DBMS can easily link two tables so that they appear as one table for the user. It is almost impossible to implement this feature in spreadsheets. And thirdly, the DBMS minimizes the overall size of the database. For the same purpose, tables containing duplicate data are split into multiple related tables.
Despite the fact that there are many database management systems in the world, they all have some similarities. Therefore, for our study, we chose the Microsoft Access 2007 DBMS, which is included in the Microsoft Office package. Os-
Access's new purpose is to provide the user with an easy and affordable way to create the kind of databases they want. Despite the simplicity of this DBMS, it allows you to create applications of a rather complex structure. If desired, the system can be developed and configured on its own using the Visual Basic programming language.
Another advantage of Access is its integration with Word, Excel and other programs in the Microsoft Office suite. Data is easily imported and exported from one application to another.
The methodological instructions include five laboratory works.
Laboratory work No. 1 Acquaintance with Access. Creating tables
Database (DB) is an ordered collection of data intended for storage, accumulation and processing by means of a computer. To create and maintain databases (update them, provide access on request and issue data on them to the user), a set of language and software tools is used, called database management system (DBMS) 1 .
Access Database Objects
Access database objects include:
1. Tables - designed for orderly storage of data.
3. Forms - designed for easy viewing, changing and adding data in tables.
4. Reports - used to analyze and print data.
5. Data Access Pages- designed to view, enter, update and analyze data over the network or from anywhere on the computer.
6. Macros - used to execute a frequently encountered set of macros that process data.
7. Modules - designed to describe instructions and procedures in the VBA language.
The main object of the database is a table, which consists of records (rows) and fields (columns). At the intersection of a record and a field, a cell is formed that contains data.
Each field in the table is assigned a unique name that cannot exceed 64 characters. Each field contains data of the same type.
Text
Memo field
Numerical
Date Time
Monetary
Logical
Substitution wizard
Data types
Description
Used to store character or numeric data that does not require computation. The field Size property sets the maximum number of characters that can be entered in
this field. By default, the size is set to 50 characters. The maximum number of characters that can be contained in a text field is 255.
upward 255 characters; can contain up to 65,536 characters Designed to store numerical data used in mathematical calculations. On the General and Substitution tabs, you can set the properties of a numeric field, including
field measures, Field format, Number of decimal places
Used to represent date and time. The choice of a specific date or time format is set in the property
Date format
Designed to store data, the accuracy of which ranges from 1 to 4 decimal places. Integer part can contain up to 15 decimal places Designed for automatic insertion of unique sequences
numbered (increasing by 1) or random numbers as the number of the new record. The number assigned to the entry cannot be deleted or changed. Fields with this data type are used as key fields of the table. Designed to store one of two values, interpreted
set as "Yes / No", "True / False", "On. / Off. " Contains data created by other programs that use the OLE protocol. These can be, for example, Word documents, Excel spreadsheets, pictures, sound and video recordings, and others. OLE objects are linked to or embedded in an Access database. You cannot sort, group, and index fields of OLE objects
A special type for storing hyperlinks. Designed for automatic field detection. It will create a combo box from which you can select data contained in another table or in a set of constant values

Database creation
2. Click on the button.
3. Name the new database "Notebook.accdb".
4. On the ribbon tab Create in the Tables toolbar, click the K button constructor of tables.
5. Enter the field names and specify the data types to which they relate.
6. Exit Design mode after saving the table under the name"Friends" ; do not specify key fields.
7. Open the table Double click "Friends" and fill in 10 lines.
8. Add the fields "Patronymic" and "Date of birth", for this:
1) position the cursor on the field in front of which you want to insert a new one
2) run the command: ribbon tab Table mode → toolbar
Ruments Fields and Columns → Insert;
3) by double-clicking on Field1, rename it to "Patronymic", and Po-
le2 - "Date of birth".
9. Switch to Design mode with the command: ribbon tab Head-
naya → Modes → Constructor.
10. For the field "Date of birth" set the data type Date / Time; v
field properties select Short date format.
11. Format your table like this: 1) grid color - Dark red; 2) background color - blue;
3) text color - dark red, size - 12 pt, style - italic.
12. Rename the field"Hobbies" in "Hobbies".
13. Delete the entry numbered 8.
14. Resize the cells so that all data is visible. To do this, just double-click the left mouse button on the border of the fields.
15. Arrange the fields in the following order:"No.", "Surname", "First name", "Patronymic", "Phone", "Date of birth", "Hobbies", "Address", "Index", "Photo", "E-mail".
16. Fill in empty table cells.
17. In Design view, add a field"Family status", which will contain a fixed set of values - married, not married, married, not married. To create a drop-down list, we will use
Substitution Wizard:
1) set data type Substitution wizard; 2) in the dialog box that appears, select the line "Will be introduced fictitious
coherent set of values " and press the button Further ; 9) the number of columns - 1;
10) enter the details of the list - married, not married, married, not married; 11) click Finish.
18. Use the dropdown list to fill in the new column. Since the table turned out to be wide, when filling out this column, some inconveniences arise: the surname of the person for whom the field is being filled is not visible"Family status"... In order for the surname to be constantly visible when filling out the table, you must use the command Freeze columns from the context menu of the Last Name field.
19. Show the work to the teacher.

Laboratory work No. 2 Creating relationships between tables
1. Start Microsoft Access 2007.
2. Let's create a database "Firm". Employees of this organization work with clients and fulfill their orders.
If you put all the information in one table, then it will become very inconvenient to work with. It will start repeating data. Every time an employee Ivanov works with a company, you will have to re-register the data about the employee and the client, as a result of which many mistakes can be made. To reduce errors, you can split the source table into multiple tables and establish relationships between them. It will be more rational than before.
Thus, you need to create 3 tables: Employees, Customers and Orders.
Employees |
|
Data type |
|
Employee code |
|
Text |
|
Text |
|
middle name |
Text |
Position |
Text |
Text |
|
Text |
|
Date of Birth |
Date Time |
Wage |
Monetary |
OLE Object |
|

Data type |
|
Client code |
|
The name of the company |
Text |
Text |
|
Phone number |
Text |
Numerical |
|
E-mail address |
|
Memo field |
|
Data type |
|
Order code |
|
Client code |
Numerical |
Employee code |
Numerical |
Posting date |
Date Time |
Execution date |
Date Time |
Monetary |
|
Completion mark |
Logical |
3. Separate tables containing information on a specific topic must be linked into a single database structure. To link tables, you must specify key fields. A key consists of one or more fields, the values of which uniquely identify each record in the table. The most suitable as a key field is "Counter", since the values
v the given field are unique (i.e., exclude duplicates).
4. Open the table Employees in Design mode.
5. Right click on the field Employee code and in the appeared context menu select the Key field command. If you need to set several key fields in the table, you can select them by holding down the Ctrl key.
6. For the Customers table, set the key field Customer Code, and for the table Orders - Order Code.
7. The Orders table contains the fields Employee Code and Customer Code. When filling them out, some difficulties may arise, since it is not always possible to remember all the enterprises with which the company works, and all employees
with code number. For convenience, you can create drop-down lists using
wizard of substitutions.
8. Open the table Orders in Design view.
9. For the field Employee Code select data type Substitution wizard.
10. In the window that appears, select the command "Object" column subst-
new "will use values from a table or query »And click on the button Further.
11. In the list of tables, select a table Employees and click the button
12. In the Available Fields list, select the Employee Code field and click the arrow button to enter the field in the Selected Fields list. Add the Last Name and First Name fields in the same way and click the Next button.
13. Select the sort order of the list by field Surname.
14. In the next dialog, set the desired width of the drop-down list columns.
15. Check the boxHide key pillar " and press the button
16. At the last stepSubstitution Wizards replace the caption for the lookup field, if necessary, and click Finish.
17. Similarly create a dropdown for the field
Client code.
18. After creating the key fields, you can start creating links. There are several types of relationships between tables:
1) in a one-to-one relationship, each record of a key field in the first table corresponds to only one record in a related field of another table, and vice versa. This type of relationship is not used very often. In-
where they can be used to split tables containing many fields, to separate parts of the table for security reasons;
2) with the ratio One-to-many each record in the first table corresponds to several records in the second, but the record in the second table cannot have more than one related record in the first table;
3) with the relation Many-to-many several records in the second table can correspond to one record in the first table, and several records in the first one can correspond to one record in the second table.
19. Close all open tables, as you cannot create or modify relationships between open tables.
20. Run the command: ribbon tabWorking with databases →
21. If previously there were no links between the base tables, then when you open the window Data schema simultaneously opens a window Adding a table
in which select tables Employees, Clients and Orders.
22. If the relationships between the tables have already been defined, then to add a new table to the data schema, right-click on the data schema
and select the item in the context menuAdd table.
23. Establish relationships between tables Employees and Orders, to do this, select the Employee Code field in the Employees table and drag it to the corresponding field in the Orders table.
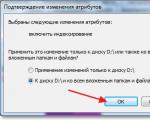
24. After dragging, a dialog box will openChanging links
(fig. 1), in which enable the checkbox Ensuring the integrity condition... This will prevent you from deleting records from one table and leaving the associated data from other tables unrelated.

Rice. 1. Creating a relationship between tables
25. Check boxes Cascade update related fields and Cascade delete related records provide simultaneous update or deletion of data in all subordinate tables when they change in the main table.
26. Communication parameters can be changed by clicking the button Union .
27. After setting all the necessary parameters, press the button
OK.
28. Relationship between tables Install Clients and Orders by yourself.
29. The result should be the data schema shown on
Rice. 2. Data schema
Theme: Creating and using queries.
Objectives of the work:
ü to consolidate the skills of editing tables;
ü get acquainted with the main types of inquiries;
ü learn how to create requests for a selection in different ways;
ü learn to create complex queries;
ü learn how to create cross queries.
Theoretical part.
Inquiry Is a means by which information is retrieved from a database that meets certain criteria. Query results do not represent all records from the table, but only those that match the query.
Queries consist of a number of conditions, each condition consists of three elements:
1.the field that is used for comparison;
2. operator describing the type of comparison;
3. the quantity with which the field value is to be compared.
Expressions and operators used in selection conditions.
| Expressions and Operators | Description of expressions and operators |
| Numbers | Introduced without restrictions |
| Text | Must be quoted |
| Dates | Delimited on both sides by # symbols (for example, # 01.02.02 #) |
| *; +; -; /; ^ | Arithmetic operators linking expressions |
| <; <=; >; >=; =; <> | Comparison Operators |
| And (And); Not Or (Or) | Logical operators |
| Like | Used for replacement logic in expressions |
| In | To determine if a data item is contained in a list of values |
| Between ... And ... | To select values from a specific interval |
| ? | Replaces one character (letter or number) |
| * | Replaces multiple characters |
Queries can be simple, complex cross-reference.
Practical part
Progress:
1) Open your sample database.
2) Create a query to select students who only have good grades in all subjects using Query Wizards.
On the toolbar, select the command<Мастер запросов>.
In the dialog box that appears, select<Простой запрос>and click on the button
In the next window, select the table on which the query is built (<Ведомость успеваемости>), and those fields that are involved in the request. Move them to the right side of the window using the button, click<Далее>... In the next window, also click<Далее>.
In another window, give the name of the request "Good people" and press<Готово>.
A table will appear<Хорошисты>, which reflects the names of all students and the subjects studied.
Open the table "Good guys" go to mode<Конструктор>... Here in the field<Условия отбора>under each item, put a condition >=4 or 4OR5.
Note: Checkmarks in each field mean that you can enable or disable any field for selection.
Switch to table mode by answering<Да>to the question about saving the request. (The surnames of the “good guys” should remain in the table).
3) Using<Конструктора запросов>create a query to select a table<Личные данные>.
Click on the table<Личные данные>, go to the menu<Создание>, select the command<Конструктор запросов >.
· Add the required table to the query field. Select it in the list and click on the button<Добавить>... Close the window<Добавление таблицы>.
· Select students whose last names begin with the letter "B" and who live in Anapa. For this:
Add to line<Поле>two fields<Фамилия>and<Город>;
In line<Условия отбора>enter the value in the first column
Like “B *”, and in the second column with the name<Город> - "Anapa";
 |
close the request by saving it as "BBB"(you must have students living in Anapa on the list). Figure 2.
Figure 2.
Independent task
a) Make a request with a title<Запрос 1>table-based<Ведомость успеваемости>, which will indicate students who have marks of at least "4" in the first two subjects. (Make a request or via Query constructor, or through Query Wizard)
b) Make<Запрос 2>table-based<Ведомость успеваемости>, which will indicate students who have no more than 30 hours of non-excuse absences. Add a Good Cause Skip field to this request between 30 hours and 45 hours (use the operator Between ... And… )
c) Make up<Запрос>table-based<Личные данные>... Print the list of students who at the moment, i.e. as of today, it is already 17 years old (use the operator Between ... And ... )
Note: The date is written using the # symbol, for example, # 01.02.02. #
4) Create a query based on three tables<Ведомость успеваемости>, <Личные данные>and<Преподаватель>... Select students who live in Novorossiysk and who have a favorite subject "Management". Title <Запрос 4>. Use<Конструктор запросов>.
· On the menu<Создание>choose<Конструктор запросов>.
· Add all three tables to the query field. Close the window<Добавление таблицы>.
 |
To first column to row<Поле>drag from the first table with the mouse<Фамилия>, from the second table to the second column<Город>and from the third table to the third column of the row<Поле> - <Предмет>(Figure 3).
Figure 3
· In field<Условия отбора>in column<Город>enter the city "Novorossiysk" in the column<Предмет>enter "Management".
Save the query under a name <Запрос 4>.
· Open a request and check the result of the work done.
5) Execute a query to create a new table in which there should be fields<Фамилия>, <Имя>, <Пропуски по неуважительной причине>, <Город>and<Предмет>.
· On the menu<Создание>choose<Конструктор запросов>.
Add all three tables from the window list<Добавление таблицы>... Close this window.
First line<Поле>transfer from the first table to the first column of the field<Фамилия>, in the second<Имя>and in the third<Пропуски по уважительной причине>, drag the field to the fourth column<Город>from the second table and the last column will have a field<Предмет>from the third table.
Close the request by saving it with a name <Запрос 5>.
6) Create cross query.
· On the menu<Создание>choose<Мастер запросов>.
In the dialog box, select<Перекрестный запрос>, click on the button
· In the window<Создание перекрестных запросов>highlight the table<Ведомость успеваемости>and click<Далее>.
Select the field whose values will be used as the row header - this is<Фамилия>and<Имя>... Click on the button<Далее>.
Select a field whose value will be used as column headings, for example<Менеджмент>... Click on the button<Далее>.
Select the function by which the values of cells at the intersection of columns and rows will be calculated (in this case Count- number). Click on the button<Далее>.
Provide a name for the request <Итог по менеджменту> and click on the button<Готово>.
Independent task
Make similar queries for grades in three other subjects.
7) Present the instructor with all your database queries on the display screen.
8) Finish working with Access.
Theme:
Database creation.
Building a table in the database.
Purpose of work:
To teach how to form the structure of a table, enter and edit data, determine a key to link two tables.
Completing of the work:
The main structured document in Access is an table. Each table contains records of defined divided type, for example about students. Each record of the table contains all the necessary information about an individual element of the database.
Forms, reports and queries are built on the basis of tables.
A database can include multiple tables.
In the open database window, click on the tab "Tables" and press the button " Create ".
Select from the dialog box list "New table" way to create table:
Table mode- table creation in table mode;
Constructor- creating a table using the table constructor;
Table Wizard- creating a table using the table wizard;
Importing tables- creating a table by importing data from an external file or other database;

We will create a table using Constructor. Select in window "Constructor" and press " OK ".
In the pop-up window, enter the name of the fields, select the data type and define the properties of the fields.

In a collumn Field name field names are set:
1. Number; 5. Gender;
2. Surname; 6. Date of birth;
3. Name; 7. Group;
4. Patronymic;
There should not be two fields with the same name in the table.
For each field included in the record, you must specify data type.
Data type defines the type of information that will be stored in this field. The data type is selected in the column Data type .
Default the data type is set Text.
To change the data type, you need to click in one of the cells in the column Data type . A list button will appear on the right side of the cell, when you click on it, a list with available data types will open.
In column Description you can freely enter comments for each field. This operation is optional.
The specification of the characteristics of the fields must be carried out sequentially, i.e. for each field you must first enter the name, then the data type and, if necessary, a comment.
To move to the desired cell, you can use the mouse, the keyTab and at the end of the entry, you can press the key Enter .
Black triangle in the marking column on the left indicates the line in which the cursor is located.
After defining all the fields in the table, you must specify one field to use as the primary key field. This will prevent duplicate records from being entered into the table.
Primary key can only be defined in table design mode.
In this table, as the primary key field, we declare the field" Number ".
For this you need:
highlight the field " Number " or just put the cursor there;
push the button Key field on a standard toolbar with a key image or
menu "Edit" "Key field"
WITH 
to the left of this field, a small key image will appear - a sign of the primary key field.
Key field
The specification of the table prepared during the design should be saved, since the entire table will be built on its basis.
For this you need:
menu "File" " Save "
If the table is saved for the first time, a dialog box is displayed.
window " Preservation ". In this window you need to enter the name of the tableSTUDENT .

Entering and editing data in table mode.
Data can be entered into the created table both directly in the default tabular form, and using a specially designed user-defined screen form. Editing records and correcting errors in the table data is also possible in each of the two indicated modes.
To enter data into a table, you need to open a database.
In the database window, click on the table name STUDENT .
V 
An empty table for data entry appears in the window that opens.
Along the top edge of the window are the table field names.
Each field corresponds to a specific column in the table.
Each record occupies one row in the table.
Data entry into the table cell is carried out from the keyboard. When you finish entering data in the last field of an Access record itself goes to the first field of the new record and waits for data input.

After entering the data, the table must be closed.
To do this, you need to enter the command twice
menu "File" "Close"
1.1 Laboratory work No. 1: Creating a database consisting of one table
Objectives of the work:
1. get acquainted with the basic concepts of the database;
2. learn how to create a database table in the Design mode;
3. master the transition from the Constructor mode to the table mode;
4. master the basic techniques of filling and editing database tables;
5. get acquainted with simple sorting of table values;
6. to get acquainted with the search for records by sample,
7. learn how to save and load the database;
8. learn to print tables.
Stages of work
Suppose we need to make the simplest version of the database, when all the information is stored in one table.
2. Construction of the structure of future database tables.
We will create the table in the Design mode. It contains 5 fields (declaration number, name of goods according to TNVED, quantity, price per unit of goods) and 7 records.
3. Creation of the database schema.
If there is one table, the database schema is also simple: it consists of this one table, i.e. you don't have to do it on purpose.
4. Entering data into tables.
In this case, there will be only one table. We will create the table in the Design mode, and fill it in the Tables mode, moving through the cells using the arrows, the tabulation key or the mouse.
Task 1. Open a new database and create a table structure with information about the goods of the customs authorities of the Russian Federation.
Call the Access program. To do this, double-click on the icon Microsoft Access... You will see a window of the database management system, shown in Fig. 1.
Rice. 1 Window of the database management system
To create an empty database, you need to do the following:
1. In the section New empty database select New database in the central part of the initial window (Fig. 1) or use the button, in the menu that appears, select the item Create.
2. The New Database area appears on the left side of the window. In the File name field, enter the name of the new database, enter your last name as the database name. (Fig. 2).
Rice. 2 Section New Database
To select the folder in which the database file will be stored, use the button.
Press the button Create... A new database will open with a single empty table, and the program will switch to the table editing mode, shown in Fig. 3.
Rice. 3 New database window
3. Switch to Design mode. To do this, click the Modes - Constructor icon in the upper left corner. Enter table name Product information... Switching the operating mode is carried out using the Mode button, which is located on the ribbon, on the Home tab: Table Mode or Constructor.
4. Enter the word Declaration number and press the key.
5. Make it a key - data type Counter. Any other is selected using the drop-down menu.
Reminder. The transition from cell to cell is carried out in one of the ways: with the mouse; by pressing a key; arrows; key.
6. Fill in the fields in the Designer with the data from the table. 1. Leave the general properties of the field by default (which are set by the program itself).
Table 1.
8. Switch to table mode. To do this, use one of the following methods:
Click on the button Mode - Table Mode;
Close the Constructor window, open the "Product Information" table - double-click on the "Product Information" table icon;
Left-click on the Product Information table and select Table Mode.
Perform data entry in this mode, filling in the cells of the table. Field value Declaration number will change automatically.
9. Populate the database with the values from table. 2. Column unit price fill in yourself.
table 2
10. Save the entered data by clicking on the "Save" button. As a result, you got a table with which you can work.
Task 2. Get to know the functions: save, close, open.
2. Click on the bottom Close button in the upper right corner of the table window to close the table.
3. Open the table Product information.
Task 3. Sort the table values.
Comment. To sort the values, you need to place the cursor in any cell of the sorted column and click on the button: ascending or descending. (Fig. 4)
Rice. 4 Sorting and filtering
Sorting can be done by clicking on the arrow next to the field name (Fig. 5).
Rice. 5 Sorting by field Name of goods according to TNVED
Sort:
1. Data in the field Commodity name according to TNVED- alphabetically (put a marker on any name in the column with the name Commodity name according to TNVED and click on the required button).
2. Data in the field Quantity.
Task 4. Search for records by pattern.
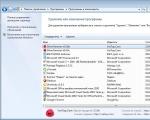
1. Place the text cursor in the field Quantity.
2. Click the button Find, which allows you to find a record by the entered value. As a result, the dialog box shown in Fig. 6.
Rice. 6. Search and Replace Window
3. Type the number 5 in the Sample field and click the Find button.
Comment. If you want to find the next similar record, then click on the button Find Next... The search is performed in the current field if the corresponding checkbox is selected. Otherwise, all fields are searched. This can be case sensitive.
When finished, click on the button Close.
1.2 Lab number 2: Creating a database, consisting of two tables
Objectives of the work:
1. learn how to delete tables;
2. learn how to create database tables in table mode;
3. learn how to create a key field yourself;
4. learn how to create forms for data entry:
5. to consolidate skills in filling and editing database tables.
Stages of work:
1. Designing the structure of the database.
Let's create a more complex version of the database. It will contain two tables: Product Information and Declarant.
2. Constructing empty database tables.
Let's use another way of creating tables, namely - Table Mode. The table Information about goods will contain the following fields: declaration number, declarant number, name of goods according to the TNVED, quantity, price per unit of goods. The fields Declarant's Code, Surname, First name, Patronymic, address will be stored in a separate Declarant table.
3. Creation of the database schema. In this case, the tables are linked in a one-to-many relationship. Links should be established with empty tables. If the tables are full, problems can arise when creating relationships and field properties.
4. Entering data into tables.
Let's create a form for data entry. When you have related tables, the order in which you populate them with data matters.
Progress
Task 1. Open the sample database made in the last lesson
1. Call the program Access.
2. Open the database.
Task 2. Delete the Product Information table
1. Highlight the table name.
2. Press the key.
3. To the question about confirming the deletion of the table, answer Yes.
Task 3. Create the Declarant table
1. Select the tab Creation - Table.
Rename the fields. To rename a column, double-click on its name, enter a new name for the column and press Enter... The new name is automatically saved and the links to the renamed column are updated.
2. Enter the name of the fields: Declarant's code, Surname, First name, Patronymic, address.
Declarant, by clicking on the button Save.
The table will look like this (Fig. 7).
Rice. 7 Table creation window
4. Switch to the mode Constructor, by clicking on the button Constructor and see how the fields are set: field Declarant code- data type counter, Surname, Name, middle name, Address- text
Task 4. Create a Product Information table
1. Click the button Creation - Tables.
2. Enter the name of the fields: Declaration number, declarant number, Commodity name according to TNVED, quantity, price per unit of goods.
3. Save the table with the name Product information, by clicking on the File - Save button.
4. Switch to the mode Constructor and see how the fields are set. Field Declaration number the key is already automatically set, the field type is numeric, the field Commodity name according to TNVED- text, fields Declarant number, quantity- numeric, field unit price- monetary. With field Declarant number special conversation. Its type is numeric. We do not change the general properties of the field. In addition, the values of this field should not be typed manually, but selected from the list contained in the table. Declarant. To do this, in the mode Constructor v Field properties you should indicate that the substitution takes place here according to the following scheme: select the tab Substitution, control type - Combo box, source of strings - Declarant. Get the values of the elements as shown in fig. eight.
Rice. 8 Table in design mode
Change Number of columns by 2, in order to see not only the declarant's number, but also the surname.
5. Save your changes.
6. Close the table.
As a result of this work, you will receive two unrelated tables. You need to create a data schema with links.
Task 5. Create a data schema
To establish links between tables, the common fields of these tables are used. Viewing, creating, editing and deleting links is carried out on the data schema. To open the data schema, you need to use the button Data schema in the tab Working with databases.
1. Click the button - Data schema.
2. In the window that appears Adding a table highlight the table Declarant and click on the button Add. Highlight the table Product information and click on the button Add... In the window Data schema a conditional view of these tables will appear. Click on the button Close the Add Table window.
3. Enlarge the table window Product information so that all fields are visible.
4. Put the mouse on the field name Declarant code in the table Declarant and without releasing the mouse button, drag it onto the field Declarant number in the table Product information... Release the mouse. The Links dialog box will appear, as shown in Fig. nine.
Rice. 9 Edit Links Windows
5. Turn on the icon Ensuring data integrity... This cannot be done if the types of both fields are not set the same.
6. Turn on the icon Cascading deletion of related fields and Cascading related fields update... This will lead to the fact that when deleting or updating the record Declarant code in the table Declarant all records from the table will be deleted or updated Product information, in which there were the corresponding numbers.
7. Click the button Create... A one-to-many relationship appears. The data schema is shown in Fig. ten.
Rice. 10 One-to-many data schema
8. Close the data schema by clicking on the button Close in the upper right corner of the window and answering yes to the question about saving the data schema.
Task 6. Fill in the Declarant table with values
1. Open the table Declarant in mode tables.
2. Fill in it with records from table. 3. Field Declarant code is filled in automatically.
Table 3
3. Save the table and close it.
Task 7. Create Data Entry Forms
To create a form using the Form tool, you need to do the following:
1. Open the table Information about the goods in table mode.
2. Go to the tab Creation and in the group Forms click on the tool The form... The automatically generated form will be displayed in layout mode (Fig. 11).
Rice. 11 Automatically generated form
3. Close the form. Before closing, a window will appear asking you to save the form.
4. Press the button Yes.
5. In the window that appears Preservation enter the name of the form layout Product information and press the button OK.
Task 8. Add records to the database using the form
1. Fill in the form with the data presented in table. 4.
Comment... The transition from the input field to the next field is made with the key, or with the mouse. To go to a new entry, click on the button.
Table 4
| Declaration number | Declarant number | Commodity name according to TNVED | number | unit price |
| Vacuum cleaners with a built-in electric motor, power not exceeding 1500 W, having a dust bag or other dust collector with a volume of not more than 20 liters | ||||
| Blue cheese-Roquefort | ||||
| Crawler tractors for laying ski trails | ||||
| Antiques over 100 years old | ||||
| Grand pianos | ||||
| Non-legal tender silver coins | ||||
| Purebred (purebred) breeding cows, live |
2. Save your entries.
3. Close the form.
4. Open the table Product information. Make sure there are new entries in the table.
6. By clicking on the bottom button Close in the upper right corner, close the table.
Task 9. Verify Cascading Updates of Linked Fields
1. Open the table Declarant.
2. Correct the name of AP Petrovskaya. on Petrov.
3. Save the table.
4. Close the table Declarant.
5. Open the table Product information.
6. Make sure the values have changed.
7. Close the table Product information.
Task 10. Check the cascading deletion of linked fields.
1. Open the table Declarant.
2. Delete the first entry (select the entire line and press the key).
3. Agree with the test question.
4. Close the table Declarant.
5. Open the table Product information.
6. Make sure the entries have disappeared.
7. Close the table Product information.
Present to the teacher:
Open tables Product information , Declarant and shape Product information on the screen.
Task 11. Quit the Access program.
1. Run the command File - Exit.
2. If you made edits in the database, you will be prompted to save the changes. Answer it in the affirmative.
1.3 Laboratory work No. 3: Creating a database consisting of three tables
Objectives of the work:
learn to design and create more complex databases.
Stages of work:
1. Designing the structure of the database.
2. Constructing empty database tables. Create a more complex version of the database, consisting of three tables: and The requisites of the declarant.
3. Creation of the database schema. In this case, the tables Product information, Declarant linked by a one-to-many relationship, tables Declarant and Declarant's details- one-to-one communication.
4. Entering data into tables. Create a data entry form.
5. Using the database for practical tasks.
Progress
Assignment 1. Open the sample database created in the last lesson.
Task 2. Delete all records of the Declarant table, leaving its structure
1. Open the table.
2. Select all entries.
3. Press the key. Click on the Yes button when asked to confirm the deletion. (You can run the command home- tab Recordings and click on the button - Delete entry).
4. Close the table and save it.
Comment. If you enter data into a table in which the key field is of the counter type, then the counter will change from the number that was assigned to the last record. To start the numbering from 1 again, run the command File - Management–Shrink and repair the database. Wait a while for the program to run.
Task 3. Create the table Declarant's details
1. In the mode Constructor enter the following fields: Code(data type counter) - key field , Fields simenami place of birth, citizenship, country of permanent residence, type of identity document, series no. – data type is text and date of birth – Date Time.
3. Switch to the Tables mode by clicking the Table Mode button.
4. Close the table, save it first. As a result, you will end up with three tables, two of which are related and the third is not.
Task 4. Correct the data schema
1. Enter the section Working with databases, click on the button Data schema. A dialog box appears – Data schema.
2. Right click - Add table... In the appearing Add Table window, select the table Declarant's details and click on the button Add, and then – by button Close window Adding a table.
3. Put the mouse on the field name Code in the table and, without releasing the mouse button, drag it onto the field Declarant code in the table Declarant. Release the mouse. A dialog box will appear Connections.
4. Check the box Ensuring data integrity. This cannot be done if the types of both fields are set differently.
5. Click the button Create. A one-to-one relationship appears. This means that one record in the table Declarant matches one record in the table The requisites of the declarant. The data schema is shown in Fig. 12.
Rice. 12 Data schema
6. Close the data schema by saving it.
Explanation. Now the problem arises of entering records simultaneously into different tables: Declarant and The requisites of the declarant. You can, of course, try to enter values in each table separately, but it is more convenient to see the cells of both tables for entering data at the same time. This problem can be easily solved by entering values through a specially created form, which contains the fields of all the necessary tables. We enter the data into the form, and as a result, the tables are filled.
Task 5. Create a data entry form
1. Go to the tab Creation and in the group Forms push the button Other forms... In the drop-down list (Fig. 13) select the tool Form wizard.
Rice. 13 List of other forms
2. A window will open Form creation(Fig. 14).
Rice. 14 Form creation window
3. Select all fields from tables Declarant and The requisites of the declarant. To do this, select the table name Declarant in field Tables / Queries. As a result, a list of fields appears in the window Available fields. Click on the >> button, which brings all the fields from the list.
4. Then select the table name Declarant's details in field Tables / Queries and click the >> button again.
6. Leave the appearance of the form in one column(selected by default).
8. Select the required style (for example, Regular) Click the Next button.
9. Set the name of the form: General form. Click on the button Ready. As a result, you will receive a form in which you can change existing data and enter new values. These values will fall into the table in which you need (part of the values – in one table, part – to another).
Task 6. Fill the tables with data
Comment. The fields Code and Code of the Declarant are filled in automatically.
1. Table data Declarant are given in table. 5, and the table data Declarant's details in table. 6.
Table 5
Table 6
| Code | Place of Birth | Date of Birth | Citizenship | Country of permanent residence | Document type | Series no. |
| Moscow | 03.05.1952 | RF | Russia | Passport | 7404 564798 | |
| Voronezh | 09.06.1989 | RF | Russia | Passport | 7405 985423 | |
| Ivanovo | 23.04.1987 | RF | Russia | Passport | 7411 674367 | |
| St. Petersburg | 30.09.1968 | Germany | Germany | Passport | 7477 366785 | |
| Kiev | 21.08.1987 | Ukraine | Ukraine | Passport | 5456 87544 | |
| Belgorod | 30.04.1978 | RF | Russia | Passport | 7405 357948 | |
| Ufa | 11.04.1987 | RF | Russia | Passport | 7401 567895 |
2. Close the table after saving it.
Open the table Declarant and Declarant details and make sure the data appears in them. Close the tables. Fill the table Product information.
Exercise 7. Learn to use a filter
1. Open the table Declarant's details.
2. A group of commands is used to manage filters. Sort and filter in the tab home(Fig. 15). To enable and disable the created filter, use the button Apply filter... To remove the filter, use the button Additionally and paragraph Clear all filters.
Rice. 15 Command group Sort and Filter of the Home tab
3. To create a simple filter, do the following: click on the button - Apply filter
4. Activate the column for which you want to create a filter. Click on the field Year of birth. A selection arrow appears next to the active field. Click on the arrow.
5. In the list of all field values, uncheck the box Select all... Next, you need to select the checkboxes for those field values that you want to include in the filter.
6. Check the boxes for 1952 and 1987.
7. Press the button OK... As a result, those records will be selected in which the field value matches one of the values marked with the checkbox.
8. Deselect the selection. To do this, you need to release the same button, which is now called Remove filter.
9. Click the button - Change filter.
10. Change the filter. It is permissible to indicate the boundaries of the change in values. In field Year of birth click on the arrow . In the field that opens, select Date Filters - After ... and type 1.01.1985 By clicking on the button OK, you will get a table that contains records with birth years greater than 1985.
11. To get the records of declarants whose Place of birth begins with the letter "I", you need to click on the arrow next to the field Place of Birth... In the window that opens, select Text Filters - Starts with - Type the letter "I".
12. Choose by yourself Place of Birth that do not start with the letter "K".
Reference Information. Filter expressions can consist of exact values that Access uses for comparison as you type. Numbers are entered without delimiters, for example, 22. The text must be enclosed in quotation marks, for example "Gorodetsky". Dates are delimited by # characters, for example # 10.01.99 #. Expression elements can be linked by operators:
arithmetic: * +, -, / ^:
comparisons:<, <=, >, >=, =, <>;
logical: And (And), Not (No), Or (Or);
Like – to use replacement logic in expressions;
In – to determine if a data item is contained in a list of values;
And – to select values from a specific interval.