Media server loads xiaomi cpu heavily. Correcting the error “Android process media. OC android is eating a battery, it started recently for no apparent reason, what can be done
In this article, we'll take a look at how you can turn your Android DLNA media server into. We will learn how to watch videos, photos and listen to music recorded on an Android mobile device, through a computer, TV or on another phone or tablet.
In order to play media files recorded on an Android phone on a TV or other smartphone, several conditions must be met:
- Both devices must be connected to the same WiFi router
- Both devices must support DLNA or Miracast standard (for Apple - AirPlay)
If everything is clear with the first point, then the second can cause difficulties. The fact is that older TV models do not all support DLNA technology, even if they have built-in WiFi. In order to provide this opportunity for such TVs, you will need to additionally purchase a WiFi adapter, or popularly a "whistle" that is guaranteed to work with DLNA / Miracast. If you want to play files from iPhone / iPad without installing additional applications (including video played from the browser), then you also need this adapter to support AirPlay - DLNA analog from Apple.
DLNA server on Android device
A smartphone can not only play files from a PC, but also be a server itself and allow viewing of files on it to other devices - TVs, PCs and smarts. For this there is another program, which is called the DLNA server. In the Play Store, it looks like this (download link):

Install the program and go into it. First, you need to create a server on this smartphone. To do this, click "Add> DLNA Server"

and set the parameters in the "Settings" tab, as in the screenshot:

- Server Name - the name that will be displayed when searching from other devices.
- Port - we leave it by default.
For safety, we activate the inclusion of the program only when connected to our home Wi-Fi network. Its name (SSID) can either be entered manually, or you can press the "GEt current SSID" button for the program to determine it on its own.
After that, go to the "Roots" tab, select a folder with files that can be viewed over the network.

After selecting the folder, press the "Back" button on the phone panel several times and, when prompted, confirm saving the settings ("Do you want to save the settings> Yes").
After that, we return to the main start window of the program, where we see our created media server. To start it, click "Start".

After that, as in the case of the Home Media Server on the computer, by going to the TV in the “AllShare” menu in the “Video” section, our DLNA server on Android will appear, from which you can watch the video.

Also, our Android server will appear on other devices when DLNA players are installed on them. For example, on Apple devices, you can use the TV Assist program. We go to the "View Multimedia", we see our running server there, and inside it folders and files for playback.
Then you can click on any of them and play.
I will answer all questions in the comments ..
If the article helped, then in gratitude I ask you to do 3 simple things:
- Subscribe to our YouTube channel
- Send a link to the publication to your wall on a social network using the button above
The Android operating system is quite flexible and universal platform, but unfortunately there are various unpleasant roughnesses, such as fast battery drain.
One of the articles on the site described in detail how to reduce battery consumption, but there is such a MediaServer Android process that can discharge a tablet or smartphone in a few hours. Why this is happening and how to deal with it, this article was specially written for this.
Having a problem with MediaServer Android
The MediaServer process in Android is responsible for scanning and detecting media files on the internal storage or memory card. Ideally, from detection, the process should stop, but if any file is damaged, then the MediaServer loops and, accordingly, consume more power, as the system tries to "solve the problem" and allocate additional resources for it.
How to fix Android MediaServer problem?
If you are using Android as an external storage device, always perform Safely Remove from your computer. As stated above, the MediaServer Android problem occurs due to file corruption.  If you do not properly disconnect Android from the PC, then thereby damage the flash memory and, accordingly, the files on it.
Use a quality microSD card, firstly, they are reliable, and secondly, they work faster.
How to choose the right memory card and what you should pay attention to, read the article - All about MicroSD.
Do not defragment flash drives and memory cards when, under any circumstances - this is certain death for them.
If you have an abundant amount of music files on Android, then 80% sure that it is in them! In order to understand exactly whether this is so, you will have to do the following:

If you have questionable video files on your Android - incompletely downloaded files or they are broken, try deleting them.
There is a pretty easy way to fix the problem with the Android MediaServer process! It is necessary to place the file in the folders with media files. The disadvantage of this option will be that Android will no longer display photo files in the standard music player where the .nomedia file is located. You can read more about the .nomedia file in.
Delete or copy all all files (backup) from the internal and external memory and format the drives using standard Android tools.
In order to format the drive, go to Memory -> Clear SD  After that, return all files to their place.
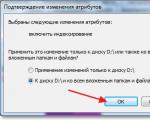
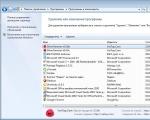
Check for bad memory sectors on flash drives. To do this, connect Android to your computer as a Drive and select the necessary one with the right mouse button - Properties - Service - Check:  Perform the proposed two tests in turn. If errors are found, they will be automatically corrected.
If it was not possible to solve the problem with the above methods, then you should try a special application
The Android operating system is quite flexible and universal platform, but unfortunately there are various unpleasant roughnesses, such as fast battery drain.
One of the articles on the site described in detail ways to reduce battery consumption, but there is such a MediaServer Android process that can discharge a tablet or smartphone in a few hours. Why this is happening and how to deal with it, this article was specially written for this.

Having a problem with MediaServer Android
The MediaServer process in Android is responsible for scanning and detecting media files on the internal storage or memory card. Ideally, the process should stop from detection, but if any file is damaged, then the MediaServer loops and, accordingly, consume more power, as the system tries to "solve the problem" and allocate additional resources for it.
How to fix Android MediaServer problem?
If you are using Android as an external storage device, always perform Safely Remove from your computer. As stated above, the MediaServer Android problem occurs due to file corruption.

If you do not properly disconnect Android from the PC, then by doing so, Damage the flash memory and, accordingly, the files on it.
Use a high-quality microSD card, firstly, they are reliable, and secondly, they work faster.
How to choose the right memory card and what you should pay attention to, read the article - All about MicroSD.
Do not defragment flash drives and memory cards when, under any circumstances - this is certain death for them.
If you have an abundant amount of music files on Android, then 80% sure that it is in them! In order to understand exactly whether this is so, you will have to do the following:
- Connect your Android device as a storage device to your computer
- Download and run the utility to fix errors in MP3 files - MP3Val
- Select scan in this utility

- If there is PROBLEM then they need to be corrected " FIX”Or delete.
If you have questionable video files on your Android - incomplete or broken ones, try deleting them.
Delete or copy all all files (backup) from the internal and external memory and format the drives using standard Android tools.
In order to format the drive, go to Memory -> Clear SD

After that, return all files to their place.
Check for bad memory sectors on flash drives. To do this, connect Android to your computer as a Drive and select the necessary one with the right mouse button - Properties - Service - Check

Perform the proposed two tests in turn. If errors are found, they will be automatically corrected.
If you did not manage to solve the problem with the above methods, then you should try the special MediaServer Killer application.
This application requires Root rights, then it will not work. The point of operation of MediaServer Killer is to stop the MediaServer process if it is running for a long time.
If you have your own ringtone installed, abandon it and set a standard ringtone for a call. The rapid charge consumption should disappear.
A SEO user needs a smartphone not only for making calls, as it is necessary to work with mobile applications, without which the work becomes more complicated. Personally, I use a dozen applications, including Web Money, Yandex Money, TOTP for Epei and a bunch of other things. They allow you to make payments outside the home, check your email, and track website activity. It’s a big trouble if viruses are running on the smartphone, because this is how the data of accounts, passwords can float away, and the device starts to dull and kick.
Today I will tell you how to remove viruses, trojans from a smartphone running Android 5. It will take half an hour to clean up, after which you will not have to worry about the state of the balance of payments, and the device will stop showing the wonders of stupidity when surfing the Internet.
The birth of a problem
The problem arose right after the New Year, when my son and I were testing the capabilities of a new smartphone and downloading various trash from everywhere on it. The first sign of the disease manifested itself in the refusal to update via OTA, since the system files were changed by viruses. The device's disease progressed - when connected to the Internet, the left applications began to load by themselves, such as AliExpress, the processor from the strain began to overheat, and the phone freezes.
As a result, at the end of the first month of life, it became impossible to use the Internet without a mat, launching applications became a torment and the phone was flying into the wall, despite the warranty.
Virus scan
Naturally, I did not sit back and started looking for evil spirits on the phone. 360 Total antivirus for a smartphone disappointed - when scanning it, it found 6 dangerous files, but did not show where they were installed and could only offer to disable applications. He can not delete anything due to the lack of root rights. The list of dangerous applications includes:
- - Android Media Service,
- - App Manager,
- - Guard Service,
- - Phone Service,
- - Setting Service.
In the applications, I found only the first two, the rest were successfully disguised. It made no sense to carry a smart under warranty, there was also no desire to pay for a flashing of a new device. What to do, asked the eyes of the brain, the latter was straining.
Working the solution started by installing Malwarebytes-anti-malware, then went on the knurled one.
Removal instructions
In order to completely remove all viruses and trojans on Android, three programs were needed:
- Malwarebytes-anti-malware,
- Kingo Root,
- ES Explorer.
Malwarebytes antivirus scanner found all the viruses, Kingo allowed to get root-rights for removal, and the explorer removed the trojans.
Malwarebytes
First, install Malwarebytes and scan your smartphone. He will find all the evil spirits, indicate its location on the phone and give a brief description of the viruses. The scanner is compatible with regular antivirus, so you do not need to remove anything before installing it. He found me in system / priv-app:
- - org.show.down.update,
- - newmast.apk,
- - higher.apk,
- - newdlir.apk,
- - parlmast.apk,
- - CLPower.apk,
- - smalls.apk,
- - tpings.apk,
- - oneshs.apk.
This is from the fact that he could not delete due to the lack of root rights and moral standing, he burned 4 folders with malicious content at the stake, I don’t remember their names exactly - the ashes hid everything. Rewrite the "coordinates" of dangerous files that the scanner found but could not delete.
So, after scanning, you found viruses, some of them were removed and you know the exact location of the rest of the malicious files. Now you need to get root-rights and install the explorer to delete files.
Kingo root
On my Android 5, only Kingo Root has successfully become, so I recommend it. Even the vaunted Bajdo Root didn't. All the programs you need to remove viruses can be found below. They are checked by me personally, everything is working and will not break Android.
Before installing Kingo, I recommend that you follow two rules - charge your phone normally and connect to the network, as you will need to download updates and install Super User. Run the application, press "get root" and turn blue while waiting for the software to be installed and updated. There is a more complicated way to install root rights using Kingo through a computer, but you shouldn't make your life difficult when it works like that.
ES Explorer
Got your license? Now install ES_file_explorer- a conductor capable of working with root-rights. In the explorer, go to the menu (top left), look for the Root explorer tab and turn it on. Agree with stupid questions from the application and go to the menu item "Local storage - device".
All that remains is to find the malicious files and delete them. Select and delete.
After removing the viruses, restart the phone and scan it again with the scanner. If not everything was removed, repeat the procedure for a complete recovery.
The disease requires sacrifice, so it happened.
So, let's consolidate the passed material:
- - Install Malwarebytes and look for viruses,
- - Record the location of non-deleted files,
- - Install Kingo Root and open root-rights,
- - Install ES Explorer,
- - Remove viruses,
- - Reboot your smartphone,
- - Recheck the system with the scanner again.
Remove the Kingo Root program immediately after the destruction of viruses, Super User and ES Explorer can be left. If you go to the workshop for warranty repairs and you need to remove root-rights and their traces, then go to the Super User menu and use the line "remove root". If Super User was deleted, and you still have root rights that need to be removed, then put it again and delete the rights through the menu... Otherwise, you cannot get to the SU file in system / bin.
And yes, if you think that you have no viruses on Android, but in 90% of cases you are mistaken.
You can download Malwarebytes, ES Explorer and Kingo Root in one rar file directly from the Zegeberg blog.
The standard media scanner on Android does not work well: it constantly walks through the same folders and checks the same files. There is little real use from it: it only makes sure that the current files are always in the standard player and gallery, but it does it with failures. Worst of all, when he stumbles upon a broken file or file system errors - then the load on the processor and battery increases greatly.
The enthusiasm with which the media scanner crawls through the folders of the operating system can be limited. If you know for certain which folders you have your photos, videos and music in, do nothing with them, and copy the empty file named .nomedia to all others. The presence of this file is a warning to the media scanner that there is no need to enter here, there is nothing interesting here. In Android 4.3 and 4.4, the media scanner has learned to ignore the .nomedia file and sometimes scans them.
If the media scanner is still displayed among the leaders in battery consumption, you will have to resort to more drastic measures - turning it off. To do this, you can use the free Rescan Media ROOT application. It requires root access and enabled USB debugging. If you have all this, launch the application and click the "Disable Media Scanner" button. Now it is responsible for scanning and adding media files to libraries, checking is done manually, no background scanning, which consumes battery without demand, will not be performed. The Re-Enable Media Scanner button disables file scanning via Rescan Media and returns the standard media scanner.

Sometimes there is a problem in which the player stopped seeing some of the tracks, and some photos disappeared from the gallery. This means that the scan is experiencing errors or has stopped. You need to fix it. Open settings and go to the list of all installed applications, search for "Media Storage" and clear the cache and user data in it.