Thunderbird mail client. Meet Mozilla Thunderbird - a handy free email client. Attaching files to sent emails
How do you like to view email better? Many people use a web browser out of habit, without thinking if they need an alternative, but some remain faithful to the good old mailers, because they know a lot about them.
– free app to work with e-mail and newsgroups from the creator of the web firefox browser... According to the developers, it concentrated in itself best qualities different mail clients, including the "classics of the genre" Microsoft Outlook and The Bat. I propose to get to know him better in order to understand whether it is worth attention or just one of many.
Why an email client is better than a browser
There are several reasons to install a separate program for working with mail or use it with a browser:
- Access to correspondence in the client program does not depend on the stability of the Internet connection.
- Using the program reduces the consumption of web traffic, since it downloads only emails, and the browser downloads page design elements and ads.
- The application interface can be configured according to your needs. Web services have very limited functionality.
- The programs have better developed functions for searching and filtering messages.
- Client programs contain more useful tools than any web service.
What is the strength and weakness of Mozilla Thunderbird
Strengths
- Built-in wizard for setting up accounts. The user can afford not to know what SSL, TLS, SMTP, IMAP, POP3 are and how to configure them correctly - the program will do it for him. It is enough to remember your email address and your mailbox password.
- Opening folders and emails in tabs is like opening web pages in a browser. This means you don't have to close everything else to work with one message.
- Unlimited number of connected mailboxes.
- Convenient sorting of letters: for correspondence of different accounts, you can use both general and individual directories. And also - configure the display of the same letters in different folders (although physically they will be in one).
- Reminder function to attach an attachment to the letter if you mentioned it in the message.
- Support for skins and extensions that are installed without leaving the application.
- Russian language interface.
- Built-in antispam filter, calendar and task scheduler.
- Protection against phishing - a warning when you go to sites whose address is different from the one specified in the letter.
- Faster filtering: you've just started typing a word in search barand the application is already producing results.
And what users don't like too much
- Not always correct display of message headers.
- Tabs cannot be dragged back and forth with the mouse.
- The attachment reminder function does not always work (just the word "attachment" is taken into account only in the nominative case).
First launch and setup
Installation Mozilla Thunderbird is nothing special. When you turn it on for the first time (immediately after installation), the Account Setup Wizard starts and offers a choice of:
- Connect existing.
- Put it off for later.
Let's consider its work on the example of connecting an existing account, because you probably already have at least one.
- In the window " Welcome to Thunderbird"Check" Skip (creating a new account) and use my existing mail».

- Enter the mailbox address and password. Click " Proceed».

- After entering, click “ Done».
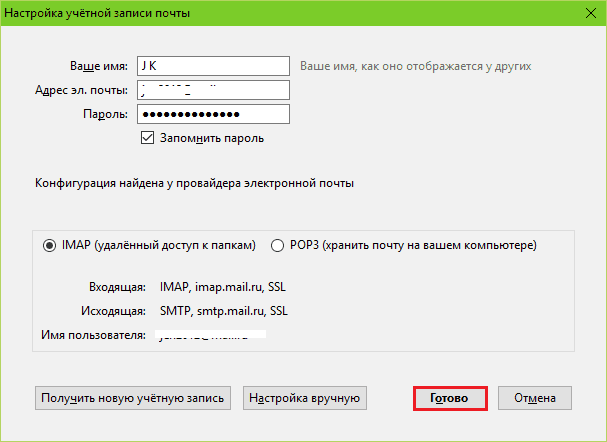
- If desired, change the parameters of the box: click " Manual tincture»And specify the required servers, ports, protocols, authentication methods and the rest as shown below. If you do not know the purpose of these parameters, leave everything as it is.

This completes the wizard and you will find yourself in the main program window. By the way, it is very similar to the Firefox browser window. On the left is the folder panel. In the frame below - context menu, opened by clicking on this panel. At the very top is the tab bar (like in a browser). Below it are functional buttons, the purpose of most of which, I think, is clear. In the main part of the window there is a shortcut menu for basic functions.

Two framed icons on the right open the calendar and task scheduler:

The three-bar button hides the main Mozilla Thunderbird menu. With the bulk of the tools collected here, I think it is easy to understand without explanation. Among other things, it contains a button to go to the add-on installation section. We should get to know him better.

Those who have installed plugins and extensions in the browser at least once will not have to explain long how to install them in Thunderbird: it is done in the same way as Mozilla Firefox... By default, the program has one single extension - Lightning (Calendar). If you want to install anything else, click " Get add-ons", Choose what you like and click" Add to Thunderbird».

And below I showed how the function “ Quick filter". As soon as I started to enter the word "coupon", as soon as 3 messages were found where this word is mentioned in the title of the topic.

General impression of the program
The Mozilla Thunderbird mail client turned out to be convenient and easy to use. It took just a few minutes to download incoming emails. Create and send a new message (button " Create a») Also passed without incident, however, the address book had to be imported from M $ Outlook manually, since the program did not want to do it itself. And that was the only thing that prevented me from starting to work right away. In general, the application takes almost no time to master, which is good news.
In my immodest opinion, the product meets the expectations of users - both experienced and beginners, and also occupies far from the last place among competitors. Give it a try, I hope you like it too.
More on the site:
Meet Mozilla Thunderbird - A Convenient Free Email Client updated: May 4, 2016 by the author: Johnny mnemonic
Good day, dear readers and other personalities.
I thought and thought and suddenly realized that by some unknown miracle I had bypassed the post subject. No, I, of course, briefly wrote about, mentioned about, and on Twitter I talked a little about my love for, but from a programmatic point of view, I forgot to devote time to any particular mail client. It's strange. Correcting :)
As you already understood, today we will talk about mail, or rather about a program that allows this mail to receive, store, sort and generally do a variety of lewd practices with it. Many of you will certainly be surprised, they say, why do you need a program, if in modern world everything has long been integrated at the browser level - take it and come in and use it.
However, as a person of the old school (my mail began in Windows 2000) and just a professional, I believe that email clients have a number of advantages over browser solutions. I will tell you about them (advantages) (and even show you a little), as well as, in fact, teach you how to install, configure and powerfully use such a wonderful mail client as Thunderbird.
Advantages of local mail over browser
Before proceeding, I, as promised, will first tell you about what I see the advantages of local, so to speak, software mail from the one that lives in the browser.
Firstly, this is the same, support for several boxes at once and in different services. I don’t know how anyone has, but I have more than a dozen emails that live on a bunch of different domains: @gmail, @mail, @yandex, @ site, etc. Naturally, running from mailbox to mailbox in the browser, even if that I will have direct bookmarks on them, you will still be tortured: while you log in, while you check everything new, while you answer .. Long and dreary.


Connection security: STARTTLS
Port (for POP): 110
@gmail and @yandex
Connection security: SSL / TLS
Port (for POP): 995
Authentication Method: Normal Password
When finished, you can press the button " Retest"..
And " Create an account"(after testing is over). The wizard will check the password and, if everything is correct, create an account, after which we will see something like this:


Now let's configure where our mail will be stored on disk.
Location of mail files
It is better not to leave the originally proposed path, because it is buried somewhere in the depths of the system and, in case of problems with it, it will not always be possible to find and restore the folder later, and therefore it would be good to assign your own, which we will do now.
On the "Local folders" tab, click on the "Browse" button and set the folder we have created, say, with the name _mail somewhere on the disk. Having done this, click on "OK".
Of course, you can set up various rules for this very sorting (by default it goes "by date", but there are also very different options, for example: "by sender", "by subject", etc., which, I think, you have already seen on the screenshot before last).
Message Filters in Thunderbird
We figured out the visual sorting. Let's take a look at the filters and try to create some of them.

Let's say that we have a huge amount of mail comes with a mention in the subject line of a certain site " Sys.Admin's Notes"and we want all these letters to be placed in the @from_site folder we created in advance (the folder is created by right-clicking on, say, the" Inbox "item). To do this, go to" Menu - Message Filters".
Here we select from the drop-down list the box for which the filters will be applied, and then click on the "Create" button.

In the window that appears, fill in the appropriate fields, namely:
- Filter name: enter something to tell you what the filter is
- Subject contains t: in this example I enter " Sys.Admin's Notes"
- In the box move message to: from the drop-down list, select the folder we created. In my case, this is @from_site
Done, press the "OK" button. The filter can be checked immediately by selecting for the field " Run selected filters in folder"the folder where we want to apply the created filter (in this case it is" Inbox ") and click on the" Run "button.

If everything is done correctly, then all mail will be sorted in accordance with the rule you specified.
Naturally, as in the case of sorting, you can create filters for the most different directions and variations, and you can configure filtering according to several rules at once, for which you use the "+" button in the list and set a new rule.

Over time, when you set up all the filters you need, you will be terribly pleased with how the comfort when working with mail has significantly increased.
Afterword
Here are the things.
It turned out quite voluminous, but this is not the end :) Especially for Thunderbird, as well as for Firefox, there are various useful extensions designed to make your life more convenient, but we will talk about them next time.
Stay with the project and you will learn a lot of new and useful;)
As always, if you have any questions, additions, thoughts, thanks, etc., I will be glad to hear them in the comments to this post.
Came out a new version Thunderbird email client. Mozilla Thunderbird is a popular free email client. Mail clients are computer programs designed to work with mail.
This client has many useful and well thought-out functions that make its use as convenient as possible. We can note the high security of work, fast message search mechanism, smart spam filter.

There is also a function for importing settings from other mail clients (The Bat !, Microsoft Outlook, Outlook Express). The ability to work with RSS, check spelling right when you write.

Despite its free status, this program implemented all necessary tools for comfortable work with mail:
- spam filtering system;
- the ability to read news via RSS;
- the ability to sort messages by folders, based on a variety of criteria - by date, by sender;
- built HTML editorwhich creates a fairly compact code, which in turn reduces the total size of the letters sent;
- support for all kinds of encodings;
- expandability due to additional modules.
If you nevertheless decide to use the Thunderbird mail client, we recommend that you download a very useful program
Your name - username (for example, "Alice Little");
Email address mail - your mailing address on Yandex (for example, « [email protected] » );
Protocol - IMAP;
Server name - imap.yandex. ua;
Port - 993;
SSL - SSL / TLS;
Run the program and click the button in the welcome window Skip this and use my existing mail.
In the window Setting up your existing account email specify the following account parameters:
Click the Continue button.
Click the button Manual configuration and specify the following email server parameters: Incoming mail
Server name - smtp.yandex. ua;
Port - 465;
SSL - SSL / TLS;
Authentication - Normal password.
Also enter the username - your Yandex login, for example, "alice.the.girl".
Attention. If you configure receiving mail from a mailbox of the form " [email protected]ua ", the login is the part of the address before the "@" sign. If you use Yandex.Mail for Domain, you must specify the full mailbox address as your login.
Click the button Retestto check the correctness of the entered parameters. If the test was successful, click Finish.
If you want to always use to send emails mozilla program Thunderbird, in the window Integration with the system press the button Set as default.
Click on the account name right click mouse and select Options.
Go to section Server parameters and set in paragraph When deleting a message value Move it to the Deleted Items folder.
"," hasTopCallout ": false," hasBottomCallout ": false," areas ": [(" shape ":" rect "," alt ":" "," coords ":," isNumeric ": false)])) \\ Go to the Copies and folders section and set the value for all folders with the name of your Yandex mailbox.
"," hasTopCallout ": false," hasBottomCallout ": false," areas ": [(" shape ":" rect "," alt ":" "," coords ":," isNumeric ": false), (" shape ":" rect "," alt ":" "," coords ":," isNumeric ": false), (" shape ":" rect "," alt ":" "," coords ":," isNumeric ": false), ("shape": "rect", "alt": "", "coords":, "isNumeric": false)])) \\ "\u003e
Click OK to apply the changes and restart the program.
Problems with Mozilla Thunderbird
it
step by step guide helps you solve problems related to your mail program. Select a problem:
What message did you receive?
{!LANG-2b55fd5102b5fb22a9f2f0ad1279698d!}
If a message appears stating that there is no connection to the server, try logging into the Yandex.Mail web interface with the same username and password that you use in the application. Enter your username and password manually, without using the ones stored in the browser.
The mailers include the protocol \\\\ n you want to use. \\\\ n
Make sure that in the settings of the mail program you have specified \\\\\\\\ n the following server parameters: \\\\\\\\ n \\\\\\\\ n \\\\\\\\ n
If you are using IMAP
- \\\\\\\\ n \\\\\\\\ n
connection protection - SSL;
\\\\\\\\ nport - 993.
\\\\\\\\ n- \\\\\\\\ n \\\\\\\\ n
connection protection - SSL;
\\\\\\\\ nport - 465.
\\\\\\\\ n\\\\\\\\ n \\\\\\\\ n \\\\\\\\ n \\\\\\\\ n
If you are using POP3
\\\\\\\\ n \\\\\\\\ n \\\\\\\\ n Incoming mail \\\\\\\\ n \\\\\\\\ n
- \\\\\\\\ n \\\\\\\\ n
connection protection - SSL;
\\\\\\\\ nport - 995.
\\\\\\\\ n- \\\\\\\\ n
address mail server - smtp.yandex.ua;
\\\\\\\\ nconnection protection - SSL;
\\\\\\\\ nport - 465.
\\\\\\\\ n\\\\\\\\ n \\\\\\\\ n \\\\\\\\ n \\\\\\\\ n \\\\\\\\ n
For more information on how to check server settings in different \\\\\\ n mail programs, see the section.
\\\\\\\\ n ")])) \\\\"\u003e
Make sure that you have specified the following server parameters \\\\ n in the mailer settings:
\\\\ n \\\\ n \\\\ n
If you are using IMAP
- \\\\ n
mail server address - imap.yandex.ua;
\\\\ nconnection protection - SSL;
\\\\ nport - 993.
\\\\ n- \\\\ n
mail server address - smtp.yandex.ua;
\\\\ nconnection protection - SSL;
\\\\ nport - 465.
\\\\ n\\\\ n \\\\ n \\\\ n \\\\ n
If you are using POP3
\\\\ n \\\\ n \\\\ n Incoming mail \\\\ n \\\\ n
- \\\\ n
mail server address - pop.yandex.ua;
\\\\ nconnection protection - SSL;
\\\\ nport - 995.
\\\\ n- \\\\ n
mail server address - smtp.yandex.ua;
\\\\ nconnection protection - SSL;
\\\\ nport - 465.
\\\\ n\\\\ n \\\\ n \\\\ n \\\\ n \\\\ n
Encryption of transmitted data.
\\\\ n \\\\ n ")])) \\"\u003e
Make sure that the protocol you want to use is enabled in the Mail programs settings section.
Make sure that you have specified the following server parameters \\\\ n in the mail program settings: \\\\ n \\\\ n \\\\ n
If you are using IMAP
\\\\ n \\\\ n \\\\ n Incoming mail \\\\ n \\\\ n
- \\\\ n
mail server address - imap.yandex.ua;
\\\\ nconnection protection - SSL;
\\\\ nport - 993.
\\\\ n- \\\\ n
mail server address - smtp.yandex.ua;
\\\\ nconnection protection - SSL;
\\\\ nport - 465.
\\\\ n\\\\ n \\\\ n \\\\ n \\\\ n
If you are using POP3
\\\\ n \\\\ n \\\\ n Incoming mail \\\\ n \\\\ n
- \\\\ n
mail server address - pop.yandex.ua;
\\\\ nconnection protection - SSL;
\\\\ nport - 995.
\\\\ n- \\\\ n
mail server address - smtp.yandex.ua;
\\\\ nconnection protection - SSL;
\\\\ nport - 465.
\\\\ n\\\\ n \\\\ n \\\\ n \\\\ n \\\\ n
For more information on how to check server settings in different \\\\ n mail programs, see the Encrypting Transmitted Data section.
\\\\ n ")])) \\"\u003e
Make sure that you have specified the following server parameters in the email program settings:
If you are using IMAP
Incoming mail
mail server address - imap.yandex.ua;
connection protection - SSL;
port - 993.
mail server address - smtp.yandex.ua;
connection protection - SSL;
port - 465.
If you are using POP3
Incoming mail
mail server address - pop.yandex.ua;
connection protection - SSL;
port - 995.
mail server address - smtp.yandex.ua;
connection protection - SSL;
port - 465.
For more information on how to check the server settings in different mail programs, see the Encrypting Transmitted Data section.
If the message "Authentication required" appears, "Sender address rejected: Access denied" or "Send auth command first", authorization on the Yandex SMTP server is disabled in the mail program settings. Make sure the option is enabled User authentication (for Outlook Express) or SMTP Authentication (for The Bat!).
If a message appears "Sender address rejected: not owned by auth user", the address from which you are trying to send a letter does not match the one under which you are authorized on the SMTP server. Make sure that the address from which you use in the SMTP authorization settings is specified as the return address in the mail program settings.
If a message appears Login failure or POP3 disabled, the mailer cannot access mailbox via POP3 protocol. Make sure to enter correct password access via the POP3 protocol is enabled from the mailbox and on in the Mail programs settings section.
If a message appears "Message rejected under suspicion of SPAM", the content of your message has been recognized by Yandex.Mail as spam. To solve the problem, open the Yandex.Mail web interface and send any one letter as a test. This will prove to the system that it is not a robot that sends letters.
Check your computer for viruses with free antivirus software: CureIt! by Dr.Web and Virus Removal Tool by Kaspersky Lab.If the mail program does not receive or does not send letters, check the correctness of the settings of your mail program, as well as the settings for connecting your computer to the Internet.
If you are using antivirus program, firewall or proxy server, disable them and check if the problem is reproducible.
personal data and link a phone number to your account.
Read step by step instructions to search for missing letters. Before starting work, open Yandex.Mail in a new tab.
What message did you receive?
When you delete messages, they go to the Deleted Items folder and are stored in it for 30 days. During this period, you can restore them:
Go to the Deleted Items folder.
Highlight the letters you want.
Click the To folder button.
If more than a month has passed since their deletion, the messages cannot be restored - they were permanently deleted from Yandex.Mail servers.
If the messages are not in the folder where they should be, then most likely they got into another folder, for example, in Deleted Items or Spam. If you remember the name or address of the sender, part of the text of the letter or the subject - try to search for letters in all folders of your mailbox.
Did you find the letters?
You can recover emails:
Go to the folder where the letters were found.
Highlight the letters you want.
Click the To folder button.
Select the folder where you want to move the messages from the list - for example, Inbox.
Why letters go missing and how to avoid it
The Deleted messages folder is stored for 30 days, in the Spam folder - 10 days. After that, they will be permanently deleted from Yandex servers. Why letters can get into these folders without your knowledge:
Another user has access to your mailbox
Emails can be deleted by a user who has access to your mailbox: perhaps you forgot to end the session after working on someone else's device. To end the session, click the link in the account menu Logout on all devices... You can also do this on the Passport page - using the link Log out on all computers.
Letters disappear in the mail program
service page
Configured a rule that deletes or moves letters. Letters disappear in the mail program
If you use the mail program and delete letters in it, they disappear on the service page as well. This happens because your program is configured using the IMAP protocol - the structure of the box on the service is synchronized with the structure of the box in the program. To delete messages only in the program, but leave them in Yandex.Mail, you can configure the program using the POP3 protocol, but we recommend that you do not do this: messages may not sync correctly with the server.
Configured a rule that deletes or moves messages Provide reliable personal data in Yandex.Passport and link a phone number to your account. Perhaps our security system considered your account suspicious and blocked the mailbox. Most often this happens due to the fact that a phone number is not tied to the mailbox or a fictitious name and surname are indicated in the Passport. It usually takes a couple of hours to unlock.
If you delete messages in the mail program, but they are still in their folders on the Yandex.Mail website, then most likely your mail program is configured using the POP3 protocol. Due to the peculiarities of the POP3 protocol, messages in the mail program may not synchronize correctly with the server. We recommend using the IMAP protocol to work with Yandex.Mail. For information on how to reconfigure your email client from POP3 to IMAP, see Migrating from POP3.
If your mail program does not display sent messages, then most likely your mail program is configured using the POP3 protocol. Due to the peculiarities of the POP3 protocol, messages in the mail program may not synchronize correctly with the server. We recommend using the IMAP protocol to work with Yandex.Mail. For information on how to reconfigure your email client from POP3 to IMAP, see Migrating from POP3.
If, when activating SSL encryption in your mail program, you receive errors about an invalid certificate, make sure that the mail program and operating system configured correctly:
Add a certificate to the list of trusted certificates manually (Windows)
Attention. If you are not sure if you can install the certificate yourself, contact a specialist.
To add a certificate to the list of trusted certificates:
Download the certificate. (If the link opens directly in your browser, click CTRL + S and save the file to your computer; you don't need to copy text from the file.)
Open the Start Menu.
Before setting up, you need to make sure that the Internet is connected, and also in the "Settings" menu of the mailbox on the Mail programs tab, check the box in the item "I want to access my mailbox using the mail client".
Automatic tuning
1. You need to start the Mozilla Thunderbird program and open the "Account Wizard":- enter through the "File" menu (in the upper right corner);
- select the "Create" button;
- go to the tab "Existing mail account".
At the first start, the program will automatically offer to create a new account.
2. In the "Mail account settings" window that opens, enter:
- email address (for example, [email protected] Incl. for other domains Rambler / mail - @ lenta.ru, @ ro.ru, etc.);
- password - and click on the "Continue" button.
If the credentials are entered correctly, the program will perform the remaining settings automatically.
If for some reason the program fails to execute automatic tuning or you need to change the parameters, the client can be manually configured.
Manual setting
1. In the "Tools" section of the menu (the upper tab of the mail client), select "Account settings".2. In the window that opens, go to the "Server parameters" tab, check and configure the following parameters (if necessary):
- the display name of the server, if you plan to use the IMAP protocol, should be imap.rambler.ru (including for other Rambler / mail domains - @ lenta.ru, @ ro.ru, etc.);
- in the security settings, you need to enable a secure connection by selecting the "SSL / TLS" item.
- server display name should be smtp.rambler.ru (including for other Rambler / mail domains - @ lenta.ru, @ ro.ru, etc.);
- enable a secure connection in the security settings by selecting the "SSL / TLS" item and click "OK".

If it was not possible to set up the mail client, detailed tutorials and reference information can be found in the special section "Help"


