How to turn off dimming on iPhone 5s. Using iPhone with VoiceOver. Which iPhones have Portrait mode available?
In 2016, Apple introduced the iPhone 7 Plus photo flagship with a unique shooting feature – Portrait mode. It is designed to take photos “like DSLRs” - they, as you know, leave the person in the foreground in focus and blur the background.
Portrait mode came out of beta this year - but is only available on new Apple smartphones. Why? You will find the answer to this and other questions below.
Which iPhones have Portrait mode available?
Portrait mode is only available on the iPhone 7 Plus, 8 Plus and iPhone X for one simple reason - Apple's development only works on smartphones with a dual main camera.

So if you are buying for shooting new iPhone 8, keep in mind: he will not have the main photo feature (at least for now). Competitors, by the way, make do with just one – for example, Google Pixel.
How does Portrait Mode blur the background in iPhone photos?

Portrait mode on iPhone requires two lenses because... each of them different types: one of them is 12-megapixel wide-angle, the other is also 12 MP, but with a telephoto lens. When working in portrait mode, the cameras perform their own tasks: the wide-angle one records the distance to the subject, and then uses this information to create a map with nine levels of depth. The card plays a key role - thanks to it the processor Apple images understands what exactly in the picture needs to be blurred and what needs to be made clear.
To make a photo look "DSLR-like," Apple's image processor goes through layers of layers and blurs each layer at different scales (the "bokeh" effect). It makes levels that are closer to the subject a little clearer than levels that are as far away from it as possible. Take a closer look at a photo with a blurred background - and you will notice that grass and leaves located close to the subject are much easier to distinguish than objects at a distance.

How to Enable Portrait Mode on iPhone
Open the Camera app on your iPhone, select Portrait mode, move about 2 meters away from the subject and press the shutter button.

How to Take High Quality Portraits on iPhone?
Background blur mode works best when photographing people and stationary objects. There are also certain restrictions on lighting and distance from the photographer to who (or what) he is photographing. In particular, the mode does not perform well in low light. If it's too dark for a portrait photo, iOS will display a notification on your iPhone screen. You also shouldn't get too close—Apple recommends staying no closer than 48cm.
The perfect image in Portraiture is easier to achieve when there is a lot of contrast between who or what is being photographed and the background. For example, if you shoot a white coffee glass against a light background, the iPhone's sensors may simply not understand what needs to be sharpened and where it needs to be blurred.
Is it possible to remove the blurred background effect from a photo?
Apple offers the ability to remove the blurred background effect from a photo if it turns out to be a bad photo. The corresponding tool (“Portrait”) can be found by clicking on the edit icon.


Is Portrait Mode different on iPhone 7 Plus, iPhone 8 Plus and iPhone X?
Portrait photography is available on iPhone 7 Plus, iPhone 8 Plus and iPhone X. On the last two models, another interesting feature is additionally available – Portrait Lighting. It simulates studio lighting for superimposing on photographs. additional effects and thus make them even more interesting.

We talked more about the Portrait lighting mode in this article.
Comparison of camera specifications between iPhone X, iPhone 8 Plus and iPhone 7 Plus

Based on materials from yablyk
In iOS 10, user access feature Night Shift, designed to make using iPhone and iPad more comfortable and safe in the evening. The technology limits the amount of blue light emitted by the screen in the evening, which makes it possible to reduce eye strain and improve the quality of sleep. There are several applications for Android devices that can achieve a similar result.
Twilight
“Are you having trouble falling asleep? Are your kids hyperactive when they play on their tablet before bed? Are you using your phone or tablet late at night? Twilight may be the solution for you!” This is how developers talk about their application.
The first launch of the Twilight application begins with a brief excursion into the matter: the program talks about why blue light from the screen is harmful, what melatonin is, and so on. Next opens main screen, which displays screen option switches and a number of basic functions.
In a couple of clicks you can change the screen color temperature, intensity level and screen dimming. True, the parameters are set using sliders and it is quite difficult to set the exact value.
An example of the application is shown in the corresponding screenshots above. Naturally, everyone will adjust the level of “darkening” individually and screenshots will not convey the full picture of what is happening. In fact, at night the eye strain is actually reduced and looking at the screen is much easier.
"Blue Light Filter"
Do you know that the bright blue color on the screen of your gadget spoils your vision at night? You need to remove the blue color from the screen - apply an appropriate filter using the Blue Light Filter application.
The first thing you can adjust is the color temperature of the screen. For this, there are five presets and manual adjustment of their strength. This way you can make the screen a little paler, yellower, and so on. For adequate display and to avoid problems with color perception, it is not recommended to move the slider more than 20-30 divisions.
The second option is screen dimming. This is some kind of analogue of the brightness slider, only it will allow you to reduce the brightness even lower than the system brightness level of your device’s screen suggests.
Because the free application"Blue Light Filter" only has automatic switching on and turning off the screen dimming, while the color temperature remains the same, then for ease of switching there is a switch in the notification shade. In addition to the above feature, it allows you to turn on a flashlight, which is quite convenient.
Night Owl
Need to make your device screen dimmer, but the brightness slider is already stuck in a corner? Now you don’t have to strain your eyesight, just download and install the Night Owl utility. The program, without unnecessary narration and reasoning, will transfer you to the main and only screen of the application. All available functions and capabilities are concentrated on it.
First on the list of features is the screen dimmer. This function allows you to reduce the screen brightness an order of magnitude lower than allowed by the settings.
It is implied that this function will be used at night, so you can configure it to turn on and off automatically. To do this, we need to set the start and stop times of the service.
After activating the above feature, a notification will appear in the status bar, through which you can adjust the brightness or turn off the application altogether.
The application also has a color filter. The option works when the screen dimmer is turned on and makes the image softer, eliminating the bright blue color that harms our vision.
iOS 8 causes a very mixed reaction from users. Even if you close your eyes, it has enough new functions that for many turned out to be completely unnecessary. Popular Mechanics has compiled a list of iOS device features that you might want to disable. We'll tell you how to do this.
Predictive input
Anyone who has ever written a more or less long text in English using new keyboard in iOS 8, they probably appreciated the convenience of predictive input and are waiting for its appearance for the Russian-language keyboard. However, as it turned out, if you enter your password often, the predictive keyboard may one day offer it to you in clear text, which is somewhat unsafe. Go to settings, then General, Keyboard, and turn off predictive dialing. Other annoying keyboard features can be disabled in the same menu.
Airdrop
We send photographs and various other information frequently. How often do we use Airdrop for this? Personally, I've used it twice since it's been on iOS. Turn it off and it might help save some battery power. This is done simply. Open Control Center by swiping up from the bottom, tap on Airdrop, and turn it off.
Background updates
Automatically update applications from App Store is definitely a handy feature, but it can work when we don't want it to. There is a possibility that we will not want to update all applications. It also negatively affects time battery life devices. In the settings section "App Store" you can disable automatic updates and update programs manually when it is most convenient for you.
Voice messages
iMessage in iOS 8 allows you to share not only text with your interlocutor, but also your voice. These messages are automatically deleted to ensure your conversation doesn't take up too much storage on your device, but if you find these recordings valuable, simply change the deletion time for audio messages in the Messages settings section.
Parallax
Have you noticed the movement of icons and wallpapers on your iPhone home screen when you change the angle? This feature appeared in iOS 7, but as you can guess, it makes little sense. In addition, disabling it can have a positive effect on performance and battery life. If you want to turn off this effect, turn on motion reduction in the Accessibility menu in General settings.
Location services
You've probably noticed that many applications want to know your location. And how many of them actually benefit from it? Everything would be fine, but determining geolocation takes up a lot of battery power, so the list of applications that can request this information should be reduced. This can be done in the “Privacy” settings menu, in the “Location Services” section.
Content Update
Another tip for increasing battery life. By turning off background update content in the General settings menu for some or all apps can help your iPhone last longer. This is recommended for some particularly power hungry applications like Facebook.
Handoff
This feature allows you to run an application on one device and continue using it on another. Handoff is a very useful and powerful tool for those who have chosen the Apple device ecosystem. But what about those who only own one device, such as an iPhone or iPad? Just turn off this useless feature in the “General” settings menu by opening the “Handoff and suggested software” section.
Spotlight
Spotlight search in iOS 8 has been improved and is now capable of providing much more information. However, if some data in search results you don’t need them at all, you can customize Spotlight based on your own requirements for it. The search is configured in the same “General” settings section.
Notifications
Not all notifications from installed applications are useful. Some people just start to get bored. Unnecessary notifications can be disabled in the settings section of the same name. You can also customize widgets in Notification Center without leaving it by clicking the Edit button.

How to disable automatic brightness on iPhone? Why does the brightness on the iPhone change on its own? Auto Brightness is a screen setting on iPhone and iPad that causes the device to automatically change the display brightness depending on the surrounding lighting conditions. For example, in the sun or in bright light, the screen adjusts and increases the brightness for better visibility, and in a poorly lit room or outdoors at night, the brightness decreases. So the brightness on the iPhone changes itself.
Auto-brightness in iOS can also extend battery life by adjusting the brightness on your iPhone or iPad based on the ambient light.
Some users turn off auto-brightness, while others leave it enabled on their iPad or iPhone. However, auto brightness was moved from standard settings display into deeper iOS settings. This led some users to think that iOS 11 didn't have auto-brightness, but in reality it was just moved.
In this article we will tell you in detail how to adjust the brightness on any iPhone.
The main brightness adjustment is in the Control Center, as always.
- Swipe from the bottom edge of the screen to activate Control Center.
- Move the brightness slider up or down to change the brightness.

You can also change the brightness of the iPhone through the settings, to do this, do the following:
- Go to “Settings”.
- Scroll down and tap on “Display & Brightness”.
- To change the screen brightness, move the Brightness slider.
Previously, in this section it was possible to disable automatic brightness on an iPhone, but in iOS 11, it is not possible.


Additional brightness settings on iPhone and iPad
If you want to adjust brightness in smaller increments or control Night Mode, you need to press and hold or use 3D Touch on the brightness slider.
Here's how to increase brightness on iPhone 6S and later:
- Swipe from the bottom edge of the screen to activate Control Center.
- Tap (on iPhone 6s or later) or long-press the brightness slider to expand it.
- Slide your finger up or down on the brightness slider to change the brightness of the display.
- Touch the “ Night mode” to turn it on or off.


How to enable or disable automatic brightness on iPhone?
In iOS 11, auto-brightness is now located in the Accessibility settings section. Here's how to turn off automatic brightness on iPhone:
- Open the Settings app, go to General and then Accessibility.
- Select “Display Adaptation”.
- Find the Auto Brightness setting and turn it on or off as needed.


The Display Adaptation settings mention that “Turning off auto-brightness may affect battery life,” especially if you increase the device's brightness quite a bit but then turn off the auto-adjustment option to reduce it. If you're experiencing battery drain or other issues with iOS 11, you probably shouldn't turn off auto-brightness, but instead leave it on and toggle other features like geolocation and background apps.
If it matters, Auto-Brightness used to be in the Display & Brightness section of Settings, but for some unknown reason was moved deeper into Access Settings in new versions from iOS 11. Keep this in mind when using this feature on your device. various devices with different iOS versions, since moving options around confuses users and raises questions like “where did auto-brightness go?” Now you know!
Here is a video instruction - “How to disable automatic brightness on iPhone and iPad in iOS 11”:
How to reduce screen brightness on iPhone to minimum?
This technique allows you to reduce the brightness iPhone screen beyond the standard settings. It also uses deep settings iOS access to complete this task. If you use your iPhone or iPad at night, your eyes will thank you.
This includes steps that don't rely on a glitch in the system or tricky timing. In fact, reducing the screen brightness is very easy because it depends on several simple settings, which can be adjusted by anyone.
- Open Settings → General → Accessibility.
- Go to the “Zoom” section and turn on the “Zoom” switch. You now see a Window Zoom overlay on top of the screen.
- Use a three-finger tap on the screen to access an additional overlay with zoom controls.
- Click on “Zoom Out” and use the slider at the bottom of the overlay to zoom out as needed.
- Click “Select Filter” and select “Low Light.”
This feature may not work on newer versions of iOS.


Thanks to the zoom with a customized low-light filter, you can dim the screen brightness on demand using a simple triple press Home buttons. I use this feature whenever I use my iPhone or iPad after I should have gone to bed.
Previously, auto-brightness could be turned off in the Screen and Brightness section and easily adjusted manually in Control Center. The function has been moved to the Universal Access section.
On iOS 11 and iOS 12, auto-brightness is enabled by default. It can still be changed on the slider in, but when the situation changes, the function will work and automatically change the brightness level on your device.
It looks like Apple has finally improved the system to the point where it can adjust screen brightness to suit any environment and therefore save battery life. And more charge is always good.
How to disable auto brightness
But there is a possibility that auto-brightness will not work properly on your device. Or you just like to adjust the brightness yourself.
In this case, you can turn it off.
Step 1: Open Settings and go to Basic.
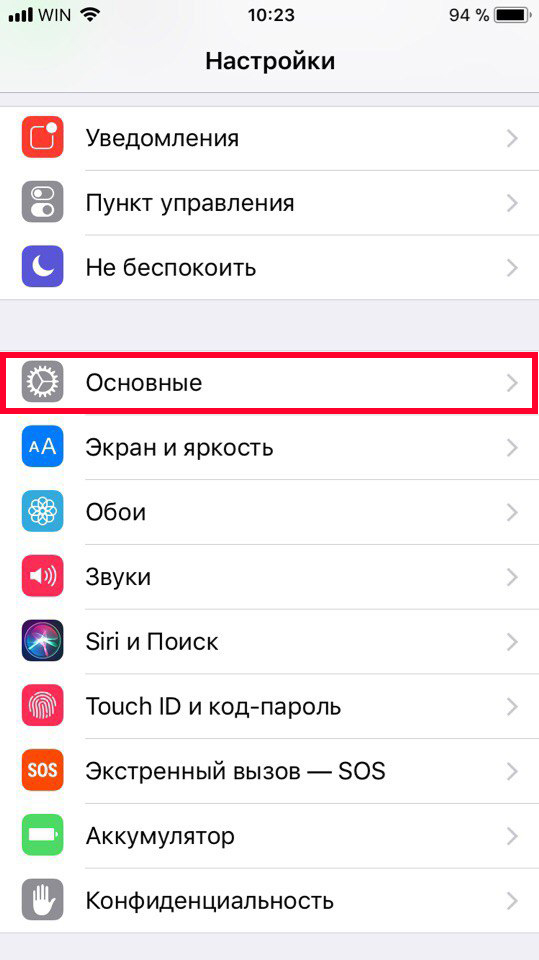
Step 2 : Select Universal access.


Step 4: And disable here Auto brightness.

Turn off auto brightness in iOS 13
In iOS 13, the location of the auto-brightness settings is located in a slightly different location.