What ssd in macbook pro. Installing an SSD and a second HDD. How much does it cost to install an SSD in UiPservice
Hello everyone! Today I'll tell you how I changed HDD to an SSD drive in your new MacBook. I already talked about on my blog, and that I bought a MacBook Pro 13 without Retina. So in this laptop there is a terribly slow HDD Hard drive, its rotation speed is 5400 because of this, there are noticeable freezes at startup certain applications or when you wake up from sleep. I especially notice this due to the fact that I have been using an SSD hard disk in a stationary computer for 3 years now, I have a system installed on it and desired programs, plus I also bought one SSD drive for games, sometimes I like to play various cool games.
I'm not saying that Apple missed the mark with this laptop and made it slow, no. Just like anyone else, someone would not even notice this if there was nothing to compare with.
This laptop has a drive, I found a lot of videos and articles on the Internet about the upgrade option by replacing the drive with optibay (dvd slim 9.5mm adapter for HDD) in which you can put a hard drive instead of a drive and put an SSD in the place where the HDD was. I bought everything, and an adapter and an SSD drive for 256 GB Vertex 450 from the manufacturer OCZ (The price is crazy 7890r.) Why did I choose OCZ? “For me, this is a proven durability maker, as SSDs have a limited number of write cycles.
Optibay - The thing is very interesting, many thanks to the one who came up with it, I think such a thing will come in handy for those who have a laptop that is not quite new, it will be possible to put an SSD drive instead of a drive and Windows will work many times faster, not even very powerful hardware.
I thought for a long time and decided that, in principle, I don’t need second HDD instead of a disk drive and decided to leave the disk drive and just put a 256 gigabyte SSD, this is not so little for a working laptop, especially since I have an external USB hard and desktop PC.
Let's start replacing this very slow HDD!
The first thing we need is a tool, we need a small Phillips Torx screwdriver, I still have it from the moment I changed the glass on my old iPhone 4. Hexagon and plastic spatula, also from the kit. The tool when parsing Apple technology plays very important role! No need to twist those little bolts with a knife! I recommend not to rush and if not necessary tools then it’s better not to take it, but first buy everything you need.

Now you need to remove static electricity from yourself, I searched on the Internet how to do this and decided that it would be easier to just undress to my underpants than to look for all sorts of antistatic agents
Turn off the laptop and turn it over

Before unscrewing, draw a diagram on a piece of paper in order not to get confused in the bolts, because in all Apple technology, almost all the bolts are different. Here we have 3 long and 7 short in these seven by 4 there is a border, this is important.

So we draw just such a thing and put the bolts in their places, so that later they can be screwed back into place without any problems! This method works in disassembling any device, and it is very effective - why didn't I know about it when I disassembled my toys as a child
Unscrewed, laid out the bolts, remove the cover and disconnect the power cable! Otherwise, if you accidentally drop a screwdriver or some other metal object on motherboard there will be a short circuit and that's it, kapets, replacement of the motherboard ... and maybe something else.

We do everything confidently and accurately with a plastic spatula!
Next, unscrew the holder hard drive. Again, I’m surprised how simple and high-quality everything is done, the holder is metal, the orange rubber bands in the photo clamp the mounting bolts so that the hard drive feels comfortable, I think it even cushions a little when hit and does less harm to the hard drive.

After removing the holder, carefully lift the hard drive and pull out the SATA cables, if it is difficult to disconnect, pry it off with a plastic spatula.


We twisted it, now we put our SSD in place, carefully connect the cable, and first insert the lower bolts into the orange rubber bands and clamp it with the holder.


We close the lid back, take the bolts from our diagram, and screw everything into place.
Don't worry about the operating system, Apple excelled here too! Let's install everything now. Yes, all data old hard the disk will have to be transferred by connecting to a computer or via a SATA - USB adapter, I think this will not be difficult.
We connect the laptop to the Internet via a cable (it's faster) or via Wi Fi, it will prompt you to choose an access point, which one to connect to, enter the password and that's it.
Turn on the laptop and hold down the CMD + R keys until the progress bar appears, after the bar is full we will see this image:

Unfortunately, they offer to install OS X Mountain Lion, although OS X Mavericks has been out for a long time, but it’s okay to update later, we don’t have a hackintosh (I used Hackintosh on my stationary PC for about a year, then my craving for Apple began, especially attracted attention time machine, this thing will never be in Windows!)
Do not rush to press continue, first go to top menu in Utilities, Disk Utility and create or partition a hard drive. After that, click "Continue", accept the license agreement, and select the disk on which we will install.
I have one, I did not share it:

We are waiting for the process of downloading the installation files of the system, it is not necessary to sit and wait, it will do everything automatically, after downloading the files, it will reboot and the installation will begin, which will take place quite quickly.
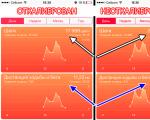
Here is the result of the speed of work, using the launch example Adobe Photoshop CS6:
There was a case when I installed Windows 8 on an SSD using a USB 3.0 installation flash drive on a PC with intel processor i5, to be honest, I was shocked, because the installation time from start to desktop took only 8 minutes! That's cool, what's in the future?
That's all, I think the information will be useful. Thank you for your attention! Subscribe to my blog updates. Ask questions in the comments, in the future I think I will write how I installed more random access memory, but for now I'm satisfied with 4 gigabytes on a laptop.
We note right away that the information will not be useful for owners of the most modern laptops, because, firstly, they only come with pre-installed solid state drives, and secondly, the installed drives have an unconventional form factor and interface.
But for owners made in the 2.5 ”form factor and with a SATA interface, the presented instructions will help increase the performance of the laptop without significant costs.
You can, of course, contact the official service center for a replacement drive. apple center, but the service can be quite expensive, besides, you will probably be offered some kind of Solit-State Drive Kit - “official, from the manufacturer”, the price of which, to put it mildly, will not match the performance.
We, in turn, suggest that you replace the HDD with an excellent SSD yourself and are ready to provide.
In the photos below you can see the SanDisk SSD. It was this solid state drive that ended up in our laboratory at the time of this article. This SSD instance is based on the SandForse SF-2281 controller, which has proven itself well in other solid state drives. characterized by high read / write speed and increased fault tolerance.
So what do we need?
This whole procedure will not take you even 30 minutes, but the performance of the laptop will increase quite seriously - the operating system and applications will load almost instantly and in general the laptop will “respond” to your requests much faster. This is because the system will have instant access to data, which is exactly what is needed to increase the speed of work.
In addition, it does not make any sounds even when actively working with data, so your MacBook will become even quieter.
In addition, due to the significantly lower power consumption of an SSD, compared to any 2.5" HDD, the MacBook will be able to work a little longer on a single battery charge - this is another undeniable plus from using SSDs in laptops.
The only thing that will lose yours is a couple of grams of weight, because the SSD is also a little lighter than the hard drive.
In the base McaBook Pro, Apple installs hard drives at 5400 rpm. And their performance with modern operating systems Mac OS X (10.6-10.8) leaves much to be desired. And it’s not for nothing that Apple is gradually, but surely, switching to installing ssd drives in all laptops.
We think it's time to spruce up your favorite MacBook too. You just need to install an SSD drive in it. And so that you are not embarrassed by the limited volume of ssd, you can install a second hard drive in place of the DVD drive.
Which laptop models are suitable for this solution? - Yes, to almost all MacBooks and MacBook Pros except MacBook Pro Retina
| SSD 120Gb | SSD 240Gb | SSD 500Gb | SSD 1Tb | SSD 2Tb |
|---|---|---|---|---|
| 9 000 rub | 12 000 rub | 20 000 rub | 55 000 rub | 94 600 rubles |
In laptops, the combination of read / write speeds from / to a hard disk at a disk spindle speed of 5400 rpm. does not even reach 50 Mb / s. A 7200 rpm drive will almost double your MacBook's life: the read/write speed can range from 80 to 105 Mb/s.
It is worth noting that there are also Seagate hybrid hard drives on the market, in the design of which a 7200 rpm hard drive with a 16 MB data cache and an 8 GB ssd drive. With such a "combo" drive, the read/write speed can be increased by another 5-7% compared to a conventional 7200 rpm drive.
SSD read/write performance varies from manufacturer to manufacturer and model to model. In addition, the prices of ssd drives have not yet reached a level comparable to conventional hard drives. The price is gradually falling, and even top-end ssds with a capacity of 500 and 960 GB are approaching $ 1 for 1 GB of storage.
Since Mac OS X is a very compact operating system, and in a set with most of the necessary programs, the total disk space usually does not exceed 30-50GB, you can safely look at ssds with a capacity of 120GB or more.
Although, in our opinion, it is already worth considering an ssd with a capacity of 180GB or more.
It is precisely because the volume of an ssd, combined with its price, that limit most users in the direction of choosing to use an ssd - we suggest you consider the option of a high-speed ssd and a good capacity of a hdd installed in place of a DVD drive.
For upgrade Apple Mac Book Pro 2011-2012, we need 3 screwdrivers: torx 6, torx 8 and Philips 00 or 000 Phillips screwdriver.
Remember! Dispose of any residual static electricity before disassembling any device.
Unscrew 10 screws on the bottom cover, 3 of which are long.

This is what a MacBook Pro 13 looks like from the inside

Before changing anything in the laptop configuration, you MUST disconnect the battery from the motherboard. We do not want to start repairs with you with the replacement of the motherboard after a short circuit, do we?


We install an ssd-drive in place of the standard "slow" hard drive, and we can old disk put in optibay in place of the DVD drive. In our case, we put in optibay new disk with a capacity of 750GB at 7200 rpm, in order to increase the speed when accessing user data, which we plan to store on hdd.
Unscrew the two screws on the bracket that holds the hard drive.


4 screws (torx 8) around the perimeter of the "old" hard drive are transferred to the ssd drive.

We install ssd in place of the system disk and fix it with a bar on two screws.

We install the hard drive in Optibey and be sure to screw it with reverse side two screws.


Remove the optical drive.
We need to disconnect 5 loops.
We do it very carefully.
Disable
- hard drive cable
- optical drive cable
- wi-fi cable
- camera cable
- speaker cable


We unscrew the speaker and disconnect the antennas from the Wi-Fi module and put the speaker aside.


DVD superdrive. Unscrew the three screws and pull it out.

We rearrange the data cable and the mounting bracket from the dvd drive to optibay, observing the direction of installation of the corner.


Install optibay with hard drive in place of dvd drive.

We put back the plastic bar of the speaker and connect the antennas to the Wi-Fi module.

We connect in reverse order the loops and cables to system board. And connect the battery.

Close and screw the bottom cover.
We install the system from an external boot drive or through the Mac OS X recovery system via the Internet (using the Cmd + R combination when booting the computer).
Now, at the owner's disposal, a very fast 2011 Apple MacBook Pro: the system itself and all programs run several times faster than with a standard hdd. The system responds instantly. With a significant amount open applications there are no fading and hanging of the “spinning colored candy”. Programs that use production data caching work with big files without any delay. And when processing very large arrays of information, the execution time was reduced (according to the owner of the laptop) by 2-3 times.
It is worth noting again that the hard drive is limited by the physical ability to read / write to spinning metal plates. Therefore, his throughput» does not exceed 115 MB/sec. (best case scenario). There are no mechanical elements in ssd, so the read / write speed on ssd can reach 550 megabytes / sec. There is an option to theoretically increase this value to 1.2 Gigabytes / sec, but for this you need to use an external hardware RAID array that is NOT system drive, connected at best over a Thunderbolt 10 Gigabit / s (or 1.25 Gigabytes / s) bus and communicating with another identical RAID array over the same Thunderbolt bus.
If you are an Apple owner Mac Pro- you can install four or more ssd drives, make a large RAID array (but note that it will not be hardware, but software if you do not use a special RAID controller). And even then, you can achieve theoretical data transfer rates of up to 750 MB/s (corresponding to a 6 Gigabit/s sata bus data rate).
In the next article, we will tell you how to make your own Fusion Drive on an Apple laptop with two or more hard drives installed. And how, in our practical opinion, Fusion Drive differs from the operation of a conventional combination of SSD + HDD.
The article was prepared based on the results repair work Service Center macfix.
The cost of installing an SSD on a MacBook in our service center
| SSD 120Gb | SSD 240Gb | SSD 500Gb | SSD 1Tb | SSD 2Tb |
|---|---|---|---|---|
| 9 000 rub | 12 000 rub | 20 000 rub | 55 000 rub | 94 600 rubles |
A solid state drive (SSD) has many advantages over a regular hard disk drive (HDD) - it's faster, more reliable and takes up less space when installed. But the choice specific model a particular manufacturer almost always ends with the words "all the same, I'll take the one that is cheaper."
When choosing an SSD for Mac, you need to know what kind solid state drives generally exist and what is suitable in your case. And we will help you in this matter.
Why install an SSD at all
- SSD is faster than HDD - read / write speed increases significantly. This speeds up system boot, application launch and work with them. For example, we took the 2009 MacBook Pro 15″:
- SSD is more reliable than HDD - in case of falls and bumps, the probability of SSD failure is much less, since the drive does not have moving parts inside, unlike HDD
Which SSDs can be installed in a Mac
There are two types of SSDs that are installed in Macs: the 2.5-inch format and Apple's proprietary format, which is very similar to the M.2 form factor. The first type is the most common, which all manufacturers of solid state drives are guided by. Such disks are universal and can be installed in any computer (where there is a place for it).

In the case of Apple computers, a 2.5″ solid-state drive can be installed in:
- MacBook (late 2008 - mid 2010)
- MacBook Pro 13" Unibody (mid 2009 - mid 2012)
- MacBook Pro 15" (early 2006 - mid 2012)
- iMac (early 2006 - late 2015)
- Mac mini (late 2005 - late 2012)
Drive in Macbook Air starting in 2008, the release can also be replaced, however, a proprietary form factor SSD is installed in this laptop model. Apple also started using this format in the MacBook Pro with Retina display(since 2012). There are fewer such drives on the market, they are more expensive, and they also differ depending on the year of manufacture and model of MacBook. In most cases, owners simply change proprietary SSDs for the same ones, but with increased volume. Here's what those drives look like: 
What is the difference between SSDs from different manufacturers
Solid state drives can differ in write / read speed, reliability, declared service life and, accordingly, price. UiPservice specialists recommend drives from two manufacturers for installation: Intel and Samsung. That's why:
- reliability tests show that Intel and Samsung drives are among the most durable on the market
- components from these manufacturers are used by Apple itself
- not all SSDs can function adequately on a Mac, while Intel and Samsung drives work without errors and do not cause system freezes
- The optimum ratio of price and quality
In the case of the proprietary form factor drives found in the MacBook Air and MacBook Pro with Retina display, there is also a choice: original parts from Apple (more expensive), drives from Transcend and OWC (cheaper). Drives from Transcend and OWC may come with an optional case that converts an internal SSD into an external USB drive. Also, depending on the MacBook model and year of manufacture, Transcend and OWC SSDs may differ slightly from the original ones in read / write speed.
How much does it cost to install an SSD in UiPservice
It all depends on what kind of Mac you have and how much storage you need - it takes less time and skills than, for example, iMac 2015. In addition, prices for SSD drives change regularly - you can get the latest information from UiPservice managers: in Messenger on the website or by phone.
Solid state drives are on the rise and are replacing hard drives in Mac computers. Today, Apple installs them not only in laptops, but also in desktop computers.
Many users, when choosing a potential computer, prefer monoblocks. Large high quality screen high resolution, excellent performance and relatively compact body. All of this combined makes the iMac a great choice for just about anyone. But Apple monoblocks have one very significant drawback. We will talk about it today.
Remember the good old days when you changed the battery in a couple of minutes, added RAM and put in an additional drive? If you are a user, all this is in the past for you, but upgrading your hard drive is still possible, and Apple developers allow us to do this for now. In 2010, Apple introduced its proprietary solid state drives - "blade" SSDs. The company touts their read/write speeds and reliability, but rarely elaborates on the technology behind SSDs, which are only for Apple computers.
If you suddenly have a 2011 or 2012 Mac mini or an old /MacBook Air, do not rush to retire them ahead of time and run to buy a new generation of computer, which costs much more. The most affordable computer in Apple line upgrades pretty well, and with an SSD you can give it a second life.
Now almost every home has some kind of storage device: hard drives and solid state drives () in computers and laptops, USB flash drives, microSD cards etc. True, all these devices have a common serious drawback. Due to the complexity of the technology that is used in their production, there is always a chance that the drive will fail, "burying" all the available information in itself: photos, home movie collections or music. At hard drives and the SSD has a limited data overwrite resource that a simple user cannot always keep track of. But even if the drive fails, this does not mean that the data is lost forever. In most cases, they are.
Few would argue with the fact that Apple has been making the best computer hardware ever, and has been doing it for a long time. Laptops and desktop computers of the company have a beautiful and stylish design, comfortable operating system and, most importantly, they work stably. But what is even more pleasant - even the old Mac computers able to serve for many years, because they have ample opportunities for upgrading.
I admit, I'm a big fan of external drives. Even when hard drives were installed in computers with a maximum of 30-40 GB, I already had external drive the same capacity - because of the constant moving, I wanted to be as mobile as possible and always have the necessary files at hand. Time goes by, and now even solid state drives (