Winchester transfer to another Windows 7 computer. Windows transfer. Transferring the system without data loss to another computer. More information about the Windows Live Skydrive storage from Microsoft
There is a task, the initial conditions are:
- Hard disk is divided into two or more of the section
- Installed Windows 7 on disk C:
- You need to install Windows 10
- Current windows must stay workable and run from disk D:
- Format the disk "D" can not
- The user does not first see the computer 🙂
And on the contrary, it is possible to install a seven, but copy the top ten, and the discs change places, it does not change anything.
What is this for? Well, for example, it's time to reinstall the system, but in the old OS there was a lot of things and configured from time immemorial. When reinstalling OS, all programs and settings are lost. And I want to be able to run the old system and to spill what it worked there. Well, or stupidly some licenses to move problematic.
All complexity is that existing programs are able, but on the same logical section. Those., From the disk C: to the C drive. And so that it is not able to do on the same physical disk to the same physical disk. Everything is complicated by the fact that even if they learn, then it is impossible to format disc-appointment, because according to the legend there is a ton of info that has nowhere or very long and hemorrhoids.
We'll have to lie. The action plan is:
- Rules boot menu
- Loading from flash drive
- Copy system folders
- Change letters of discs
Windows download menu
When you boot Windows, we will appear menu with the ability to select the operating system: new (current) Windows and copied current. To add a new item there
Run through the right button and select "Run from the administrator." Next, we go to the tab "BCD", where "BCD OF CURRENT SYSTEM" must be selected. Click on the "Easy Mode" button

Now you need to configure a new menu item:

BootDISK.: Our hard disk with current Windows
Partition.: Section (Disk D) on which the current Windows copied
OS.title: arbitrary name of the menu item
Language.: RU-RU, Russian
Timeout.: Seconds, how many will automatically select the default item.
To record the Save Current System with the Save Current System. All this can be done and then read below.
Preparation of flash drive
Under the article. We will need Paragon Hard Disk Manager and Acronis Disk Director. Therefore, choose an image for a flash drive, where there are these programs. Suitable image from Sergei Strelec. Instead of a flash drive, there may be a CD / DVD or an outer hard drive, it is not fundamentally.
On Wednesday, Windows PE, this is the Windows that runs from USB.
Now you need to copy the system folders to the root of the disk D, namely:
- Windows
- Users.
- Program Files.
- Program Files (x86) - if there is
- ProgramData.
All these folders are needed that Windows and all installed programs have functioned on the second section. Some highly specialized programs are set by default to the root of the disk, and not to the "Program Files" folder, so beaten by the heads for the root of the disk C: and if you see the familiar folder names, they also need to be copied.
You can simply be copied using the file manager, for example, Total Commander. You can use the Teracopy program, which is enabled in the Sergei Strelec image. It copies without stopping error messages if that. And then at the end you can see what could not be copied and take action.

There may be problems in this step. Surprisingly, running Windows from a flash drive, it still protects windows system files on other disks! Not always, but it happens. Therefore, there may be access error messages when copying the registry files and its custom branches (NTUSER.DAT). Namely problem folders:
- System32 \\ Config
- ServiceProfiles.
- Users \\ user folder \\ Ntuser *. *
If you listened and chose an image from Paragon Hard Disk Manager, then copy all or only problem areas. Run it, go to the "utilities" and choose "Moving Files"

Select the necessary folders or files and wait for the end of the process:

You can also copy using Acronis True Image by selecting there backup files, saving them to another disk, and then restoring to your D. D.

If someone has only this program at the disposal - then please. But she sometimes, for some reason, it freezes when copying large volumes, for example, all the desired folders.
If the Bootice utility was on the flash drive, you can add another Windows to the menu item now, and not in the first step. All actions are the same, but on the BCD tab, select "Other BCD File" and looking for it on the path "C: \\ BOOT \\ BCD". Now the C drive is a hidden disk in the usual Windows, and booting it in Windows PE it can be seen, and it must be a volume of 100-350 MB. Or, if there is no such hidden disk, then this is a disc with the current Windows 7/8/10.
Final strokes - letters
And now the very raisin. The main problem of launching Windows from another disk is that it has another letter, for example D, and most of the settings are tightly spelled out to the C drive, we will change the letters of the disks in the copy of the operating system, i.e. so that Windows considers that disc d, on which he is now located, Disk C.
So, we run from the Acronis Disk Director flash drive. Select the copied Windows from the list. You now have now supposed to get two identical windows, and you can distinguish a copy by the letter of the disc and its size on which it is:

Now click on the disk with the right button and choose "Change the letter". We choose any free, for example the letter G. We now need to simply release the letter C. Next, change the letter D to C, and the D disc on D:


It remains to apply changes:

That's all.
Results what happened
So, we have created a new item in the download menu, copied system folders and changed the letters in places. The chip is that both Windows will now work, and that that remains on the C drive, the current, will continue to "see" the wheels with and d, as they are now. And if you run the copied Windows, then in it you will see your discs "picked" in places.
When you set Windows 10 to the C disk boldly format the section. The new installation will be replaced in the name menu of the old Windows 7/8 to 10 and will leave our new menu item.
But there may be a problem - most likely flies the activation of the copy of Windows. You can reactivate or do nothing if you need it for a while.
I did not find a simpler and "stupid" method to do it all, and if you know how you can still - please write in the comments.
Acquisition of a new SSD or HDD does not have to have a consequence of installing Windows from zero. To a new hard disk, if the old is still connected to a computer, Windows with all its settings and installed software can be transferred using special software. This process is called the migration of the operating system. It provides for cloning of the system partition (disk with and boot sector) to another hard disk. Such operations can hold the Acronis True Image program, various Paragon software assemblies, including the Paragon Migrate OS to SSD utility, as well as products from Aomei developer only. But then, the products from Acronis and Paragon can only be used on a fee, by Aomei is available completely free of charge.
The possibility of transferring Windows to another hard disk is contained in two AOMEI products - in the Aomei Backupper Professional backup program and in the Aomei Partition Assistant Disc Manager. Use free Windows Migration feature in Aomei Backupper Professional is only a month, until the term of the full-featured trial version is over. But with the free editors of Standard, the Aomei Partition Assistant disc manager to transfer Windows from one hard disk to another can be constantly. But not only this moment makes Aomei Partition Assistant a favorable solution for transferring Windows to another hard drive. This program is essentially a single tool and for the migration of the operating system, and for the distribution of space on a new hard disk for the specific needs of the user. Today we consider how using Aomei Partition Assistant transferring Windows to another empty hard disk.
1. Specificity of operation: necessarily read
The Windows migration method described below does not save partition structure and target hard disk data (the ongoing operating system will be transferred). Because this method is suitable only for cases when nothing needs to be saved on the target SSD or HDD. For example, in the case of purchasing a new device with unallocated space. Or when the Used device is connected, the data of which does not represent values. Aomei Partition Assistant can transfer Windows to a separate system section of the target hard disk while saving the structure of the latter and stored on other sections of the data. In this case, the migration method from the above will differ. If there is important data on the target hard disk, the use of the manual below cannot be used.
2. Download and launch the program
Aomei Partition Assistant can be downloaded from the official website of the creators. In the list of editors, you can choose a free Standard. Its features will be enough to transfer Windows to another hard drive and to create partitions on it (if necessary).
After starting the program in the center of the window, we will see the picture of all connected disks and their partitions - in the table form at the top and visual format at the bottom. If the target SSD or HDD is new, its space will be retained, as shown in the screenshot.
In this case, I remember its sequence number - disk 1, disc 2, etc. - And immediately proceed to paragraph 4 of the article.
3. Deleting partitions on the target hard drive with existing markup
Before launching Windows transfer operation, target hard drives with existing markup must be soldered from sections by removing them. Operation to remove sections requires special care. If several hard drives are connected to the computer with a similar partition structure, to figure out where the target to be transferred to the Windows to be transferred will help their properties window. To find out which of the hard drives is displayed as a disk 1, like a disk 2, etc., we make the click on it (on the block of the entire disk, as shown in the screenshot), call the context menu and select "Properties".

In the properties window in the first column we will see the brand and model of the hard disk.

We are convinced that the desired hard disk is selected, and in turn, delete its sections. Each of the sections, call the context menu and select "Delete the section".

For each of the sections, confirm the deletion without changing the preset option "Quickly delete the section".

When the target hard disk will be displayed as a unallocated space, click the button at the top of the Apply program window.


Once again, confirm the decision to remove partitions.

Upon completion of the operation, click "OK".

4. Migration (migration) Windows to another hard drive
Well, on the target SSD or HDD disk space is not distributed, now we can proceed directly to the transfer process on it, which is located on the source hard disk and is currently working. In the Aomei Partition Assistant window, click the Master menu and select "Transfer SSD or HDD".


Then click on the target disk with unallocated space. Click "Next".

In the next window, the size of the future system partition is configured on the target disk. Aomei Partition Assistant By default installs the same dimensions as on the source hard disk to the Windows boot sector. If the target disk is not a 60-gigabyte SSD, and the carrier with a large space, the system partition slider can delay up to 70-100 GB. This is the optimal size today for Windows 7, 8.1 and 10. The remaining space of the target disk will later be given to non-system sections for data storage. Click "Next".

The work of the wizard is completed - click "End".

Returning to the main window of the program, click the button at the top "apply".


Then we will see another dialog box with a warning that the operation will be carried out in the preloading mode. Save the files open on your computer, close the other active programs and in the Aomei Partition Assistant window, click "Yes".

The computer will restart, and on the screen we will monitor the operation of transferring Windows.

5. Checking the target hard disk
Upon completion of the operation, the system will boot from the original hard disk. You need to restart the computer again to configure the download to the BIOS already from the target hard disk and check the performance of the transferred Windows.
For Windows transfer cases to the only SSD system section, the stokery process.
6. Creating non-system sections on the target hard disk
Aomei Partition Assistant has moved to the target hard disk along with Windows. After downloading the computer from the target disk, we can use the program to create non-system sections. We make the click on the unallocated space after the C partition, call the context menu (or use the section "Section" program) and select "Creating a section".

In the window that appears, dragging the slider on the visual block, allocate for the part being created by all available space or only part it. Click "OK".

If the disk space is divided into several sections, we do this operation the required number of times. Upon completion of the formation of sections, we use scheduled operations.

Confirm their launch.

Click "OK".

The formation of disk partitions is completed.
Excellent day!
The system transfer to SSD is an effective way to organize a computer.
Content:Note, depending on the version of Windows and the parameters of the purchased flash drive, transfer methods may vary.
What data can be transferred to SSD
The storage of the operating system on SSD allows not only to speed up its operation, but also increases the response of other programs and files that are stored on the disk.
On the flash drive, the user can move the following data types:
- Operating system . It is added to SSD with all the ready drivers and settings. In fact, its duplicate is created, which was previously stored on HDD;
- Programs - Choose yourself which applications you want to add on, and which wish to leave on (HDD). We advise you to leave on the computer the volume programs for editing video and development / testing software - so they will work at times faster;
- User files . It can be any of your documents, photos, music, video and other data types.
Components for moving
To add the Windows used on SSD, the following objects are required:
If you work only with OS resources, you will not need to install a third-party utility.
Requirements for computer
Before performing any action on transferring OS, make sure that your device meets all the minimum requirements that allow the utility to interact with SSD and transfer large amounts of data.
The minimum requirements are indicated in the following table:
| Parameter name: | Minimum value: |
|---|---|
| OS. | · Windows XP (only 32x); · Windows Vista (all discharge); · Windows 7 (all discharge); · Windows 8 \\ 8.1 (all discharge); · Windows 10 (all discharge). |
| RAM | At least 1GB |
| Types of disks that you carry | GPT or MBR |
| Copy sections | Standard. Without the transfer of RAID-Arrays |
Compare the parameters of your computer with the above characteristics can be using the "System" window.
It displays the correct data on the main hardware and software components of the device:
We use the built-in windows
Follow the instructions to transfer the operating system to the flash device:
- Open the window "Disk management". To do this, in the Perform window, write the diskmgmt.msc command and confirm the action;

Fig.3 - Running disk management tools
- Now you need to reduce the OS volume on the disk. You can perform an action using the "Compress Tom" function. All data will remain in the same condition, only the place occupied on the HDD will decrease. Click the right key to the "System" section, and then to "compress Tom";

Fig.4 - Compression volume
- After successfully reduced OS volume, a free section will appear in the disk circuit. This means that everything was done correctly;
- Connect the drive to the computer and restart the window "Disk management";
- Now click on the "Master" tab and select "Transfer OS SSD" list;

Fig.5 -Bext "Master"
- The standard utility will open. Press the "Next" key to go to the settings;
- Click on point "Unoccupied space" and go to the next window;

Fig.6 - choice of disk space
- Now you can independently change the size of the future disk or leave all the parameters unchanged;

Fig.7 - change the size of the disc partition
- After clicking on the "Next" key, the master will start moving the system. After completing the action, you can turn off the computer and the next time you select the OS that is on SSD.
Windows on the solid disk will also remain. You can delete it or use it as a backup when you need to restore the system.

Fig.8 - the result of successful movement of Windows
Do not forget to click on the "Apply" key in the left side of the window. "Disk management"Otherwise, all changes made will not be saved.
If windows or hangs occurred during the transfer, you should reset the settings, restart the PC and try to transfer again.

Fig.9 - Application of changes
Instructions for SSD from Samsung
The company has released the official utility that allows you to quickly move the OS from the hard disk to the purchased flash drive.
The utility is called samsung data migration. You can download it for free from the official website of the company (section "Memory" - "SSD") or with a disk that is in the configuration of the device.
The program's initial window is as follows:

Fig.10 - SAMSUNG DATA MIGRATION utility window
Immediately after starting the utility, connect to the SSD computer using the appropriate adapter. Click on the "Start" key.

Fig.11 - analysis of the disk with the installed copy of Windows
After analysis, the program will automatically determine the SSD connected to the computer and show it on the screen:

Fig.12 - reconciliation of the source and end disk
If the place that Windows takes on the HDD does not exceed the available place on the SSD, you can immediately begin the transfer by pressing the "Start" key.
The automatic movement of all components will begin. The procedure can take from 30 minutes to 1.5 hours, depending on the Windows version used.

Fig.13 - Successful system transfer
As a result, you will receive a notice of successful. Close the window and delete all Windows data from the HDD.
Plus, the use of Samsung Data Migration lies in the simple interface. The program will make all the work for you and the maximum will reduce the likelihood of errors or bugs after the OS transfer.
What if at the analysis stage you found that the space for the OS lacks on SSD? In this case, you need to clear Windows from unused data and applications.
You can do this right in the SAMSUNG DATA MIGRATION utility window.

Fig.14 - Error. Not enough space on SSD
After the error text appears (highlighted in red), click on the "Next" button and delete all library files in the new window that litter the system.
Clean the OS until the text will appear in the main window of the utility. "Ready for cloning on SSD".

Fig.15 - Successful cleaning of unnecessary files
Utility Acronis True Image
Acrins is the most popular OS transfer utility for removable media. It recognizes all SSD brands. The application is supported by all versions of Windows, so there will be no compatibility issues.
Remember, you can use the application only if your PC hardware has a disk from the Acronis manufacturer.
There are no components - no utility will not start, and the user will be notified of the impossibility of working with the program.

Fig.16 - the main window of the Acrins application
Connect the removable media to the computer to move the system and in the program window, click on the tile "Cloning disk"-"Copying sections".
In the window that opens, select the automatic movement mode. It is suitable for all tasks and quickly performs data copying.

Fig.17 - Select cloning mode
All sections will be copied to. All data that were on SSD to cloning will be deleted.
The disk itself will become bootable and can only be used to start operating systems installed on it.

Fig.18 - Copy Process
SEAGATE Discwizard utility
The utility completely repeats the Acronis interface. It should be used if you have at least one hard disk from the seagate manufacturer at your PC.
For cloning, you should perform the same actions that were described in the previous paragraph of the article.

Fig.19 - Main window Seagate Disc Wizard
Changing the bootloader configuration
After cloning the system, a copy of the OS will remain on the computer, and the window will appear with the load selection. After transfer, we advise you to perform a number of actions:
- Without deleting an initial copy from HDD, test Windows work on HDD. There are cases when the system begins to slow down, performance deteriorates. This occurs extremely rarely and depends exclusively from the selected SSD. While the first copy is not deleted, you will always have the opportunity to return to its use and delete OS with SSD;
- Change the system loader settings.
The download manager is the built-in component by which the computer determines which of the installed OS to run. Also, you can configure the order of running hardware components.
Immediately after the dispatcher will show two systems with identical names - initial and copied.
If Windows is normal operation on SSD, you need to remove the version that remains on the hard disk of the computer. Follow the instructions:
- Restart the PC and run the version that is moved to the flash drive;
- Open;
- Enter the following command below, setting a copy of the OS on the SSD unique name;

Fig.20 - command to rename the loader component
- Now configure the dispatcher in such a way that it always started the new OS. You can do this using the following command:

Fig.21 - Automatic launch of cloned OS
- To delete an old system, enter such a command (where the ID is the number of an old copy of the OS in the download list):

Fig.22 - Removal of the original copy of Windows
Outcome
As you can see, to transfer the system to a removable flash drive, it is enough to use a universal utility for duplicating components or move it yourself.
Do not forget to remove the disk boot record that is no longer used. If this is not done, errors may occur while the OS is turned on.
Users who have suffered a SSD system mark an increase in computer performance and faster execution of complex tasks and processes.
The speed of the operating system is increased by 2-3 times.
Thematic videos:
How to connect an SSD to a desktop computer. Transferring Windows with HDD on SSD
Proper SSD disk connection to a personal desktop computer. How to quickly transfer Windows from a hard disk (HDD) to a solid state drive (SSD). Practical tips, performance rating after replacing SSD.
Laptop Hard Disk HDD SSD Transferring System Free
Laptop Hard Drive HDD SSD Transfer System + System Cloning Program
To use the operating system, the space is needed on which it will store files to work. Thus, you can start both from the hard disk and from the flash drive, from the disk. What to do when you need to transfer Windows with all the necessary files to another medium, without loss of performance? In this case, we will look at the version with the transfer of the system to the second hard disk.
Will the transfer takes place?
Of course, it's just that the system will not be transferred to be transferred, because it will not be able to copy / insert here. To make this operation, you will need special software that will be run from under DOS, i.e., not launching the system itself at all - working only on the preloading stage. Yes, you can take advantage of the large list of algorithms with DOS commands, but much better pay attention to programs with ready-made solutions.
Among them are Acronis, Seagate Discwizard, Samsung Data Migration and others. Each of them in its own way is simple, it has a different cost or can be conditionally free. We turned our attention to the program from Acronis - Acronis Disk Director, which can be downloaded from torrents with license keys. An excellent version of Windows will be version 11 HOME and above.
After downloading the program, install it and connect the second hard disk to the computer. PC must, of course, turn off, and after rebooting, run the application. No need to do anything with the disk. Further, everything is performed directly in the Acronis Disk Director 11 HOME.
Step-by-step instructions on how to transfer Windows 7, 8, 8.1, 10
The instruction is suitable for all versions of Windows that support the Acronis Disk Director program, i.e. Starting with Windows 7. All actions are performed similarly, no differences are present. We will proceed to transfer the system to another hard drive:
- Suppose there are two disks. The first is the main, the second - the additional to which the system must be transferred. In the program window, they have a disk 2 and disk 1;
- As shown on the screen, you need to right-click on the main disk and choose "Cloning a basic disk";
- In the next window, which will appear after clicking on the button "Clone…"You will be prompted to choose which drive you want to transfer Windows. In our case, we transfer to the disk 1, and choose it, and then click "Further";

- Do not forget that after clicking "Further"will need to put a tick or mark opposite item "One to one" in field "Cloning method"and then click "Complete";

- When this task is accepted by the program, the above will be shown the checkbox with an option to apply waiting operations. It is necessary to click on the left mouse button, and then click "Proceed";

- Do not be scared, you will be prompted to confirm once again what you want to do. Press "OK";

- When the reboot starts, the program will automatically start in DOS mode and will make cloning from one disk to another. It may take a long time, but your computer should be in sight, just in case.

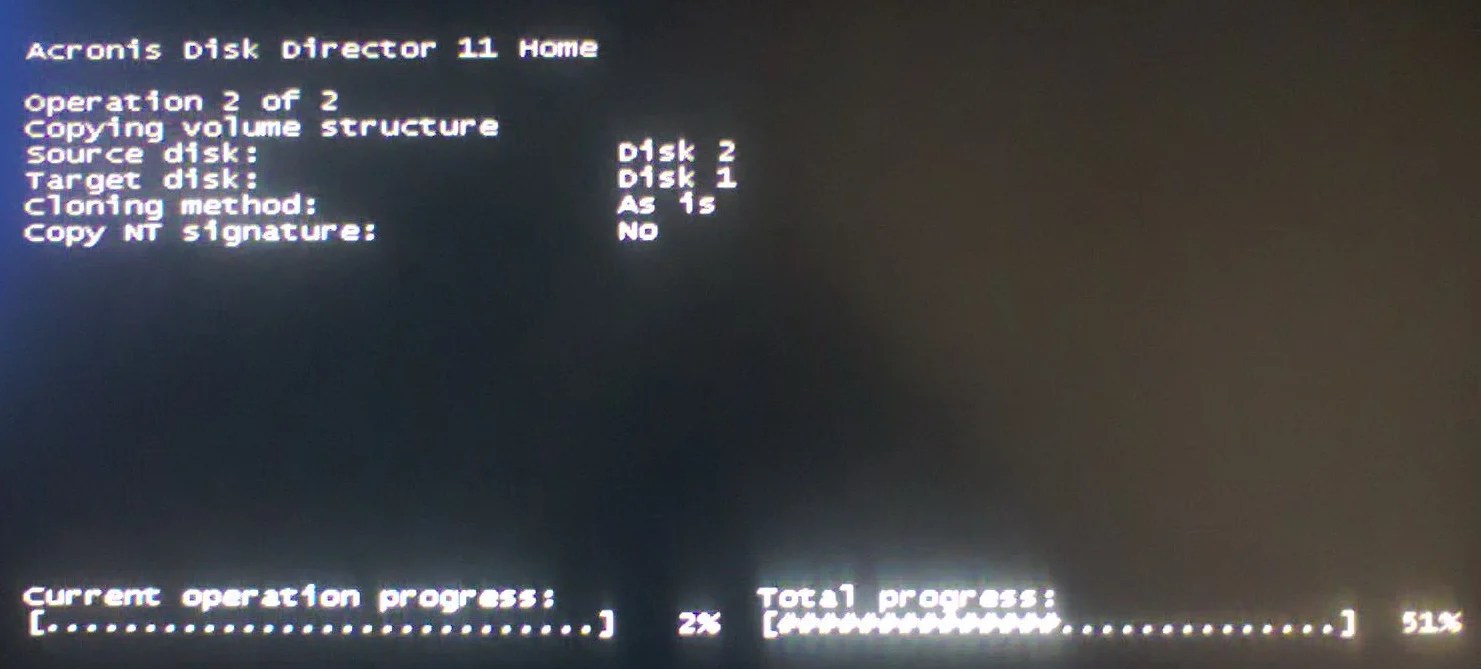
- When the entire operation is completed, a reboot will occur and you can run the application again. Now you will see that the system is transferred correctly:

- To make sure that everything works fine - turn off the computer, disconnect the old hard disk and start the computer again - everything should work, as before. We recommend formatting an old rigid disk and use it as an additional drive.
- An unbalanced area that the program has left when cloning, you can place as you like to do this, read it.
Thus, you made sure that Windows transfer from one hard disk to another is an easy procedure that requires only attention from the user and the correctness of the instructions.
It happens that it is necessary to replace the old computer or laptop, or to replace the motherboard. Then I would have to re-install the operating system. Yes, this process is not complicated, but you can transfer the operating system using the utility Sysprep.. This Microsoft utility, which allows users to transfer OS to a new iron while saving all data.
As soon as you run the SYSPREP utility, then all information about the drivers and the operating system will be cleaned. The main thing is that all installed programs will not be touched. No need to make all sorts of backups there, re-install programs, etc. Another nuance is that Windows 7 activation information is lost, therefore, it will have to reinstate activation. This does not apply to version, since activation is tied to the gland and it happens automatically.
To transfer Windows 7 using the SYSPREP utility, you must open the command line. To do this, click Win + R. And introduce cmd.. Now I will enter the following command on the command prompt:
% WINDIR% \\ SYSTEM32 \\ SYSPREP \\ SYSPREP
A system preparation window will open, where you want to put some settings.
Where it is written System Cleaning Action, you need to choose item Switching to System Welcome Window (Oobe) And be sure to check Preparation for use.
In parameters completion of work You can choose to complete the completion of work, and you can select and restart the system.
After sysprep, it is not recommended to download this procedure to renew this procedure when transferring to a new computer.
So, Zhmem. OK We are waiting for the end of work. After all, the computer will turn off and now you can change your motherboard, or move your hard drive to a new computer.
When you enable a new computer, or a PC with a new motherboard, you will install Windows 7, checking and defining devices. The system can be rebooted. Do not touch anything and wait. After, a window will appear with the choice of regional parameters: Country, Language, etc.

Having done everything you need, now you can enter your account, which you had on the old computer. Do not forget to install the necessary drivers. Now you can work as usual.
As you can see, the procedure is not complicated, and it is better to use the SYSPREP utility, and everything is quickly done than reinstall Windows.
Microsoft does not guarantee 100% that when transferring all data will be saved, and there may be any failures, but it looks at what iron you will be transferred. Mostly everything goes smoothly.


