Airport time capsule connecting to a computer with a wire. Airport time capsule setup: backup storage from Apple. How Time Machine works
AppleTimC apsule or another router model, you can always contact Cyberkeeper for help. We are in the process of setting up WI- FIrouters, as well as installing and configuring other network equipment. Our tel. 8(499)755-50-21. .jpg)
Setting up the routerAppleTimeCapsule The setup is different from many other routers, as are many Apple products. We will provide a guide for setting up an Apple router and will try to tell you about the features of setting it up.
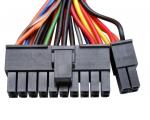
Before starting work, here is a diagram showing the connectors of the Apple Time Capsule router:

After unpacking the device, you need to connect your provider's cable to the WAN port, which is located at the bottom of the router. Above are three Ethernet LAN ports, with which you can connect your computer via cable. If the router is located next to computers, we recommend a cable connection. In any case, it is faster and more stable than a wireless signal. However, WiFi has also recently significantly improved its technical performance, so all clients will receive the Internet via a Wi-Fi signal without any problems. At the very bottom you will need to connect a 220V cable, and a USB connector is provided for connecting a printer or MFP to the Apple Time Capsule.

After connecting all the necessary wires, you can turn on the device.
The following table shows what the lights on the Apple TimeCapsule indicate:

Apple router operation diagram:

The Apple router is configured through the AirPort utility. To do this, you will need a Mac computer running OS X version 10.7.5 or higher. AirPort utility on your computer. Connection via network cable or wi-fi with a router. To configure you need:
- Open AirPort app
- Select your AirPort Time Capsule from the list of networks.
- Configure your provider's settings by following the instructions on the screen.
In addition to the Internet sharing function, AirPort Time Capsule will help keep all your data in one place. Backup is set up on your Mac computer and all your data will be duplicated on the Time Capsule. If your Mac computer fails, you won't need data recovery, because all information will be located on an external device, from which everything can be easily restored.
Problems and troubleshooting of the AirPort Time Capsule router.
Tips for locating your Apple Time Capsule router:
- Install the router on an open surface, with no large objects nearby.
- Do not install Apple Time Capsule in a closed space, such as a drawer, closet, etc. Also, do not place it on a carpet, as this will cause the device to heat up.
- Do not place large metal objects around the router, as this will degrade the WiFi signal.
- Do not place any foreign objects on your AirPort Time Capsule.
- Do not place AirPort Time Capsule near microwave ovens, radio equipment, or mobile phones.
You can always call a wizard to set up your Apple AirPort Time Capsule router. We will install and configure your Apple router.
This device is a mini-station and can help you with the following tasks:
- when setting up a new Internet connection prepared for devices and their communication with each other;
- increasing your Internet network: you can add any gadgets when working on the Internet;
- Using gadgets connected to this unit, exchange any files.
In this article we will talk about the apple airport time capsule 2tb and configure it.
Step 1 We take out the wide-band cable with which you can access the Internet from your previous router and insert it into the WAN port of our unit. We turn on the device itself to the power supply. In “Programs” on your computer, look for “Utilities” and click on the proprietary Airport utility.
Step 2 In the window in the upper left corner of the screen, select the name of your device, then click the “Continue” button, then select the “Create a new wireless network” section and click “Continue” again. After this, your unit must reboot for all the manipulations you have chosen to take effect.

Step 3 Now, you need to restart Airport in the window (upper left corner of the screen), select the name of your unit, click on it and select the “Manually configure” tab. Depending on what type of connection you have (PPPoE or VNP - this data is presented in the service agreement with your Internet provider), choose:
- if you have a PPPoE connection: “Connect via PPPoE” and enter the login and password from the agreement with the provider;
- if you have a VNP connection: open " wireless network“- there you assign a network name and password and click “Update”.
Step 4 Now you set up access to your wireless station. In the same utility, select the Time capsule tab and enter the station name and password. Click the “Update” button and all settings will take effect. 
Step 5 Through the Time machine program, which is provided on all devices with the Mac operating system, when it starts, our installed device is automatically detected. Through this program you can work with the unit to solve any problems.

Airport time capsule 3 TB and setting it up is no different from the steps described above. This rule applies to any model of these devices.
As you can see, creating another connection on the apple airport time capsule 3tb and setting it up takes very little time, but the opportunities that will be available after completing all the steps described above will definitely please any user.
If you want to see on our website answers to your questions about everything related to Apple technology, operating system Mac OS X (and running it on PC), write to us via .
We received the following question (spelling preserved):
I would like to know how to set Time
Capsule for remote access to it having
Internet connection to it and static
IP address.
In fact, Access Time Capsule from the Internet It's not that difficult to set up.
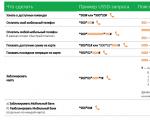
First, launch AirPort Utility and start screen look what internal IP address she has in yours home network(Line "IP address"). Then click on the “Manual Setup” button and go to the tab "Disks-File Sharing". Place the checkboxes as shown on the screen:

Then you need to go to the tab "Advanced-Forwarding" and click on the plus there:

In the window that opens, fill in the fields as follows:
- Common UDP Ports And Common TCP Ports- any number (for example, four-digit). If this port is already in use, a warning will appear indicating that you need to change the number
- Private UDP Ports And Private TCP Ports- required 548
- Private IP address— the same internal address of your Capsule that you needed to find out on the start screen of the AirPort Utility

Click “Continue” and enter any name for the created port forwarding rule. Then all that remains is to save the settings and reboot the Capsule.
To access the Time Capsule drive from the outside, you need to press the keyboard shortcut Cmd+K in the Finder and enter an address like 123.123.123.123:5678 , where everything that comes BEFORE the colon is yours permanent IP address, and everything after is the General UDP and TCP port you selected in the AirPort Utility settings.
Early last week, Apple released AirPort utilities and firmware for its wireless devices that support the 802.11n specification. In addition to general fixes, AirPort Extreme and Time Capsule have learned to provide remote access to drives using your iCloud account. Today I will tell you how to set up this function, since some readers have not been able to do it.
Initial data
For experiments and writing instructions, I got hold of a “purebred American” - a brand new fifth-generation AirPort Extreme wireless access point (model MD031LL/A), which supports 802.11 a/b/g/n specifications, simultaneous operation of two frequency ranges Wi-Fi (2.4 GHz and 5 GHz), many protocols and encryption algorithms.
In addition, you must have a Mac computer with Internet access, updated AirPort 6.0 Utility, and on the wireless gadget itself - latest version firmware (7.6.1).
The external drive is connected to the AirPort Extreme USB connector.
Settings
Setup begins by opening AirPort Utility, which is located in the Applications > Utilities directory. Since the test AirPort Extreme was brand new, I installed the update on it software- fortunately, this is very easy to do, just a few clicks.

As soon as the firmware is installed and the Apple access point connects to the Internet (two green indicators will indicate this), you will need to select AirPort Extreme in the Utility and click on the “Change” button to view additional settings.

On the first tab “Base. station." (I would tear my hands off for such a localization) click on the add button (1). Next, in the window that appears, enter the login and password for your account. iCloud recordings(2), click on the “Login” button and wait until the status indicator turns green - this means that it has accepted your Apple ID and is ready for further setup.

Now go to the last tab “Disks”, check the “Allow file sharing” checkbox and assign the type of protection for shared disks. There are three options available to you, you can choose any of them, but I settled on the default option - “With device password”.

Once you do this, click the “Update” button. And while the AirPort Express settings are being applied, let's move on to setting up the Mac computer: in System settings> iCloud check the box next to “Access my Mac”. It will take no more than a minute to activate the component.

Almost everything is ready, but how to access the disk now? To do this, just open the window, select our device in the “Sharing” category in the sidebar, after which it will be mounted on the system to any other shared resource.

That's all for sure now! You will be able to access files stored in your home, from your work computer, or from any other Mac computer associated with your account. However, it is worth remembering that the connection speed depends entirely on your Internet connection. Naturally, the instructions are also suitable for Time Capsule.
By the way, I almost forgot to thank you for providing the AirPort Extreme for the experiments.
At Apple sometimes they do very strange devices, allowing users to use them not only for their intended purpose, but also as they please. Moreover, when there is such a powerful community in which there are many inventors. For example, a set-top box for the Apple TV, it would seem, well, what can you do with it, after all, it can do a lot! But no, there were enthusiasts who turned the device into a kind of video recorder that supports many common video formats. There were good people who revealed to the world the secret of replacement hard drive without much harm. And, of course, this is not all that enthusiasts have done with this accessory. Today I want to tell you about another similar device under called Apple Time Capsule. The name is closely related to one of the functions of Mac OS, Time Machine, - backing up system data for later restoration both on your own and on a new laptop or computer.
Appearance
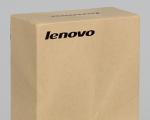
The device is delivered in a small box, opening it, we find the Time Capsule itself, a power cable, disks with software for Mac OS and Windows. Since this accessory is not yet officially supplied to Russia due to problems with certification of the IEEE 802.11n standard (as far as I understand, precisely because of this), the power cable needs an adapter for our sockets. You can connect the Time Capsule without fear of burning it, it supports voltage from 140 to 240 V. The device itself is a relatively small box, branded milky-white plastic, a light indicator on the front panel and not a single button. Except that there’s a hole with a hidden Reset button, it’s located on the back, and at first I thought with a grin that I wouldn’t have to use it. As it turned out, I was mistaken. On the back there are ports scattered:
- One Gigabit Ethernet WAN port for ADSL or cable modem connection
- Three Gigabit Ethernet LAN ports for connecting computers or network devices
- USB port for connecting a USB printer or external USB hard drive


The dimensions of the device are 197x197x36.6 mm, Time Capsule weighs from one and a half kilograms, depending on the modification. On this moment Devices with a hard drive capacity of one or two terabytes are relevant; the latter option was tested. In an article about the company’s recent announcement, I pointed out one fact that was not particularly pleasant for me personally - the “capsules” were also updated and became more productive. It so happened that I bought the copy I took for testing a few hours later, because it was necessary to update it “on time.” On the other hand, it's still a good thing.


Two words about HDD: As written on the Apple website, a server-grade Serial ATA, 7200 rpm hard drive is used.

Settings
Perhaps I’ll talk about how I set up Time Capsule for my own use, and below we’ll talk a little about other possibilities. So, the reason for changing the access point is simple for me personally. I've been using the Zyxel P-330 for two years now. Or rather, it wasn’t even that he used it, but rather fought. The family has a lot of devices with Wi-Fi, and when I sat down to play PS3 in the evening, the console simply gave a connection error. Of course, if there is also my wife’s laptop, my laptop, iPhone, and some other device that has been forgotten on the network. But connected. What did Zyxel do? Required a reboot. And so every day. I believe that with one or two devices this thing can work quite well. But as soon as something else appeared, 330, waving his pen, politely sent this “something” to distant lands. Thoughts about a replacement arose a long time ago, but never got around to it. And when I took the Time Capsule for testing, I didn’t think about buying it - it’s a very expensive router, no matter what you say and no matter what arguments you come up with. Even despite the very large hard drive, even despite all the other goodies. I thought like this: I’ll test it, if I like it, I’ll look at AirPort Express. Well, or to a regular AirPort.
Everything turned out wrong. To begin, I inserted the Ethernet cable into the device, into the WAN port. I’ve been using Akado for many years now, it’s a shame that it can’t get to my house digital television. But everything is fine with the Internet. I had all the settings written down, so all I had to do was install a small program from the included disk, it’s called “AirPort Utility.” It’s interesting that you didn’t even have to choose the installation and program language; everything was in Russian right away. Yes, for setup I used MBP 17 with installed system Snow Leopard. So, all the pieces of the puzzle are put together, the indicator on the Time Capsule blinks yellow, the program detects this device and offers to configure it. Okay, let's do it! The process is not complicated; if you have at least once configured the access point via the web interface, then there will be no problems here either. But not in my case. The problem appeared after completing the settings. All this time, the indicator on the device regularly blinked yellow, showing that the settings were being recorded. But at the final stage, when the Time Capsule was supposed to reboot, nothing happened. Moreover, it was not detected by any computer. I had to take a pen and use the Reset button. Hmm, that didn't help. After reading the instructions, I found out interesting fact: If simply pressing and holding the button for a few seconds does not help, you need to unplug the cable from the outlet, press and hold the Reset button, and connect the Time Capsule to the network again. This method helped. I entered the settings again, very carefully, and again the same problem. At the final stage, the device did not reboot.


I won’t torture you, I spent an hour trying to find out the reason, and it turned out to be banal. I set up the Time Capsule using what's called the "quick" setting, when I should have chosen the setting manually. When I entered all the data in this window, the Time Capsule rebooted properly and began distributing the Internet to the entire area.
I don’t want to blame the creators of the software for Time Capsule in any way, since for some reason the problem that arose was typical only for me; no one on the forums had encountered this.
What can you do in the settings? You can configure AirPort, everything is traditional here. In the “Wireless” section you can select a radio mode: 802.11 a/n - 802.11 b/g or 802.11 a - 802.11 b/g. The “Guest Network” section is designed to create a kind of special little world for visitors to your home or office - they will be able to connect to the network, but private network and Time Capsule will not be “seen”. And, accordingly, they will not receive access to her disk. The Internet settings are standard, this is where you had to enter the provider data. Some official information:
- Time Capsule is certified to Wi-Fi draft 802.11n specification version 2.0 (firmware version 7.3.1)
- Interoperability with Mac, Windows PC and more Wi-Fi devices, certified for Wi-Fi standard 802.11a, 802.11b, 802.11g and the draft 802.11n specification version 2.0.
- NAT, DHCP, PPPoE, VPN passthrough (IPSec, PPTP and L2TP), DNS Proxy, SNMP, IPv6 (6-in-4 and manual setting tunnels).


There are also separate sections for setting up printers, disks (connected via USB), in the Advanced section you can view statistics, configure port forwarding, specify your MobileMe data for the “Access to my” function. Mac computer", configure IPv6.
So, after all the settings, another device appears in the Finder, the Time Capsule. On the vastness of your hard drive, you can save many necessary and useful files and access them at any time. For example, the first thing I decided to do was save a mighty bunch of different videos in the Time Capsule memory - watched TV series, good films that had already been watched a hundred times, recordings of concerts, and so on. Simply put, something that you would hate to delete, but you also don’t want it to take up space on your laptop’s disk. To begin with, I chose four films, standard “avishkas”, the average size is 1.5 GB. A VIDEO folder was created in the Time Capsule and the files were fed to the “capsule”. Well, the speed is not bad, four videos in twenty minutes is not bad.
Separately, it must be said about the Internet, about stable and smooth operation with all home devices. For me, this is a kind of psychological “turning point” when you have breakfast in the morning, turn on Wi-Fi on your phone and don’t know whether it will connect to the network or not... Sometimes this makes me very angry. This is not the case with the Time Capsule; it has been at home for a couple of weeks now, during which time there have been no reboots or connection problems. I personally am satisfied with the operating range; in a three-room apartment the signal is reliable everywhere, both on the loggia and in the kitchen.
Time Machine
In theory, the main purpose of the Time Capsule is use of hard disk for Reserve copy. Everything is simple here: select Time Machine, enable this function, specify the hard drive - respectively, Time Capsule. After this, the backup occurs automatically. This process does not greatly affect the speed of work on the network, but it can take a fair amount of time. And, frankly, it’s a pity for space on such a good network drive, I think if I “move” to another laptop, I’ll connect external hard disk via USB and I’ll get a copy much faster. True, in my case, when using the Time Capsule, the process is very slow.

What else?
Well, now let's talk about what you can do with the Time Capsule. The scheme of working with the device that I described is very simple; in fact, for me it is just an access point and a network drive for storing and playing various files. Yes, yes, right from the Time Capsule you can watch videos perfectly, without problems, without delays or “brakes”. But if you have other types on your Time Capsule and want more, then you need to come here, to the Ru_mac community. We look for the tag and find a real treasury of knowledge. For example:
“Hello! The following problem has arisen: I have a netbook with Windows 7. The Internet through the Capsule works with a bang, but the capsule screw refuses to be seen... There is also no capsule in the network environment, although the Workgroup group is everywhere. If you connect a network drive in Windows, it thinks for a very long time, then it falls off, like check network address... It works fine with a MacBook with a capsule screw, and Windows 7 sees shared folders on a MacBook normally, but it simply refuses to see the capsule... Has anyone encountered this problem? or maybe if you have any guesses what can be done other than throwing out the netbook with Windows 7"
The solution turned out to be simple: “The whole point is that in Windows 7, by default in the settings public access You should only work with devices that support 128-bit encryption... if you disable this garbage, then everything works with a bang.”
I won’t occupy your attention, if you are interested in Time Capsule and non-standard scenarios for its use, then follow the link in the Ru_mac community. There are topics about connecting additional devices to the Time Capsule, and about using different providers, and about backup features, and a lot general information. Including comparisons with competitors, advice on purchasing and repairs.
conclusions
I’ll do without any “buts” this device It costs quite a bit, but if you buy it in the USA, you will need to prepare it for about five hundred dollars. In Russia, this figure turns into twenty thousand rubles or even more. The Time Capsule, like some other Apple gadgets, is not covered by a worldwide warranty; if it breaks, you'll have to find an enthusiast willing to help with the repair. So it’s expensive and not very relevant for Russia yet. Moreover, you can buy another router for less money.
For myself, I made a choice for a simple reason: for a MacOS user, working with a network drive is a real pleasure, plus I like the Time Capsule as an access point. It operates almost silently, although it does heat up during data transfer. Therefore, the “capsule” has taken root and found its place at home; I don’t want to scour around in search of a substitute now. Perhaps later I will connect a printer and one of the external hard drives, We'll see. In any case, Apple has come up with a rather interesting thing, albeit an expensive one.