How to reduce the brightness on a laptop and computer? Display settings How to disable contrast mode in windows 7
Windows doesn't particularly indulge users with diversity in terms of the availability of regular tools for modifying the interface. The desktop picture, the color of windows, the taskbar, the Start menu in Windows 8.1 and 10 systems are changing. And in the latter, you can even apply a dark theme to individual standard applications. But radically transforming the Windows interface - with a different design of Explorer, other icons, an excellent implementation of the Start menu, and other points - is possible only with the participation of third-party software tools and patches. Changing the Windows interface more strikingly than changing one to another similar themes, without third-party tools, is possible only with the help of high-contrast themes.
1. Assign high contrast themes
High-contrast themes made their way into the Windows environment thanks to Microsoft's concern for visually impaired people. These themes are more austere than regular themes, featuring two accent colors for the interface and a few additional colors for text decoration. Themes initially do not provide pictures on the desktop. If desired, of course, colorful wallpapers can be installed, but then the use of a minimalistic interface style is partly lost. After all, the effect of color contrast when working with shortcuts on the desktop will be less noticeable. The austerity of the colors and the contrast of the colors make orientation easier. And in the absence of a variety of colors and shades, the eyes are less strained and, accordingly, less tired. High-contrast themes are designed for people with already impaired vision, and for those who want to save their eyesight, but as part of their work duties, they have to sit at the monitor screen for a long time.
 2
2 2. Speed up the system
High-contrast themes have the added benefit of making Windows run a little faster with their austere color schemes and lack of visual effects.
3. High contrast theme support environments
High-contrast themes fully support native Windows applications, including Internet Explorer and Microsoft Edge browsers, as well as installed Microsoft programs, in particular, applications of the Microsoft Office suite. Sites in standard Windows browsers are displayed in the style of the selected theme.
 3
3 Third-party Windows programs either do not support high-contrast themes at all, or only partially support them. For example, the Google Chrome browser only changes the menu background from white to dark when a high-contrast theme with a dark theme is selected, but the contents of its windows remain in their original format.
 4
4 But in any case, Chrome has gone further than other programs in terms of adapting to high-contrast themes: this browser determines the fact of switching to such themes and itself offers to bring itself into line with them by installing either a dark theme from its store or an extension that implements high-contrast mode in the browser. contrast.
 5
5 4. Disadvantages
You need to get used to working with high-contrast themes, ascetic interface design is an amateur thing. But this is more a feature than a drawback. As for the specific shortcomings of these topics, there are two of them. The first one only applies to Windows 8.1, where high-contrast themes may cause the Start screen and apps from the Windows Store to display incorrectly. The second drawback is the lack of a single format when actively working with third-party programs. Constantly switching between windows of Windows applications and windows of programs that do not support high-contrast themes will make your eyes more tired than when working with regular Windows themes.
5. Install high contrast themes
High-contrast themes are a Windows feature that hasn't changed in essence for a long time. In all current versions of the system - 7, 8.1 and 10 - a selection of four basic themes is provided, which, if necessary, can be corrected and matched with your own colors for individual interface elements. But access to this functionality in the system has changed during the evolution of Windows.
In Windows 7 and 8.1, high-contrast themes are available where normal themes are located - in the personalization section, below the regular themes.
 6
6 After applying a high contrast theme in Windows 7, you can customize it more flexibly by clicking "Window Color". In the settings window that opens, you can select individual interface elements from the drop-down list and set your own colors for them.
 7
7 In Windows 8.1, these settings are implemented more simply.
 8
8  9
9 Access to any themes in the personalization section of the control panel has been removed, but high-contrast themes have not become part of the personalization section of the Settings application, like regular themes. They are now a separate functionality and are contained in the "Accessibility" section of the "Settings" application. The same four basic themes can be found in the tab of the “High Contrast” section.

When you select one of the basic themes, settings will appear for changing the color of individual interface elements.
Have a great day!
The article is good, but I have a laptop with Windows 8 and I was surprised to find that the Aero effects in the "eight" are completely absent. In theory, in Windows 8 they should be even better than in Windows 7, but they were completely removed! In this regard, I want to ask a few questions on your useful site.
1. Why is the Aero Glass effect widely used in Windows 7 completely missing in Windows 8?
2. How to get Aero effects back in Windows 8: beautiful animation, fade, slide, fade out.
3. Our system administrator at work uses only high-contrast themes on his Windows 8 computer and why, does not say. What's the secret?
Friends! The fact is that Windows 8/8.1 has a completely different design concept than all previous versions of Windows. Along with the implementation of the tiled Metro interface in Windows 8, the Aero Glass effect in the desktop part of the system was removed, and the themes became simpler, lighter, and the focus was shifted from the beauty of window design by Microsoft to a variety of desktop wallpapers. They can be downloaded in a huge variety from the official website of the software giant absolutely free. You can make windows translucent in Windows 8/8.1 only by adjusting the color intensity.
But, of course, it will only be a pathetic parody of the Aero Glass effect in Windows 7. There will be no that depth, that volume, that atmosphere. However, the Aero Glass effect in Windows 8/8.1 can be implemented by installing unofficial third-party software patches. Another question is why do this if Microsoft, when creating Windows 8, planned to simplify the interface design so that the hardware resources of low-powered computer devices were used to the maximum for the operation of the system and programs?
You can make the system a little faster in both Windows 7 and 8/8.1 versions by setting a high-contrast theme.

High contrast themes are based on a different engine than regular themes. True, their intended purpose is completely different, and saving system resources is only a collateral benefit. High-contrast Windows themes are designed for visually impaired users. All unnecessary distracting elements are removed, and thanks to the contrast of colors, find the necessary buttons, options, list positions, etc. can be done quickly and easily.

High-contrast themes are also used by programmers for health prevention - to protect eyesight and reduce fatigue during daily active work with a computer. And, perhaps, many of them are simply nostalgic for the old days of monochrome displays and the simplicity of the non-diverse DOS operating system.

Windows 8/8.1 comes preinstalled with four basic high contrast themes. But flexible settings of high-contrast themes allow you to customize the system interface to individual user preferences.
To install and configure a high contrast theme, call the context menu on the desktop and select "Personalization".

Basic high contrast themes will be at the very bottom of the list of preset themes.

Select a theme with a set of colors that appeals to you and it will replace your current theme.

And you can set some nice image.

After that, return to the personalization section and click the "Color" link.

High contrast themes will fully work in Windows system services and only in some programs, but not in all. For example, the content of the windows of some third-party browsers will be the way the whole world sees it.

The high-contrast look of the interface in the style of the selected theme will only be within the browser menu.

But regular Internet Explorer will dutifully follow all the color trends of the installed high-contrast theme.

Some Metro applications will not agree to the inferiority of the colors of reality.

However, many Metro apps will change their original look and feel to a high contrast theme style.

Naturally, the Windows 8/8.1 Metro start screen will lose all its beauty and will resemble a kind of prison, through the barred windows of which application tiles will timidly look through. At the same time, dynamic tiles will also periodically change the appearance of the picture, as in the full-fledged Windows 8/8.1 interface theme.

A high-contrast theme will not interfere with working with graphic editors in any way - on the contrary, it will allow you to concentrate on the image being edited.

But perhaps the biggest effect of using a high-contrast theme can be obtained when working with text editors. It is simply impossible not to notice and not correct errors in the typed text.

One of the greatest benefits of the Windows user interface is how easy it is to customize its appearance to suit your own tastes. And although it will not be possible to make any cardinal changes to the interface, it is quite possible for any user to make its design personal and unique.
Most of the tools needed to personalize the system can be found under Control panels with a telling name Decoration and personalization. Also, the window with the design settings can be called using the context menu by right-clicking on any free space on the desktop and selecting the lowest item Personalization.
The Windows interface consists of several different elements - desktop background, window colors, mouse cursor, sounds accompanying events in the system, and others. Each of them can be individually modified to your liking. But it's easier to make changes to all these components at once using themes, which are placed right in the center of the personalization window.
Themes
Windows design themes are divided into three groups: My themes, ThemesAero And Basic (simplified) and high contrast themes. Initially, the system included 6 basic designs and one regional Aero style, as well as 6 basic ones.

Aero themes include several themed desktop backgrounds that cycle through each other after a certain time and have their own window decoration color.

Simplified or basic themes remove all Windows decorations (roundings, shadows, translucent surfaces) and give it a strict, concise look. This reduces the load on the video subsystem of the computer, which makes it possible to run Windows 7 on weak machines. Themes with high contrast are designed for visually impaired people.
In addition to the themes that are already built into the system by default, you can download additional skins from the Microsoft website by clicking on the link Other topics on the web. There you will find a huge number of various types of design, sorted for convenience by thematic areas.
Despite such a wide range of topics to choose from, sorting through them all in search of a suitable style is quite troublesome and not everyone will like it. It is much easier for someone to choose the background image and the color of the windows on their own. Moreover, some users may want to change only the picture on the desktop, without touching the rest of the design.
All the commands you need to step by step change the look and feel of Windows are at the bottom of the personalization window.

desktop background

By default, you are prompted to select an image from the built-in Windows collection, but clicking on the button Overview you can specify any other folder with graphic files, for example, with your family photos.
Under the image selection window there are buttons for selecting the position of the image on the screen, changing the time for changing images if a slide show is enabled, and a check box, enabling which will allow you to show images in random order.
window color
Selecting the next item in the bottom line of the window Personalization - window color- you can change the color of window borders, taskbars and menus Start.

In the window that opens, in addition to choosing a color from the ready-made options, you can enable / disable transparency, adjust the color intensity, its hue, saturation and brightness.
If these settings are not enough, then click on the link Additional appearance options, where you can choose an individual style for almost every element of the Windows interface.
Sounds
Button Sounds at the bottom of the window Personalization is responsible for changing the sound scheme, which will set the sounds that accompany various events in the operating system and programs.

In this case, you can choose one of the already existing schemes or independently assign your own sounds to the necessary events, thereby creating a new scheme.
True, in most cases, annoying system sounds not only do not have the desire to configure, but I want to disable it altogether, which can also be done in this window by selecting a sound scheme Without sound.
Screensaver
The last setting on the bottom line of the personalization window is responsible for the screen saver, the image that appears on the monitor when the computer is idle.
In the days of CRT monitors, a screen saver made a lot of sense. Constantly changing the image on the screen, it ensured uniform burnout of the phosphor layer, which was responsible for the color reproduction of the monitor.
In the era of liquid crystal displays, screensavers are no longer of almost any use and are just decoration.

Windows 7 comes with just six pretty simple screensavers. Those for whom this will not be enough can take a walk on the Internet, where a huge number of screensavers for Windows are located. Some of them have a very practical purpose, for example, turning your monitor screen into a clock, and some are a real feast of three-dimensionality and special effects.
If you are more concerned about energy saving when your computer is idle, then it is better to turn off the screen saver altogether.
At the end of acquaintance with the panel Personalization let's look at the top of her left column. Here are additional commands that allow you to change the settings of desktop icons (their composition and icons), configure the display of mouse pointers and change the personal account icon.
Screen resolution and font size
Decorations are certainly good, but beautiful pictures, although pleasing to the eye, do not make working at a computer more comfortable. For this, parameters such as the size of the font and its clarity in the captions under the icons or in the menu, as well as the size of the icons themselves, are more responsible.
To a greater extent, these parameters are affected by the screen resolution - one of the main characteristics of the monitor, showing the number of dots (pixels) horizontally and vertically that the display can accommodate. For example, a resolution of 1280x1024 indicates that the monitor screen consists of 1024 horizontal rows, in which there are 1280 pixels each, forming an image.
It is important that in Windows the screen resolution be set equal to the physical resolution of the monitor, since only in this case the clarity of the output image is guaranteed. That is, if your monitor has a resolution of 1920x1080 pixels, and the resolution of the operating system is set to 1680x1080 pixels, then double the font may appear, the outlines of the icons may be blurry, and the image itself becomes more grainy and “rough”.
To set or check the permission, right-click on any free point on the desktop and select the command in the context menu that appears. Screen resolution.

If the resolution item, next to its value, says “recommended” in brackets, then the system has the optimal resolution for your monitor.
On the one hand, the higher the resolution of the monitor, the clearer the image is obtained, the picture quality becomes better, and more information is placed on the screen. However, at the same time, the icons and the system font become smaller, and people with visual impairments are less comfortable working at this resolution.
Of course, in this case, you can simply set the monitor resolution to a lower one instead of the recommended one and all captions, menu windows and icons will become larger. But at the same time, the overall image quality will drop dramatically due to the reasons mentioned above. So how to be?
Fortunately, the developers have taken care of this problem, and in the Windows system, you can increase the size of text and icons without changing the optimal resolution. To do this, in the panel Screen resolution click on the link Make text and other elements bigger or smaller.

In the window that opens, you can select the required scale from three standard values, or set it manually by clicking on the link Other font size in the left column.
By the way call a window Screen possible from the panel Personalization by clicking on the link of the same name in the lower left corner.
Operating system Windows XP
1) Click the "Start" button, select "All Programs", "Accessories", "Ease of Access" and click "Ease of Access Wizard"
2) In the "Ease of Access Wizard" dialog box, click the "Next" button
3) In the text size dialog, select the smallest text that can be read, and then click the "Next" button
4) In the "Display Options" dialog box, check "Change font size". If you want to use Microsoft Magnifier, select the Use Magnifier check box. Press "Next"
5) In the "Set Wizard Options" dialog box, check the "Visual Impairment" box. Click the "Next" button to continue with the wizard
6) In the Completing the Wizard dialog box, click the Finish button to save your changes and exit the wizard. To cancel your changes, click the Cancel button, and then click the No button. To go to the previous screens, press the "Back" button
Operating system Windows 7
Open the Screen Optimization page. To do this, click the "Start" button, select the "Control Panel", "Ease of Access", "Ease of Access Center" and "Screen Image Optimization" components in sequence.
Choose a high contrast theme
Turn high contrast on and off when pressing ALT Left + SHIFT Left + PRINT SCREEN
This option allows you to turn the high contrast scheme on or off when you press ALT Left + SHIFT Left + PRINT SCREEN
Change the size of text and icons
This option allows you to enlarge text and other elements on the screen and, accordingly, make them easier to read.
Enable Magnifier
Setting the color and transparency of the window borders
Setting display effects
This option allows you to customize how certain items are displayed on the desktop
Make focus rectangle thicker
Adjust the thickness of the blinking cursor
Disable all unnecessary animations
Delete background pictures
Operating system Windows VistaOpen the Screen Image Optimization page by clicking the Start button and selecting Control Panel, Ease of Access, Ease of Access Center, and Screen Image Optimization. p
Select the options you should use:
Select a high contrast color scheme.
This option allows you to set a high-contrast color scheme that enhances the color contrast of text and some images on your computer screen, making those elements clearer and easier to identify.
Enable Magnifier.
This setting turns on Magnifier when you sign in. Magnifier magnifies the part of the screen where the mouse pointer is located, and is especially useful when viewing objects that are hard to see
Adjust the color and transparency of the window borders.
This option allows you to change the appearance of the window borders to make them easier to see.
Make the focus rectangle thicker.
This option thickens the rectangle around the currently selected item in the dialog box so that it is easier to see.
Adjust the thickness of the blinking cursor.
This option allows you to thicken the blinking cursor in dialog boxes and programs to make it easier to see.
Disable all unnecessary animations.
This option allows you to disable all animation effects, such as slow fading, when closing windows and other objects
Delete background pictures.
Setting this option turns off all unimportant and redundant information and background images to make the screen easier to read.
Operating system Mac OS XYou can customize the display and use the Magnifier or VoiceOver text-to-speech functionality in documents and Web pages using the following keyboard shortcuts:
Option-Command-* (asterisk)- enable screen magnifier
Option-Command- + (plus)- increase screen details
Option-Command- − (minus)- reduce screen details
Control-Option-Command-* (asterisk)- switch to black and white mode
Command-F5- enable/disable VoiceOver
Question from user
Hello. My brightness on my laptop began to spontaneously change: with a dark image, the brightness drops, and with a light image, it is restored to its normal level.
How can I get rid of this problem, otherwise my eyes began to get tired because of it? OS: Windows 8, graph. accelerator (video card) Intel HD 4000 (built-in).
Good day!
This problem began to appear more and more often after the release of Windows 8 (this OS introduced the ability to adaptively adjust the brightness, depending on the picture on your screen). Also, some laptops are equipped with special software and sensors that determine the level of illumination in the room, and adjust the brightness of the screen according to it.
There is nothing wrong with this, but in certain cases such a change does not allow it to work normally and interferes with the user. In the article I will tell you in detail how you can turn off this spontaneous change in brightness ...
Eliminate automatic monitor brightness changes
1) Disable adaptive brightness control
This is the first thing to do. This option is available in Windows 8, 8.1, 10. Those who have Windows 7 can omit this part of the article.
You need to open the power settings section:
- or via the following address: Control Panel\Hardware and Sound\Power Options
- or by pressing the Win + R keys and entering the powercfg.cpl command (see screenshot below).

In power settings: follow the link "Setting the power plan" in the selected mode (on the screen below it is balanced mode. The selected mode is marked in bold black).


And now find among the settings tab "Screen" and open it. Here in the tab there are 3 key settings:
- screen brightness on battery and mains: set the values that suit you;
- screen brightness level in dimmed mode: set exactly the same values that you have set in the tab "Screen Brightness";
- turn off adaptive brightness from the mains and battery (see screenshot below).

Now save your settings and try looking at bright and dark pictures (for example) to see if the brightness changes. As a rule, such settings completely eliminate this problem ...
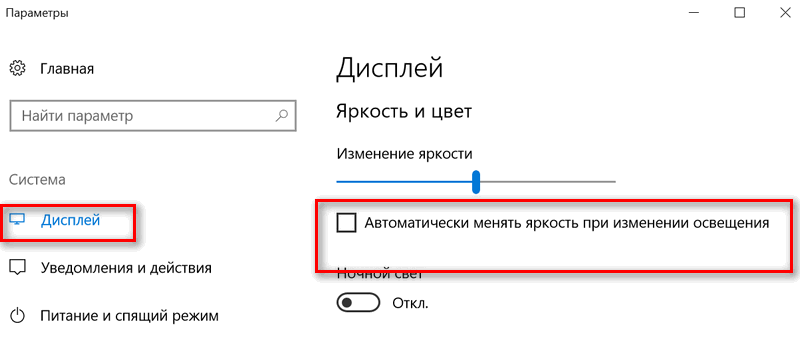
Update 06/10/2018
If you are using Windows 10, pay attention to its control panel (to go to it - press Win + i). In section "System/Display" there is a special a setting that allows the laptop to change its brightness as the ambient light changes. Turn it off too!
2) Setting the power supply of the video card
The laptop itself can reduce the brightness under certain operating modes. For example, Intel HD graphics cards support Display Power Saving Technology, extended gaming time on battery power. Similar technologies exist in both AMD and nVidia.
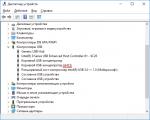
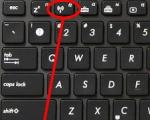
First you need to go to the video card driver settings (you can through - see the screen below), or you can through the tray icon, next to the clock.

Intel graphics settings (tray)

Important!
If you do not have a tray icon, and there is also no link to the graphics settings in the control panel, then most likely you do not have drivers installed (it is likely that you have a "universal" driver that was installed during Windows installation). In this case, I recommend programs for updating drivers:
They need to set the following:
- set the power saving option to maximum performance mode;
- turn off extended game play time on battery power;
- disable display power saving technology (screen below - see arrows).

Note!
For example, in AMD video cards, you need to open the "Power" section, then enable maximum performance, and disable Vari-Bright technology (this is AMD's technology that allows you to adjust brightness).
Vari-Bright disabled! (AMD Graphics settings) / Clickable

3) Sensor Surveillance Service
There is one service in Windows that monitors the sensors and adjusts the display lighting, depending on the illumination of the room in which your device works.
I can say that sometimes the service does not work properly and can affect the brightness adjustment, even if you do not have any sensors!
How to disable sensor monitoring services
Open a window with services: the easiest way is to press the keys Win+R, enter services.msc, press Enter. The method works in all versions of Windows.

Next in the list you need to find the service "Sensor Monitoring Service" , open it. In the graph "launch type" put [disabled], and stop the service itself so that the status is listed as "Stopped" (see screenshot below).
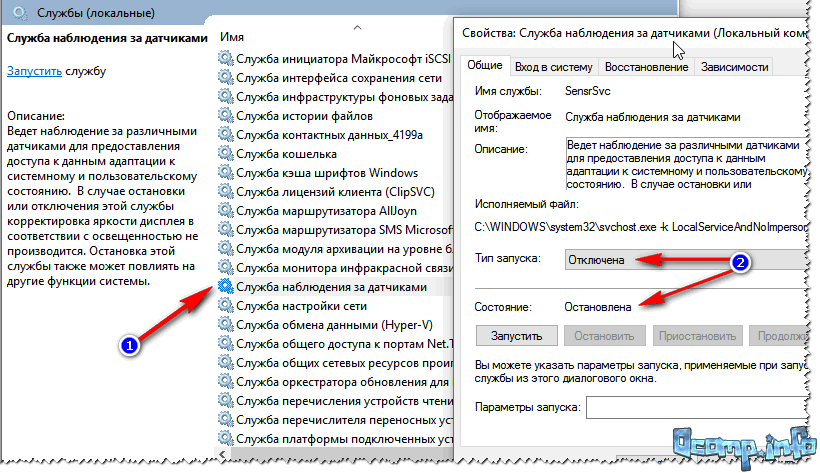
Then save the settings and restart the laptop.
4) Laptop Control Center
Certain laptop models have a control center among the software installed with the drivers. For example, in the VAIO laptop line from SONY, there are VAIO control center .
In this control center, for example, you first need to open the tab "Power supply" and set high performance, as well as disable the function that extends battery life (see screenshot below).

High performance // Power // VAIO control center

Image Quality // VAIO Control Center
Actually, it is hardly possible to give a description for each of these centers. The VAIO Center is shown above as an example of such software.
Something similar is also in Lenovo laptops: a variety of night modes, dynamic changes in brightness, contrast, and other things can significantly change the quality of the picture on the screen. It is recommended to turn them all off (at least at the time of setup and adjustment).

5) Problems with iron
A change in screen brightness can be associated not only with software settings, but also with faulty hardware. In what cases can you determine that the laptop hardware is to blame:
- if not only the brightness changed on the screen, but stripes, ripples, dots began to run (as in the example below);
- if when you add / decrease the brightness on the monitor, absolutely nothing happens;
- if the brightness changes even without changing the picture on the screen and without changing the lighting mode in the room;
- if the brightness in different parts of the screen is different.
To help!
If you have stripes and ripples on your monitor, I recommend that you read another article of mine:

Stripes and ripples on the screen / As an example
Successful work!