How to delete downloaded ringtones on iPhone. Removing sounds (ringtones) from iPhone. How to remove an unnecessary ringtone from an iPhone downloaded via iTunes using iFunBox and iTools
September 28, 2017Products from Apple is very popular all over the world, in particular Cell phones. These gadgets are somewhat different from regular smartphones. You need to be able to work with them. Otherwise, besides making a call, you will not be able to cope with any other capabilities of the phone. Quite often, owners of Apple devices wonder how to remove a ringtone or music from an iPhone. Next we have to find the answer to this question. In fact, if you follow the suggested instructions, you will be able to bring your idea to life in a few minutes.
Removal methods
iPhone is in demand among many people around the world. But not everyone can handle this device. This smartphone requires certain knowledge and skills.
How to remove a ringtone from an iPhone? This question has several answers. Each owner of Apple products can do the following:
- use the phone settings;
- work with iTunes;
- use iTools;
- carry out the removal through iFunBox (analogous to iTools).
In addition, it is proposed to work with a variety of third party applications. In practice, they are used extremely rarely and do not inspire any confidence. Below we will look at all of the listed techniques in more detail.
One phone and its settings
How to remove purchased ringtones from iPhone? Some try to swipe to the left for one tune or another. Before that, they go to “Settings” - “Sounds” - “Ringtones”.
What happens if you do this? Nothing. This trick doesn't work. And so you have to think about how to remove purchased and saved ringtones from your iPhone. Unfortunately, you won't be able to do this just like that. 
File managers
Still, it's worth a try. To work with music on iPhone you need to download from Cydia file manager called iFile. It will allow you to work with ringtones and other documents. The application is paid, it costs about $4, but if a person actively uses file editing, the expense will be justified.
How to remove a ringtone from an iPhone? Required:
- Download and install iFile.
- Open the main menu of the device and launch the mentioned application.
- Go to var/mobile/media/iTunes_Control.
- Go to the Ringtones folder.
- Swipe left on the desired document.
- Select the "Delete" function.
- Confirm the process.
One caveat - only owners of Apple phones with jailbreak can use this technique. Otherwise it won't work. You can consider other options for the development of events.
iTunes to the rescue
We found out how to remove ringtones from an iPhone without a computer. Perhaps this is the only solution that can be recommended. In all other cases you will have to use a PC.
Let's start with the simplest and most correct approach - using iTunes. Every owner of an Apple device is familiar with this application. The program is used to work with Apple devices in various ways - from restoring settings to downloading new documents. 
How to remove a ringtone from an iPhone? You can do this:
- Install on PC latest version iTunes. It is important that it is no older than build 12. Otherwise, the user will not find the required menu item.
- Connect your iPhone to your computer using a USB cable.
- Launch the mentioned application.
- Create a media library ("File" - "Add to media library...").
- Go to "Devices" and select the connected smartphone.
- Open the "General" tab.
- Check the boxes next to “Manually process music and videos”, “Synchronize only marked songs”.
- Go to the "Sounds" section.
- Check the box next to "Synchronize".
- Click on "Apply".
- Do similar actions with the “Music” section.
This way you can remove ringtones and songs from Apple devices. It is important to understand that all documents that have not been added to the library must be purged. In addition, you can only get rid of documents downloaded via iTunes in this way.
iTools and ringtones
But “iTools” allows you to work with any files. This application is similar to iTunes, but it does not require synchronization of devices, which significantly speeds up the process. The program is free, easy to understand and master.
How to remove a ringtone from an iPhone? Required:
- Install iTools on your PC.
- Connect your iPhone to your computer. A USB cable is used for this.
- Launch iTools.
- Open "Media" - "Ringtones".
- Right-click on the required document.
- Select the "Delete" function.
- Confirm the operation.
As practice shows, this is the simplest solution. But it is not the only one.
iFunBox
You can use the iFunBox program to bring your idea to life. Typically, in this case, users work with iOS and MacOS.
The guide to remove music and ringtones is as follows:
- Install iFunBox on your computer.
- Connect iPhone to PC using USB.
- Launch "iFanBox".
- Click on "My Mac".
- Select "Raw File System".
- Go to var/mobile/media/itunes_control/ringtones.
- Right-click on the required document.
- Click on "Delete".
After a moment, the ringtone will be deleted. There is nothing difficult or incomprehensible about this! 
Can you answer how to remove a default ringtone from an iPhone? Yes, but you shouldn't do that. This may damage the operating system.
No matter how paradoxical it may sound, some very basic actions that budget smartphones and tablets with Android on board, can be done in a few movements, but on an iPhone it is quite difficult to do.
Setting any mp3 track as a ringtone or deleting it, downloading or deleting music, or a movie on an iOS device is also not difficult, but it requires special knowledge. Today I will tell you how to remove a ringtone (ringtone) from an iPhone.
We have already talked about how to use it as a ringtone.
Let's say you're tired of old ringtones and it's time to update your collection. It’s not good to clutter up an expensive device with unnecessary “garbage”, irrelevant ringtones “under the broom”.
In order to remove an unnecessary ringtone from iPhone memory you will need:
- standard USB cable;
- iPhone from which you need to remove the ringtone (sound);
- computer based on Windows or Mac OS X;
- file managers: iFunBox (free download), iTools (free download) or DiskAid (official site)
How to remove a ringtone directly from iPhone
Swiping left on the name of the ringtone in “Settings -> Sounds -> Ringtone” does not give any results. Removing ringtones directly from the iPhone does not work (for devices without jailbreak); you cannot do it without a computer.

If you have a jailbroken device, you can remove the ringtone directly from the device. To do this, you need to install the file manager for iOS - iFile. It is available in the BigBoss repository (http://apt.thebigboss.org/repofiles/cydia), you do not need to add it, it comes bundled with Cydia. iFile costs $4, but if you actively dig into your file iPhone system, the program is irreplaceable. There is also a hacked version of the manager on the Internet, we cannot give a link, but Google can do anything.

We would like to remind you that only owners of jailbroken devices will be able to install iFile and access the iOS file system directly from their iPhone.
How to remove a ringtone from iPhone via iTunes
You can delete from your iPhone via iTunes only those ringtones that were downloaded to the device’s memory using it.
It is impossible to delete ringtones downloaded by file managers like iFunBox and iTools using a media harvester.
To remove ringtones from iPhone:

How to remove ringtone from iPhone using file manager
File managers iFunBox, iTools and DiskAid “can” download and delete music, videos, ringtones (sounds) and documents from iPhone, bypassing iTunes without synchronization.
Some manager capabilities are also available for “pure” iOS (without jailbreak), including working with ringtones (adding/deleting) with the exception of standard ones.
Using the file manager you can delete ringtones:
- available in iOS by default (standard);
- downloaded via iTunes;
- downloaded using file managers (iFunBox, iTools and DiskAid).
How to remove default ringtone from iPhone
We will deliberately not talk about how to remove standard ringtones from iPhone, because... We don’t recommend this ourselves. After deleting a ringtone file from the device’s memory in “Settings -> Sounds -> Ringtone”, entries with the names of the deleted ringtones still remain; the ringtone is only physically deleted. Let's try to remove the standard "Silk" ringtone, but first you need to gain access to the iOS file system, and without this you won't be able to do this.
In order to access system folders In iOS 7.1.2, you also need to install “Apple File Conduit 2” in Cydia. This tweak allows access to system partition iOS.

iPhone ringtones before deleting the Silk.m4r file

Contents of Ringtones on iPhone before deletion

Ringtones in iPhone after removing Silk.m4r

Contents of "Ringtones" in iPhone after deletion

As you can see, the contents of the “Ringtone” menu in the iPhone settings even after physically deleting the ringtone file contains an entry with its name. By tapping on it you can make sure that the melody will not be played. There is no point in deleting ringtones this way.
How to remove an unnecessary ringtone from an iPhone downloaded via iTunes using iFunBox and iTools
File managers iFunBox and iTools allow you to get to the downloaded folder via iTunes ringtones and in “pure” iOS, and if you need to remove some of them, there is no need to jailbreak.

Same thing in iTools:

As you can see, in iTools it is more convenient and faster to delete unnecessary ringtones downloaded by iTunes; they are available from the main menu. Choose for yourself which option to use: iTools is more convenient, iFunBox is available in Russian.
How to delete a ringtone downloaded to iPhone using a file manager
If you previously “uploaded” your own ringtones into the iPhone’s memory through file managers (iFunBox or iTools), they are among the standard ones and are available in the “Ringtones” (in iFunBox) and “Ringtone” (in iTools) menus.

In iFunBox the same thing is a little easier to do.

As you can see, there are several ways to remove an unnecessary ringtone from an iPhone and it’s quite easy to do. Those ringtones that were downloaded via iTunes can be deleted using the same “tuna” or any file manager, but you need an iOS jailbreak.
If you have any questions or problems with deleting sounds from the memory of iOS devices, write to us in the comments, we will certainly help you.
We have already said more than once that interaction with music on an iPhone is carried out through iTunes. It won't be enough to just delete songs from the iPhone's memory. To get rid of unnecessary ones once and for all, you will have to use iTunes.
It is necessary to delete music from your phone so that there is always free memory there. There are situations when you urgently need to download some files, but there is no free “space” on the device. Of course you can delete unnecessary applications, photographs and videos, but the issue of cleaning needs to be approached comprehensively: if you really want to remove unnecessary files, then music too.
How to delete music through iTunes?
No one forbids deleting songs directly from your smartphone. In this case, after the first launch of iTunes, they will be restored again. This program allows you not only to quickly find and download the tracks you need, but also to delete unnecessary ones.The sequence of actions for deleting is as follows:
Step 1. Connect your device to your PC via USB. In the program window, select your device as shown in the image below.
Step 2: Click on the "Overview" tab and go to the "Options" section. You need to check the box, as shown in the screenshot. This function When synchronization is enabled, it allows you to manage files located in the device memory. You can quickly select and delete the required tracks, as well as leave the ones you need.
 Go to the "Overview" section
Step 3. Go to the “Music” tab and check all the boxes as shown in the image below.

Step 4. In the list that opens, you need to check off those files that do not need to be deleted. Files not checked will be deleted. This action will take from 1 to 15 minutes, depending on the amount of music on your smartphone.

Step 5. To activate the changes, you must click on the “Apply” button. After this, all unmarked folders will be deleted.

If you need to delete only certain songs, and not entire folders, you can do this from the iTunes library itself. This is done in a couple of steps in a few minutes.

How to check deletion?
To check whether music has been deleted from the device’s memory, just go to your iTunes library from your phone and check whether there are any unmarked tracks left in the smartphone’s memory. If they are not there, then you did everything right. If they remain, repeat the removal algorithm again. Perhaps you made a mistake at some stage.There is nothing complicated about it. All you need is a free PC and a USB cable to connect to it. A small theoretical basis in the form of this article will help you delete all unnecessary tracks from your phone’s memory.
No matter how unusual it may be, some actions that can be performed on Android phones in just a couple of taps will present enormous difficulties on an iPhone. For example, in order to remove standard sounds, you will need to use ingenuity. In this article, we would like to tell you about the rules for deleting ringtones, perhaps to install newer ringtones or to easily clear free space.
Removing a ringtone specifically from an iPhone
To begin with, you should know that you will be able to erase unnecessary sounds specifically from the device only if it is jailbroken. It allows you to purchase full access to all files.
If you do not have this function enabled, you will need to use a computer.
Otherwise, it will be very easy to remove the ringtone. To do this, find an ergonomic file manager online, download and install it. We recommend that you pay attention to iFile, it has a huge set of functions, the domestic instructions will be based on the example of this manager. Then we carry out the following manipulations:
Launch the manager and go to the following path: /var/mobile/Media/iTunes_Control/Ringtones/
We are looking for a ringtone that will need to be deleted, but at the same time you should know that it will be impossible to identify it by title, since iTunes renames files. The iFile manager has a built-in player with which you can play sounds and listen to them, so you can understand what needs to be erased;
Swipe left on the desired melody, and then click on the “Delete” inscription. All actions should be done with caution, since the program will not ask confirmation questions.
Removal process for jailbroken devices
Now the extra sound will no longer disturb you under any circumstances; you have the opportunity to replace it with a new melody.
Removing sounds via iTunes
To remove unnecessary sounds from a phone that does not have Jailbreak installed, you will need the following:
iPhone from which you want to remove the ringtone;
USB cable, which in most cases comes with the device;
Computer, since it will be useful to connect the device to it;
iTunes updated to the latest version;
In addition, it is worth noting that with this method you can only delete those ringtones that were previously downloaded to the iPhone via iTunes. So, to remove unnecessary songs you need to perform the following manipulations:
Connect the device to the computer using a USB cable;
Turn on iTunes, find the “Devices” section, then go select your own iPhone;
Go to the “Options” -> “Browse” section and check the box next to “Synchronize only tagged songs and videos.” This needs to be done in those cases when you want to remove certain melodies, and not all at once.
Then go to the “Sounds” tab (it is displayed only if you have downloaded music compositions);
If you want to erase from memory all the ringtones that were downloaded via iTunes, uncheck the box next to “Sync sounds”, and then click “Apply”. Upon completion, the ringtones will be erased from the device's memory, but they will be saved in iTunes;
If you want to delete only certain songs, then do not uncheck the “Synchronize sounds” checkbox, but in the list below, click on “Selected sounds”. A list of all sounds will then be displayed. All you have to do is uncheck those melodies that need to be erased from the device’s memory and click “Change” to confirm the action.
Removing ringtones using a third-party manager
Using another file manager, recommended for use - iTools, you can delete sounds downloaded through iTunes or a second file manager. To delete melodies you need to do the following:
Connect your iPhone to your PC using a USB cable;
Turn on the previously downloaded iTools;
In the main menu, find the “Music” item and select “On this iPhone” -> “Ringtones”;
We highlight required file and click “Delete”. Immediately after this, it will be deleted without the possibility of recovery.
The steps outlined above can also be performed through the iFunBox program. To do this, launch the application, go to “Ringtones”, look for the file in that place and click delete in the window that appears.
The ringtone will be permanently deleted from the phone's memory.
Now you understand how it is possible to remove unnecessary ringtones from your own iPhone; at first glance it may seem that this is too difficult, but if you figure it out, everything is completely different.
One of the most annoying problems you have to deal with iOS users, it is a complex process of creating and installing a ringtone on iPhone call. iOS has a large collection of standard ringtones, but many people prefer to set their favorite songs as ringtones.
Fortunately, it can be done, and in this article we will tell you how to make a ringtone on iPhone via iTunes and set it as a ringtone.
These instructions are suitable for all modern iPhones:
- iPhone Xs, Xs Max
- iPhone Xr
- iPhone X(10)
- iPhone 8, 8 Plus
- iPhone 7, 7 Plus
- and older models.
How to set a ringtone on iPhone from any song via iTunes
Step 1: Connect your iPhone to your computer and open iTunes.
Step 2: Select Songs in the menu on the left tab Media library. A media library will open with all your songs.
Step 3: Find the song you want to set as a ringtone, right-click on it and select Song information.

Step 4: In the window that opens, go to the tab Options and click the checkboxes next to “start” and “end”. Enter the desired time of the song you want to use. Then click OK.

Step 5: In your library, click on this song, then in the menu at the top, go to File > Convert (Convert) > Create a version in the formatA.A.C.. A copy of the song with the same name will appear.

Note: If you don't know which of the songs are in AAC format, please click on them right click mouse and view Song information. On the tab File you will find the song format.
Step 6: Now the song needs to add an extension . m4 r so that this ringtone can be installed on an iPhone. To do this, right-click on the song and select Show in Windows Explorer or Show inFinder (Mac).

Step 7: Finder will open the iTunes folder where the song is located. It will have the extension .m4a. Rename the song by adding .m4r at the end. For example, if the file name was Hello. m4 a, it needs to be renamed to Hello. m4 r.

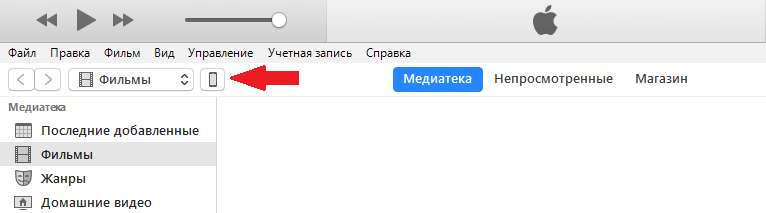
Step 8: Return to iTunes and click on your device icon in the menu.
Step 9: Go to Sounds.
Step 10: Drag the song.m4r file to the Sounds tab in iTunes. 
If you don't have a section Sounds, drag a song to the general section of your device and it will appear automatically.
Step 11: Once the ringtone appears in iTunes, it should be transferred to the iPhone.
How to set a ringtone on iPhone
Step 1: Open Settings on iPhone.
Step 2: Go to Sounds.

Step 3: In section Sounds and vibration patterns select the type of notification you want to set a ringtone for.

Step 4: A list will appear with all available ringtones. The one you created should be at the very top of the list. Click on it to set it to ring.

How to Add Ringtones to iPhone via iTunes 12.7

If you've updated to iTunes 12.7, you've probably noticed the changes Apple has made to new version programs. The App Store section was removed, as well as the ability to sync ringtones with iPhone.
Luckily, you can still add ringtones through iTunes 12.7, but now it's done a little differently. Users may be confused at first, but the process is actually not that complicated and over time you will be able to set ringtones on your phone with ease.
Step 1: Connect your iPhone or iPad to your computer and open iTunes.
Step 2: Click on the device icon in the top left corner of iTunes. If there is no icon, iTunes was unable to detect your device. Check that the USB cable is well connected.
Step 3: If you don't see side panel, you need to turn it on by clicking on View in the menu at the top, and then selecting Show side menu. If the panel is visible, just skip this step.
step 4: In the iTunes side menu, click Sounds. Now just drag the .m4r file into the Sounds section that opens.
- If you don't have a section Sounds, drag the ringtone to the section On mine device. The Sounds section will appear on its own, and all your ringtones will be displayed in it.


Step 5: When the ringtone appears in iTunes, it will also be added to the iPhone.
That's how easy it is to add ringtones to your iPhone or iPad using iTunes 12.7.
As you can see, managing ringtones through iTunes 12.7 is quite easy. Fortunately, this Apple feature I have not removed it yet, and we hope that this will not happen in the future.
How to change ringtone on iPhone (official method)
Most users know how to change the ringtone on their iPhone, but there are also those who recently got it. It is intended for such people this method. Below we will tell you how to change to iPhone official way.
Changing the ringtone on iPhone
1) Open Settings and select Sounds.
2) Select Ringtone in section Sounds and vibration patterns.
3) By selecting each option, you can listen to it. At the very bottom of the list there will be an item Classic, which contains even more options.
4) When you find the perfect ringtone, simply select it and close settings.

If you don't like the standard ringtones, you can buy additional ones.
Top of page Ringtone you will see the item Sound store. Select it and a screen will open where you can search, buy and download any ringtone.

Change iPhone Message Ringtone
In the settings section Sounds can change Message sound. This option is located immediately below Ringtone.
Select it and you can change the sound of the message, as well as buy additional ones.

It is important to choose a ringtone and message sound that you like, because you will hear them very often. So take a couple of minutes and find the perfect option for you.
How to remove your ringtones fromiPhone
Step 1: Connect your iPhone to your computer and open iTunes.
Step 2: Click on your device icon in the upper left corner.
Step 3: Select Sounds in the side menu.
Step 4: iTunes will show a list of all your ringtones. Find the one you want to delete, right-click on it and select Delete.
See also another way to set a ringtone on an iPhone without a computer
- How to set a ringtone on iPhone without a computer and iTunes via GarageBand
Don't miss Apple news - subscribe to our Telegram channel, as well as