Css bulleted list indentation. How to remove indentation of an HTML element. How to remove indentation at the edges of an HTML page
When creating a block with a list of links, it is generally a good idea to use the display property with block or inline-block attributes to increase the size of the active link box. Large active link fields improve the usability of elements; large elements are easier to hit with the mouse.
Elements with display: block are rendered as block-level.
An element with display: inline-block is rendered as a block element that is wrapped around other elements like inline. The content is formatted as a block element, and the element itself is formatted as inline.
Let's look at a simple example with a list of links:
- This little
- piggy went to
- market
If you do not change the style of links, then the size of their active fields corresponds to the size of the text inside them.
We can improve this by making the active box fit the width of the parent element.
Ul a (display: block;) 
We can do even better.
- Make sure list items have no fields as opposed to links.
- Links do not have external margins, as these margins are not the active area of the elements.

The article consists of obvious things, but we can quite often find on the Internet the blocks of links that are not "disfigured" by enlarged active fields.
Original article: Keep Margins Out of Link Lists By: Chris Coyier on 11/29/2010

"Lorem ipsum dolor sit amet, consectetur adipisicing elit, sed do eiusmod tempor incididunt ut labore et dolore magna aliqua. Ut enim ad minim veniam, quis nostrud exercitation ullamco laboris nisi aliquip ex ea commodo consequat. velit esse cillum dolore eu fugiat nulla pariatur. Excepteur sint occaecat cupidatat non proident, sunt in culpa qui officia deserunt mollit anim id est laborum. " Paragraph 1.10.32 "de Finibus Bonorum et Malorum", written by Cicero in 45 AD. "Sed ut perspiciatis unde omnis iste natus error sit voluptatem accusantium doloremque laudantium, totam rem aperiam, eaque ipsa quae ab illo inventore veritatis et quasi architecto beatae vitae dicta sunt explicabo. Nemo enim ipsam volatatem sitia quasi. consequuntur magni dolores eos qui ratione voluptatem sequi nesciunt.neque porro quisquam est, qui dolorem ipsum quia dolor sit amet, consectetur, adipisci velit, sed quia non numquam eius modi tempora incidunt ut labore et dolrat volt venam aliquamate , quis nostrum exercitationem ullam corporis suscipit laboriosam, nisi ut aliquid ex ea commodi consequatur? Quis autem vel eum iure reprehenderit qui in ea voluptate velit esse quam nihil molestiae consequatur null, vel illum qui dolorem eum fugiat 1914 English translation, H. Rackham "But I must explain to you how all this mistaken idea of denouncing pleasure and praising pain was born and I will give you a complete account of the system, and expound the actual teachings of the great explorer of the truth, the master-builder of human happiness.No one rejects, dislikes, or avoids pleasure itself, because it is pleasure, but because those who do not know how to pursue pleasure rationally encounter consequences that are extremely painful.Nor again is there anyone who loves or pursues or desires to obtain pain of itself, because it is pain, but because occasionally circumstances occur in which toil and pain can procure him some great pleasure. To take a trivial example, which of us ever undertakes laborious physical exercise, except to obtain some advantage from it? But who has any right to find fault with a man who chooses to enjoy a pleasure that has no annoying consequences, or one who avoids a pain that produces no resulta nt pleasure? " Paragraph 1.10.33 "de Finibus Bonorum et Malorum", written by Cicero in 45 AD. "At vero eos et accusamus et iusto odio dignissimos ducimus qui blanditiis praesentium voluptatum deleniti atque corrupti quos dolores et quas molestias excepturi sint occaecati non provident, similique sunt in culpa qui officia deserunt hardened mollitia et labor. rerum facilis est et expedita distinctio. Nam libero tempore, cum soluta nobis est eligendi optio cumque nihil impedit quo minus id quod maxime placeat facere possimus, omnis voluptas assumenda est, omnis dolor repellendus. ut et voluptates repudiandae sint et molestiae non recusandae. Itaque earum rerum hic tenetur a sapiente delectus, ut aut reiciendis voluptatibus maiores alias consequatur aut perferendis doloribus asperiores repellat. " 1914 English translation, H. Rackham "On the other hand, we denounce with righteous indignation and dislike men who are so beguiled and demoralized by the charms of pleasure of the moment, so blinded by desire, that they cannot foresee the pain and trouble that are bound to ensue; and equal blame belongs to those who fail in their duty through weakness of will, which is the same as saying through shrinking from toil and pain. These cases are perfectly simple and easy to distinguish. In a free hour, when our power of choice is untrammelled and when nothing prevents our being able to do what we like best, every pleasure is to be welcomed and every pain avoided.But in certain circumstances and owing to the claims of duty or the obligations of business it will frequently occur that pleasures have to be repudiated and annoyances accepted. The wise man therefore always holds in these matters to this principle of selection: he rejects pleasures to secure other greater pleasures, or else he endures pains to avoid worse pains. "
Which browsers do they install by default? A similar question often arises for novice layout designers who want to remove such indents from elements such as HTML tables (tag) and their cells, etc. In fact, nothing is easier, but first let's figure it out, do you mean indentation when looking for an answer to this question?
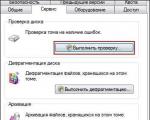
There are two types of properties in CSS that control the padding (CSS) and margins (CSS) of elements. Their location is shown in the following image:
So, when many newbies say that they want to remove indentation from an element, they actually mean its margins, since they are usually added by browsers to some elements. No, indents are, of course, also added, but there are very few such elements, for example, tags and browsers set non-zero indents so that the text on the buttons does not fit closely to the frame.
The situation is a little different with HTML tables, since they have two more parameters - this is a CSS property that changes the distance between borders or cell borders (which can also be called indents) and CSS, which removes this distance altogether and makes the borders common. The image below shows the placement of all these margins and padding on the table.

What you need to pay attention to here. Well, firstly, for table cells there are no fields in the usual sense, they are used instead, and secondly, the tag has both margins and indents, like a regular HTML element. And, thirdly, the indentation from the inner edge of the table to the cells is made up of the size of the inner indentation of the table, to which the size of the distance between the cells is added.
Well, now that you know all this, let's look at a few examples.
How to remove indentation at the edges of an HTML page
HTML and CSS example: remove indentation from the BODY tag
Page content.
Description of the example
Description of the example
For the visual design of lists, all popular browsers set the margins and indents for the tag, and they put the margins only at the top and bottom (like paragraphs), and the margin only on the left to move the list items to the right. However, for the sake of reliability, the margins and indents were removed from the tag, in case some browser decides to behave differently. By the way, this approach is called resetting the CSS, you can read.
How to remove indents from a table
HTML and CSS example: remove padding between table cells
| Cell 1.1 | Cell 1.2 |
| Cell 2.1 | Cell 2.2 |
| Cell 1.1 | Cell 1.2 |
| Cell 2.1 | Cell 2.2 |
| Cell 1.1 | Cell 1.2 |
| Cell 2.1 | Cell 2.2 |
Description of the example
For greater clarity, frames have been added to tables and cells. I did not apply any special styles to the first table, so that you can see that browsers do not add margins or indents to tables by default, but only set short distance between cells. So we will clean it up.
The CSS: collapse property was applied to the second table so that the borders of adjacent cells became common. But in the third, the distance between the cells was simply zeroed, but their borders (frames) remained in their places, this is very clearly seen by the characteristic thickening of the frames. Naturally, in fact, no thickening occurred, just the frames in the table "snuggled" to each other.
In general, as you can see, both of these methods help remove indents in the table, they just do it a little differently.
Among the rarely discussed advantages of CSS is the ability to overlay background images to achieve various effects. According to the CSS2 standard, a separate HTML element is required for each background image. In most cases, a typical code describing common interface components provides several HTML elements at our disposal. One such case is bookmark-based navigation. It's time to take back control of bookmarks, which are growing in popularity as their primary means of navigation. And now, thanks to the widespread support for CSS, we can improve the quality and appearance of bookmarks on our sites. As you probably already know, CSS can be used to tame a simple bullet list. You may have even seen lists with tabbed design that look something like this: What if we could take the exact code from the previous example and turn the tabs into something like this: With simple CSS, it’s possible. What's the innovation? Many of the CSS bookmarks I've come across (CSS based bookmarks) suffer from the same design uniformity: colored rectangles, possibly with a stroke, the current bookmark without a stroke, the color changes for the hover state. Is this all that CSS has to offer? Multiple rectangles with a solid color fill? Before CSS became widespread, there were many new ideas in navigation design: fancy shapes, subtle color transitions, and imitation of real-world interfaces. This design, however, relied heavily on complex constructs of rasterized text and multiple nested tables. Editing the text or changing the order of the bookmarks was cumbersome. Scaling the text was not possible or caused serious problems in the page composition. Plain text navigation is easy to edit and loads significantly faster than rasterized text navigation. Also, while we can add an alt attribute for each image, plain text is still more publicly available as it can be scaled. So it's no surprise that plain text navigation is making a comeback in web design. However, the look and feel of CSS bookmarks has so far been a step back in design, and certainly not something to include in a design portfolio. New technologies (like, for example, CSS) should allow you to create something better and with the same quality of design that the use of tables and tabs based on bitmaps gave. The Sliding Doors Method We can create beautiful, truly flexible interface elements that expand and contract depending on the size of the text using two separate background images. One is for the left side of the bookmark, the other is for the right. Imagine this pair of pictures are Sliding doors covering one doorway. These doors move and overlap more if the doorway is narrow, and vice versa, move apart and overlap less if you need to close a wider space. This is shown in the illustration: According to this model, one image overlaps part of the other. Assuming that there is something unique around the edges of our pictures, such as the rounded corner of a bookmark, we hardly want one picture fully covered the other one behind. To prevent this from happening, we will make the front (in our case, the left) image as narrow as possible. But at the same time, the picture must be wide enough to preserve its visible uniqueness. In our case, the rounded corners are unique, so the front image will be as wide as this rounded part of the image: If the size of the bookmark increases as a result of, for example, scaling the text, our images will spread apart, revealing an unpleasant gap. Therefore, the scale of the acceptable expansion needs to be assessed. How much can an object grow larger when text is scaled in a browser? In reality, one should count on the possibility of increasing it up to 300%. To compensate for this growth, the background images need to be stretched. In our example, we will make the back (right side) 400x150 pixels and the front 9x150 pixels. Remember that background images are only visible in the "doorway" of the element to which they are applied ("doorway" - content area + padding). Both of our pictures are attached to the outer corners of their respective elements. The visible parts of these images are combined inside the doorway to form the shape of a bookmark: When the bookmark is enlarged, the images move apart, filling a wider opening, and the visible area of the images also becomes larger: For our example, I created two images in Photoshop with a soft, imitating three-dimensionality For one of the tabs, I highlighted the fill and darkened the stroke - this option will represent the "current" tab. Following the selected model with the left and right images, we must cut the picture into two parts: The same should be done with the light image for Now that we have all 4 images, (1, 2, 3, 4), we can start creating the code and CSS for our bookmarks. CSS help you will notice at least two ways of arranging a group of objects in one row. Each has its own advantages and disadvantages. Both require access to rather complex aspects of CSS, and can quickly become confusing as a result. The first way uses inline elements, the second one uses the float property. The first method — perhaps more common — involves changing the display property to "inline" (inline). The "line" method is attractive for its simplicity. However, it leads to problems in the implementation of our method Sliding doors in some browsers. The second way, on which we will focus our attention, is using floating model to line up list items in a horizontal row. The floating model, however, can be disappointing too. Her contradictory behavior sometimes violates all conceivable logic. Still, a general understanding of how to deal with multiple floating elements and knowing reliable ways to "exit" a floating row (or enclose it in a container) can work wonders. We'll try to put some floats inside another float container. This needs to be done so that the outer parent float completely surrounds the inner floats. Then we can add a background color or background image behind our bookmarks. It is important to remember that the position of the next element following the bookmarks must be restored using the clear CSS property. Then floating bookmarks will not be able to influence the arrangement of other elements on the page. Let's start with the following code: · Home · News · Products · About · Contact In practice, the #header block could contain, for example, a logo and a search form. In our example, we will shorten the href value for each link to “#”. It is clear that in real life, instead of this icon, the path to a file or folder will be indicated. Let's get started with CSS by assigning a float property to the #header container. This ensures that the container actually "contains" the elements of the list, which will also be floated. Since we made the #header float, we need to give it 100% width. We'll also add a temporary yellow background to make sure this parent expands to full width behind the tabs. Finally, let's set a few basic font properties to ensure consistency. appearance elements: #header (float: left; width: 100%; background: yellow; font-size: 93%; line-height: normal;) We will also set the margins and padding of the ul and li elements to zero and remove the list marker. For all list items, write a float declaration: left: #header ul (margin: 0; padding: 0; list-style: none;) #header li (float: left; margin: 0; padding: 0;) For links, we'll set block display so that we can control what happens without worrying about the inline model: #header a (display: block;) Then we'll add our right background image to the list item (changes and additions are shown in bold): #header li (float: left ; background: url ("norm_right.gif") no-repeat right top; margin: 0; padding: 0;) Before adding the left background image, let's pause and see what we have by this minute, in example 1. (Do not reverse attention to the rule that I applied to the body element in the example file. It only sets the basic values for margins, padding, colors and text.) - - - Now we can place the left image in front of the right one by applying it to the link (our inner element) ... Immediately add some padding to move the text away from the edges of the bookmark: #header a (display: block; background: url ("norm_left.gif") no-repeat left top; padding: 5px 15px;) The result is shown in example 2. Our bookmarks began to take shape. At this point, we turn to confused IE5 / Mac users who are asking themselves, “What's going on here? Bookmarks are stacked vertically and stretched to fill the entire screen. " Don't worry, we'll get to you soon. In the meantime, just watch what is happening or temporarily switch to another browser and be sure that we will soon solve the problem of IE5 / Mac. - - - Now that the pictures for simple bookmarks have taken their place, we will set the pictures for the current bookmark. We do this by referring to the list element with id = "current" and the link inside it. Since we are not changing any background properties other than background images, we will use the background-image property: #header #current (background-image: url ("norm_right_on.gif");) #header #current a (background-image: url ( "norm_left_on.gif");) At the bottom of our tabs, we need some kind of stroke. But applying the border property to the parent #header will prevent us from "bleeding" the current bookmark through that border. Instead, we'll create a new image with the desired stroke along its bottom edge. And while we are working with this image, add a subtle gradient to make it look like this: We will apply this image to the background of our #header container (instead of the previously set yellow color), move it to the bottom of the container and assign a background color that matches the top color of the created gradient. ... We'll also remove the originally added padding for the body element and add 10px padding to the top, left and right of the ul element: #header (float: left; width: 100%; background: # DAE0D2 url ("bg.gif") repeat -x bottom; font-size: 93%; line-height: normal;) #header ul (margin: 0; padding: 10px 10px 0; list-style: none;) To complete the work on the bookmark, it remains to "leak" the current bookmark across the border, as we have already discussed above. You might think that we will apply a bottom border to our bookmarks that matches the color of the bottom border of the #header element's background image, and then change the border color for the current bookmark to white. However, this would result in a tiny "rung" visible to the attentive eye. But if we change the indentation for the links, we can create clear and straight corners within the current bookmark, as shown in the enlarged image: We achieve this by decreasing the bottom indent for a regular link by 1 pixel (5px - 1px = 4px), and then adding this pixel to the current link: #header a (display: block; background: url ("norm_left.gif") no-repeat left top; padding: 5px 15px 4px;) #header #current a (background-image: url (" norm_left_on.gif "); padding-bottom: 5px;) This change makes the bottom border visible through regular bookmarks, but hides it for the current bookmark. We get Example 3. Final Steps A close eye may have noticed in the previous example white areas at the corners of the tabs. These opaque corners prevent the back image from being visible through the left corner of the front image. In theory, we could make these corners the same color as the background behind them. But our tabs can increase in height, and then the background gradient background will move down, which will lead to a mismatch in the color of the corners and the background gradient. Instead, we will change our images by making their corners transparent. If anti-aliasing is applied to the stroke of the bookmarks, we will set the matte color to the average value of the background background gradient. Now that the corners are transparent, a slice of the right image is viewed through the transparent corner of the left. To avoid this, add a small left padding to the list item equal to the width of the left image (9px). To keep the text centered after indenting the list item, you need to remove the same amount of left indentation from the link (15px - 9px = 6px): #header li (float: left; background: url ("right.gif") no-repeat right top; margin: 0; padding: 0 0 0 9px;) #header a (display: block; background: url ("left.gif") no-repeat left top; padding: 5px 15px 4px 6px;) But this option We will not be satisfied, since the left image is now moved from the left edge of the bookmark by 9 pixels of the added padding. Now that the inner edges of the left and right "doorways" are joined together, we no longer need to keep the left picture in front. And we can change the order of the background images by applying them to the opposite elements. We also need to change the images for the current bookmark: #header li (float: left; background: url ("left.gif") no-repeat left top; margin: 0; padding: 0 0 0 9px;) #header a, #header strong, #header span (display: block; background: url ("right.gif") no-repeat right top; padding: 5px 15px 4px 6px;) #header #current (background-image: url ("left_on. gif ");) #header #current a (background-image: url (" right_on.gif "); padding-bottom: 5px;) Having done this, we get Example 4. Notice that the steps we took to create the transparent corners are led to the appearance of a small "dead" zone on the left side of the bookmark, where it does not respond to mouse hover. The dead zone is outside the text, but it is still noticeable. Transparent pictures for each side of our bookmarks are optional. If we prefer not to have a "dead" area on our tab, we just need to use a solid fill behind the tabs, and not a gradient, and make the corners of the tabs the same color. For now, we'll keep the corners transparent. [ In IE / Win, the mentioned "dead" zone existed even before the steps taken, and on all sides of the link text. The solution to this problem is covered in the next article in the Sliding Doors of CSS series, Part II. translator] - - - And, finally, the final touches. All at once: we make all the text bold, the text on regular tabs is brown, and on the current one - dark gray, we assign the same color to the text for the state of the link hover, remove the underlining of links. All the additions and changes made to this minute are shown in Example 5. Another Method to Ensure Compatibility After reviewing Example 2, we recognized that there was a problem with IE5 / Mac, which stretched tabs to the full width of the window, stacking them vertically one under the other. Not exactly the effect we are trying to achieve. In most browsers, applying the float property to an element causes it to be compressed to the smallest possible size, dictated by its content. If the floating element contains a picture (or is itself a picture), then it will shrink to the width of the picture. If it contains only text, it will shrink to the width of the long line text that does not contain hyphenation. Problems arise in IE5 / Mac when an auto-width block element is placed inside a floated element. In this case, all browsers will shrink the floated element to the smallest possible width, regardless of the inner block element. But IE5 / Mac does not do this in the described situation. Instead, it stretches the floated and inner box elements to the full available width. To get around this behavior, we need to float the link as well, but only for IE5 / Mac, without affecting other browsers. First, let's add a float to the already existing rule. Then we'll use the Backslash Method to hide a new rule from IE5 / Mac that removes floats for other browsers: #header a (float: left; display: block; background: url ("right.gif") no-repeat right top; padding: 5px 15px 4px 6px; text-decoration: none; font-weight: bold; color: # 765;) / * Commented Backslash Hack hides rule from IE5-Mac \ * / #header a (float: none;) / * End IE5-Mac hack * / As per example 6, IE5 / Mac now displays bookmarks as expected. Nothing has changed for the rest of the browsers. IE5 / Mac contains a huge number of CSS bugs that have been fixed in IE5.1. The Sliding Doors method also suffers from these bugs in IE5 / Mac. Their number exceeds every conceivable limit, and I am not going to fight with them. And since the update to 5.1 has been available to everyone for quite a long time, the percentage of Macs with OS 9 and installed IE5 / Mac is constantly decreasing and approaching zero. Variants We have just detailed the Sliding Doors method, which allows you to create a layout with an unordered list and links and refined with a few CSS rules bookmark navigation based on simple text. Such navigation loads quickly, is easy to maintain, and the text inside it can be significantly scaled in any direction without breaking the design. Needless to say, how flexible is this method to create any sophisticated looking navigation? The use of this technique is only limited by our imagination. The final example illustrates just one option. But this example should not limit our ideas. Bookmarks, for example, do not have to be symmetrical. I quickly created a second version of the bookmarks, in which I used simple colors, angular shapes and a wider and more complex shape on the left side. As option 2 shows, we can freely change the order of the left and right images depending on the design. With clear planning and skillful handling of pictures, you can drop the bottom border in favor of a style combination of pictures with a background located behind, as shown in the option I created 3. If your browser supports switching between alternative styles, you can see all the options presented by opening this master file and switching between stylesheets. [ In NN7.1, access to alternative styles is carried out through the main menu View> Use Style, in Opera 7.20, through the main menu View> Style, in IE / Win there is no such possibility. translator] Other effects can be added to the applied technique, which we do not consider here. In our example, we changed the text color for the hover state, but why not change the entire background image for interesting rollover effects. With two nested HTML elements in the code, we can always use CSS to overlay background images and get effects that we never dreamed of. In our example, we created a horizontal row of tabs, but the Sliding Doors method can be used in many other cases as well. What application would you suggest for this method?Task
Remove indentation around a bulleted or numbered list.
Solution
Use the nullable margin and padding style property for the UL or OL selector, depending on the list type, as shown in Example 1.
Example 1. Indenting a list
HTML5 CSS 2.1 IE Cr Op Sa Fx
- Cheburashka
- Crocodile Gena
- Shapoklyak
The result of this example is shown in Fig. 1.
Rice. 1. List without vertical and horizontal indents
Notice that the list bullets that go off the left edge of the web page disappear. To remove only the top and bottom padding without moving the list to the left, use the margin-top and margin-bottom properties (example 2).
Example 2. Indentation in a list
HTML5 CSS 2.1 IE Cr Op Sa Fx
- Cheburashka
- Crocodile Gena
- Shapoklyak