Windows won't boot? Practical advice on how to fix everything. Windows OS does not load If Windows 7 does not work
Users often encounter a problem when they cannot boot a computer or laptop running Windows 7 not only in normal mode, but also in safe mode. This problem can be caused by a variety of reasons. System and hardware failures often lead to the fact that the operating system cannot boot or spontaneously reboots, or a blue screen of death appears after turning on the PC. What to do if Windows 7 does not enter safe mode, how to solve this problem and restore the functionality of your PC. In this article we will try to solve these problems.
What is safe mode and why is it needed?
Safe mode in Windows OS (Safe Mode) is a special diagnostic mode of operation of the operating system, which is used to identify and eliminate errors in the OS registry. If you run Safe Mode, unnecessary system components will be disabled by default. In other words, when you turn on a computer or laptop with this option, only the most necessary system components of the device and important drivers will be loaded.
If the PC on which Windows 7 is installed encounters any malfunctions after turning it on, you can try starting the device through safe mode with a basic set of services. After the system boots into Safe Mode, the user can perform the same actions as during normal Windows 7 startup.
This download method will help detect the presence of virus, adware, and spyware in the system that interfere with the normal functioning of a desktop computer or laptop.
If Windows 7 only boots into safe mode immediately after turning on the PC, this indicates that there is a problem that is preventing the operating system from starting normally. In this case, the reason, as a rule, lies in recently installed software.
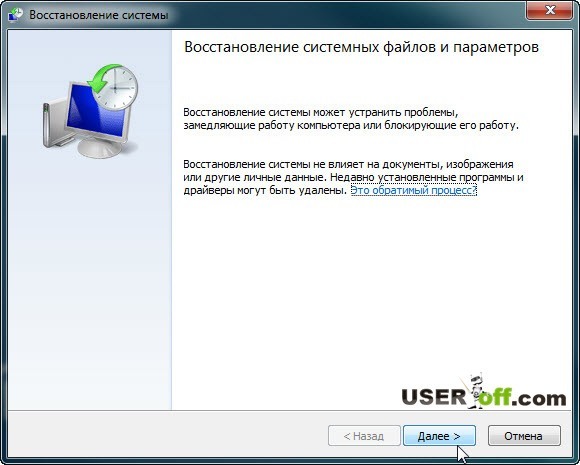
To solve the problem, you can try to restore the system. To do this, go to “ Start» - « Control Panel» - « System Restore».

But what to do if a device with Windows 7 not only does not enter safe mode, but does not want to start even in normal mode. Let's try to understand this issue.
Reasons why Windows 7 cannot boot into Safe Mode
As already noted, most often the need to enter safe mode on any version of Windows OS, including the “seven”, is due to the need to scan and check the PC for viruses and the presence of virus software. Of course, if the computer does not turn on in normal mode.

Despite the fact that Windows 7 currently occupies a leading position among all operating systems presented, it cannot be said that this version of the OS is the standard of absolute quality. Unfortunately, Windows 7 has many of its own bugs and shortcomings, which affect the stability of your device. Especially if you neglect to install licensed software.
If Windows 7 Safe Mode does not turn on, this problem may be caused by:
- the presence of viral, potentially dangerous software (viral advertising, software);
- hardware power failure;
- file system damage;
- technical problems.
As a rule, if Windows 7 does not want to turn on in safe mode, according to experts, this problem lies in the presence of “evil” viruses in the registry due to the installation of applications and software from unverified, dubious sources. Most likely, under the influence of modified spyware, the registry branches in the system files that are responsible for entering safe mode were deleted.
How to boot your PC in safe mode
Everyone knows that you can boot your PC in safe mode by pressing the F8 key immediately after turning on the PC. But pressing this key does not always bring up the safe mode menu, which can be caused by a number of problems.

If Windows 7 does not boot in safe mode, there are several ways to fix this problem:
- reinstalling the OS;
- changing the system configuration;
- using the special AVZ utility.
The most radical method is complete OS reinstallation. The only thing worth noting is that this option is only suitable if you have removable media on hand, a distribution kit with this version of the operating system. That is, the one that was already installed on the PC. This will require " System restore point" The most recently saved system restore points will open in a special window when this feature is activated.
It is worth noting that if the system has important files and it is not possible to install the system from the installation disk, this option cannot be called the best solution to the problem.

Sometimes, if turning on the computer is impossible in Safe Mode, you can perform the so-called “knurling” ( system rollback) - a process that is identical to a complete reinstallation of the OS, allowing you to save all previously installed important programs, applications, software. If necessary, you can back up data and important information on your PC.
If you completely reinstall the system, you can restore lost registry data using a utility application, namely System Restore. But you need to remember that using this console is not effective in all cases. To ensure that the OS boot option is restored in Safe Mode, we will need a recovery REG file that is fully compatible with this OS.
The best option that will help if Windows 7 does not want to boot or start in safe mode is AVZ utility, which can be downloaded without any problems from the official web portal. In addition to restoring the functionality of your PC, this program will help eliminate various threats and malware from the system of your laptop or personal computer. To do this, you need to perform the following sequence of actions:

To boot Windows 7 in safe mode, you can also try change OS configuration. At the same time, the main thing is to avoid mistakes in your actions by adhering to the following sequence:
- Go to the menu " Start", click " Execute».
- In field " Open"We enter the msconfig command and press the OK button. After which you can see the window that appears “ system configuration", as well as other active tabs at the top. ", after which the line " Safe mode».
- Check the box " Safe mode", confirm the action by pressing OK.

Now you need to restart your PC and check the functioning of safe mode. To do this, during the reboot process, at the very beginning of the system boot, press ". Now you need to re-enter " system configuration» - «» - « Safe mode" Uncheck the box next to “ Safe mode", click OK.
As you can see, if Windows 7 does not boot in safe mode, you can solve this problem using several of the methods presented above. The main thing is to adhere to the established sequence. If the system continues to be unstable, the computer does not boot in safe and normal mode when turned on, the system reboots spontaneously, perhaps the main reason is technical malfunctions. In this case, qualified specialists will help you troubleshoot the problem after conducting a comprehensive diagnosis of your laptop or PC.
Video on the topic
The topic that I want to discuss in this article is very popular and talking about it in detail so that you understand how and what to do is not so simple. But still, I will try to describe possible ways of what to do if Windows 7 does not boot on a laptop or computer. We will also find out why this could happen?! The task ahead of us is not an easy one, namely, to correct the current situation, but there is no need to be afraid. Just follow the clear instructions and everything will be great! Some points may be suitable for other operating systems, but I will focus on Windows 7.
Dear reader, if you really want to solve the problem, then I strongly recommend reading the article in full, and then drawing some conclusions. I cannot talk about all the nuances in one paragraph.
Safe Mode and Last Known Good Configuration
This is a must try! Reboot the computer, press the F8 key continuously.
Attention! In Windows 8, entering Safe Mode is a little different, so it's best to follow the link below to find out all the details. In the list that appears, we are interested in the item called “Last Known Good Configuration (advanced).” Select and press Enter.
About how to enter safe mode on different systems:
What to do if the information above did not help you? We repeat the steps described in the previous paragraph, but select “Safe Mode”.
Next, you can make a choice: fix the problem due to which Windows 7 does not boot manually, or try to do it in semi-automatic mode. Usually I do everything manually, for example, if Windows does not boot after installing the drivers, then I delete the drivers and try to boot. I think you understand that the manual method requires more knowledge on your part, so Windows offers you another option, which I will describe below.
If everything loads, go to the Start menu, Control Panel, System and Security. In the “Support Center” tab, click on the inscription “Restore the computer to a previous state.” See the “Run System Restore” button? Great, then you've come to the right place.

Now click it and follow the instructions.
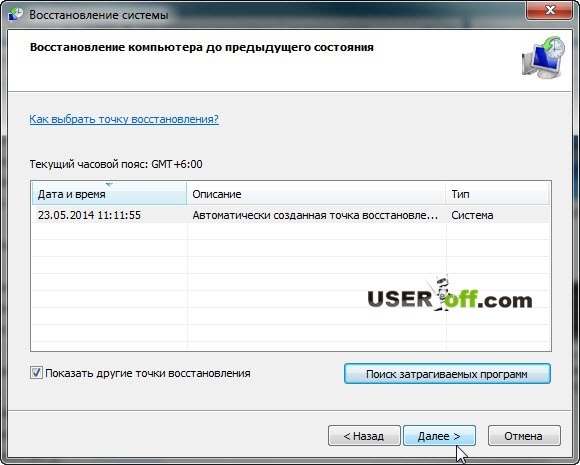
Next, you will need to select a restore point. In my case, I am asked to select a point on the 23rd, and now it is the 29th on the calendar. Therefore, you need to click on “Search for affected programs” to find out what actions you will need to take after recovery.

So, you have become familiar with the affected software during system recovery and can now close this window. After closing the window, click “Next”.
If you were unable to enter safe mode to restore Windows, then do not despair. Below we will look at another method.
Note: at the very beginning, when Windows 7 was just coming out, there was one strange glitch that you might have too. When you turn on the computer, the welcome screen follows and a black screen appears. As I remember, it seemed like there was still an arrow, but nothing else was visible. The cure was very simple - go into safe mode and restart the computer as usual. After this, I was able to log into my account without any additional manipulations with Windows.
You may need to reinstall Windows
This option should be considered when you have tried to revive Windows, but all attempts have produced no results.
The very first thing that comes to mind for many, and for me too, is reinstalling Windows 7. But this method, you see, is very long, and if you are a busy person, then access to the computer should be almost constant. Reinstallation is suitable for those who have a lot of free time, or do not have time to understand faster methods, or for those who will not be helped by any of the methods I have listed below for restoring the Windows operating system.
I will not dwell in detail on installing Windows, since I wrote about this on my blog:
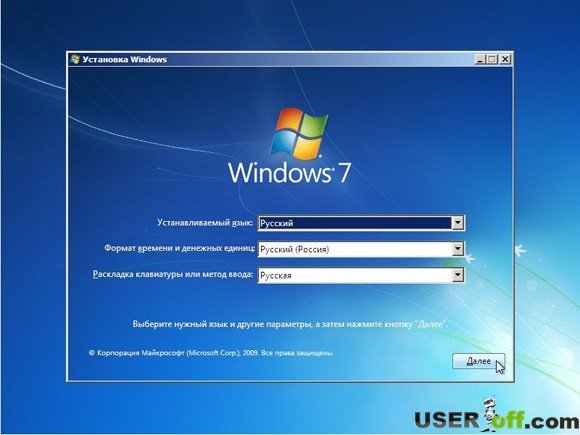
Here are brief instructions: since you do not have access to the desktop, go to the BIOS, look for the Boot or Advanced BIOS Features tab, or search for it yourself. Then in it we find the line “1st Boot Device”, set the value to CD-ROM. What have we done? What we did is that now when the computer boots, it will boot from the disk that is installed in your CDRom, and not from the hard drive. After turning it on, when the inscription “Press any key...” appears on a black background, press any button and get into the Windows installation wizard. Then follow the instructions on the screen.
You can read more about how to boot from disk in my article: “”.
I decided to talk about the installation at the very beginning, because if you were going to reinstall Windows, then perhaps this is some kind of sign to implement it))). But as I said at the very beginning, we will now try to bring your Windows back to life without reinstalling it.
System Restore
First of all, you can use the function that is in the installation disk “System Restore”. I will give an example of the Windows 7 system, but if you have a different system, then this is not a reason to think that you cannot do on your system. The names of the buttons may differ, but the principle remains the same.
So, for this procedure we need a Windows installation disk or its image (can be downloaded on the Internet). If you are unable to download the image or do not have a disk, then write to me by email [email protected] or contact your friends who have already installed Windows themselves.
If you don’t have a working disk drive or don’t have one at all, then the article “” will help you create a bootable flash drive.
When you have a Windows distribution, insert it into the drive and restart the computer. If the BIOS is configured for installation, you will see the line:

When it appears, press any key.
If it is not there or Windows boots as usual, then you need to make manipulations in the BIOS. Namely, set loading priorities. Usually the hard drive is set in the BIOS settings, since that is where your Windows is installed.
In order for the computer to start booting from the disk that is in your drive, you need to go into the BIOS and specify CDRom as the first device to boot. I have already talked about this above, if you have not read this point, then it’s time to do so.
So, you pressed any key, now a window will appear where you click “Next”.
In the next window you need to click “System Restore”.

A search will be performed for installed systems. If you have one system installed, then there will be one operating system in the list. Select it and click Next.

Often at this stage, a message may appear in which you will be asked to restore the system. If this message is displayed on your screen, then click “Fix and restart”. After that, try to log into your account.
If the message does not appear, then in the next window you select your system and click “Next”.
After this, a window will appear where you can select system recovery methods.

– automatic problem solving.
System Restore - you can use this method, but provided that this function has been enabled.
Restoring a system image – if you have a Windows recovery image.
Command line– using certain commands you can revive Windows. This method will be discussed further.
Now click “Startup Repair”. Now you need to wait a little for the utility to try to automatically find the problem and solve it.
System Restore via Command Line
Then enter and press Enter.

A list of commands that can be used in this utility will appear; now you need to enter: Bootrec.exe /FixMbr and press Enter.

Now enter . exe / , then clicking on Enter. Next, exit the utility by typing exit and pressing Enter. Now you can try to log into your account, since the recovery work is complete.
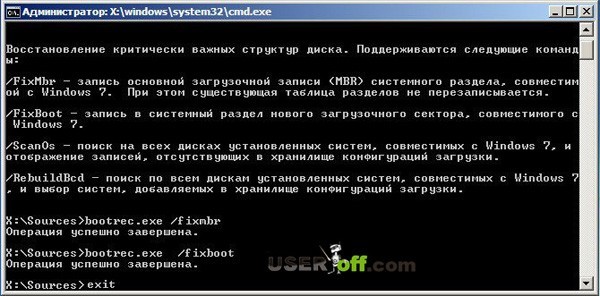
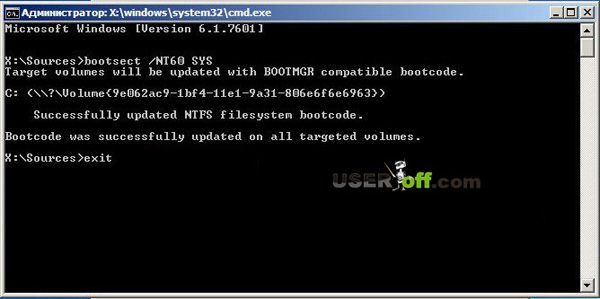
You can also try updating the boot code by entering the command bootsect /NT60 SYS. Then leave as a team Exit.
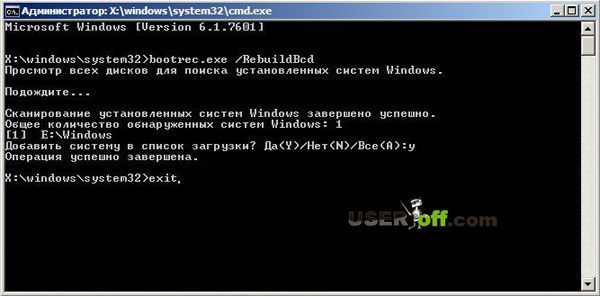
If the above commands did not help you, then go to the command line and enter Bootrec.exe /RebuildBcd. With this command, you will scan your hard drive to find the systems installed on it.

When the scan is finished, a list of installed operating systems on your hard drive will appear. To add it to the download list, click Y And Enter. After successful completion of the operation, enter Exit and press Enter.
So, we have dealt with the command line. In principle, this should help to get your system to boot.
Inactive hard drive partition
This situation does not occur often, but it is still necessary to talk about it, otherwise the article can be said to be truncated. Let me give you an example, after which you will understand what's what.
Let's say you have several Windows operating systems installed on your computer, which are installed on different hard drives. If you assign incorrect attributes to hard drive partitions, you will have problems booting a particular version of Windows.
To check or fix this, you can use the Acronis Disk Director boot disk to change the partition attributes. So, download and burn the Acronis Disk Director boot disk and boot from it. How to do it? Insert the disc into the drive, restart the computer, and it will begin booting from the disc in the drive. But before that, check your download priorities. There should be a CDRom, just like when installing Windows. We have already talked about this in this article above.
When the program loads, pay attention to the checkboxes that are on the hard drive partitions.

In the image above we see that the checkboxes are on the second partitions of the hard drive. You need to make sure that these checkboxes are on the first sections. We got to practice ;). You need to right-click on each first partition of your hard drive and select “Mark as active.”
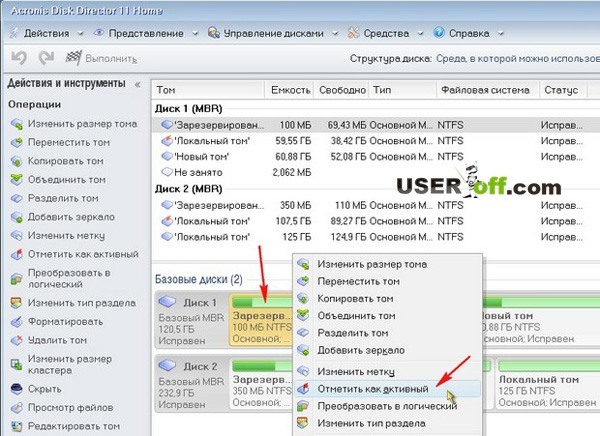
A message should appear where you click “OK”. This is what it looks like after the whole procedure:
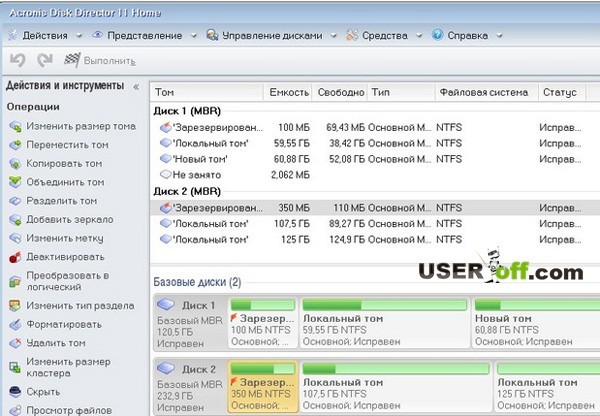
Now all that remains is to click on the “Run” checkbox, wait for the operation to complete and restart the computer. Be sure to remove the disc from the drive.
Hardware problems, BIOS and viruses
HDD. If your system unit, or rather your hard drive, makes suspicious sounds: clicking or tapping, then there is a possibility that the hard drive needs to be replaced. To verify this, you need to open the cover of the system unit, turn on the computer and listen to the operation of the hard drive. Also check the wire connection to the hard drive. It is possible that the wires have become disconnected and the computer cannot see the hard drive.
If you suspect that the problem is with the hard drive, then you need to copy all important data to another medium. Otherwise, you may lose them completely.
BIOS. Go to the BIOS settings and put the hard drive first so that it starts booting from it. Above we looked at an example where we set up a CDROM; you do the same with a hard drive. Just don’t forget to save the changes in the BIOS by pressing the F10 key.
The second method – you won’t believe it, but it actually works! Just go into the BIOS and, without changing anything there, exit, saving the changes that actually never happened (by pressing the F10 button). I personally once fixed my friends’ laptop this way, and when they asked me how I did it, my answer was: “Magic and nothing more 😉.” So give it a try, maybe everything will be much easier than you think.
Viruses. Sometimes viruses prevent Windows from booting. If there are viruses on your computer, you need to scan the entire disk for viruses. Here are articles that will be useful to you: “” and “”.
Of course, if you check your hard drive for viruses, you will need to disconnect it and connect it to another computer, since in your case Windows will not load. Or you can use special boot programs with which you can scan your computer for viruses even if you cannot boot your Windows. Here are a couple of them: and.
Attention! There are cases when, after installing updates, Windows 7 stopped loading! Therefore, you may want to try uninstalling recent updates that were installed before the Windows boot problem occurred.
Important! If you see a specific error on your screen, I recommend using a search in Google or Yandex. You can enter into the search not only the error code, but also the words that are used in it. Thus, you will save your time searching for the problem and its solution.
Important! If the system unit makes squeaks when turned on, then you need to use this squeak to determine the problem. Ask how? Here's an article on this topic: "".
That's all I wanted to say. The article turned out to be long, and I sincerely hope that at least one of the methods I described helped you.
Says a lot of unnecessary things, but there is useful information for you:
Unfortunately, Windows not being able to boot is a problem that occurs without an error message or any other obvious solution. You may experience a black screen immediately upon startup, or your computer may restart itself instead of or even after displaying the Desktop screen.
This most often occurs due to incorrect device drivers, system registry errors, file corruption, and malware.
What to do if Windows won't start? There is no Explorer to delete files, no Internet to find a solution, no Device Manager to disable or enable components, and no solitaire to kill time while you wait for the anti-malware program to download. All you have is this book and the sound of your breathing in the silence. Fortunately, Microsoft has removed the limited Recovery Console that was used in Windows 2000 and XP. It has been replaced by a fully automatic set of tools, which will be discussed later, as well as a fully functional command line.
Startup recovery
When building tools for Windows 7 Startup Recovery, Microsoft took the Apple Computer approach: make everything simple, but in a way that doesn't work in the real world.
Launching Recovery is installed by default in Windows 7 in a separate disk partition, but depending on the level of damage, you will either be able to get there or not. Read the Using F8 section.
If F8 does not work, then you will have to find the Windows 7 installation disk, which you may have already forgotten about.
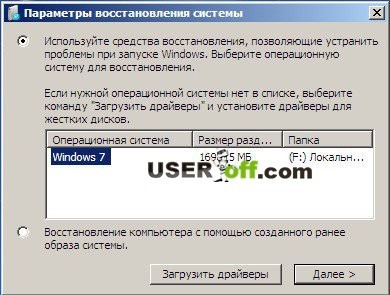
Insert the installation disc into the drive and turn on the computer. If the “Install Now” window appears, then click on the Restore your computer link located below. If a prompt appears on the screen, select the Use recovery tools option, select the operating system from the list and click Next.
Another option here is called Recover your computer using a system image, and it only applies if you used the Create a System Image tool. Be careful with this tool; you will definitely lose all the information if you choose this option.
The good news is that you can relax in your chair and follow the sign for about twenty minutes. The bad news is you have no other choice.
You may be familiar with the interactive menu of five useful repair tools used in Windows Vista; don't worry, they are also present in Windows 7, but you need to wait for them. Windows will try to fix the problem for a few minutes without your help, only to then give you the option to start installing Windows again. Click Cancel to continue watching the running black bar; later you will be offered the best system recovery tools.
If an automated Windows tool solves your problem, consider yourself lucky. Otherwise, the message “Startup Repair cannot repair this computer automatically” will appear asking you to report the problem to Microsoft; but since the Windows system is not running and the network connection is inactive, such a message will not be sent anywhere. Click Cancel to display the long-awaited page with System Restore tools. Here's how these tools work:
Startup recovery
Pressing this button will take you back a step; if you've already gone this far, then this option is useless.
System Restore
This button takes Windows back to multiple restore points. This comes in handy if the last driver installation prevented Windows from starting the system. Depending on how long ago the last system restore point was created, either nothing will happen, or you may go back very far. It's worth a try, but don't be surprised if it breaks a recently installed app or driver. Pay attention to the section “Back to the past - using restore points and shadow copies.”
Restoring a system image
You can use this operation to wipe your hard drive and restore a backup made using the Create a System Image tool in Control Panel.
Windows Memory Diagnostics
This button will check the system memory for errors. Unlike all the others, this tool does not change anything on the hard drive, so it can be used at any time.
Command line
Of all the tools listed on this page, this is the one that will save you time. Use this tool to open a Command Prompt window that will allow you to copy, delete, or rename files that may be preventing Windows from loading. These actions are also possible in Safe Mode with Command Line Support.
Using F8
Immediately after your computer starts, but before the Windows logo appears, press F8 to launch the More boot options menu.
If F8 does not help, then your computer may not recognize the Windows installation, and you will need the Startup Repair tool on the Windows installation disk described earlier. If these tools do not work or you do not have the original disk, then the best way is to disconnect the hard disk from the computer and connect it to another computer using a special USB tool. And then it will be possible to determine the problem, or - in the worst case - try to restore at least part of your data, as described in the section “Restoring a system after a breakdown.”
From the menu that appears after pressing F8, you can select the following functions:
Computer recovery
When you select this option, you are immediately taken to the System Recovery Options page.
If the Computer Restore option doesn't appear, it means your hard drive doesn't contain the hidden 100MB System Restore partition. If this partition does not exist, then you will need a Windows 7 installation disc to access the tools.
Safe mode
In this mode, Windows runs in a semi-functional state, allowing you to troubleshoot problems or remove programs or device drivers. If network drivers are not responsible for breaking Windows, use the Safe Mode with Network Drivers option instead of just Safe Mode.
Safe mode with loading network drivers
This is almost the same as Safe Mode, except that Windows loads network drivers. This is very important if you need to access the Internet or transfer files from or to other computers over a network to search for solutions and download anti-malware programs.
Safe Mode with Command Line Support
Instead of loading Windows and the Desktop, you will see a Command Prompt window. It will be similar to the one available from the System Recovery Options window.
The boot option Safe Mode with Command Prompt support is a good choice if you suspect that a recent driver installation is preventing Windows from starting. When the Command Prompt window appears, type devmgmt.msc and press Enter to launch Device Manager. Then, in the Device Manager window, find the driver, right-click and disable it. Close Device Manager and restart Windows.
To exit the Command Prompt window and restart Windows, type Exit and press Enter. If after entering the word Exit the Command Prompt window closes, but Windows remains running, press Ctri+Alt+Del, and then press the small arrow located next to the red button at the bottom of the screen. To resolve file errors on your hard drive, see the “Finding disk errors” section.
Load Logging
This option starts Windows as usual, except that each boot step is written to the ntbtlog.txt file, which is located in the \Windows folder. If Windows does not start, then start it by selecting boot logging at least once. Then restart your computer, press F8 again and select one of the Safe Mode options listed earlier. When you log back into Windows, read the entry using Notepad; it is likely that the last entry in the log contains information about the source of the problem.
Enable low resolution video mode
This option starts Windows the normal way, but in VGA mode. It helps detect broken drivers or incorrect video hardware settings by starting Windows in the most compatible display mode.
Loading Last Known Known Configuration
This option starts Windows with the configuration of drivers and System Registry settings with which the system booted successfully before. Use this option if recent Registry changes or hardware installations have caused the problem that prevents Windows from starting. Check out the section “Back to the Past - Using Restore Points and Shadow Copies.”
Directory Services Restore Mode
If your computer is a network domain controller, which is strictly speaking not possible in Windows 7, this option disables Active Directory. In other words, you won't be able to use this method on Windows 7.
Debug mode
This mode, which is not typically intended for end users, sends problem fix information to the serial port for recording by another computer. In general, does your computer have a serial port?
Disable automatic reboot on system failure
Unlike the other eight options, this one simply changes the settings so you can determine why Windows won't start. If the crash occurs while Windows is loading, then by default the computer reboots so quickly that it is impossible to read the error message on that infamous blue screen. Disable automatic reboot on system failure if you want to read the message and then restart your computer manually.
Disable driver signing enforcement
By default, the 64-bit edition of Windows 7 will not allow the installation of any drivers that have not been electronically signed.
It is possible to disable driver signing enforcement to allow the computer to install unsigned drivers, but in practice this never works. Instead, to boot Windows, open a Command Prompt window and type the following:
bcdedit.exe - set loadoptions DDISABLE_INTEGRITY_CHECKS
Press the Enter button, close the Command Prompt window and restart Windows to get the desired result. If this doesn't work, then you may have to stop supporting certain devices until the manufacturer makes a signed and native driver for them.
The name of this option says it all - use it to continue booting Windows normally as if you had never pressed F8. With these tools, you'll have everything you need to get Windows running again.
The popular Windows operating system of the seventh modification sometimes refuses to boot completely when installing updates. Users quite often complain that after installing updates, Windows 7 does not start. But they seem to be designed to improve the operation of the system. What is the reason for this phenomenon and what measures can be taken to restore the computer’s functionality, read on.
Why won't Windows 7 start after updating?
It’s worth starting with the root causes of this system behavior. It's no secret that today there are a lot of all kinds of pirated copies, repacks or stripped-down versions of this OS. Sometimes an official update simply cannot be integrated into the system for purely technical reasons (it lacks the necessary components to install them).
On the other hand, it also happens that after updating Windows 7, the system does not start even if there is an official copy. Why? It is difficult to answer this question unambiguously. The fact is that the updates themselves, developed by Microsoft specialists, do not always look finalized, and if you also take into account conflicts with hardware, you yourself understand that there is no need to talk about any performance.
However, in most cases when Windows 7 does not start after an update, this is purely due to its own components. To resolve the problem, you can offer several solutions that usually correct the situation. And it’s worth starting with the simplest.
After updating Windows 7, the computer does not start: what to do?
Surely, every user knows that the system has an automatic recovery function. First, try to force restart your computer several times. Perhaps this tool will start.
If this does not happen, use the F8 key at startup, and from the menu select load the last known known configuration. If the restoration works, you will need to manually search for updates in the Update Center and exclude the last ones found from the list. But this is not a solution either.

Sometimes restoring the system from removable media can help. There is no complete certainty, but it is worth trying to carry out such actions.
Uninstalling updates via the command line
When Windows 7 does not start after updating, you can select the troubleshooting option from the start menu and enter the recovery environment, where the command console is used. The best option would be the same choice, but with the condition of booting from removable media.

First, in the console you need to use the commands to select the system partition into which the updates were installed, as shown in the figure above. The disk number usually does not change.

Next, you need to enter a command to view recently installed updates (dism /image:D: /get-packages), after which, through RMB, you need to copy the package ID, highlighted with a red frame in the image above (there may be several updates).

The actual operation of removing packages is to use the uninstall command and insert the identity number after it (picture above). After completing the procedure, the system must be rebooted. If starting again turns out to be impossible, you will have to remove all the latest updates one by one, based on the date of their installation.
Removing patches using Microsoft tools
Also, in a situation where Windows 7 does not start after updating, you can use specialized advanced tools like ERD Commander to create bootable media. The recovery and diagnostics menu will remain the same, but the Diagnostics & Recovery Toolset item will appear at the bottom. This is what needs to be used.

After entering the main menu, you should use the line to remove patches, after which the corresponding “Wizard” will launch. A list of all installed updates will appear in a new window. To be sure, you will have to remove them one at a time, rebooting the system each time and checking its performance. In the end, when the faulty update is found, the system will boot in normal mode.
Note: it is advisable to write down the numbers of all packages, set a manual search in the Update Center and exclude previously removed updates from the list.
Additional measures
In principle, you can use safe mode, if it works. In this case, you will not need to use the command line. Bad packages can be uninstalled through the Update Center or the Programs and Features section, where you select the appropriate menu for viewing installed updates. But, again, you will still have to uninstall the packages one at a time, and not as a whole list.
Finally
As you can already understand, the problem can be resolved quite simply. As for using the system tools, no matter what anyone says, it is best to use bootable media rather than the built-in system tools, which, by the way, may not be available. But in general, the main solution comes down solely to removing recently installed updates. Damage to the bootloader was not considered, although to be sure, you can use commands based on the Bootrec.exe tool with alternately specifying additional attributes using a right slash (fixboot, fixmbr, rebuildbcd).
One of the biggest troubles that can happen to a computer is a problem starting it. If any malfunction occurs in a running OS, then more or less advanced users try to solve it in one way or another, but if the PC does not start at all, many simply fall into a stupor and do not know what to do. In fact, this problem is not always as serious as it might seem at first glance. Let's find out the reasons why Windows 7 won't start and the main ways to fix them.
The causes of computer boot problems can be divided into two large groups: hardware and software. The first of them is associated with the failure of any PC component: hard drive, motherboard, power supply, RAM, etc. But this is more a problem of the PC itself, rather than the operating system, so we will not consider these factors. Let's just say that if you do not have the skills to repair electrical equipment, then if you find such problems, you need to either call a technician or replace the damaged element with its working counterpart.
Another cause of this problem is low line voltage. In this case, you can restore the start by simply purchasing a high-quality uninterruptible power supply unit or connecting to an electricity source whose voltage meets the standards.
In addition, problems with loading the OS may occur if a large amount of dust accumulates inside the PC case. In this case, you just need to clean the computer from dust. It is best to use a brush. If you use a vacuum cleaner, turn it on blowing rather than blowing, as it can suck up parts.
Also, problems with startup may arise if the first device from which the OS is loaded is a CD drive or USB drive, but there is currently a disk in the drive or a flash drive is connected to the PC. The computer will try to boot from them, and given the fact that in reality there is no operating system on these media, all attempts are expected to lead to failures. In this case, you should disconnect all USB drives and CD/DVD drives from the PC before starting, or specify the computer’s hard drive in the BIOS as the first boot device.
It is also possible that the system simply has a conflict with one of the devices connected to the computer. In this case, you need to disconnect all additional devices from the PC and try to start it. If the download is successful, this will mean that the problem lies precisely in the designated factor. Connect devices to the computer sequentially and reboot after each connection. This way, if at some point the problem returns, you will know the specific source of its cause. This device will always need to be disconnected from it before starting the computer.
The main factors of software failures that resulted in Windows being unable to load are as follows:
- Damage to OS files;
- Violations in the registry;
- Incorrect installation of OS elements after updating;
- Presence of conflicting programs in startup;
- Viruses.
We will talk about ways to solve the above problems and restore the OS startup in this article.
Method 1: Activate Last Known Good Configuration
One of the easiest ways to solve a PC boot problem is to activate the Last Known Good Configuration.

Method 2: "Safe Mode"
Another option to solve the startup problem is by logging into Windows in "Safe Mode".

Method 3: “Startup Repair”
You can also fix the problem described using a system tool called - "Startup Recovery". It is especially effective when the registry is damaged.

This method is good because it is quite universal and is great for cases when you do not know the cause of the problem.
Method 4: Checking the integrity of system files
One of the reasons why Windows cannot start is corruption of system files. To resolve this problem, it is necessary to carry out an appropriate check procedure followed by recovery.


Method 5: Scan the disk for errors
One of the reasons for the inability to boot Windows may be physical damage to the hard drive or logical errors in it. Most often, this manifests itself in the fact that the OS loading does not begin at all, or it ends at the same place, without ever reaching the end. To identify these types of problems and try to fix them, you need to check using the chkdsk utility.

Method 6: Restore boot configuration
The next method, which restores the boot configuration if it is impossible to start Windows, is also carried out by entering a command expression in "Command line", running in the system recovery environment.

Method 7: Removing viruses
A problem with starting the system can also be caused by a virus infection of the computer. If these circumstances exist, you should find and remove malicious code. This can be done using a special anti-virus utility. One of the most well-proven tools in this class is Dr.Web CureIt.

But users may have a reasonable question: how can they check if the system does not start? If you are able to turn on your PC "Safe Mode", then you can perform a scan by performing this type of startup. But even in this case, we recommend checking by starting the PC from LiveCD/USB or from another computer.
If the utility detects viruses, follow the instructions that will be displayed in its interface. But even if the malicious code is eliminated, the launch problem may remain. This means that a virus program has probably damaged your system files. Then it is necessary to carry out a check, described in detail when considering Method 4 and carry out resuscitation when damage is detected.
Method 8: Cleaning autorun
If you can boot into "Safe Mode", but problems arise during normal loading, then it is likely that the cause of the malfunction lies in a conflicting program that is in autorun. In this case, it would be reasonable to clear startup altogether.
- Start your computer in "Safe Mode". Dial Win+R. A window opens "Run". Enter there:
- A system tool called "System configuration". Go to the tab.
- Click on the button "Disable everything".
- All items in the list will be unchecked. Next, click " Apply" And "OK".
- Then a window will open asking you to restart your computer. You need to press .
- If after restarting the PC starts in normal mode, this means that the reason lay precisely in an application conflicting with the system. Then, if you wish, you can return the most necessary programs to startup. If, after adding an application, the problem with launching recurs, then you will definitely know the culprit of the problem. In this case, you must refuse to add such software to startup.


Method 9: System Restore
If none of the above methods work, you can restore the system. But the main condition for using this method is the presence of a previously created restore point.
- You can proceed to resuscitate Windows while in "Safe Mode". In the program section of the menu "Start" you need to open the directory "Service", which in turn is located in the folder "Standard". The element will be located there "System Restore". You just need to click on it.

If the PC does not start even in "Safe Mode", then open the Startup Troubleshooter or activate it from the installation disk. In the recovery environment, select the second position – "System Restore".
- The tool interface called "System Restore" with general information about this tool. Click "Further".
- In the next window you need to select a specific point to which the system will be restored. We recommend choosing the most recent one by creation date. To increase the selection space, check the checkbox "Show others...". Once the desired option is highlighted, click "Further".
- Then a window will open where you need to confirm your recovery actions. To do this, click "Ready".
- The Windows recovery process will begin and your computer will restart. If the problem was caused only by software and not hardware reasons, then the startup should be carried out in standard mode.
Approximately the same algorithm is used to restore Windows from a backup copy. Only for this in the recovery environment you need to select a position "System Image Restore", and then in the window that opens, specify the backup directory. But, again, this method can only be used if you have previously created an OS image.


As you can see, in Windows 7 there are quite a few startup recovery options. Therefore, if you suddenly encounter the problem being studied here, you do not need to immediately panic, but simply use the advice given in this article. Then, if the cause of the problem was not a hardware, but a software factor, with a high degree of probability it will be possible to restore functionality. But to be on the safe side, we strongly recommend that you also take preventive measures, namely, do not forget to periodically create restore points or backup copies of Windows.