Paste your face in online superheroes template. Create funny photomontages for moments. Purify your image expressiveness with the help of custom-made photo installations
The program created by the Faculician specialists allows you to make a photo montage of the face online for free. It is enough just to choose one of the template, special effects or tools in the set and apply it to edit the photo. You can also apply all sorts of frames and other effects that can significantly improve the quality of the picture.
It should be noted, the photo montage of the online person is carried out absolutely free of charge and without the need to study some popular graphic products. Absolutely any action performed through such an online editing program, the network makes the process of photomontage free and accessible to many users. The quality of the received photo should be mentioned, is also at the highest level.
Advantages of photo editor online
Free photomontage running online through our site is not only high quality, but also very fast. All you need to do to start editing is just three simple actions:
- Select the necessary special effects from the online installation service;
- Download from a computer or other source you need to edit a photo;
- Choose the most optimal effect online and save the photo;
After the edited photo is ready, the online editing program allows you to make practically anything with it - send to your own gallery, save on a computer, as well as add friends. Thanks to the enormous variety of modern functionality, as well as simplicity to use, a free online photo editor from the "photoulica" is very convenient to use and allows you to quickly and efficiently change photos.
The variety of effects available on the portal allows you to create with a photo almost anything. The main thing is to know what exactly I want to obtain ultimately. After, the photo received through the use of the service can be admired without a reason and with great pleasure. This is a very fast and practical way to receive photos that does not assume the presence of various kinds of programs and special skills.
A set of means for photomontage to choose
Fotor is a powerful online photo editor and a means for creating graphic design. It provides a huge database of photomontage templates online, backgrounds, and cliparts to help you create stunning photo montages. Various stylish photomontage templates also give you the opportunity to create your own stunning photo montage online. Hundreds of individual cliparts allow you to greatly decorate your photo editing image. Try the Fotor Photommont Program right now!
Purify your image expressiveness with the help of custom-made photo installations
Photomontage is a unique way to make your images much more significant and help you attract more attention in any social network. Fotor will make you a great favor, allowing you to create and edit your own photo montages online for free. Clean the background in images using the background puller from Fotor, change the background and add stickers that include various forms. After, you can configure their size and add other images into forms. It will make your photo more expensive than thousands of words.
Smonst your designs
Feel free to get much more inspiration from photomontage. Use your imagination to full and create your amazing visual creations using the creator of a design from Fotor, a set of backgrounds or background patterns can serve as your photo montage. You can also add more images and stickers to the background. Fotor can help you create awesome posters, flyers and quickly increase the sale of products.
Have you ever wanted to reincarnate into the image of the famous hero, imagine yourself in comic or unusual form, change photos of friends? Often, Adobe Photoshop is used to replace persons, but the program is difficult to understand, requires installation on a computer and productive iron.
Today we will tell about unusual sites that will allow real-time to replace your face into photos on any other. Most resources use the face recognition function, this allows you to mostly enter a new image in a photo. After processing the photo exposed to automatic correction, due to which the maximum realistic installation is obtained at the output.
Method 1: Photofunia
The user-friendly and functional editor PhotoFUNIA allows only a few steps and a few seconds of time to change the face in the photo. You only need to download the main photo and the picture with which a new person will be taken, all other operations are carried out automatically.
Try to choose the most similar photos (in size, the turn of the face, color), otherwise manipulation with the movement of the face will be very noticeable.

Persons Website replaces qualitatively, especially if they are similar in composition, brightness, contrast and other parameters. To create an unusual and funny photomontage, the service will suit 100%.
Method 2: MakeOVR
Anglo-language resource MakeOVR allows you to copy your face from one image and insert it to another photo. Unlike the previous resource, allocate the area that will be embedded, select the facial size and its location at the final photo will have to be independently.
The disadvantages of services include the absence of a Russian language, but all functions are intuitive.

Mounting in the MakeOVR editor is less realistic than in photofunia described in the first way. Negatively, the lack of automatic correction and tools for configuring brightness and contrast.
Method 3: Faceinhole
On the site you can work with ready-made templates, where it is enough to insert the desired face. In addition, the users have a function of creating their own template. The procedure for replacing the face on this resource is much more complicated than in the methods described above, however, a variety of settings that allow you to choose a new face as accurately as possible to the old photo.
The lack of service is the lack of Russian and numerous advertising, it does not interfere, but significantly slows down the download of the resource.
The site constantly hangs, so it is desirable to be patient. The English interface is understandable for Russian-speaking users due to the convenient illustration of each button.
The considered resources allow in minutes to move the face with one photo to another. The most convenient was the photofunia service - here the user only needs to load the desired pictures, the rest of the site will do it yourself.
29.01.2017 28.01.2018
Hello all regular visitors and guests site site
In this lesson, we will look at how in Photoshop insert a face in another photo. And slightly pierced.
It is worth noting, the main aspect that needs to be remembered before creating installation using persons is the source. You need to treat them carefully and seriously, because the result depends on the choice of the source. It is necessary to ensure that the slope and the position of the head, the lighting, it is necessary that the photo is made from one angle, etc. Otherwise, you should not count on a qualitative result.
As mentioned earlier, we decided to stalk and insert Putin's face to Trump's head. Download images.
Open photoshop and start work
Open both photos in Photoshop (Ctrl + O):
Go to the photo with Vladimir Vladimirovich and in any convenient way to highlight the face.
For example, the Lasso Tool (Lasso Tool). Hot Tool Call Key - L.

We highlight Putin's face - we capture all the features of the face, the forehead cut out in part:

Click on the keyboard Ctrl + C to copy the face, go to the recipient - the tramp and press Ctrl + v in order to insert your face into the document.

Click on the Ctrl + T keyboard to call a free transformation (free transform).
We reduce the person so that it corresponds to the size of the Trump face:

To even better fit the face, we reduce the opacity of the layer and try to make eyes, lips and eyebrows coincided:

As soon as you successfully place the face - return the opacity to 100% back.

Go to the selection - Modification - compress (Select - Modify - Contract):

In the drop-down window, we put the radius of 5-8 pixels:

Go to the layer with a tramp and click on the lock twice, to unlock the layer:

Click on the keyboard the Delete key. After that, the "hole" appears on the layer with a tripample:

Click on the Ctrl + D keyboard to remove the selection. Close the SHIFT key and highlight the layers on the palette:

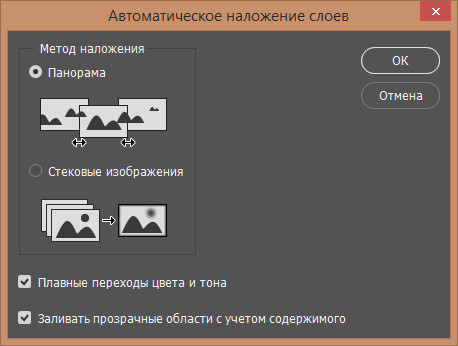
Go to editing - Auto Layers (Edit - Auto - Blend Layers):

Settings must be the following:

All shortcomings of an automatic insertion can be corrected, for example, a mixer tool (Mixer Brush).

Create a new layer:

In the top panel of the mix-brush tool setting, set approximately such settings:
The new layer is a mix of brush by junction areas. Especially paying attention to the left side of the person:

Create another new layer, pour it (SHIFT + F5) 50% gray:

Go to the filter-noise menu-add noise (Filter-Noise-Add Noise):
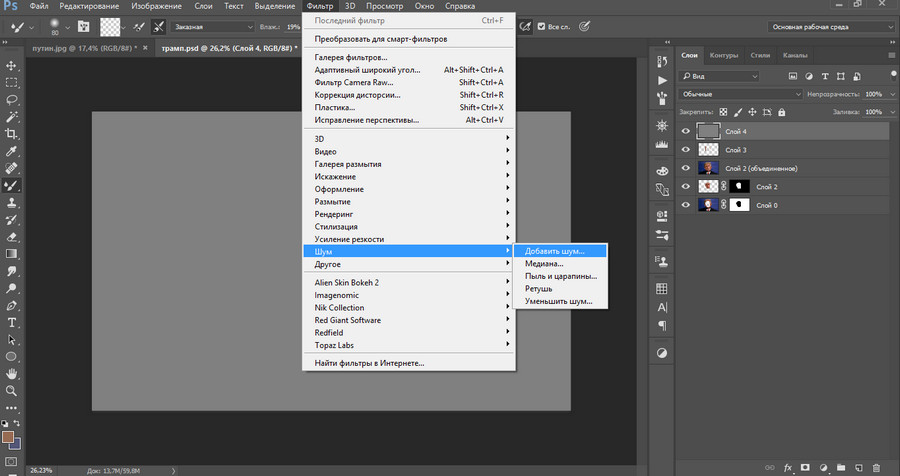
Add 1-3%:

Change the overlap layer overlay mode (Overlay):

Click the PCM (right-click) by layer in the layer palette and select the "Create a clipping mask" item. Thus, the noise layer will only affect the layer on which we painted the mix brush.


So we learned how simple, easily and quickly insert into another photo. Very affordable way in Photoshop!
Success in creative work! Let the muse you do not leave!
Want to know how you can "change faces" with a friend, relative or beloved celebrity? This will help you the magic of photomontage! How it works? Search engines on request, for sure, will be offered to use photoshop, but this program will not fit the non-professional. The optimal option is simple, like a "home photo studio". In this article you will learn how to insert a different person in the photo, without having experience in the photo moment.
Step number 1. We start work
To begin with, we offer and install it on your PC. Follow the instructions of the installation wizard - the program will be ready for work literally per minute. Run the utility. In the starting window, select the option "Open photo" And find the file with the photo you want to edit.
You can start work immediately after the program is installed
Step number 2. Photomontage
The next stage is the most responsible. In the main menu, click on the tab "Decor" And find the list. In the window that appears, create a new layer. To do this click "Add layer"\u003e "PHOTOS" And download the photo you want to impose.

With the help of photomontage you can easily apply one photo to another
When choosing a snapshot, it is worth remembering that both photos should have been about the same permission and quality. Moreover, faces should be removed from the most similar angle.
In the list, select a layer with added image and click "Trim photos". A new window will automatically appear. Take advantage of an arbitrary form of trimming. Carefully circle your face along the contour, trying to avoid unnecessary objects, like accessories. If it turned out uneven, use the option "Reset selection" And try again. Close the dotted line, clicking on the mouse twice. Increase the score "Blur of boundaries"pulling the slider to the right and click "Apply".

Increase the scope of the picture so that the result is as accurate as possible and neat.
Now find out how in the photo insert another person so that the difference is not noticeable. To do this, you must transform a cropped layer. Change the size of the new image by pulling the selected area of \u200b\u200bthe corners. The "new" person must coincide with the face size on the source image. If necessary, turn the layer by moving the slider on the scale "Angle of rotation". Mixing mode "Normal" will be set by default, but if you wish, you can choose another. Ready! Click "Apply".

Adjust the layer overlay so that the "new" face looked maxilmatism
Step number 3. Levels and color correction
It's still too noticeable that the face was taken from another snapshot. Perform the simplest color correction. To do this in the tab "Picture" Open "Levels". Understand the use of this function is very simple. On the scale "Levels at the entrance" 3 slider - white (light shades), gray (halftone) and black (dark shades). With their help, you can comprehensively configure the brightness of the photo. Change the position of the slider to darken (right) or clarify (left) image. Then, save it by pressing "OK".

Regulating levels, you can make a picture with a "new" face more monophonic
Step number 4. We work with details
Now you know how in the photo insert another person as natural as possible, but these are not limited to. If the processing requires individual areas on the image, use the tools on the left pane. Choose "Brush blur"To make the transition from the initial picture even more smooth. Configure the tool parameters - the less the processing object, the smaller the size and transparency of the brush.
You can also dimly darken or illuminate individual sections of the photo, add them sharpness, contrast or saturation. Simply select the appropriate brush on the toolbar and process the desired part of the image.

Use blackness and clarification brushes to give the image more volume
Step number 5. Keep and share with friends
Let us estimate the final result.

Photomontage will help you try on the role of your favorite film

You can adjust the picture picture before saving
Ready! Now you know that inserting a person to another photo in Photoshop is not the only solution. This manual is universal, use it in practice as you want. Find out and discover new features of the program! The "home photo studio" will be a faithful assistant for you in any situation when you need to qualitatively handle the snapshot.


